Class 5 Exam  >  Class 5 Tests  >  Computer  >  Test: MS Word 2010- 1 - Class 5 MCQ

Test: MS Word 2010- 1 - Class 5 MCQ


Test Description

10 Questions MCQ Test Computer - Test: MS Word 2010- 1

Test: MS Word 2010- 1 for Class 5 2025 is part of Computer preparation. The Test: MS Word 2010- 1 questions and answers have been prepared according to the Class 5 exam syllabus.The Test: MS Word 2010- 1 MCQs are made for Class 5 2025 Exam. Find important definitions, questions, notes, meanings, examples, exercises, MCQs and online tests for Test: MS Word 2010- 1 below.
Solutions of Test: MS Word 2010- 1 questions in English are available as part of our Computer for Class 5 & Test: MS Word 2010- 1 solutions in Hindi for Computer course. Download more important topics, notes, lectures and mock test series for Class 5 Exam by signing up for free. Attempt Test: MS Word 2010- 1 | 10 questions in 10 minutes | Mock test for Class 5 preparation | Free important questions MCQ to study Computer for Class 5 Exam | Download free PDF with solutions
Test: MS Word 2010- 1 - Question 1

Select the INCORRECT match. 

Detailed Solution for Test: MS Word 2010- 1 - Question 1

Command button shown in option [B] is used to increase the indent level of the paragraph, so it is incorrect.

Test: MS Word 2010- 1 - Question 2

Which of the following options align text to both left and right margins, thus creates a clean look in the page?

Detailed Solution for Test: MS Word 2010- 1 - Question 2
Justify the text
- Justifying text aligns the text to both the left and right margins, creating a clean and uniform look on the page.
- This helps to create a neat and professional appearance in documents, such as essays, articles, or reports.
Add borders around the text
- Adding borders around the text does not align the text to both left and right margins.
- Borders are used to visually separate and highlight specific sections or elements within a document, but they do not contribute to creating a clean look by aligning the text.
Center align the text
- Center aligning the text only aligns it to the center of the page, not to both left and right margins.
- This may be useful for titles, headings, or other elements that need to be centered, but it does not create a clean look by aligning the text to both margins.
Adding paragraph marks in the document
- Adding paragraph marks (also known as line breaks or new lines) in the document does not align the text to both left and right margins.
- Paragraph marks are used to separate paragraphs or create line breaks within a paragraph, but they do not contribute to creating a clean look by aligning the text.
Therefore, the correct option is A: Justify the text. Justifying the text aligns it to both left and right margins, creating a clean and professional look on the page.
Test: MS Word 2010- 1 - Question 3

Clicking on ________ separates the paragraph from the left margins using blank spaces.

Test: MS Word 2010- 1 - Question 4

What is the use of 

Detailed Solution for Test: MS Word 2010- 1 - Question 4

Command button shown in the question is of Line Numbers, which is used for adding line numbers in a document.

Test: MS Word 2010- 1 - Question 5

To insert a symbol like a © , which tab of the ribbon should you use?

Detailed Solution for Test: MS Word 2010- 1 - Question 5

To insert a symbol like a ©, you should use the "Insert" tab of the ribbon. Here is a detailed explanation:
1. Open the Ribbon:
- When you open a document in Microsoft Word, you will see a toolbar at the top of the screen called the Ribbon.
2. Navigate to the "Insert" Tab:
- The Ribbon is divided into several tabs, such as "Home," "Insert," "Design," and "Page Layout."
- Click on the "Insert" tab to access the options related to inserting various elements into your document.
3. Find the Symbol Option:
- Once you are on the "Insert" tab, look for the "Symbols" group.
- In this group, you will find the "Symbol" button. Click on it to open the drop-down menu.
4. Choose the Copyright Symbol:
- In the drop-down menu, you will see a list of frequently used symbols.
- If the copyright symbol (©) is not listed, click on "More Symbols" to open the Symbol dialog box.
5. Select the Copyright Symbol:
- In the Symbol dialog box, you can browse through different symbol fonts and categories.
- Select the font that contains the copyright symbol (usually "Arial" or "Times New Roman").
- Locate the copyright symbol (©) in the list and click on it to select it.
6. Insert the Symbol:
- After selecting the copyright symbol, click on the "Insert" button to insert it into your document.
- You can also use the "Close" button to close the Symbol dialog box.
7. Verify the Symbol:
- Once inserted, the copyright symbol (©) should appear at the current cursor position in your document.
- You can move it around, resize it, or format it as needed.
Using the "Insert" tab and the Symbol feature, you can easily insert symbols like the copyright symbol (©) into your Microsoft Word documents.
Test: MS Word 2010- 1 - Question 6

 The given icon is used to ___________.  

Detailed Solution for Test: MS Word 2010- 1 - Question 6

Using the shading option available in Paragraph group of Home tab, background color of text can be changed.

Test: MS Word 2010- 1 - Question 7

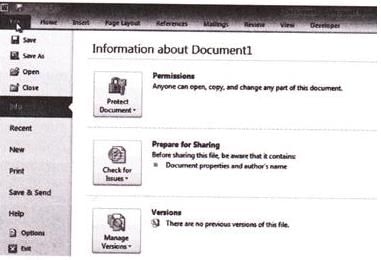
The Backstage view of word document is given. To go back to the document from the Backstage view, click on _______.
Test: MS Word 2010- 1 - Question 8

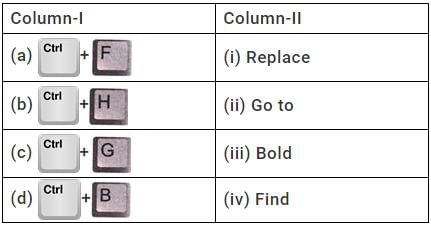
Match the following MS-Word shortcut keys in Column-I with the operations they perform in Column -II  
Test: MS Word 2010- 1 - Question 9

How do you increase the line spacing between two lines?

Detailed Solution for Test: MS Word 2010- 1 - Question 9

To increase the line spacing between two lines in a document, you can follow these steps:
Step 1: Open the document in which you want to increase the line spacing.
Step 2: Go to the Home tab in the Microsoft Word ribbon.
Step 3: Look for the Paragraph group in the Home tab.
Step 4: Within the Paragraph group, you will find the Line and Paragraph Spacing option. Click on the small arrow at the bottom-right corner of this option to open the Paragraph dialog box.
Step 5: In the Paragraph dialog box, under the Spacing section, locate the Line spacing drop-down menu.
Step 6: Click on the drop-down menu and select the desired line spacing option. You can choose from options such as Single, 1.5 lines, Double, or even specify a custom line spacing value.
Step 7: After selecting the desired line spacing option, click on the OK button to apply the changes.
By following these steps, you will be able to increase the line spacing between two lines in your document effectively.
Test: MS Word 2010- 1 - Question 10

Observe the position of cursor in the given snapshot. How would the text look when you click on Dropped option in Drop Cap command button

Detailed Solution for Test: MS Word 2010- 1 - Question 10

Drop cap command creates a large capital letter at the beginning, no matter where the cursor is.

33 videos|30 docs|32 tests
Information about Test: MS Word 2010- 1 Page
In this test you can find the Exam questions for Test: MS Word 2010- 1 solved & explained in the simplest way possible. Besides giving Questions and answers for Test: MS Word 2010- 1, EduRev gives you an ample number of Online tests for practice
33 videos|30 docs|32 tests
Download as PDF