Prepare for Photography Exam
with EduRev
Photography syllabus


| Why students choose EduRev for their Photography Exam | 4.6  (150K+ ratings) (150K+ ratings) |
 (150K+ ratings)


What is Photography? Understanding the Art and Science Behind the Lens
Photography is the art, science, and practice of creating durable images by recording light - either electronically through an image sensor or chemically through light-sensitive film. For students pursuing photography as an academic or competitive subject in India, it is much more than clicking pictures. It demands a strong understanding of optics, light behaviour, composition, and post-processing techniques.
As a subject, photography is broadly categorised into several specialisations: portrait, landscape, wildlife, architectural, documentary, commercial, and fine art photography. Each genre carries its own technical demands and aesthetic language. Whether you are appearing for a photography examination or simply looking to build a strong foundation, understanding the subject from its roots is the smartest starting point.
Camera Basics and Functioning: How Does a Camera Actually Work?
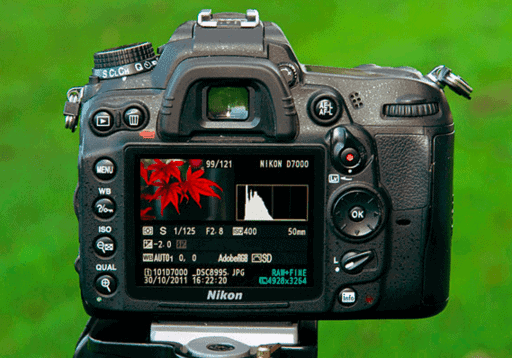
At its core, a camera works by controlling the amount of light that enters through the lens and strikes the image sensor (in digital cameras) or film (in analogue cameras). This fundamental principle applies across all camera types, from basic point-and-shoot devices to professional DSLRs.
If you want a thorough understanding of optical principles, shutter mechanisms, and sensor technology, explore this detailed resource on Camera: Its Basics and Functioning (Educational Series) - ideal for building your foundational knowledge step by step.
Key Components Inside a Camera
- Image Sensor: Captures incoming light and converts it into digital data (CCD or CMOS sensors)
- Shutter: Controls how long the sensor is exposed to light
- Lens: Refracts and focuses light onto the sensor or film plane
- Viewfinder: Allows the photographer to frame the shot
- Autofocus System: Ensures the subject is sharply rendered
- Memory Card Slot: Stores captured digital images
In DSLRs, a mirror box reflects light up to the viewfinder before the shot is taken; when the shutter is pressed, the mirror flips up to allow light to hit the sensor. Mirrorless cameras, on the other hand, skip the mirror entirely and use an electronic viewfinder - making them lighter and faster.
Key Concepts in Digital Photography Every Student Must Know
Digital photography basics go well beyond simply switching on a camera. For any photography exam or course, students must be comfortable with a core set of concepts that govern how images are captured and interpreted.
| Concept | Definition | Why It Matters |
|---|---|---|
| Rule of Thirds | Divides the frame into a 3×3 grid for balanced composition | Guides placement of subjects for visual impact |
| Depth of Field | Range of distance that appears acceptably sharp in an image | Controls focus and background blur |
| White Balance | Adjusts colours to appear natural under different light sources | Prevents colour casts in varied lighting |
| RAW Format | Uncompressed, unprocessed image retaining all sensor data | Maximum flexibility during post-processing |
| Histogram | Graphical representation of tonal distribution in a photo | Helps assess whether an image is correctly exposed |
Understanding these concepts will help you answer both theoretical and application-based questions in your photography studies with confidence.
Exposing Digital Photography: Insights from Harvard Extension School's Course
One of the most respected resources available to photography learners is the Exposing Digital Photography course by Harvard Extension School, accessible on EduRev. This course takes students from foundational concepts all the way to intermediate digital photography techniques.
The curriculum covers digital camera functioning, understanding exposure, composition principles, colour theory, and an introduction to post-processing workflows. Learners also gain familiarity with RAW vs JPEG formats, colour spaces, histograms, and the role of image metadata - all of which are increasingly relevant in today's photography curriculum.
Harvard Extension School's open-enrolment model means that this professional-level photography education is designed to be accessible, making it an excellent resource for Indian students looking to strengthen their conceptual understanding alongside their practical skills.
How to Learn Photography: Best Courses for Beginners and Serious Learners
Learning photography online has never been more structured or accessible. Whether you are a school student curious about the subject or a serious learner preparing for a competitive photography examination, the right course can make a significant difference in how quickly you master the fundamentals.
On EduRev, you can access curated photography learning resources, including the Camera: Its Basics and Functioning Educational Series, which walks you through optical principles and practical shooting techniques in a structured, beginner-friendly format.
What to Look for in a Good Photography Course
- Coverage of the exposure triangle - aperture, shutter speed, and ISO
- Hands-on guidance on camera settings for beginners
- Introduction to composition rules and visual storytelling
- Basics of post-processing and digital workflow
- Clear explanation of camera types and their functions
Essential Camera Settings Explained: Aperture, Shutter Speed, and ISO
The photography exposure triangle is arguably the most important concept for any photography student to master. These three camera settings work together to determine how bright or dark your final image appears - and each one affects the image in additional ways beyond just exposure.
| Setting | Measured In | Controls | Side Effect |
|---|---|---|---|
| Aperture | f-stops (e.g., f/1.8, f/11) | Light entry and depth of field | Wide aperture = shallow DoF; narrow = deep DoF |
| Shutter Speed | Seconds or fractions (e.g., 1/500s) | Duration of light exposure | Fast speed freezes motion; slow speed creates blur |
| ISO | Numeric values (e.g., 100, 3200) | Sensor sensitivity to light | Higher ISO = more noise/grain in the image |
Practising in Manual (M) mode is highly recommended for students, as it builds genuine understanding of how each setting interacts with the others - a skill that is directly tested in photography examinations.
Types of Cameras and Their Functions: A Complete Beginner's Guide
For any photography exam or course, familiarity with different camera types is essential. Each camera type is designed with a specific purpose in mind, and knowing their differences will help you answer both theoretical questions and make informed practical choices.
Common Camera Types You Should Know
- DSLR (Digital Single-Lens Reflex): Uses a mirror mechanism; popular among professionals and serious enthusiasts for their versatility and interchangeable lenses
- Mirrorless Cameras: Compact, fast, and increasingly popular; offer comparable image quality to DSLRs without the mirror box
- Point-and-Shoot Cameras: Simple, automatic cameras with fixed lenses; ideal for casual photography
- Medium Format Cameras: Feature larger sensors than DSLRs; used in high-end commercial and fashion photography
- Smartphone Cameras: Widely used and increasingly capable, leveraging computational photography for impressive results
Focal length also plays a crucial role - wide-angle lenses (below 35mm) capture broader scenes, while telephoto lenses (above 85mm) magnify distant subjects and compress perspective.
How to Prepare for Your Photography Exam: Study Strategies and Resources
Preparing for a photography examination requires a balanced approach covering both theory and practical understanding. Here are some proven strategies that students appearing for photography exams in India have found effective:
Effective Study Strategies
- Master the Exposure Triangle First: Aperture, shutter speed, and ISO form the backbone of almost every photography concept
- Study Legendary Photographers: Works of Ansel Adams, Henri Cartier-Bresson, and Dorothea Lange sharpen visual literacy and compositional understanding
- Practise Shooting in Manual Mode: Hands-on practice is irreplaceable for understanding how settings affect the final image
- Learn Post-Processing Concepts: Familiarity with tools like Adobe Lightroom concepts is increasingly part of digital photography curricula
- Review Core Terminology: Be confident with terms like histogram, white balance, RAW format, depth of field, and focal length
Studying the history of photography - including the transition from film to digital - also gives students a richer perspective on the subject and often appears in theoretical sections of photography examinations.
Best Free and Paid Photography Courses Available Online
EduRev offers some of the best photography learning resources for Indian students at various levels. Whether you are a beginner looking for photography basics or a serious learner seeking structured digital photography notes, there are options available to suit your preparation needs.
The Exposing Digital Photography by Harvard Extension School on EduRev is a standout option for anyone wanting to go beyond the basics. It covers everything from camera functioning to colour theory, post-processing workflows, and understanding RAW formats - making it suitable for both exam preparation and real-world skill building.
Additionally, the Camera: Its Basics and Functioning Educational Series is ideal for students who want a focused, step-by-step understanding of how cameras work before moving on to more advanced digital photography techniques.
Whether you are just starting out or looking to sharpen your photography fundamentals before an upcoming exam, investing time in structured, credible resources on EduRev will give you a genuine competitive edge.
Photography FAQs
| 1. What is the rule of thirds in photography and how do I use it? |  |
| 2. How do I get sharp photos with better focus techniques? | |
| 3. What camera settings should I change when shooting in low light conditions? | |
| 4. How do I learn photography basics for beginners step by step? | |
| 5. What's the difference between aperture priority and shutter priority modes? | |
| 6. How can I improve my portrait photography lighting setup at home? | |
| 7. Why do my photos look blurry and how do I fix camera shake issues? | |
| 8. What's the best way to understand exposure metering and light measurement? | |
| 9. How do I choose between different lens types for specific photography styles? | |
| 10. What camera settings and techniques should I use for landscape photography? | |
 One subscription to unlock all Photography Courses View Pricing Plans Starting @ $1 per month | |


