Grade 12 Exam > Grade 12 Notes > Physics for Grade 12 > Measurements & Errors
Measurements & Errors | Physics for Grade 12 PDF Download
Random & Systematic Errors
- Measurements of quantities are made with the aim of finding the true value of that quantity
- In reality, it is impossible to obtain the true value of any quantity, there will always be a degree of uncertainty
- The uncertainty is an estimate of the difference between a measurement reading and the true value
- Random and systematic errors are two types of measurement errors which lead to uncertainty
Random Error
- Random errors cause unpredictable fluctuations in an instrument’s readings as a result of uncontrollable factors, such as environmental conditions
- This affects the precision of the measurements taken, causing a wider spread of results about the mean value
- To reduce random error: repeat measurements several times and calculate an average from them
Systematic Error
- Systematic errors arise from the use of faulty instruments used or from flaws in the experimental method
- This type of error is repeated every time the instrument is used or the method is followed, which affects the accuracy of all readings obtained
- To reduce systematic errors: instruments should be recalibrated or the technique being used should be corrected or adjusted
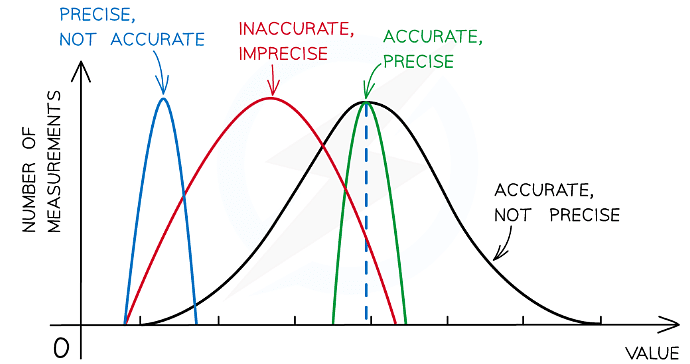
 Representing precision and accuracy on a graph
Zero Error
- This is a type of systematic error which occurs when an instrument gives a reading when the true reading is zero
- This introduces a fixed error into readings which must be accounted for when the results are recorded
Precision & Accuracy
- Precision of a measurement: this is how close the measured values are to each other; if a measurement is repeated several times, then they can be described as precise when the values are very similar to, or the same as, each other
- The precision of a measurement is reflected in the values recorded - measurements to a greater number of decimal places are said to be more precise than those to a whole number
- Accuracy: this is how close a measured value is to the true value; the accuracy can be increased by repeating measurements and finding a mean average
 The difference between precise and accurate results
Calculating Uncertainties
- There is always a degree of uncertainty when measurements are taken; the uncertainty can be thought of as the difference between the actual reading taken (caused by the equipment or techniques used) and the true value
- Uncertainties are not the same as errors
- Errors can be thought of as issues with equipment or methodology that cause a reading to be different from the true value
- The uncertainty is a range of values around a measurement within which the true value is expected to lie, and is an estimate
- For example, if the true value of the mass of a box is 950 g, but a systematic error with a balance gives an actual reading of 952 g, the uncertainty is ±2 g
- These uncertainties can be represented in a number of ways:
- Absolute Uncertainty: where uncertainty is given as a fixed quantity
- Fractional Uncertainty: where uncertainty is given as a fraction of the measurement
- Percentage Uncertainty: where uncertainty is given as a percentage of the measurement

- To find uncertainties in different situations:
- The uncertainty in a reading: ± half the smallest division
- The uncertainty in a measurement: at least ±1 smallest division
- The uncertainty in repeated data: half the range i.e. ± ½ (largest - smallest value)
- The uncertainty in digital readings: ± the last significant digit unless otherwise quoted


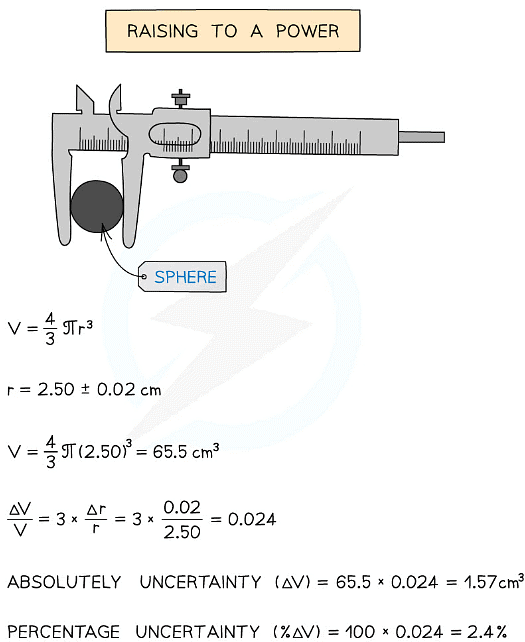
How to calculate absolute, fractional and percentage uncertainty
Combining Uncertainties
- The rules to follow
- Adding / subtracting data – add the absolute uncertainties

Multiplying / dividing data – add the percentage uncertainties
Raising to a power – multiply the uncertainty by the power
Measurement Techniques
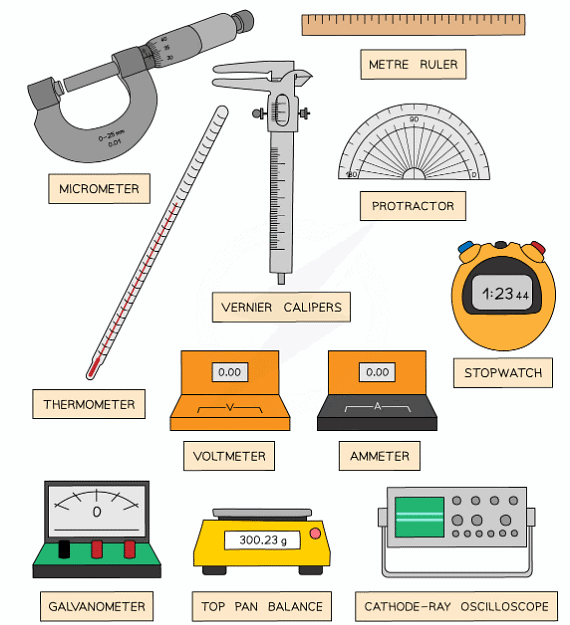
Common instruments used in Physics are:
- Metre rules - to measure distance and length
- Balances - to measure mass
- Protractors - to measure angles
- Stopwatches - to measure time
- Ammeters - to measure current
- Voltmeters - to measure potential difference
More complicated instruments such as the micrometer screw gauge and Vernier calipers can be used to more accurately measure length
- When using measuring instruments like these you need to ensure that you are fully aware of what each division on a scale represents
- This is known as the resolution
- The resolution is the smallest change in the physical quantity being measured that results in a change in the reading given by the measuring instrument
- The smaller the change that can be measured by the instrument, the greater the degree of resolution
- For example, a standard mercury thermometer has a resolution of 1°C whereas a typical digital thermometer will have a resolution of 0.1°C
- The digital thermometer has a higher resolution than the mercury thermometer
Measuring Instruments Table
Micrometer Screw Gauge
- A micrometer, or a micrometer screw gauge, is a tool used for measuring small widths, thicknesses or diameters
- For example, the diameter of a copper wire
- It has a resolution of 0.01 mm
- The micrometer is made up of two scales:
- The main scale - this is on the sleeve (sometimes called the barrel)
- The thimble scale - this is a rotating scale on the thimble
- The spindle and anvil are closed around the object being measured by rotating the ratchet
- This should be tight enough so the object does not fall out but not so tight that is deformed
- Never tighten the spindle using the barrel, only using the ratchet. This will reduce the chances of overtightening and zero errors
- The value measured from the micrometer is read where the thimble scale aligns with the main scale
- This should always be recorded to 2 decimal places (eg. 1.40 mm not just 1.4 mm)
 How to operate a micrometer
Vernier Calipers
- Vernier calipers are another distance measuring tool that uses a sliding vernier scale
- They can also be used to measure diameters and thicknesses, just like the micrometer
- However, they can also measure the length of small objects such as a screw or the depth of a hole
- Vernier calipers generally have a resolution of 0.1 mm, however, some are as small as 0.02 mm - 0.05 mm
- The calipers are made up of two scales:
- The main scale
- The vernier scale
- The two upper or lower jaws are clamped around the object
- The sliding vernier scale will follow this and can be held in place using the locking screw
- The value measured from the caliper is read when the vernier scale aligns with the main scale
- This should always be recorded to at least 1 decimal place (eg. 12.1 mm not just 12 mm)
 The vernier caliper reading is read when the vernier scale aligns with the main scale
The document Measurements & Errors | Physics for Grade 12 is a part of the Grade 12 Course Physics for Grade 12.
All you need of Grade 12 at this link: Grade 12
|
143 videos|360 docs|145 tests
|
Related Searches


