Photons & Wave-Particle Duality | Physics for Grade 12 PDF Download
| Table of contents |

|
| The Photon Model |

|
| The Electronvolt |

|
| Determining the Planck Constant |

|
| Electron Diffraction |

|
| The de Broglie Equation |

|
The Photon Model
- Light waves can behave like particles (i.e. photons) and waves
- This phenomenon is called the wave-particle nature of light or wave-particle duality
- Light interacts with matter, such as electrons, as a particle
- The evidence for this is provided by the photoelectric effect
- Light propagates through space as a wave
- The evidence for this comes from the diffraction and interference of light in Young’s Double Slit experiment
Light as a Particle
- The photon model of light explains that:
- Electromagnetic waves carry energy in discrete packets called photons
- The energy of the photons are quantised according to the equation E = hf
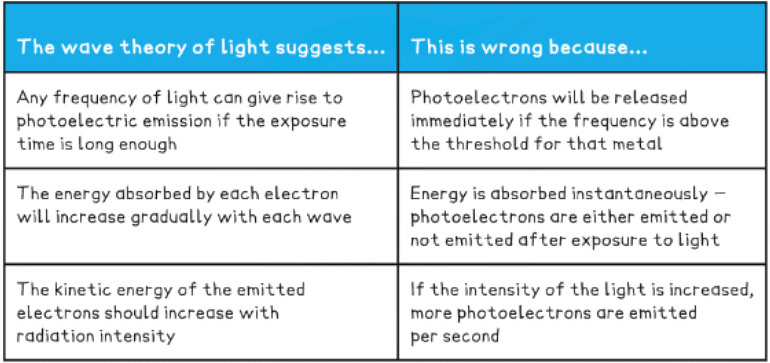
- In the photoelectric effect, each electron can absorb only a single photon - this means only the frequencies of light above the threshold frequency will emit a photoelectron
- Although the wave theory provided good explanations for phenomena such as interference and diffraction, it failed to explain the photoelectric effect
Defining the Photon
- Photons are fundamental particles which make up all forms of electromagnetic radiation
- A photon is defined as:
- A massless “packet” or a “quantum” of electromagnetic energy
- This means that the energy is not transferred continuously but as discrete packets of energy
- In other words, each photon carries a specific amount of energy, and transfers this energy all in one go, rather than supplying a consistent amount of energy
Energy of a Photon
The energy of a photon can be calculated using the formula:
- E = hf
Using the wave equation, energy can also be equal to:
- E = hc/λ
Where:
- E = energy of the photon (J)
- h = Planck's constant (J s)
- c = the speed of light (m s-1)
- f = frequency (Hz)
- λ = wavelength (m)
This equation shows:
- The higher the frequency of EM radiation, the higher the energy of the photon
- The energy of a photon is inversely proportional to the wavelength
- A long-wavelength photon of light has a lower energy than a shorter-wavelength photon
Example: Light of wavelength 490 nm is incident normally on a surface, as shown in the diagram.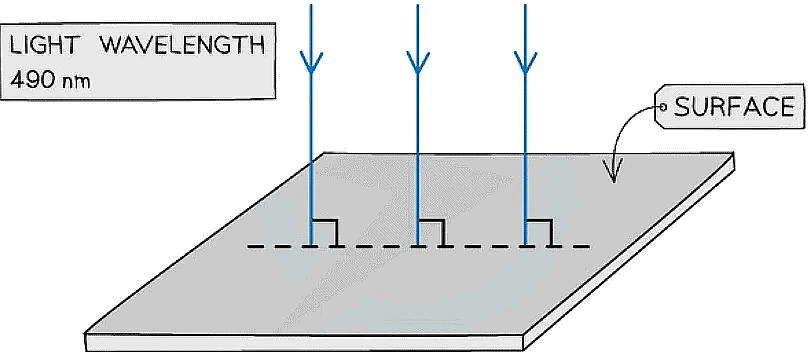
The power of the light is 3.6 mW. The light is completely absorbed by the surface.Calculate the number of photons incident on the surface in 2.0 s.
Step 1: Write the known quantities
- Wavelength, λ = 490 nm = 490 x 10-9 m
- Power, P = 3.6 mW = 3.6 x 10⁻³ W
- Time, t = 2.0 s
Step 2: Write the equations for wave speed and photon energy
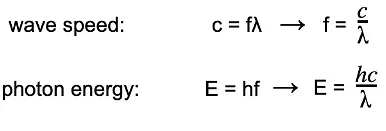
- Wave speed: c = f λ → f = c/λ
- Photon energy: E = hf → E = hc/λ
Step 3: Calculate the energy of one photon
Step 4: Calculate the number of photons hitting the surface every second
Step 5: Calculate the number of photons that hit the surface in 2 s
(8.9 x 1015) x 2 = 1.8 x 10¹⁶
The Electronvolt
- The electronvolt is a unit which is commonly used to express very small energies
- This is because quantum energies tend to be much smaller than 1 Joule
- The electronvolt is derived from the definition of potential difference:
v = E/Q - When an electron travels through a potential difference, energy is transferred between two points in a circuit, or electric field
- If an electron, with a charge of 1.6 × 10⁻¹⁹ C, travels through a potential difference of 1 V, the energy transferred is equal to:
E = QV = 1.6 × 10-19 C × 1 V = 1.6 × 10⁻¹⁹ J - Therefore, an electronvolt is defined as:
The energy gained by an electron travelling through a potential difference of one volt
1 eV = 1.6 × 10⁻¹⁹ J
Relation to kinetic energy
- When a charged particle is accelerated through a potential difference, it gains kinetic energy
- If an electron accelerates from rest, an electronvolt is equal to the kinetic energy gained:
- eV = ½ mv2
- Rearranging the equation gives the speed of the electron:
Example: Show that the photon energy of light with wavelength 700nm is about 1.8 eV.
Step 1: Write the equations for wave speed and photon energy
Step 2: Calculate the photon energy in Joules
Step 3: Convert the photon energy into electronvolts
Determining the Planck Constant
Using LEDs to estimate the Planck Constant h
- When a large enough potential difference is applied across a light-emitting diode (LED), it emits photons that all have the same wavelength and frequency
- When the LED just begins to glow, the energy, E, lost by each electron as it passes through the LED is converted into the energy of a single photon
- The energy, E, of a photon is equal to:
E = hf = hc/λ - Where:
- f = frequency of the emitted photon (Hz)
- λ = wavelength of the emitted photon (m)
- h = Planck’s constant (J s)
- c = speed of light (m s–1)
- The energy lost by each electron is:
E = e∆V - Where:
- e = elementary charge (C)
- ∆V = potential difference across the LED (V)
- Equating the two energies gives the equation:
e∆V = hc/λ - This equation can then be used to estimate the Planck's constant, h
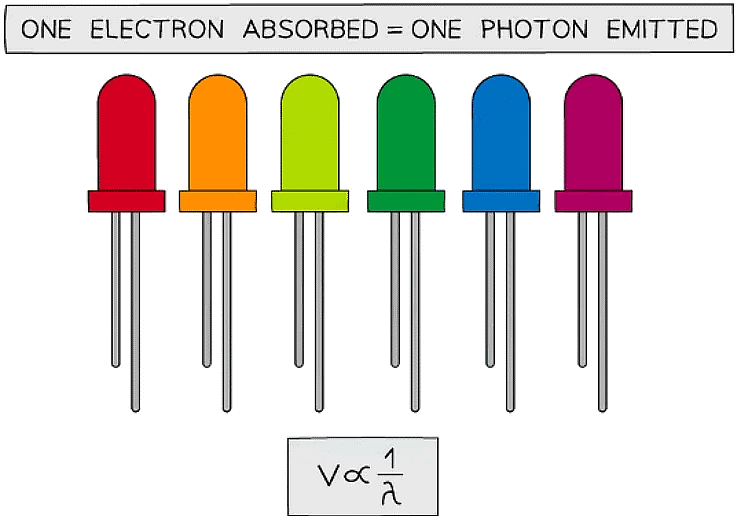
The potential difference across an LED is proportional to the reciprocal of the wavelength of light emitted
Using Different Coloured LEDs to determine the Planck Constant h
Aims of the Experiment
- The aim of this experiment is to use the I–V characteristics of different coloured LEDs to determine the value of the Planck constant
Variables
- Independent variable = wavelength of light emitted by the LED, λ
- Dependent variable = potential difference across the LED, ΔV
- Control variables:
- E.m.f of the cell
Equipment List
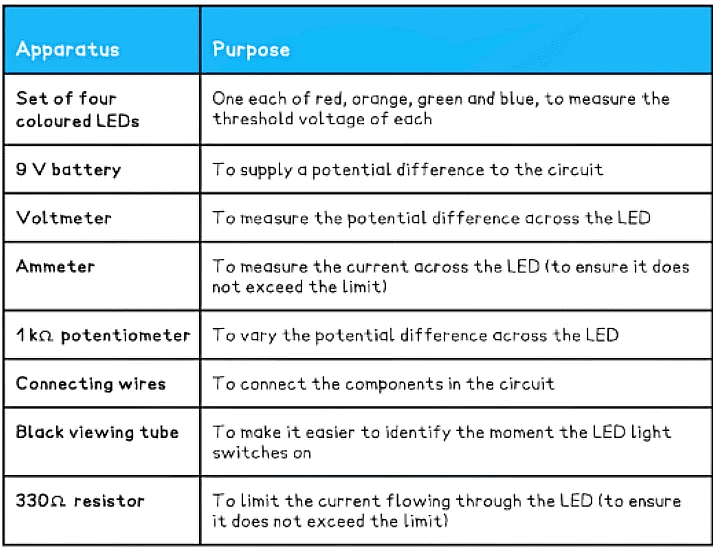
- Note – ensure the LEDs have a clear, colourless casing surrounding the LED so that the colour of the light comes from the device itself and not from the coloured casing
- Resolution of measuring equipment:
- Voltmeter = 1 mV
- Ammeter = 0.1 mA
Method
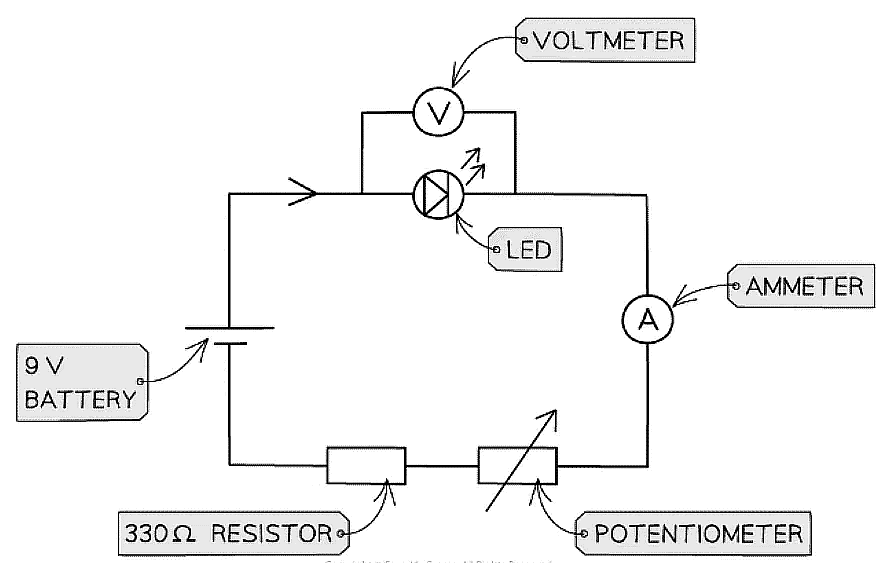
- Set up the circuit as shown in the diagram above. Connect the ammeter in series with the LED to measure the current through it and connect the voltmeter in parallel to the LED to measure the voltage across it
- The applied voltage can be changed by using the potentiometer. Slowly increase the voltage in steps of 0.05 V from 0 V to 3 V until the LED just begins to emit light
- Note down the threshold voltage ie. the minimum p.d across the LED that is required before any current is able to flow
- Repeat the procedure for each coloured LED
Record the results in a table similar to this:
Analysing the Results
- Comparing the equation eV = hc / λ with the equation of a straight line y = mx + c
- y = ΔV (V)
- x = 1 / λ (m–1)
- Gradient = hc / e
- Plot a graph of ΔV against 1 / λ for the different LEDs and draw a line of best fit
- This should produce a straight line with slope hc / e, as shown below:
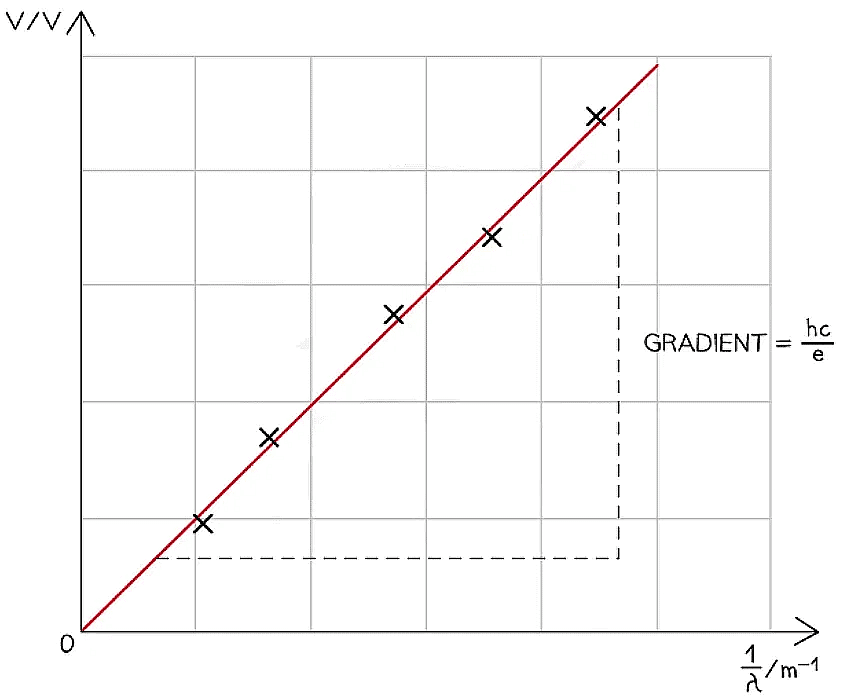
- Measure the gradient and multiply it by e / c to determine Planck's constant, h
h = gradient × (e / c) - Compare this experimental value of h with the accepted value and find the percentage error using:

Evaluating the Experiment
Systematic Errors:
- There is a human error associated with identifying the exact voltage at which the LED just begins to glow
- For optimal results, use a black viewing tube in a darkened room
- A more accurate method would be to plot a graph of current against voltage for each LED and determine the threshold voltage by extrapolating the straight line backwards until it intercepts the x-axis
Random Errors:
- LEDs do not emit a single frequency of light, instead, they emit a narrow spectrum with a width of approximately 60 nm
- The wavelength quoted on the LED represents the central wavelength it emits
- When the LEDs just begin to glow, the lower end of the wavelength will be emitted, so this can introduce an error in the wavelength
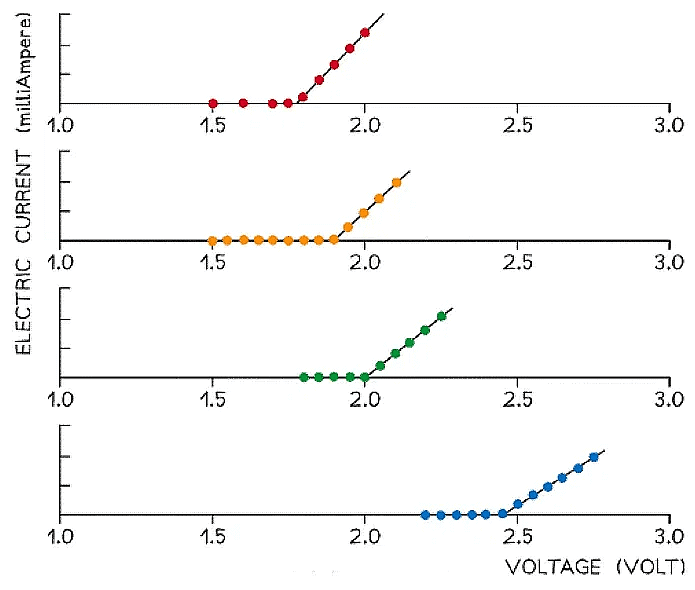
I–V characteristics for LEDs emitting red, orange, green and blue light
Safety Considerations
- Do not stare directly at LEDs when they are brightly lit, especially the blue LED
- LEDs are safe when they just begin to glow, but they quickly become bright as the potential difference increases above the threshold value
- As the blue LED is closest to the UV part of the spectrum, do not stare at the blue LED even when it is dimly lit
- LEDs can be destroyed if the current flowing through them is too large
- The current should be no more than about 50 mA, but the exact limit can be checked on the ratings for the specific LEDs used
- Note that when the current flowing through the LED is small, the LED might not light up, but the ammeter can still measure the current
- Use a 330 Ω resistor to limit the current flowing through the LED
- The potentiometer can be destroyed if wired incorrectly, and this can be a fire hazard
- An incorrectly wired potentiometer can create a short circuit which leads to a large potential difference across a low resistance
- As a result, the potentiometer heats up rapidly and may begin emitting smoke
- If burning is smelled turn off the electricity supply immediately
- Make sure no water is present near any electrical equipment
Electron Diffraction
- Electron diffraction tubes can be used to investigate the wave properties of electrons
- The electrons are accelerated in an electron gun to a high potential, such as 5000 V, and are then directed through a thin film of graphite
- The electrons diffract from the gaps between carbon atoms and produce a circular pattern on a fluorescent screen made from phosphor
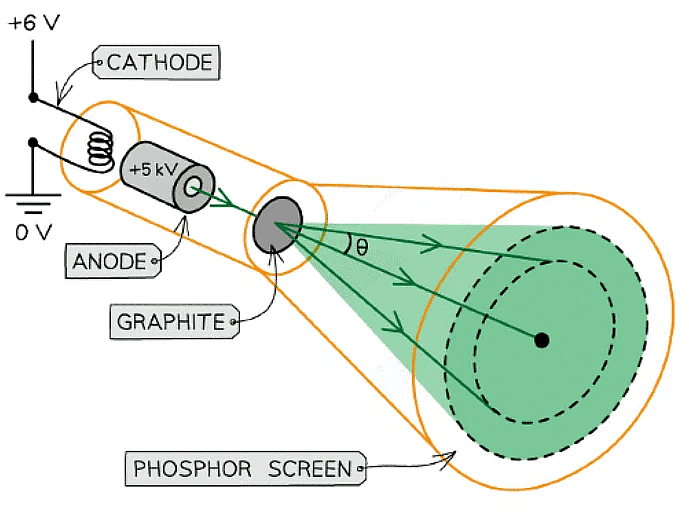
Experimental setup to demonstrate electron diffraction
- Increasing the voltage between the anode and the cathode causes the energy, and hence speed, of the electrons to increase
- The kinetic energy of the electrons is proportional to the voltage across the anode-cathode:
Ek = ½ mv2 = eV - Electrons are normally referred to as particles, however, diffraction is a wave-like behaviour
- Therefore, electron diffraction provides evidence for the wave-like behaviour of particles
Diffraction of Electrons through Graphite
- Louis de Broglie discovered that matter, such as electrons, can behave as a wave
- He showed a diffraction pattern is produced when a beam of electrons is directed at a thin graphite film
- Diffraction is a property of waves, and cannot be explained by describing electrons as particles
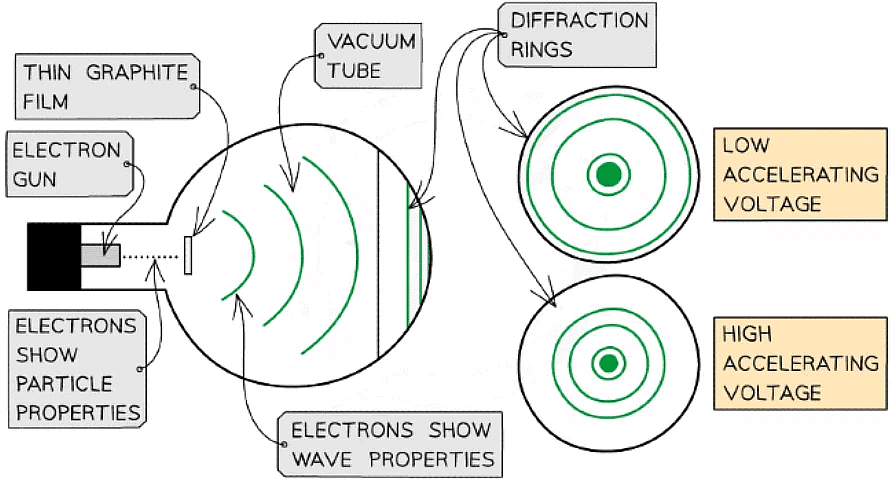
Electrons accelerated through a high potential difference demonstrate wave-particle duality
- In order to observe the diffraction of electrons, they must be focused through a gap similar to their size, such as an atomic lattice
- Graphite film is ideal for this purpose because of its crystalline structure
- The gaps between neighbouring planes of the atoms in the crystals act as slits, allowing the electron waves to spread out and create a diffraction pattern
- The diffraction pattern is observed on the screen as a series of concentric rings
- This phenomenon is similar to the diffraction pattern produced when light passes through a diffraction grating
- If the electrons acted as particles, a pattern would not be observed, instead, the particles would be distributed uniformly across the screen
- It is observed that a larger accelerating voltage reduces the diameter of a given ring, while a lower accelerating voltage increases the diameter of the rings
The de Broglie Equation
- Using ideas based upon the quantum theory and Einstein’s theory of relativity, de Broglie related the momentum of a particle to its wavelength
- This is known as the de Broglie equation:
λ = h/p - Where:
- λ = the de Broglie wavelength (m)
- h = Planck's Constant (J s)
- p = momentum (kg m s-1)
- The de Broglie question, therefore, links a particle-like property (momentum) to a wave-like property (wavelength) demonstrating wave-particle duality for all particles
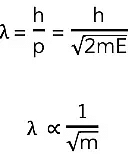
- Since momentum p = mv, the de Broglie wavelength can be related to the speed of a moving particle (v) by the equation:
λ = h/mv - Since kinetic energy E is equal to
E = ½ mv2 - Momentum and kinetic energy can be related by:

- Combining this with the de Broglie equation gives a form that relates the de Broglie wavelength of a particle to its kinetic energy:

- Where:
- E = kinetic energy of the particle (J)
- m = mass of the particle (kg)
- v = speed of the particle (m s-1)
Example: A proton and an electron are each accelerated from rest through the same potential difference. Determine the ratio:

- Mass of a proton = 1.67 × 10⁻²⁷ kg
- Mass of an electron = 9.11 × 10⁻³¹ kg
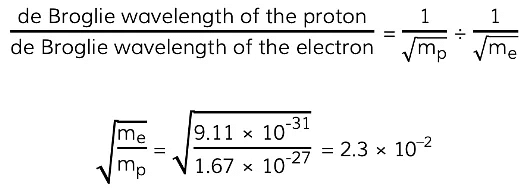
Step 1: Consider how the proton and electron can be related via their masses
- The proton and electron are accelerated through the same p.d., therefore, they both have the same kinetic energy
Step 2: Write the equation relating the de Broglie wavelength of a particle to its kinetic
energy
Step 3: Calculate the ratio
This means the de Broglie wavelength of the proton is 0.023 times smaller than that of the electron OR the de Broglie wavelength of the electron is about 40 times larger than that of the proton.
|
142 videos|312 docs|132 tests
|


