Fun with Magnets Class 6 Notes Science Chapter 10
Introduction
Imagine walking into a scrapyard full of metal junk. You see a big crane moving over a pile, and suddenly, pieces of iron start sticking to it as if by magic. This happens because the crane has a magnet attached to it!
Magnets are not just in cranes; they're also in things like stickers that stick to your fridge or boxes that close tightly without a lock. These magnets help hold things together in a simple and clever way!

How Magnets Were Discovered
Discovery of Magnets: A shepherd named Magnes in ancient Greece discovered magnets when his iron-tipped stick got stuck to a rock. The rock, later called magnetite, naturally attracted iron.

- Origin of the Name: The name "magnetite" may come from Magnes or the place Magnesia, where these rocks were found.
- Natural and Artificial Magnets: Magnetite is a natural magnet, while people later learned to make artificial magnets from iron, which come in different shapes like bar magnets and horseshoe magnets.
Magnetic and Non-Magnetic Materials
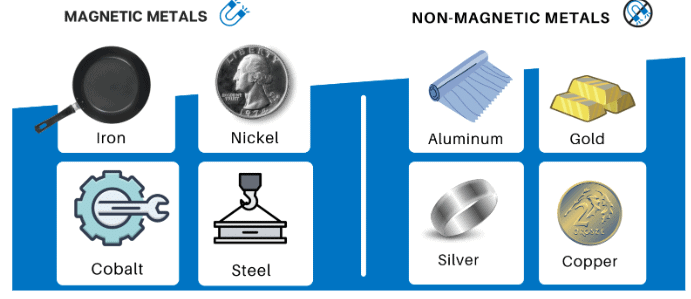
Magnetic Materials: These are materials that get attracted to a magnet. Examples include iron, nickel, and cobalt. When you bring a magnet close to these materials, they will stick to it.
Non-magnetic Materials: These are materials that do not get attracted to a magnet. Examples include wood, plastic, glass, and cloth. These materials won't stick to a magnet, no matter how close you bring it.

Poles of Magnet
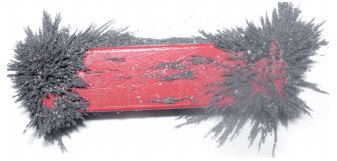
When you sprinkle iron filings (tiny pieces of iron) around a magnet, they move and line up with the invisible force called the magnetic field. This force is strongest at the ends of the magnet, which are called the poles.
The iron filings show us where the magnetic force is strongest by gathering more at the poles. So, if you look at a bar magnet, you'll see lots of filings at the ends and fewer in the middle.
No matter what shape the magnet is—whether it's a straight bar, a horseshoe shape, or a cylinder—the filings will always gather more at the poles. This helps us see where the magnet is strongest and shows us where the poles are located.
Finding Directions
- Magnets have been known and used since ancient times. For example, Emperor Hoang Ti of China had a chariot with a statue that always pointed south, helping people find directions.
- A magnet, if allowed to hang freely, will always settle in the North-South direction. The end that points north is called the North-seeking end or North pole, while the end pointing south is called the South-seeking end or South pole.
- This means that a freely hanging magnet always points north and south. Other objects like iron bars or wooden sticks do not do this.

- If you try this with other objects, like an iron bar or a wooden scale, they won't behave the same way because they aren't magnets. Magnets always have a North and South pole, no matter their shape.
- In history, travellers used hanging magnets to find their way. Later, people invented the compass, which has a magnetized needle that turns to show the North-South direction. The North end of the needle is usually painted a different colour, making it easy to find directions.
Make Your Own Magnet
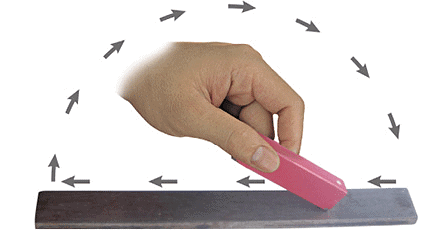
- To make a magnet, take a rectangular piece of iron and place it on a table.
- Use a bar magnet and place one of its poles near one edge of the iron bar.
- Without lifting the bar magnet, move it along the length of the iron bar until you reach the other end.

- Lift the magnet and bring the same pole back to the starting point of the iron bar.
- Move the magnet along the iron bar again in the same direction, repeating this process about 30-40 times.
- Check if the iron bar has become a magnet by bringing a pin or iron filings near it.
- If the iron bar has not become a magnet, continue the process for a longer time, ensuring that the pole of the magnet and direction of movement remain consistent.
- This method can also be applied to convert an iron nail, a needle, or a blade into a magnet.
Attraction and Repulsion between Magnets

- Magnets have two types of poles: north and south.
- Opposite poles (north-south) attract each other, meaning they pull towards each other.
- Similar poles (north-north or south-south) repel each other, meaning they push away from each other.
- When two magnets with opposite poles facing each other are placed close together, they will move towards each other due to attraction.
- When two magnets with similar poles facing each other are placed close together, they will move away from each other due to repulsion.

- Changing the orientation of the poles, such as positioning the rear of one car towards the front of another, affects the direction of movement based on the principles of attraction or repulsion.
- This principle can be observed by suspending a magnet and noting how it interacts with other magnets, demonstrating that opposite poles attract and similar poles repel.
- Example: Two toy cars each with a bar magnet are used. If the south pole of the magnet on one car faces the north pole on the other, the cars will move towards each other because of attraction. If both cars have the same poles facing each other, they will repel and move apart.
A Few Cautions
- Magnets lose their properties if heated, hammered, or dropped from a height.
- Magnets become weaker if not stored properly.
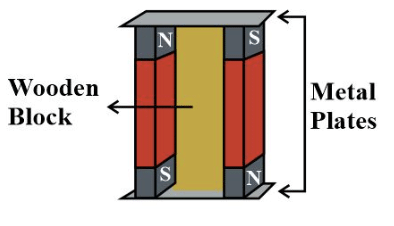
- Bar magnets should be stored in pairs with unlike poles on the same side, separated by a piece of wood.

- Use two pieces of soft iron across the ends of bar magnets for protection.
- For horseshoe magnets, keep a piece of iron across the poles.
- Keep magnets away from cassettes, mobiles, televisions, music systems, compact disks (CDs), and computers to avoid interference.
|
74 videos|148 docs|104 tests
|
FAQs on Fun with Magnets Class 6 Notes Science Chapter 10
| 1. How were magnets discovered and what materials were used? |  |
| 2. What are magnetic and non-magnetic materials? |  |
| 3. What are the poles of a magnet, and how do they work? |  |
| 4. How can I find directions using a magnet? |  |
| 5. What precautions should be taken when using magnets? |  |


