Chapter Notes: Practical Geometry

Lines That Don't Meet
Method of construction of a line parallel to a given line, using only a sheet of paper
- Take a piece of paper.
- Fold it in half and unfold the line l. Mark a point A on paper outside l.
- Fold the paper perpendicular to the line such that this perpendicular passes through A. Name the perpendicular AN.
- Make a fold perpendicular to AN through point A. Name the new perpendicular line as m.
- Now, l || m.
Steps of construction of a line parallel to a given line
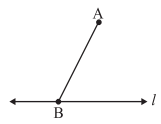
- Take a line l and a point A outside l.
- Take any point B on l and join it to A.
- With B as the centre and a convenient radius, cut an arc on l at C and BA at D.
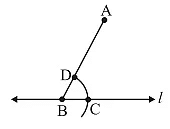
- With A as the centre and same radius as in Step 3, cut an arc EF to cut AB at G.
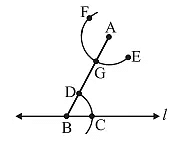
- Measure the arc length CD by placing pointed tip of the compass at C and pencil tip opening at D.
- With this opening, keep G as centre and draw an arc to cut arc EF at H
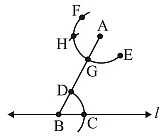
- Join AH to draw a line m
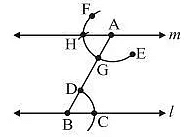
- ∠ABC and ∠BAH are alternate interior angles. Therefore, m || l
- To know more about Construction of a Parallel Line.
Let's Build Triangles
Classification of triangles based on sides and angles
Triangles can be classified based on their:
1. Sides
- Equilateral triangle: All three sides are equal in measure.
- Isosceles triangle: Two sides have equal measure.
- Scalene triangle: All three sides have different measures.
2. Angles
- Acute triangle: All angles measure less than 900.
- Obtuse triangle: One angle is greater than 900.
- Right triangle: One angle is 900.
Important properties of triangles
- The exterior angle is equal to the sum of interior opposite angles.
- The sum of all interior angles is 180°
- Sum of the lengths of any two sides is greater than the length of the third side.
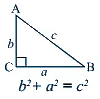
- Pythagoras theorem: In any right-angled triangle, the square of the hypotenuse is equal to the sum of the squares of the other two sides.
- Triangles can be constructed if any of the following measurements are given
- Three sides.
- Two sides and an angle between them.
- Two angles and a side between them.
- The hypotenuse and a leg in case of a right-angled triangle.
Construction of triangles given a criterion are listed below:
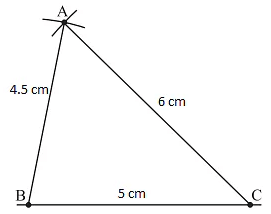
1. Construction of a triangle with SSS criterion.
Construct a triangle ABC, given that AB = 4.5 cm, BC = 5 cm and AC = 6 cm.
Steps:
- Make a rough sketch for your reference
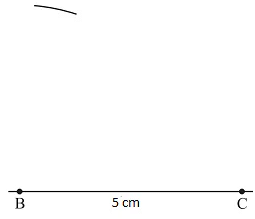
- Draw a line segment BC = 5 cm

- With B as centre, draw an arc of radius 4.5 cm
- With C as centre, draw an arc of radius 6 cm and cut the previous arc
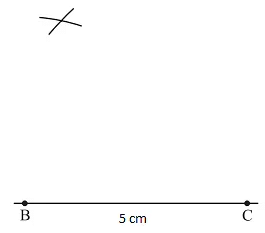
- Mark the point of intersection of arcs as A. Join AB and AC. ΔABC is now ready
Note: SSS congruency rule: If three sides of one triangle are equal to the corresponding three sides of another triangle, then the two triangles are congruent
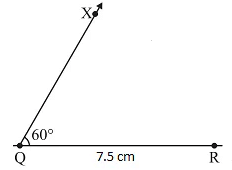
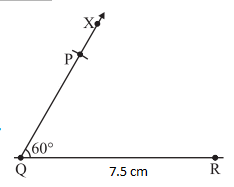
2. Construction of a triangle with SAS criterion
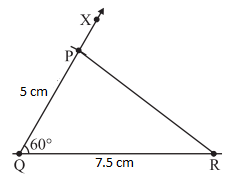
Construct ΔPQR with QR = 7.5 cm, PQ = 5 cm and ∠Q = 600.
Steps:
- Make a rough sketch for your reference
- Draw a line segment QR = 7.5 cm

- At Q, draw QX making 600 with QR
- With Q as centre, draw an arc of radius 5 cm. It cuts QX at P.
- Join AB. ΔPQR is now ready
3. Construction of a triangle with ASA criterion
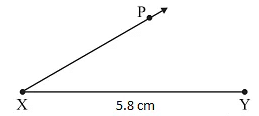
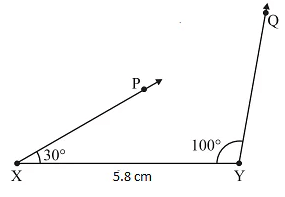
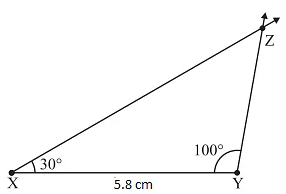
Construct ΔXYZ with ∠X = 300, ∠Y = 1000 and XY = 5.8 cm.
Steps:
- Make a rough sketch for your reference
- Draw XY = 5.8cm

- At X, draw a ray XP making an angle of 300 with AB.
- At Y, draw a ray YQ making an angle of 1000 with XY.
- The point of intersection of the two rays is Z.
- ΔXYZ is now completed
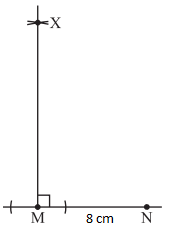
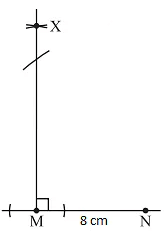
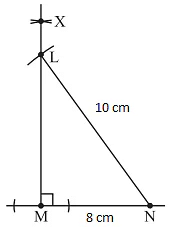
4. Construction of a triangle with RHS criterion
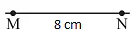
Construct ΔLMN, where ∠M = 900, MN = 8cm and LN = 10 cm.
Steps:
- Make a rough sketch for your reference
- Draw MN = 8 cm
- At M, draw MX ⊥ MN.
With N as centre, draw an arc of radius 10 cm to cut MX at L
Join LN.
ΔLMN is now completed
Basics of Practical Geometry
Introduction to Constructions of basic figures
Basic constructions:
- To draw a line segment of given length
- a line perpendicular to a given line segment
- an angle
- an angle bisector
- a circle
In geometry, you have already studied basic constructions.
- To recap, some of them are:
- Drawing a line segment of given length
- Drawing a line perpendicular to a given line segment.
- Angles
- Angle bisectors
- Circles
- Tools used for simple constructions are ruler, protractor and a compass.
FAQs on Chapter Notes: Practical Geometry
| 1. What is practical geometry? |  |
| 2. What are some common tools used in practical geometry? | |
| 3. How is practical geometry useful in everyday life? | |
| 4. Can practical geometry help in solving real-life problems? | |
| 5. What are some examples of real-life applications of practical geometry? | |

