NCERT Solutions: Playing with Constructions


Page 190
Construct
Q1: A Person
How will you draw this?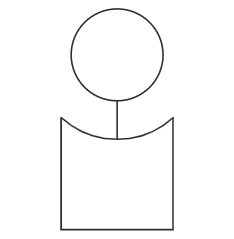 This figure has two components.
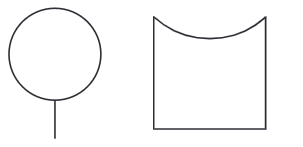 You might have figured out a way of drawing the first part. See this for drawing the second part.
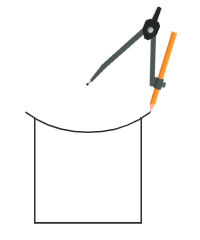 The challenge here is to find out where to place the tip of the compass and the radius to be taken for drawing this curve. You can fix a radius in the compass and try placing the tip of the compass in different locations to see which point works for getting the curve. Use your estimate to determine where to keep the tip.
Ans: Step 1: We start with the base of the diagram. We take a line AB of length 4 cm as the base. (Fig. 1)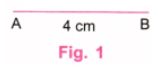
Step 2: At A and B, draw perpendicular lines using a protractor. (Fig. 2)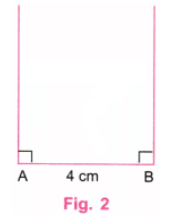
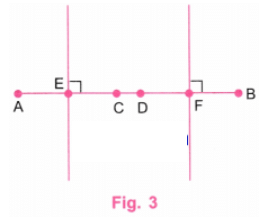
Step 3: Using a ruler, mark points C and D such that AC = 4 cm and BD = 4 cm. Join C and D by a line. (Fig. 3)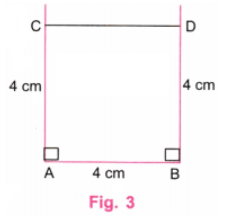 Step 4: Using a ruler, take point M on the CD such that CM = 2 cm. M is the midpoint of CD. Using a protractor, draw a perpendicular to CD at M. Take a point P on this perpendicular such that PM = 2 cm. Distance PM can also be slightly less than or greater than 2 cm. (Fig. 4)
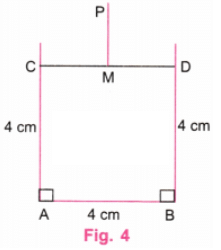
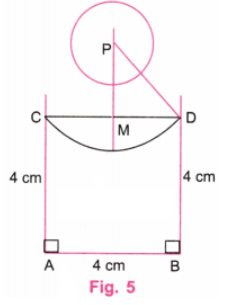
Step 5: Join PD. With centre at P, draw an arc from D to C of a radius equal to PD. With centre at P, draw a circle of radius 1.5 cm. Extend PM to touch the arc. (Fig. 5)
Step 6: Erase the extra lines in Fig. 5 as in Fig. 6.
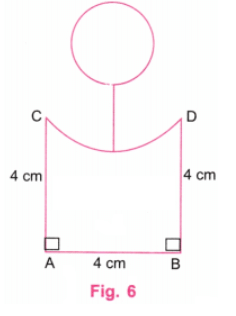
Step 7: Fig. 6 represents the required depiction of the given "A person".
Page 191
Q2: Wavy Wave
Construct this.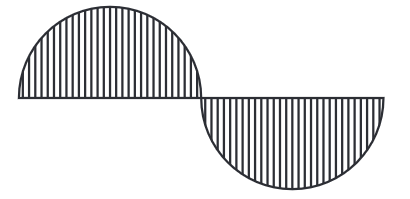
As the length of the central line is not specified, we can take it to be of any length.
Let us take AB to be the central line such that the length of AB is 8 cm. We write this as AB = 8 cm.
Here, the first wave is drawn as a half circle.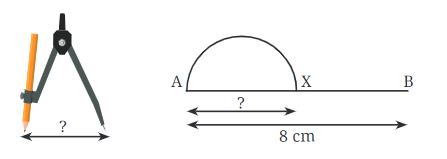 Ans: Step 1: We start with the central line AB of length 8 cm, say. (Fig. 1)
 Step 2: Since 8 ÷ 2 = 4, using a ruler, take point C on AB such that AC = 4 cm. C is the mid-point of AB.
Since 4 ÷ 2 = 2, using a ruler, take points D on AC and E bn CB such that AD = 2 cm and CE = 2 cm. D is the mid-point of AC and E is the mid-point of CB. (Fig. 2).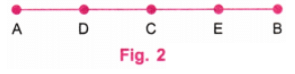 Step 3: With centre at D, draw a semicircle above the line AB and of radius 2 cm. With the centre at E, draw a semicircle below the line AB and of radius 2 cm. (Fig. 3)
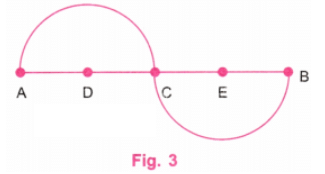
Step 4: Draw vertical lines in the semicircles above and below the line AB. (Fig. 4)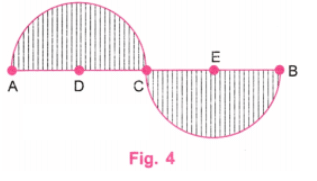 Step 5: Fig. 4 represents the required depiction of the given "Wavy Wave".
Figure it Out
Q1: What radius should be taken in the compass to get this half circle? What should be the length of AX?
Ans: We have AB = 8 cm.
Since the "Wavy Wave" has two equal half circles, we have AX = XB.
∴ X is the mid-point of AB.
∴ AX = 8/2 = 4 cm
∴ The length of AX is 4 cm.
Let M be the mid-point of AX.
∴ AM = MX = 8/2 = 2 cm
The center of the half circle is M.
∴ Radius of half circle = AM = 2 cm
∴ The radius of the half circle is 2 cm.
Q2: Take a central line of a different length and try to draw the wave on it.
Ans: Step 1: We start with the central line of different lengths, say, 10 cm. (Figure 1)
Step 2: Since 10/2 = 5, using a ruler, take point C on AB such that AC = 5 cm. C is the mid-point of AB.
As 5 ÷ 2 = 2.5, using a ruler, take points D on AC and E on CB such that AD = 2.5 cm and CE = 2.5 cm.
D is the mid-point of AC and E is the mid-point of CB. (Figure 2)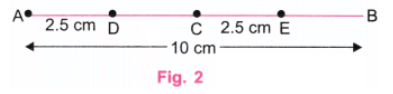
Step 3: With centre at D, draw a half circle above the central line AB and of radius 2.5 cm. With centre at E, draw a half circle below the central line AB and of radius 2.5 cm. (Figure 3)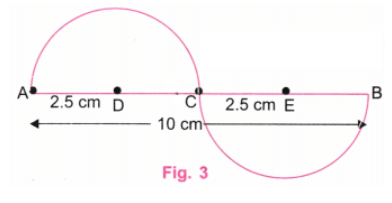
Step 4: Draw vertical lines in the half circles above and below the line AB. (Figure 4)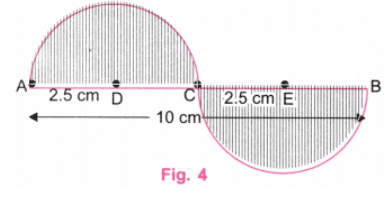
Step 5: The figure represents the required depiction of the given "Wavy Wave" with the central line of length 10 cm.
Q3: Try to recreate the figure where the waves are smaller than a half circle (as appears in the neck of the figure 'A Person'). The challenge here is to get both the waves to be identical. This may be tricky!
Ans: We shall draw a "Wavy Wave" of the form given in Figure 1.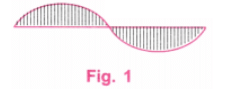
Here, the waves are smaller than a half circle.
Step 1: We start with the central line AB of length 10 cm, say. (Figure 2)
Step 2: Since 10 ÷ 2 = 5, using a ruler take a point C on AB such that AC = 5 cm. C is the mid-point of AB.
Since 5 ÷ 2 = 2.5, using a ruler, take points D on AC and E on CB such that AD = 2.5 cm and CE = 2.5 cm.
D is the mid-point of AC and E is the mid-point of CB. (Figure 2)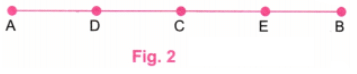 Step 3: At D, draw a perpendicular line below AB, using a protractor. At E, draw a perpendicular line above AB, using a protractor. (Figure 3)
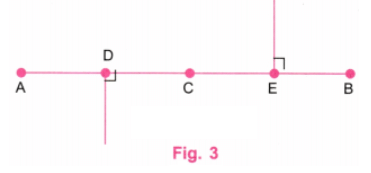
Step 4: Using a ruler, mark points F and G such that DF = 1.5 cm and EG = 1.5 cm.
Equal distances between DF and EG can also be slightly less than or greater than 1.5 cm. (Figure 4)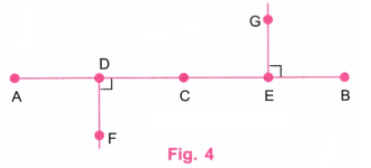 Step 5: Join AF and BG. With the centre at F, draw an arc from A to C of a radius equal to AF. With the centre at G, draw an arc from B to C of a radius equal to GB. (Figure 5)
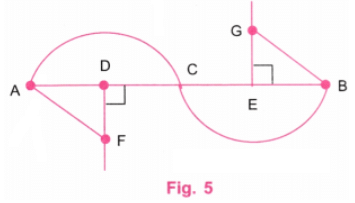 Step 6: Draw vertical lines in Figure 5. Also, erase the extra lines in Figure 5 as shown in Figure 6.
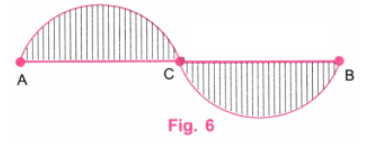 Step 7: Figure 6 represents the required depiction of a "Wavy Wave", where the waves are smaller than a half circle.
Page 192
Q3: Eyes
How do you draw these eyes with a compass? Ans: Step 1: Take a line AB of length 8.5 cm (4 cm + 0.5 cm + 4 cm) as a base. Take points C and D on AB such that AC = 4 cm and AD = 4.5 cm (4 cm + 0.5 cm). (Fig. 1)
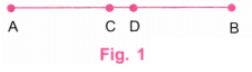 Step 2: Take points E and F on AB such that AE = 2 cm and FB = 2 cm. E is the mid-point of AC and F is the mid-point of DB. (Fig. 2)
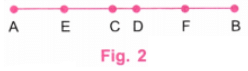 Step 3: Using a protractor, draw perpendiculars at E and F. (Fig. 3)
Step 4: Using a ruler, take points G, H, I, and J such that EG, EH, FI, and FJ are all equal to 1.5 cm. Equal distances can also be slightly less than or greater than 1.5 cm (Fig. 4)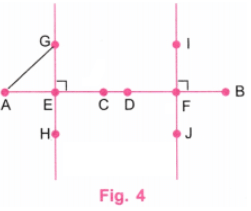
Step 5: With the centre at G, draw an arc from A to C of a radius equal to AG. Similarly, with the centre at H, I, and J draw arcs of radius equal to AG. Erase the extra lines as shown in Fig. 5.
Step 6: At points E and F, draw two black dots of big size. (Fig. 6)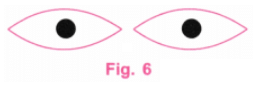
Page 192
Q: Which of the following is not a name for this square?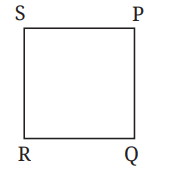 1. PQSR
2. SPQR
3. RSPQ
4. QRSP
Ans: To name a square correctly, the vertices must be listed in order around the boundary (either clockwise or anticlockwise). You cannot jump across the shape.
From the figure:
- Top-left = S
- Top-right = P
- Bottom-right = Q
- Bottom-left = R
So the correct cyclic orders are:
- Clockwise: S → P → Q → R
- Anticlockwise: S → R → Q → P
Now check options:
- PQSR → P → Q → S → R
This jumps from Q to S (diagonal), not along the boundary → Invalid - SPQR → S → P → Q → R
Correct (clockwise) - RSPQ → R → S → P → Q
Correct (anticlockwise) - QRSP → Q → R → S → P
Correct (anticlockwise)
Page 194
Figure it Out
Q1: Draw a configuration of one rectangle and four squares on a square dot paper as shown in the given figure.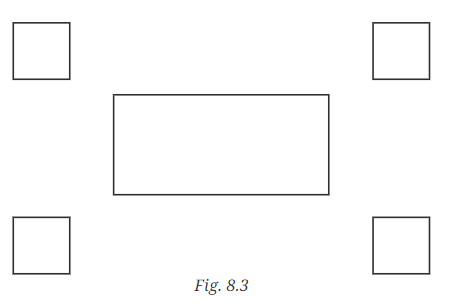 What did you do to recreate this figure so that the four squares are placed symmetrically around the rectangle? Discuss with your classmates.
Ans: Step 1: Take a square dot paper and mark a dot on it at A. Start from A move 10 dots to the right and mark the tenth dot at B.
Step 2: Start from B and move 6 dots above B and mark the 6th dot as C. Start from A and move 6 dots above A and mark the 6th dot as D. Join AB, BC, CD, and DA.
Step 3: Take points E, F, G, and H on the dot paper as shown in the figure.
Step 4: Take points I, J, K, and L at a distance of 4 dots from E, F, G, and H respectively. Join IE, FJ, GK, and LH.
Step 5: On LH and GK, construct squares above the rectangle.
Step 6: On IE and FJ, construct squares below the rectangle.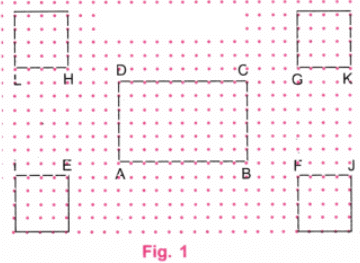
Step 7: The figure is the required configuration of one rectangle and four squares on a square dot paper.
Q2: Identify if there are any squares in this collection. Use measurements, if needed.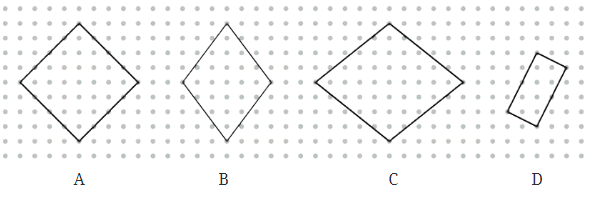 Think: Is it possible to reason out if the sides are equal or not, and if the angles are right or not without using any measuring instruments in the above figure? Can we do this by only looking at the position of corners in the dot grid?
Ans: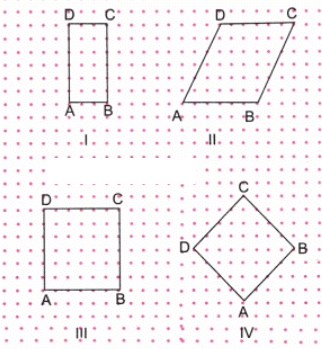
Fig. I: In this figure, AB and BC are not equal. So, ABCD cannot be a square.
Fig. II: In this figure, ∠BAD is not equal to 90°. So, ABCD cannot be a square.
Fig. III: In this figure, counting dots between sides, we find that AB, BC, CD, and DA are all equal sides. Also, the position of the dots on the sides shows, that each angle of ABCD is 90°.
∴ ABCD is a square.
Fig. IV: In this figure, counting dots between sides, we find that AB, BC, CD, and DA are all equal sides. Also, using a protractor, we find that each angle of ABCD is 90°.
∴ ABCD is a square.
Q3: Draw at least 3 rotated squares and rectangles on a dot grid. Draw them such that their corners are on the dots. Verify if the squares and rectangles that you have drawn satisfy their respective properties.
Ans: We draw two rotated squares and two rotated rectangles on a dot grid such that the comers of squares and rectangles are on dots.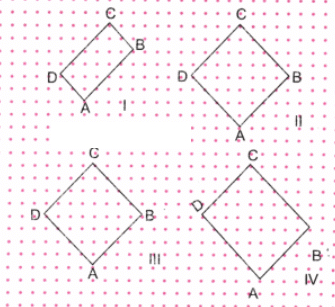
We have drawn two rotated squares (II and III) and two rotated rectangles (I and IV). These squares and rectangles are drawn keeping in view the number of dots between sides and also the position of sides.
Using a protractor, we find that all angles of figures I to IV are 90°.
Using a ruler, we find that the opposite sides of Figures I and IV are equal and all sides of Figures II and III are equal.
∴ By definition, figures I and IV are rectangles, and figures II and III are squares.
Page 197
Construct
Q1: Draw a rectangle with sides of length 4 cm and 6 cm. After drawing, check if it satisfies both the rectangle properties.
Ans: We shall draw a rectangle of the form shown in Fig. 1.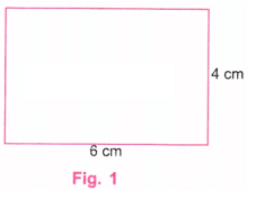 Step 1: Using a ruler, draw a line AB equal to 6 cm. (Fig. 2)
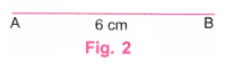 Step 2: Using a protractor, draw perpendicular lines at A and B (Fig. 3)
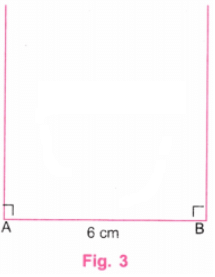 Step 3: Using a ruler, mark point P on the perpendicular line at A such that AP = 4 cm. Using a ruler, mark point Q on the perpendicular line at B such that BQ = 4 cm. (Fig. 4).
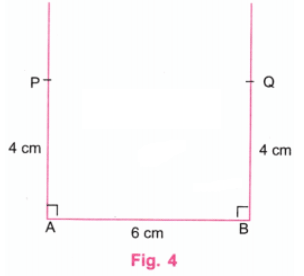 Step 4: Join P and Q using a ruler. Erase the lines above P and Q. (Fig. 5).
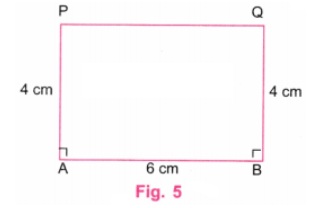
Step 5: Using a ruler, verify that PQ is of length 6 cm.
Using a protractor, verify that ∠P and ∠Q are 90° each.
Step 6: We have:
(i) AB = PQ = 6 cm and AP = BQ = 4 cm
(ii) ∠A = ∠B = ∠Q = ∠P = 90°.
Step 7: ABQP in Fig. 5 is the required rectangle of sides 4 cm and 6 cm.
Q2: Draw a rectangle of sides 2 cm and 10 cm. After drawing check if it satisfies both the rectangle properties.
Ans: We shall draw a rectangle of the form shown in Fig. 1.
 Step 1: Using a ruler, draw a line AB equal to 10 cm. (Fig. 2).
Step 2: Using a protractor, draw perpendicular lines at A and B (Fig. 3).
Step 3: Using a ruler, mark point P on the perpendicular at A such that AP = 2 cm. Using a ruler, mark point Q on the perpendicular at B such that BQ = 2 cm. (Fig. 4)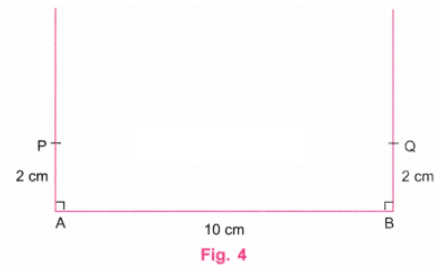
Step 4: Join P and Q using a ruler. Erase the lines above P and Q. (Fig. 5)
Step 5: Using a ruler, verify that PQ is of length 10 cm.
Using a protractor, verify that ∠P and ∠Q are 90° each.
Step 6: We have:
(i) AB = PQ = 10 cm and AP = BQ = 2 cm
(ii) ∠A = ∠B = ∠P = ∠Q = 90°.
Step 7: ABQP in Fig. 5 is the required rectangle of sides 2 cm and 10 cm.
Q3: Is it possible to construct a 4-sided figure in which-
- all the angles are equal to 90° but
- opposite sides are not equal?
Ans: Step 1: Using a ruler, draw a line AB equal to 6 cm, say. (Fig. 1).
Step 2: Using a protractor, draw perpendicular lines at A and B (Fig. 2). Step 3: Using a ruler, mark point P on the perpendicular at A such that AP = 4 cm.
Using a ruler, mark point Q on the perpendicular at B such that BQ = 2 cm, which is not equal to AP. (Fig. 3).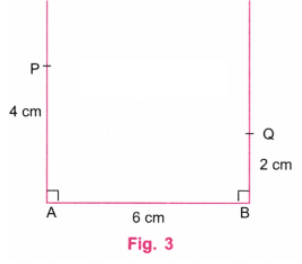 Step 4: In Fig. 3, the opposite sides of AP and BQ are not equal. Join P and Q using a ruler. Erase the lines above P and Q (Fig. 4).
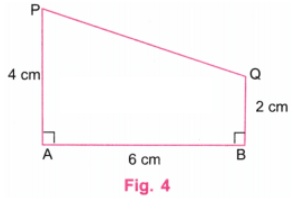 Step 5: Using a protractor, we find that neither ∠P nor ∠Q is 90°.
Step 6: We conclude that it is not possible to construct a 4-sided figure in which all angles are 90° and opposite sides are not equal.
Page 199
Q: Breaking Rectangles
Construct a rectangle that can be divided into 3 identical squares.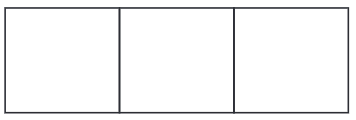 Ans: We shall draw a rectangle of the form shown in Fig. 1.
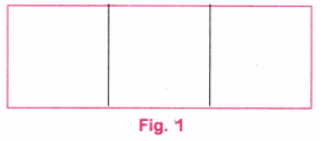
Step 1: Let us keep the vertical side of the rectangle to 3 cm. Since the rectangle is to be divided into three identical squares, the length of the rectangle must be 3 cm + 3 cm + 3 cm = 9 cm.
Step 2: Using a ruler, draw a line AB equal to 9 cm. (Fig. 2).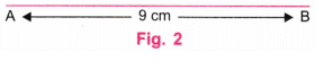 Step 3: Using a ruler, find points P and Q on AB such that AP = 3 cm and PQ = 3 cm. Here, QB is also 3 cm. (Fig. 3).
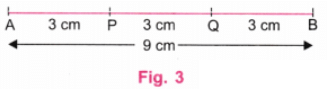 Step 4: Using a protractor, draw perpendicular lines at A, P, Q, and B. (Fig. 4).
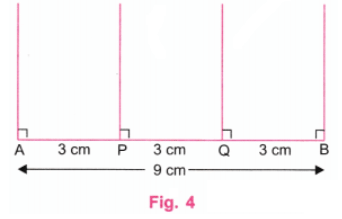
Step 5: Using a ruler, mark points A', P', Q', and B' on perpendiculars at A, P, Q, and B respectively such that AA' = PP' = QQ' BR' = 3 cm. (Fig. 5).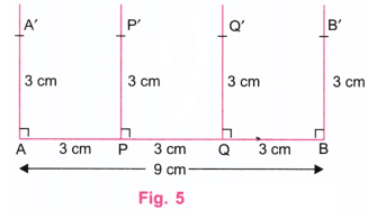 Step 6: Join A' and P', P' and Q', and Q' and B' using a ruler. Erase the lines above A', P', Q', and B'. (Fig. 6).
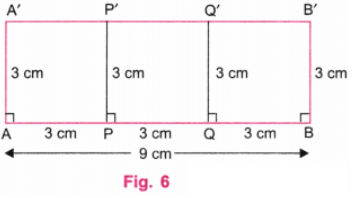 Step 7: ABB'A' is the required rectangle which is divided into 3 identical squares APP'A', PQQ'P', and QBB'Q'.
Page 201
Q: Give the lengths of the sides of a rectangle that cannot be divided into:
(i) Two identical squares;
(ii) Three identical squares.
Ans: (i) Let the smaller side of a rectangle be x cm. If the larger side of the rectangle is 2x cm (x cm + x cm), then this rectangle can be divided into two identical squares of side x cm. (Fig. 1)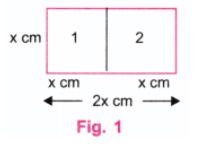 Let us consider a rectangle of sides 4 cm and 6 cm. Here, 6 is not equal to 8 (4 + 4), so, it cannot be divided into two identical squares as shown in Fig. 2
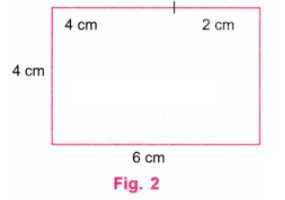
(ii) Let the smaller side of a rectangle be x cm. If the larger side of the rectangle is 3x cm (x cm + x cm + x cm), then this rectangle can be divided into three identical squares of side x cm. (Fig. 3)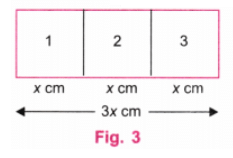 Let us consider a rectangle of sides 3 cm and 8 cm. Here, 8 is not equal to 9 (3 + 3 + 3), so, it cannot be divided into three identical squares as shown in Fig. 4.
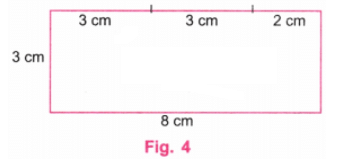
Construct
Q1: A Square within a Rectangle
Construct a rectangle of sides 8 cm and 4 cm. How will you construct a square inside, as shown in the figure, such that the centre of the square is the same as the centre of the rectangle? Hint: Draw a rough figure. What will be the sidelength of the square? What will be the distance between the corners of the square and the outer rectangle?
Ans: The centre of a rectangle (or square) is the point of intersection of its diagonals.
Step 1: Using a ruler, draw a line AB equal to 8 cm. Using a protractor, draw perpendicular lines at A and B. Using a ruler, mark point P on the perpendicular line at A such that AP = 4 cm. Using a ruler, mark point Q on the perpendicular line at B such that BQ = 4 cm. Join P and Q using a ruler. Erase the lines above P and Q. (Fig. 1)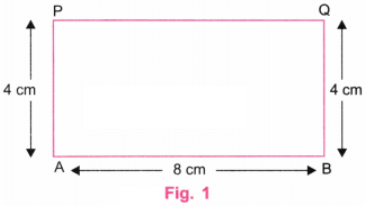 Step 2: Draw diagonals AQ and BP, using a ruler. Let the diagonals intersect at C. This point is the centre of the rectangle ABQP and of the required square. (Fig. 2)
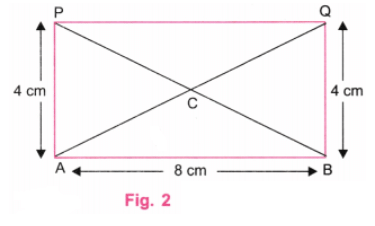 Step 3: Erase diagonals AQ and BP. Using a protractor, draw a perpendicular line on AB and pass through the centre C. Let this perpendicular meet AB at R and PQ at S. (Fig. 3).
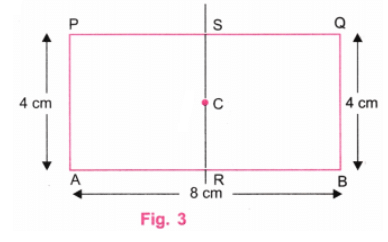
Step 4: Since AP = 4 cm, each side of the square must be 4 cm. Using a ruler, mark points A' and B' on AB such that A'R = 2 cm and RB' = 2 cm. Thus, A'B' = A'R + RB' = 2 cm + 2 cm = 4 cm.
Similarly, using a ruler, mark points P' and Q' on PQ such that P'S = 2 cm and SQ' = 2 cm. Thus, P'Q' = P'S + SQ' = 2 cm + 2 cm = 4 cm. (Fig. 4).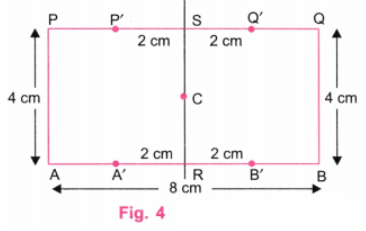 Step 5: Using a ruler, join A' and P' and also B' and Q'. Erase the line RS. (Fig. 5).
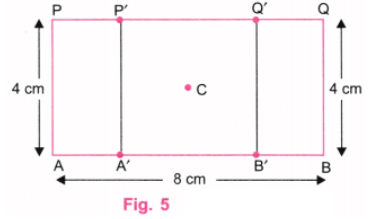
Step 6: In Fig. 5, A'B'Q'P' is the required square with centre C, which is also the centre of the given rectangle.
Page 202
Q2: Falling Squares
Construct the 'Falling Squares" figure shown below:
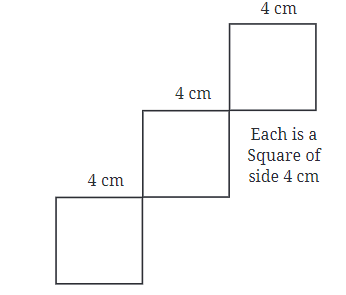 Make sure that the squares are aligned the way they are shown. Now, try this.
 Ans: In the given figure, there are three falling squares and the side of each square is 4 cm.
Step 1: Using a ruler, draw a line AB equal to 4 cm. Using a protractor, draw perpendicular lines at A and B.
Using a ruler, mark point C on a perpendicular line at A such that AC = 4 cm.
Using a ruler, mark points D and E on a perpendicular line at B such that BD = 4 cm and DE = 4 cm. (Fig. 1). Step 2: Join C and D. Produce CD to F such that DF = 4 cm. Using a protractor, draw a perpendicular line at F. Using a ruler, mark points G and H on a perpendicular line at F such that FG = 4 cm and GH = 4 cm. (Fig. 2).
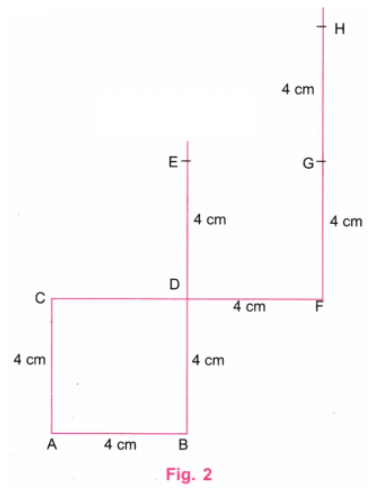
Step 3: Join E and G. Produce EG to I such that GE = 4 cm. Using a protractor, draw a perpendicular line at I. Using a ruler, mark point J on the perpendicular line at I such that IJ = 4 cm. Join H and J. Erase extra lines in the figure. (Fig. 3).
 Step 4: Fig. 3 is the required figure of three "falling squares" each of side 4 cm.
Q3: Shadings
Construct the figure given below. Choose the measurement of your choice. Note that the larger 4-sided figure is square and so tire the smaller ones. Ans: Step 1: Using a ruler, draw a line AB equal to 8 cm. Because, 8 ÷ 4 = 2, we shall draw smaller squares of side 2 cm. Using a protractor, draw perpendicular lines at A and B. Using a ruler, mark point P on the perpendicular line at A such that AP = 8 cm. Using a ruler, mark point Q on the perpendicular line at B such that BQ = 8 cm. Join P and Q using a ruler. Erase the lines above P and Q (Fig. 1).
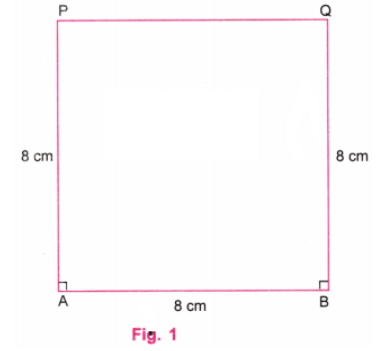 Step 2: On the lines AB, BQ, QP, and PA, mark points at distances of 2 cm, using a ruler. Draw horizontal lines and vertical lines to get 16 squares. (Fig. 2)
Step 3: From comer A, erase the inner sides of four squares to get a square of side 4 cm with one comer at A. Draw parallel diagonals of the remaining 12 small squares of side 2 cm each. (Fig. 3)
Step 4: In the 12 small squares, draw horizontal lines in the portion above the diagonals. (Fig. 4)
Step 5: Fig. 4 is the required figure having 12 small squares in a square.
Page 203
Q4: Square with a Hole
Observe that the circular hole is the same as the centre of the square.
Construct a "Square with a Hole" as shown in the given figure. The centre of the hole is the same as the center of the square.
Hint: Think where the centre of the circle should be.
Ans: The centre of a square is the point of intersection of its diagonals. This centre is also the centre of the hole in the figure.
Step 1: Using a ruler, draw a line AB equal to 5 cm, say. Using a protractor, draw perpendicular lines at A and B. Using a ruler, mark point P on the perpendicular line at A such that AP = 5 cm. Using a ruler, mark point Q on the perpendicular line at B such that BQ = 5 cm. Join P and Q using a ruler. Erase the lines above P and Q (Fig. 1).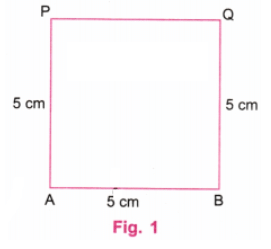
Step 2: Draw diagonals AQ and BP using a ruler. Let the diagonals intersect at C. This point is the centre of the square ABQP. Erase the diagonals AQ and BP. (Fig. 2). Step 3: With centre at C and a radius of 1.5 cm, say, draw a circle using a compass. (Fig. 3)
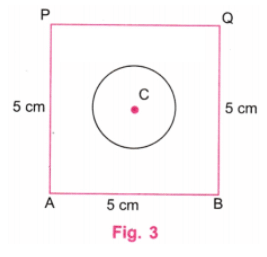
Step 4: Fig. 3 is the required "Square with a Hole".
Q5: Square with more Holes
Construct a "Square with Four Holes" as shown in the given figure. Ans: In the figure, the centre of a circle is the same as that of the corresponding square.
Step 1: Using a ruler, draw a line AB equal to 8 cm, say. Using a protractor, draw perpendicular lines at A and B. Using a ruler, mark point P on the perpendicular line at A such that AP = 8 cm. Using a ruler, mark point Q on the perpendicular line at B such that BQ = 8 cm. Join P and Q using a ruler. Erase the lines above P and Q. (Fig. 1)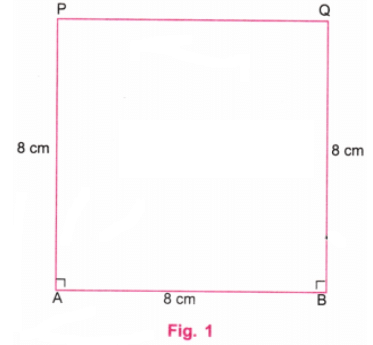
Step 2: Using a ruler, find points C, D, E, and F such that AC = 4 cm, BD = 4 cm, QE = 4 cm, and PF = 4 cm. Join C and E and also F and D. (Fig. 2)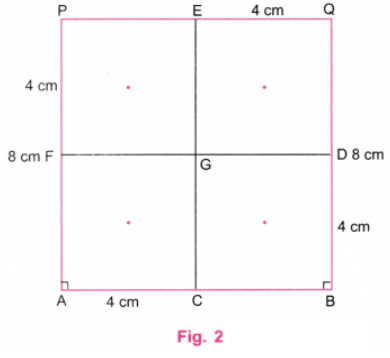
Step 3: Let G be the intersection of lines FD and CE. Find the centres of squares ACGF, CBDG, DQEG, and GEPF by joining their respective diagonals. (Fig. 3)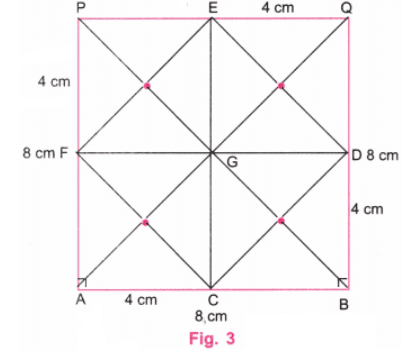 Step 4: Erase the extra lines used for finding the centres of the smaller circles. With centre at centres of small squares, draw four circles of radius 1.3 cm, say. (Fig. 4)
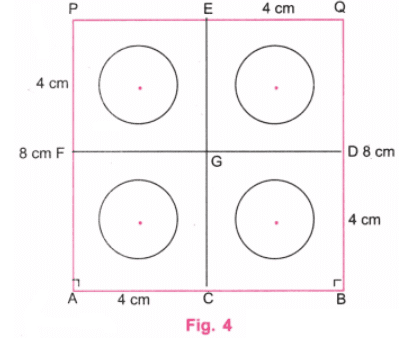 Step 5: Fig. 4 is the required "'Square with Four Holes".
Q6: Square with Curves
This is a square with 8 cm sidelengths.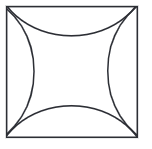 Construct a "Square with Curves ", taking a square of side 8 cm as shown in the figure.
Hint: Think where the tip of the compass can be placed to get all 4 arcs to bulge uniformly from each of the sides. Try it out!
Ans: In the given figure, the centres of the four arcs are outside the square.
Step 1: Using a ruler, draw a line AB equal to 8 cm. Using a protractor, draw perpendicular lines at A and B. Using a ruler, mark point P on the perpendicular line at A such that AP = 8 cm. Using a ruler, mark point Q on the perpendicular line at B such that BQ = 8 cm. Join P and Q using a ruler. Erase the lines above P and Q. (Fig. 1)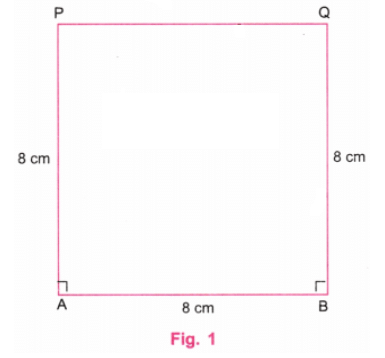 Step 2: Using a ruler, mark points C, D, E, and F such that AC = 4 cm, BD = 4 cm, QE = 4 cm, and PF = 4 cm. Join C and E and also D and F. Extend these lines outside the square. (Fig. 2)
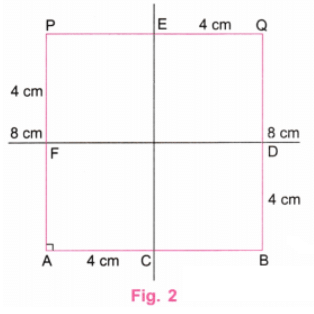 Step 3: Extend DF and take points G and H on it so that DG and FH are equal to 4 cm. Extend CE and take points I and J on it so that Cl and EJ are equal to 4 cm. The distance 4 cm can be taken slightly less than or greater than 4 cm. Join B and G. (Fig. 3)
 Step 4: With centres at G, H, I, and J and a radius equal to BG, draw four arcs inside the square as shown in the given figure. Erase the extra lines. (Fig. 4).
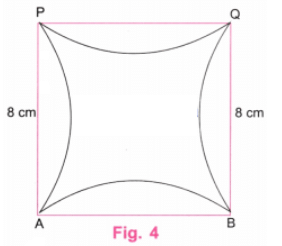 Step 5: Fig. 4 is the required "Square with Curves" with the square of side 8 cm.
Page 204
Q1: What general laws did you observe with respect to the angles and sides? Try to frame and discuss them with your classmates.
Ans: From the activity, we observe:
- All sides of a square are equal.
- All angles are equal, and each angle is 90° (a right angle).
- Opposite sides are parallel.
So, in general:
A square has four equal sides and four right angles, with opposite sides parallel.
Q2: How can one be sure if the laws that you have observed will always be true?
Ans: We can be sure the laws are always true by checking them in many different constructions and examples. If the same result is observed every time, we can conclude that the laws are always true.
Page 208
Q1: How do we spot it? What else do we know about the position of B? We know that it is of distance 7 cm from the point D.
Ans: We can spot point B by using the given condition that it is at a distance of 7 cm from point D.
So, point B must lie on a circle with centre D and radius 7 cm.
Hence, to locate B:
- Draw a circle with centre D and radius 7 cm.
- The point where this circle meets the required line or arc gives the position of B.
In simple words:
Point B is found as a point 7 cm away from D, so it lies on a circle centered at D with radius 7 cm.
Page 211
Q1: Construct a rectangle in which one of the diagonals divides the opposite angles into 50° and 40°.
Ans: We shall draw a rectangle of the form shown in Fig. 1.
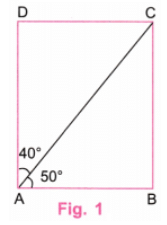
Step 1: Using a ruler, draw a line AB equal to 4 cm, say. (Fig. 2.)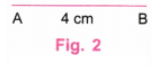 Step 2: Using a protractor, mark dots C and D at angles 50° and 90° (50° + 40°), keeping the central point of the protractor at A. (Fig. 3)
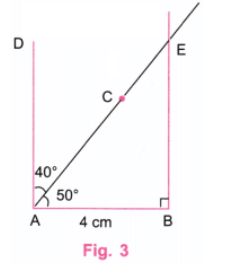 Step 3: Using a protractor, draw a perpendicular line to AB at B and let it intersect the extended line AC at E. (Fig 3)
Step 4: Using a protractor, draw a perpendicular line to BE at E and let it intersect the extended line AD at F. (Fig 4)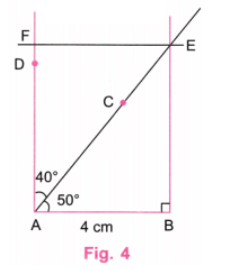 Step 5: Erase the extra lines in Fig. 4. (Fig. 5)
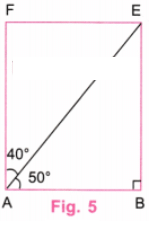 Step 6: Fig. 5 is the required rectangle in which one of the diagonals divides the opposite angles into 50° and 40°.
Q2: Construct a rectangle in which one of the diagonals divides the opposite angles into 45° and 45°. What do you observe about the sides?
Ans: Draw a horizontal line segment AB. This will be one side of the rectangle. (i) At point A, use a protractor to measure and draw AX a 45° angle.
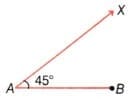 (ii) At point B, measure and draw a 90° angle. Draw a line segment BC extending from B at this angle meeting AX at C.
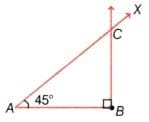 (iii) At Point A and C, Draw a 90° angle which meets at the point D.
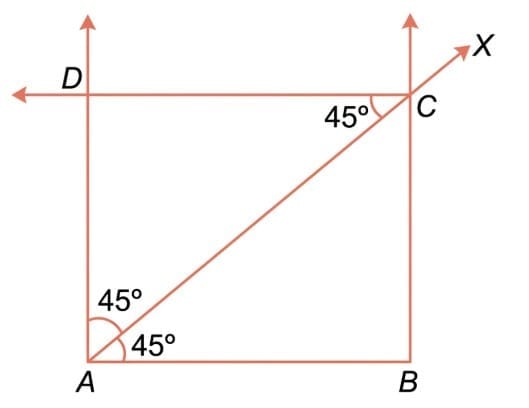 ABCD is the required rectangle. Here, diagonal AC divides the opposite angles A and C into 45° and 45°.
Observation You will notice that when the diagonals divide the opposite angles into 45° and 45°, so the sides of the rectangle will be equal, forming a square.
Q3: Construct a rectangle one of whose sides is 4 cm and the diagonal is of length 8 cm.
Ans: We shall draw a rectangle of the form shown in Fig. 1. Step 1: Using a ruler, draw a line AB equal to 4 cm. (Fig. 2)
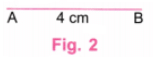 Step 2: Using a protractor, draw a perpendicular line to AB at A and B (Fig. 3)
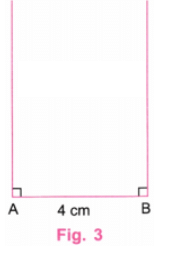 Step 3: With the centre at A and a radius equal to 8 cm, draw an arc to intersect the perpendicular at B. Similarly, draw an arc of radius 8 cm with a centre at B to intersect perpendicular at A. (Fig. 4)
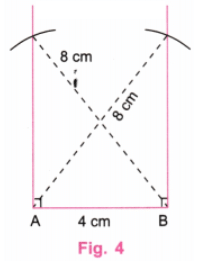 Step 4: Join the points of intersection of arcs by PQ. (Fig. 5)
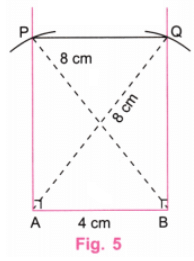 Step 5: Erase the extra lines in Fig. 5 (Fig. 6)
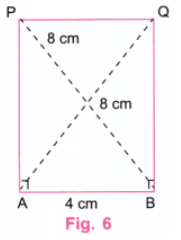 Step 6: Fig. 6 is the required rectangle with one side equal to 4 cm and diagonals of length 8 cm.
Q4: Construct a rectangle one of whose sides is 3 cm and the diagonal is of length 7 cm.
Ans: To construct a rectangle of the given dimensions follow this steps:
- Draw a line segment AB = 3 cm.
- Draw angles of 90° at A and B.
- From A, mark an arc (taking 7 cm length) to the line drawn perpendicular to B, which intersects at C.
- From B, mark an arc (taking 7 cm length) to the line drawn perpendicular to A, which intersects at D.
- Now join CD.
- ABCD is the required rectangle
Page 215
Q1: Construct a bigger house in which all the sides are of length 7 cm.
Recreate the given figure. Note that all the lines forming the border of the house are of length 7 cm.
Ans: 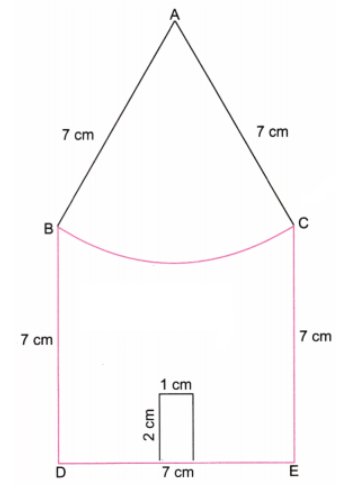
Step 1: Using a ruler, draw a line DE equal to 7 cm. (Fig. 1) Step 2: Using a protractor, draw perpendicular lines to DE at D and E. Take point B perpendicular at D such that BD is 7 cm. Take point C on perpendicular at E such that CE is 7 cm. (Fig. 2)
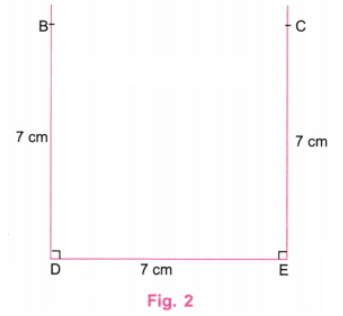 Step 3: 7 cm - 1 cm = 6 cm and 6 cm ÷ 2 = 3 cm. Using a ruler, take points P and Q on DE such that DP = 3 cm and QE = 3 cm. Using a protractor, draw perpendiculars to DE at P and Q of length 2 cm each. (Fig. 3)
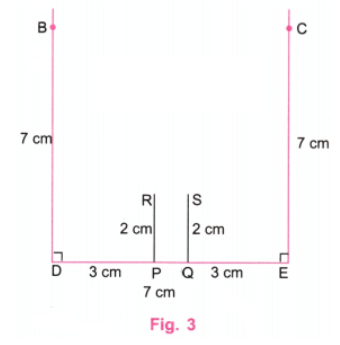 Step 4: Join R and S. With centres at B and C and a radius of 7 cm, draw arcs to intersect at point A. Join AB and AC. With the centre at A and a radius of 7 cm, draw an arc from B to C. Also, erase the extra lines. (Fig. 4)
 Step 5: Fig. 4 is the required recreation of the given house with all the lines forming the border of the house of length 7 cm.
Q2: Try to recreate 'A Person', 'Wavy Wave', and 'Eyes' from the section Artwork, using ideas involved in the 'House' construction.
Ans: 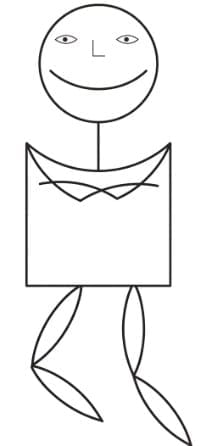
Q3: Is there a 4-sided figure in which all the sides are equal in length but are not squares? If such a figure exists, can you construct it?
Ans: Step 1: Draw a line and take points A and B on it such that AB = 5 cm, say. (Fig. 1)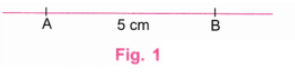 Step 2: Using a protractor, take points C and D such that angles on the right of A and on the right of B are 60° each. (Fig. 2)
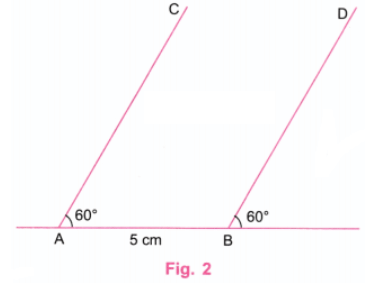 Step 3: Using a ruler, take point P on AC such that AC = 5 cm and Q on BD such that BD = 5 cm. Join P and Q. (Fig. 3)
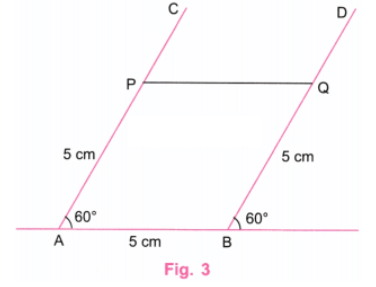 Step 4: Using a ruler, we measure the distance PQ. PQ is equal to 5 cm. Thus, in Figure ABQP, each side is equal to 5 cm. Here ∠A is 60°, which is not equal to 90°.
∴ ABQP is not a square.
Step 5: We find that there are 4-sided figures in which all the sides are equal in length but are not squares.
FAQs on NCERT Solutions: Playing with Constructions
| 1. How do I draw a line segment of exact length using a ruler and compass in Class 6 constructions? |  |
| 2. What's the difference between constructing perpendicular lines and parallel lines in CBSE Class 6 geometry? | |
| 3. Can I use only a compass and straightedge to bisect an angle, or do I need a protractor? | |
| 4. Why do my perpendicular and angle bisector constructions keep coming out unequal when I draw them? | |
| 5. How do I construct a triangle when given three side lengths using the compass method in Class 6? | |