Chapter Notes: Properties of Two-Dimensional Shapes (Term 3)


Some Revision
This section reviews the basic properties of 2D shapes, focusing on their sides and angles.Types of Sides
2D shapes can have:
- Straight sides only: All edges are straight lines (e.g., a square).
- Straight and curved sides: Some edges are straight, others are curved (e.g., a semicircle with a straight base and curved arc).
- Curved sides only: All edges are curved (e.g., a circle).
Each shape can be analyzed to count:
- Number of straight sides.
- Number of curved sides.
Example: A triangle has 3 straight sides and 0 curved sides; a circle has 0 straight sides and 1 curved side.
Angles in Shapes
Angles are measured relative to a right angle (90°):
- Reflex angle: An angle greater than 180° but less than 360° (e.g., the inner angle of a concave shape like a star).
- Right angle: Exactly 90° (e.g., corners of a square).
- Acute angle: Less than 90° (e.g., angles in an equilateral triangle).
- Obtuse angle: Greater than 90° but less than 180° (e.g., angles in some quadrilaterals).
Example: A concave shape (e.g., Figure F) may have reflex angles inside; a rectangle (e.g., Figure G) has right angles.
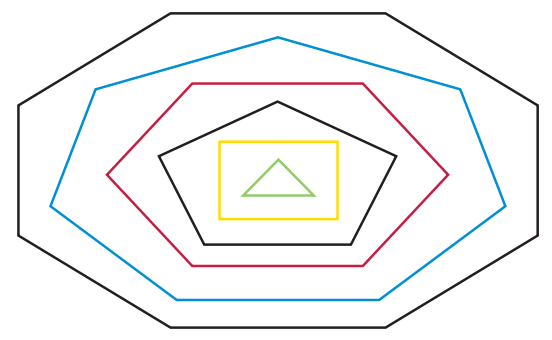
Polygons
This section introduces polygons, their naming, and their angle properties.Defining Polygons
A polygon is a 2D shape with straight sides that are fully connected, forming a closed figure.
Polygons are named based on the number of sides:
- Triangle: 3 sides.
- Quadrilateral: 4 sides.
- Pentagon: 5 sides.
- Hexagon: 6 sides.
- Heptagon: 7 sides.
- Octagon: 8 sides.
Example: A diagram may show a colorful arrangement of polygons, each identifiable by its side count (e.g., a red quadrilateral, a blue hexagon).
Angle Properties of Polygons
Polygons can have angles that are:
- Bigger than right angles (obtuse, > 90°).
- Right angles (exactly 90°).
- Smaller than right angles (acute, < 90°).
Example: A square has four right angles; an equilateral triangle has three acute angles; a concave polygon may have obtuse or reflex angles.
The type of angles in a polygon depends on its shape and whether it is regular (all sides and angles equal) or irregular.
Working with Polygons
- Students trace and manipulate polygons (e.g., hexagons) to create patterns or subdivide them into smaller shapes.
- Example: Tracing six hexagons and arranging them in a pattern, then drawing lines to form smaller polygons like triangles, quadrilaterals, or pentagons within them.
- Shading techniques highlight specific polygons (e.g., shading triangles or a pentagon) to emphasize their properties or relationships.
Drawing Circles and Patterns in Circles
This section teaches students how to use compasses to draw circles and create interlocking circle patterns.Drawing Circles
A circle is a 2D shape with one continuous curved side, drawn using a compass.
To draw a circle:
- Set the compass to a specific radius (e.g., 3 cm between the sharp tip and pencil tip).
- Place the sharp tip at the center and rotate the pencil to form the circle.
Example: Draw a circle with a 3 cm radius on a sheet of paper.
Creating Interlocking Circle Patterns
Start with one circle and draw additional circles to form a pattern:
- Draw a horizontal line through the center of the first circle.
- Place the compass tip where the line intersects the circle's edge and draw another circle with the same radius.
- Repeat to create a row of interlocking circles (e.g., six circles total).
Example: The pattern resembles a chain of overlapping circles, with each circle's center on the previous circle's edge.
Extend the pattern by adding rows:
- A second row of circles aligns below the first, with centers offset to interlock.
- A third row can be added similarly, creating a grid-like pattern.
Shading Patterns
- Shading parts of the interlocking circle pattern highlights geometric shapes formed by overlaps (e.g., lens-shaped regions).
- Different shading styles create varied visual effects, emphasizing the pattern's structure.
Patterns with Circles
This section builds on circle patterns, introducing more complex arrangements using intersecting lines and multiple circles.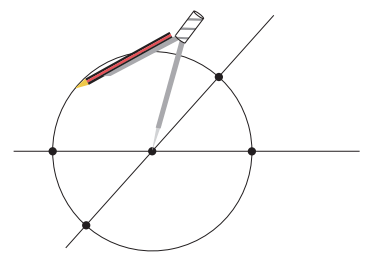
Circles with Intersecting Lines
Create a pattern by drawing a circle centered at the intersection of two lines:
- Draw two lines that cross (forming any angle, e.g., acute or right angles).
- Place the compass tip at the intersection and draw a circle.
- Mark dots where the circle intersects the lines (e.g., four dots for two lines).
- Draw additional circles centered at these dots, using the same radius.
Example: The resulting pattern has a central circle surrounded by four overlapping circles, forming a flower-like shape.
Shading highlights regions (e.g., overlapping areas or individual circles) to show patterns.
Right-Angle Patterns
Draw two lines that cross to form four right angles (e.g., a vertical and horizontal line forming a cross).
Repeat the process:
- Draw a circle centered at the intersection.
- Mark dots at the four intersection points with the lines.
- Draw four circles centered at these dots.
Example: The pattern forms a symmetrical arrangement with a central circle and four surrounding circles, creating a grid-like effect.
Shading enhances the visual impact, highlighting shapes like quadrants or overlapping regions.
Other Circle Patterns
- Additional patterns can be created by varying the number of lines, angles, or circle placements.
Example: Patterns shown in the chapter include intricate designs with multiple overlapping circles, demonstrating the versatility of compass-based constructions.
Points to Remember
- Shape sides: 2D shapes have straight sides only (e.g., triangle), curved sides only (e.g., circle), or both (e.g., semicircle).
- Angles: Shapes may have right (90°), reflex (> 180°), acute (< 90°), or obtuse (> 90° but < 180°) angles.
- Polygons: Named by side count: triangle (3), quadrilateral (4), pentagon (5), hexagon (6), heptagon (7), octagon (8).
- Polygon angles: Polygons can have acute, right, or obtuse angles, depending on their shape (e.g., square has right angles).
- Tracing polygons: Copying shapes like hexagons and dividing them into smaller polygons (e.g., triangles) creates patterns.
- Circles: Drawn with a compass, circles form patterns when interlocked or centered at line intersections.
- Interlocking circles: A row or grid of overlapping circles creates geometric patterns, enhanced by shading.
- Line-based circle patterns: Circles centered at line intersections form symmetrical designs, especially with right angles.
Difficult Words
- Two-dimensional (2D): A shape with only length and width (e.g., a triangle or circle).
- Polygon: A closed 2D shape with straight sides (e.g., pentagon, hexagon).
- Straight side: A flat, linear edge of a shape (e.g., a triangle's edges).
- Curved side: A rounded edge, like the boundary of a circle or semicircle.
- Reflex angle: An angle greater than 180° but less than 360°, often in concave shapes.
- Right angle: An angle of exactly 90°, like a square's corner.
- Compass: A tool for drawing circles, with a sharp tip (center) and a pencil tip (radius).
- Interlocking circles: Circles that overlap, with centers on each other's edges, forming patterns.
Summary
This chapter equips Grade 6 students with a comprehensive understanding of two-dimensional shapes and their properties. Students learn to classify shapes by their sides (straight, curved, or both) and angles (right, reflex, acute, obtuse). They explore polygons, naming them by side count (e.g., triangle, quadrilateral, octagon) and analyzing their angle properties. The chapter also covers creating circle patterns using compasses, including interlocking rows and designs based on intersecting lines, with shading to highlight geometric features. These skills foster geometric reasoning and creativity, preparing students for advanced shape analysis and constructions.FAQs on Chapter Notes: Properties of Two-Dimensional Shapes (Term 3)
| $1. What are polygons and what are their properties ? |  |
| $2. How can I draw circles accurately ? | |
| $3. What are some common patterns that can be made using circles ? | |
| $4. What are some difficult words related to polygons and circles ? | |
| $5. Can you summarize the properties of two-dimensional shapes ? | |