NCERT Based Activity: Life Processes in Plant


Activity 10.1: Let us test some explanations
Objective
To understand the role of sunlight and water in plant growth.
Procedure
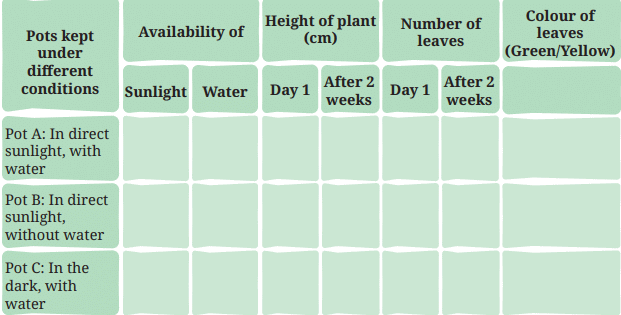
- Take three earthen pots of the same size and fill them with garden soil.
- Plant similar-sized saplings (for example, chilli or tomato) in each pot.
- Label the pots as follows:
- Pot A: Direct sunlight, with water.
- Pot B: Direct sunlight, without water.
- Pot C: Kept in the dark, with water.
- Count the initial number of leaves and record the initial height and leaf colour.
- Place Pot A in sunlight and keep its soil moist daily.
- Place Pot B in sunlight and do not water it.
- Place Pot C in a dark place and keep its soil moist daily.

Observe the plants for two weeks and record changes in height, number of leaves, leaf colour and other visible changes.
Observation (initial)
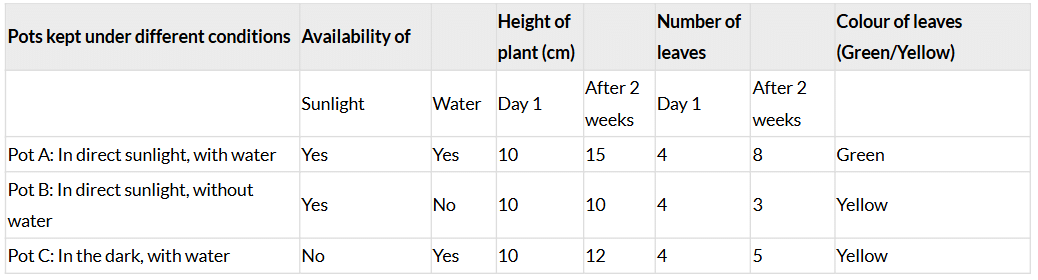
On Day 1 each sapling had about 4 leaves, height ≈ 10 cm, and green leaves.
Ans: Table 10.1: Effect of sunlight and water on plant growth
Differences observed after two weeks
- Pot A: Significant growth - height increased by about 5 cm and 4 new leaves appeared; leaves remained green. This indicates healthy growth when both sunlight and water are available.
- Pot B: No height increase, one leaf dropped, leaves turned yellow and the plant appeared wilted. Lack of water caused wilting despite sunlight.
- Pot C: Minimal growth - height increased by about 2 cm and 1 new leaf appeared; leaves turned yellow. Lack of sunlight resulted in poor growth despite water being available.
- Maximum growth: Pot A - received both sunlight and water, essential for photosynthesis and growth.
- Least growth: Pot B - lacked water, causing wilting and poor growth.
Explanation
Sunlight and water are two essential requirements for photosynthesis. Sunlight provides energy, while water supplies hydrogen and is involved in the formation of glucose. Without water, plants cannot perform normal metabolic processes and cannot keep cells turgid, causing wilting. Without sunlight, chlorophyll cannot trap light energy and starch (the stored form of sugar) is not produced in normal amounts, resulting in poor growth and yellowing of leaves (chlorosis).
Conclusion
Pot A (sunlight + water) shows healthy growth. Availability of both sunlight and water is required for normal photosynthesis and growth.
Activity 10.2: Let us check (demonstration activity)
Objective
To test for the presence of starch in leaves, indicating food production by the plant.
Procedure
- Boil a fresh leaf in water for about 5 minutes to soften and kill the leaf tissue.
- Place the leaf in alcohol (in a test tube) and warm the test tube in boiling water until the leaf becomes decolourised (chlorophyll removed).
- Remove the leaf and place it on a white plate.
- Add a few drops of dilute iodine solution to the decolourised leaf and wait for a few minutes.
- Observe any colour change.
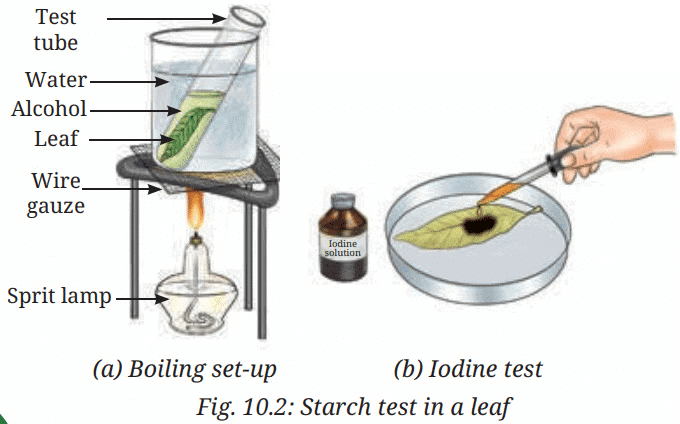
Caution: Alcohol is flammable. Keep the test tube in boiling water (water-bath) and avoid direct flame under the alcohol.
Ans
- Observation: If the leaf turns blue-black on adding iodine, starch is present in that part of the leaf.
- Reason for decolourisation: Removing chlorophyll makes the colour change caused by iodine visible. Chlorophyll masks the blue-black colour of the starch-iodine complex.
- Inference: Leaves store food in the form of starch produced during photosynthesis. Iodine reacts with starch to give a characteristic blue-black colour.
Additional note
Iodine forms a complex with the helical structure of starch (amylose), producing the blue-black colour used as a reliable test for starch presence in plant tissues.
Activity 10.3: Let us check
Objective
To investigate the role of sunlight and chlorophyll in the production of starch in leaves.
Procedure
- Take leaves with green and non-green patches from two similar potted plants: one kept in sunlight and the other kept in the dark for 36 hours.
- Sketch the leaves indicating green and non-green patches for record.
- Perform the iodine test (as in Activity 10.2) on both leaves after decolourising them with alcohol.
- Record observations in Table 10.2.
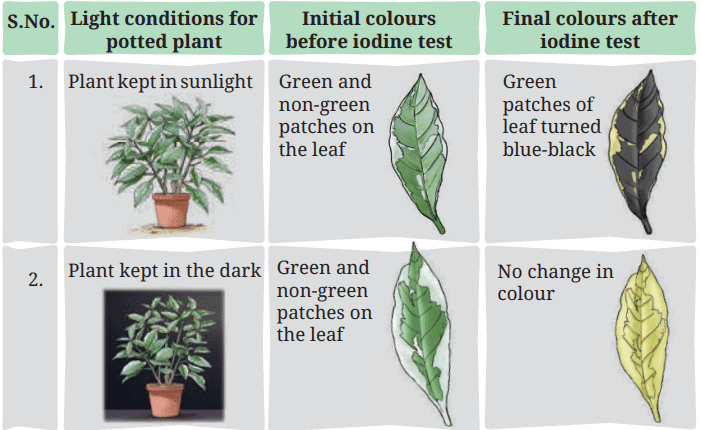
Ans
Table 10.2:

Leaves or parts of leaves that are green (contain chlorophyll) and exposed to sunlight turn blue-black with iodine, showing starch formation. Non-green patches (without sufficient chlorophyll) do not turn blue-black, indicating little or no starch formation. Leaves from plants kept in the dark show little or no blue-black colour on iodine testing because photosynthesis did not occur in the absence of light.
Explanation
Chlorophyll is necessary to capture light energy for photosynthesis. Sunlight provides the energy and chlorophyll helps convert carbon dioxide and water into glucose which is stored as starch. Non-green parts lack chlorophyll and so cannot carry out photosynthesis effectively; hence they do not produce starch.
Activity 10.4: Let us experiment (demonstration activity)
Objective
To test the role of carbon dioxide in starch production by leaves.
Procedure
- Keep a potted plant in the dark for 2-3 days to destarch it (use up stored starch).
- Select one leaf for the experiment.
- Pour caustic soda (sodium hydroxide) into a wide-mouthed bottle. Caustic soda absorbs carbon dioxide from the air inside the bottle.
- Insert half of the destarched leaf into the bottle through a split cork so that the other half remains outside the bottle.
- Place the setup in sunlight for a few hours so that photosynthesis can occur in the exposed half of the leaf.
- Remove the leaf and perform the iodine test on the entire leaf after decolourising it.
- Record observations in Table 10.3.

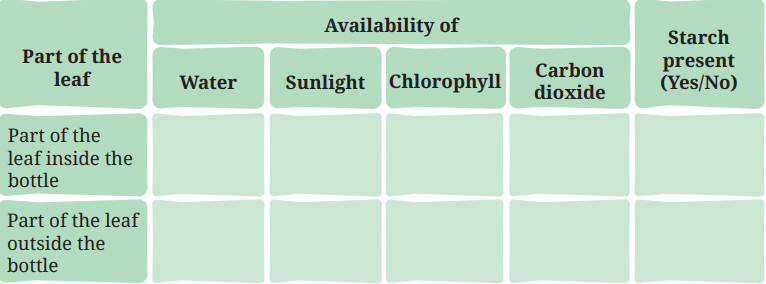
Ans
Table 10.3: Role of air (carbon dioxide) in the preparation of starch by plants

The half of the leaf outside the bottle turns blue-black on iodine testing, indicating starch formation where sunlight, water, chlorophyll and carbon dioxide were available. The half inside the bottle does not turn blue-black because caustic soda absorbed carbon dioxide from the bottle, so photosynthesis could not occur in that part. This shows that carbon dioxide from air is necessary for the formation of starch during photosynthesis.
Explanation
Carbon dioxide combines with hydrogen (from water) during photosynthesis to form glucose, which is stored as starch. Removing carbon dioxide prevents the synthesis of glucose and hence no starch is formed.
Activity 10.5: Let us explore
Objective
To demonstrate that oxygen is released during photosynthesis.
Procedure
- Prepare two similar setups (A and B) as shown in Fig. 10.4: both contain an aquatic plant or a potted plant under an inverted test tube to collect any gas produced.
- Place Setup A in sunlight and Setup B in the dark.
- Observe whether bubbles appear in the inverted test tube of Setup A.
- When gas collects in the inverted test tube of Setup A, collect sufficient gas.
- Place a thumb over the mouth of the test tube to trap the gas, remove the tube and introduce a glowing or burning matchstick into the mouth of the tube.
- Observe the behaviour of the flame or the matchstick.
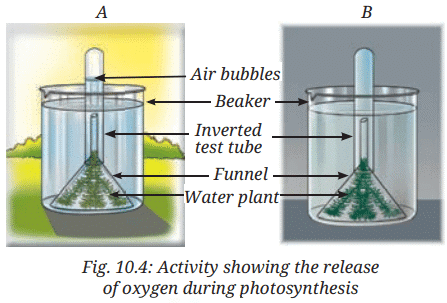
Ans
In Setup A (in sunlight) bubbles are produced and gas collects in the inverted tube. In Setup B (in the dark) no bubbles are observed. The gas collected from Setup A rekindles a glowing splint or increases the brightness of a match flame - a positive test for oxygen. This demonstrates that oxygen is released during photosynthesis in the presence of sunlight.
Explanation
During photosynthesis, water molecules are split (photolysis) and oxygen is released as a by-product. The presence of bubbles and the positive oxygen test confirm oxygen evolution from the photosynthesising plant.
Activity 10.6: Let us examine (demonstration activity)
Objective
To observe stomata on leaves and understand their role in gas exchange.
Procedure
- Collect a fresh leaf such as from rhoeo or money plant.
- Place the leaf in a beaker containing water to keep it fresh.
- Carefully peel a thin layer from the lower surface of the leaf (epidermal peel).
- Place the peel in a watch glass containing water to keep it moist.
- Transfer the peel to a clean microscope slide with a drop of water.
- Add a drop of ink if required to increase contrast, cover with a coverslip and observe under the microscope.
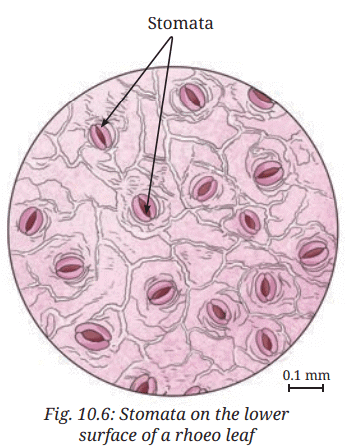
Ans
Under the microscope small pores are visible on the leaf peel; these are stomata. Each stoma (singular of stomata) is usually flanked by two guard cells which control its opening and closing. Stomata allow exchange of gases - carbon dioxide enters for photosynthesis and oxygen and water vapour leave during transpiration and photosynthesis/respiration.
Additional note
Stomata are more abundant on the lower surface of many leaves and their opening is regulated by turgidity changes in the guard cells, which respond to light, CO₂ concentration and water availability.
Activity 10.7: Let us experiment
Objective
To study water transport in plants and demonstrate that water moves upward through the plant.
Procedure
- Take two glass tumblers and fill them with water.
- Add red ink or food colour to one tumbler to make the water coloured; keep the other as plain water.
- Place similar tender twigs (for example, white sadabahar) with flowers or leaves into each tumbler - one twig in plain water and the other in coloured water.
- Leave them undisturbed for one day and then observe any colour change in the stem, leaves or flowers.
- Cut the stem and examine the cut end to see whether the coloured water has moved up the stem.
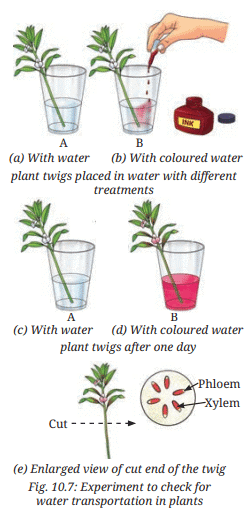
Ans
After one day the twig in coloured water shows red colour in the stem and sometimes in the white flowers. The twig in plain water shows no such change. On examining the cut end of the twig that was in coloured water, the xylem vessels appear stained red. This shows that water (with dissolved materials) moves from the cut end upward through the xylem vessels to stem and flowers.
Explanation
Xylem vessels transport water and dissolved minerals from roots to aerial parts. The movement is driven by a combination of root pressure, capillarity and transpiration pull. The coloured water makes the path of water transport visible.
Activity 10.8: Let us find out (demonstration activity)
Objective
To demonstrate that living parts of plants (and germinating seeds) respire and release carbon dioxide.
Procedure
- Soak moong bean seeds overnight and place wet cotton at the bottom of a conical flask.
- Add the soaked seeds onto the wet cotton inside the flask.
- Close the flask with a cork having two holes and fit two tubes through the holes (one connecting to a test tube of lime water, the other acting as an outlet or ventilation).
- Leave the setup undisturbed for about 24 hours in the dark.
- Fill two test tubes with lime water (calcium hydroxide solution). Connect one test tube to the flask through the tube; keep the other test tube as a control exposed to normal air.
- After the set time, compare the appearance of the lime water in both test tubes.
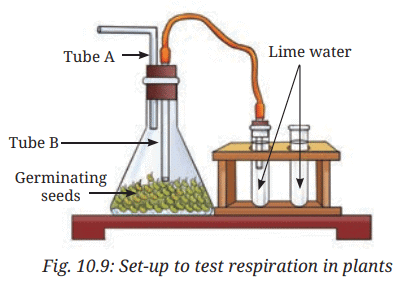
Ans
The lime water connected to the flask containing the moong beans turns milky, while the control lime water remains clear. The milky appearance is due to the carbon dioxide produced by the respiring seeds reacting with lime water to form calcium carbonate (a white precipitate). This shows that germinating seeds respire and release carbon dioxide.
Explanation
Respiration breaks down stored food (carbohydrates) in seeds to release energy, producing carbon dioxide and water as by-products. Carbon dioxide reacts with lime water (calcium hydroxide) to form calcium carbonate, which appears milky, confirming CO₂ production.
Summary and key concepts
The activities above demonstrate important life processes in plants:
- Photosynthesis: Plants use sunlight, water and carbon dioxide in the presence of chlorophyll to make food (glucose) which is stored as starch. The simplified chemical equation is:
\(6CO_2 + 6H_2O \rightarrow C_6H_{12}O_6 + 6O_2\)
- Gas exchange: Stomata on leaves allow carbon dioxide in and oxygen and water vapour out. Guard cells regulate stomatal opening.
- Transport: Xylem conducts water and minerals upward from roots to shoots; phloem (not demonstrated here) transports food from leaves to other parts.
- Respiration: All living parts respire and release carbon dioxide; germinating seeds are actively respiring.
- Experimental checks: Iodine test (blue-black for starch), oxygen test (glowing splint rekindles), and lime water test (milky with CO₂) are reliable demonstrations used in school experiments.
These simple experiments together explain how sunlight, water, carbon dioxide and chlorophyll are essential for food production in plants, how water is transported in the plant body and how gas exchange and respiration occur.
FAQs on NCERT Based Activity: Life Processes in Plant
| 1. What are the main life processes in plants? |  |
| 2. How do plants perform photosynthesis? | |
| 3. What is the role of transpiration in plants? | |
| 4. How do plants reproduce? | |
| 5. Why is respiration important for plants? | |