NCERT Based Activity: Light: Shadows and Reflections


Activity 11.1: Let us investigate
Activity Description
1. Take three matchboxes and make a hole in the inner tray of each matchbox at exactly the same position.
2. Arrange these three matchboxes in a straight line so that the holes are at the same height and lie in a straight line.

3. Place a torch on one side of the matchboxes so that the lamp of the torch is at the height of the holes.
4. Place a cardboard screen on the other side and obtain a bright spot of light on it. You may need to adjust the heights slightly to get a clear spot.
Q: Move one of the matchboxes slightly to a side or up and down. Are you able to obtain the light spot on the screen now?
Ans: When one matchbox is moved to the side or up and down, the holes are no longer aligned. As a result, the light from the torch cannot pass straight through all three holes to reach the screen and the bright spot disappears. This shows that light travels in straight lines.
Activity 11.2: Let us explore
Activity Description
- Caution: use a lighted candle only under adult supervision.
- Take a long hollow pipe made of a flexible material. Align it so that you can see the candle flame through the pipe when the pipe is straight.
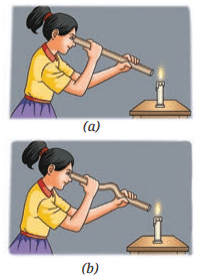
Q: Now, bend the pipe and try to see the candle flame again (Fig. 11.5b). Can you still see it?
Ans: When the pipe is bent you cannot see the candle flame through it. This is because light travels in straight lines and will not follow a curved path inside the pipe. When the pipe is straight the light from the flame travels directly through the pipe to your eye, but bending breaks that straight path and the flame is not visible.
Activity 11.3: Let us experiment
Activity Description
1. Collect objects made of different materials and a torch.
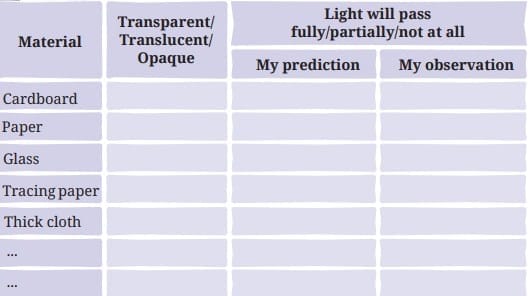
2. List the materials of the objects in a table and classify each as transparent, translucent or opaque (you learnt these terms in Class 6).
3. Go to a dark room, turn on the torch and place it so that you get a spot of light on a wall or on a cardboard screen.

4. For each object, predict what will happen when you hold it in front of the light spot, then actually place the object between the torch and the screen and note the observation.
5. Repeat for all objects and record predictions and observations in your table.
Q: Predict what will happen if you hold an object in front of the light coming out of the torch. Would you continue to see the spot of light on the screen? Note your prediction in Table 11.1.
Now, actually place the object between the torch and the screen. Does light pass through the object? Note your observation in Table 11.1. Was your observation the same as your prediction? What conclusions could you draw?
Ans:
- Prediction:
- Transparent materials (for example, clear glass): predict that light will pass almost completely and the spot will still be visible.
- Translucent materials (for example, tracing paper): predict that light will pass partially and the spot will appear dimmer or diffused.
- Opaque materials (for example, cardboard, thick cloth): predict that light will not pass through and a shadow will form; the spot will disappear.
- Observation:
- Transparent materials: most light passes through and the spot of light remains clearly visible on the screen.
- Translucent materials: some light passes through, producing a dimmer or diffused spot on the screen.
- Opaque materials: light does not pass through and a dark patch (shadow) appears on the screen instead of the spot.
- Conclusions:
- Transparent materials allow nearly all light to pass through.
- Translucent materials allow some light to pass but scatter it, producing a diffused image.
- Opaque materials block light and produce shadows where the light is absent.
- Comparing prediction and observation helps confirm understanding of how different materials interact with light.
Activity 11.4: Let us explore
Activity Description
- Collect several opaque objects of different shapes and sizes.
- Repeat Activity 11.3 but now perform the actions listed in the first column of Table 11.2 (for example: change object distance from screen, tilt the object, move object nearer to torch, etc.).
- Observe and record the shape and size of the shadow on the screen for each action.
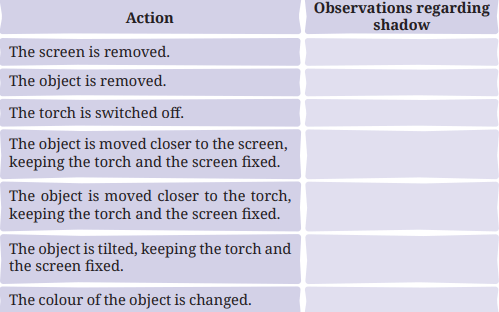
Q: Did the shadow form in all cases? Was the shape and size of the shadow the same as the object?
What conclusions do you draw from this activity? What do we need to observe a shadow? Does the colour of the shadow change when the colour of the object is changed?
Ans:
- Shadow formation and general properties:
- A shadow forms whenever an opaque object blocks light from reaching a screen or wall.
- The shadow's outline generally resembles the object, but size and sharpness vary with positions of the object, light source and screen.
- How size and sharpness change:
- If the object is moved closer to the screen (with torch and screen fixed), the shadow becomes smaller and sharper.
- If the object is moved closer to the torch (away from the screen), the shadow becomes larger and often blurrier.
- If the object is tilted, the shadow shape distorts corresponding to the tilt.
- Conditions when a shadow is not seen:
- If there is no screen or surface to receive the blocked light, no visible shadow is produced.
- If the light source is switched off, there is no light to be blocked and no shadow forms.
- Colour of shadow:
- The colour of the shadow does not change with the object's colour; shadows appear dark because they are regions where less light reaches the screen.
- Conclusions:
- To observe a shadow you need a source of light, an opaque object to block the light, and a screen or surface to receive the shadow.
- Size and sharpness of the shadow depend on distances and relative positions of the light, object and screen.
Activity 11.5: Let us investigate
Activity Description
1. Find a shiny flat steel plate or a plane (flat) mirror.
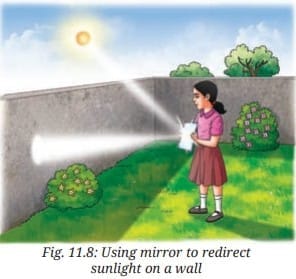
2. Take it outside and let sunlight fall on the shiny surface. Try to redirect the sunlight onto a wall where sunlight is not falling directly.
3. Turn the shiny plate or mirror in different directions and notice whether a spot of light appears on the wall.
4. Tilt the plate or mirror in various directions and observe how the position of the light spot on the wall changes.
Ans:
- By holding the plane mirror at an angle, sunlight that falls on it gets reflected and can be redirected to a wall where direct sunlight was not falling.
- A bright spot of light appears on the wall when the mirror is correctly oriented; this shows that the mirror has changed the direction of the sunlight by reflection.
- When you tilt the mirror, the spot of light moves because the angle of reflection changes. Light still travels in straight lines, but the mirror alters the direction of the reflected rays.
Conclusion: A shiny surface or plane mirror reflects light and thus changes its direction - this phenomenon is called the reflection of light.
Activity 11.6: Let us experiment
Activity Description
1. Take a plane mirror with stand, a torch, a comb and a sheet of white paper. Also take a strip of black paper.
2. Use the black paper to cover all openings of the comb except one, making a thin slit.
3. Spread the white paper on a table, hold the comb perpendicular to it and shine the torch through the slit. Adjust until a thin beam of light appears on the paper (this beam is produced by light passing through the slit).
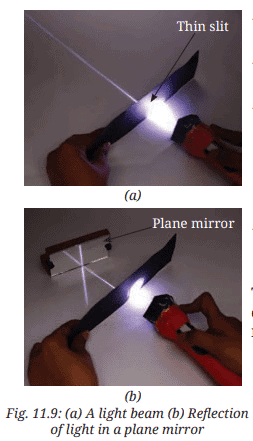
4. Now place the plane mirror in the path of this thin beam while keeping the comb steady and observe what happens to the beam on the paper.
Q: What do you observe?
Ans: The thin beam of light reflects off the plane mirror and changes its direction. The reflected beam is visible on the paper at a new position. This demonstrates that a mirror changes the direction of light by reflection while the light still travels in straight lines between reflections.
Activity 11.7: Let us experiment
Activity Description
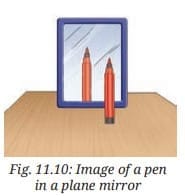
1. Take a plane mirror and a pen (or any small object).
2. Place the pen in front of the mirror and observe the image formed in the mirror.
3. Move the pen to different positions in front of the mirror and compare the sizes of the images at each position.
4. Observe whether the image is upright at each position.
5. Place a screen vertically behind the mirror and move it around. Try to get the image on the screen. Repeat by placing a screen in front of the mirror.
Ans:
- Image appearance: The mirror shows an image that appears as if a similar pen is placed behind the mirror. This is the image formed by the mirror; the pen itself is the object.
- Size comparison: The image formed by a plane mirror is of the same size as the object irrespective of the object's position in front of the mirror.
- Orientation: The image is upright (erect); the tip of the pen appears on top in the image just as in the object.
- Projection on a screen: The image formed by a plane mirror is virtual and cannot be obtained on a screen placed either behind or in front of the mirror because the reflected rays only appear to come from behind the mirror; they do not actually converge there.
Conclusion: The image in a plane mirror is virtual, erect and of the same size as the object.
Activity 11.8: Let us experiment
Activity Description
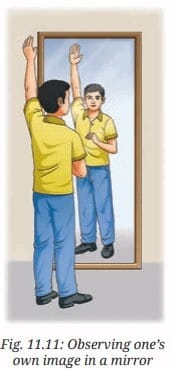
1. Stand in front of a plane mirror and look at your image. Notice how far it appears to be from the mirror.
2. Stand close to the mirror. Is the image also closer?
3. Stand at different distances and note how far the image appears behind the mirror in each case. Check the relation between object distance and image distance.
4. Raise your left arm. Which arm does your image raise?
5. Touch your right ear. Which ear does your image appear to touch?
Ans:
- Distance relation: The image appears to be as far behind the mirror as you are in front of it. If you stand 1 metre in front of the mirror, the image appears 1 metre behind the mirror.
- When you move closer: If you move closer to the mirror, the image also appears closer, maintaining equal distance behind the mirror.
- Lateral inversion: If you raise your left arm, the image appears to raise its right arm. If you touch your right ear, the image appears to touch its left ear. This left-right reversal is called lateral inversion.
Conclusion: A plane mirror produces a virtual image at the same distance behind the mirror as the object is in front, and the image shows lateral inversion (left and right are interchanged).
Activity 11.9: Let us explore
Activity Description
1. Caution: use a lighted candle only under adult supervision.
2. Take a piece of cardboard and make a small hole in it.
3. In a dimly lit room, place the cardboard a short distance from a screen.
4. Place a lighted candle in front of the cardboard so that light from the flame passes through the hole and falls on the screen.
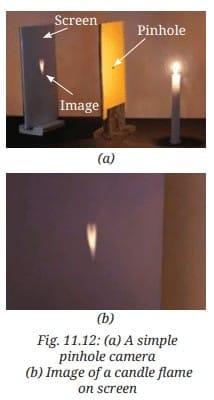
5. Observe the image formed on the screen.
Q: What do you see on the screen? Light coming from the flame passes through the hole on the cardboard and forms an image of the candle flame on the screen. Do you notice anything surprising? The image of the candle flame is upside down, that is, inverted.
Ans:
- An image of the candle flame appears on the screen produced by light passing through the small hole.
- The surprising observation is that the image is inverted (upside down). This happens because rays from the top of the flame travel through the pinhole and strike the lower part of the screen, while rays from the bottom of the flame strike the upper part of the screen. The geometry of straight-line propagation of light through a small aperture produces an inverted image.
Activity 11.10: Let us construct
Activity Description
1. Take two cardboard boxes so that one can slide into the other with a small gap. Cut open one side of each box.
2. On the opposite face of the larger box, make a small hole in the middle (the pinhole).
3. On the opposite face of the smaller box, cut out a square about 5-6 cm on a side and cover this opening with thin translucent paper (for example, tracing paper) to form a screen.
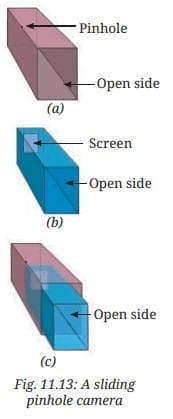
4. Slide the smaller box inside the larger one so that the side with the tracing paper is inside.
5. Hold the pinhole camera with the pinhole facing a distant bright object (tree, building) in sunlight. Cover your head and the camera with a dark cloth and look at the tracing paper screen. Move the smaller box in or out until a clear image appears on the tracing paper.
6. Observe whether the image shows colours of the object and whether the image is erect or inverted.
Ans:
- The images formed on the tracing paper show the colours of the objects because light rays that carry colour information pass through the pinhole.
- The images are inverted (upside down). This is because rays from the top of the object pass through the pinhole and reach the lower part of the screen, and rays from the bottom reach the upper part, producing an inverted image.
FAQs on NCERT Based Activity: Light: Shadows and Reflections
| 1. What is the difference between a shadow and a reflection? |  |
| 2. How are shadows formed? | |
| 3. What factors affect the size and shape of a shadow? | |
| 4. Can shadows be colored? | |
| 5. How do we see reflections? | |