NCERT Based Activity: Living Creatures: Exploring Their Characteristics


Activity 10.1: Let us record
- We are surrounded by numerous things. Just look around in your classroom and you may find many examples-the pencil that you are holding, the book that you are reading or the pigeon near the window.
- List them in Table 10.1 and identify each of them as living or non-living on the basis of your understanding in column II.
- Write a reason for grouping them as living or non living in column III.
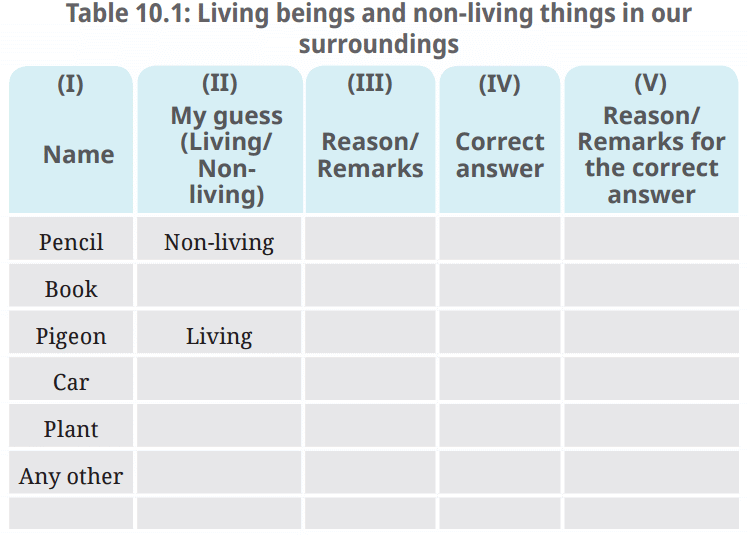
Q: List them in Table 10.1 and identify each of them as living or non-living on the basis of your understanding in column II. Write a reason for grouping them as living or non living in column III.
Ans:
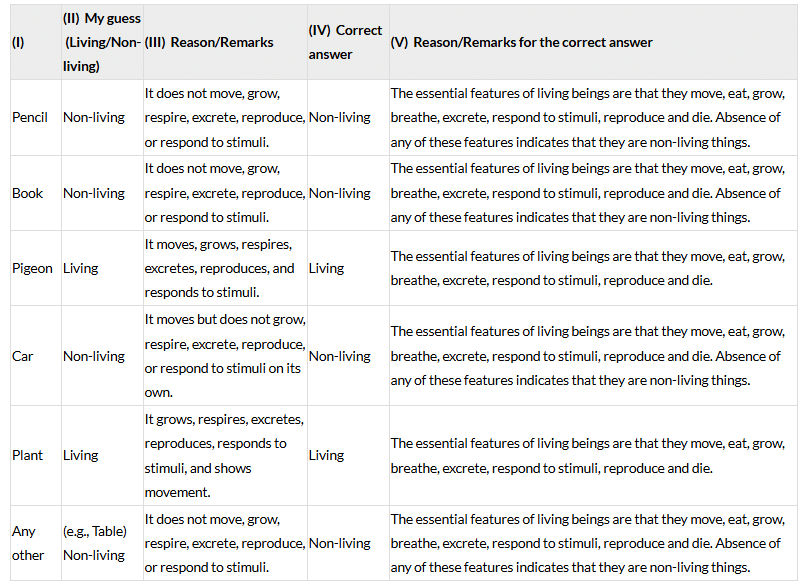
Ans: A seed is living. It contains a tiny embryo which is capable of growing into a new plant when conditions are suitable. Seeds show the signs of life because they can take in water, use the food stored inside them and begin to grow. Water softens the seed coat and activates the embryo, allowing the seed to germinate into a plant.
Activity 10.2: Let us experiment
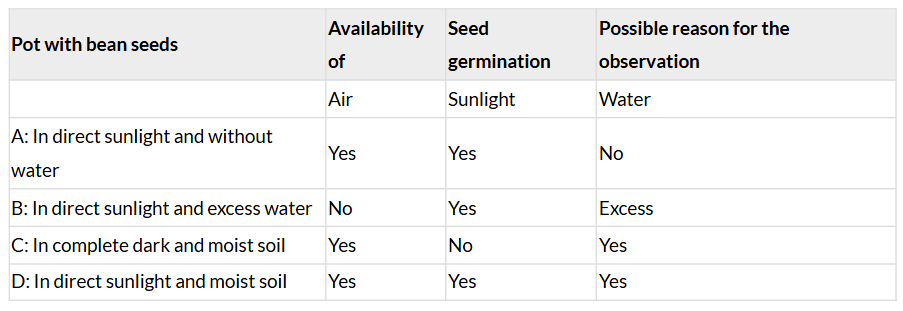
- Take four identical pots filled with garden soil. Sow four bean seeds in each pot. Now, keep these pots in the following conditions for 15 days.
- Pot A: Do not water the soil. Place this pot in direct sunlight.
- Pot B: Add excess water to the soil such that water is always present above the soil. Keep adding water on a regular basis if water reduces. Place this pot in direct sunlight.
- Pot C: Keep the soil in this pot slightly moist by adding a moderate amount of water on a regular basis. Place this pot in a dark location.
- Pot D: Maintain the soil in this pot slightly moist by adding a moderate amount of water on a regular basis. Place this pot in direct sunlight.
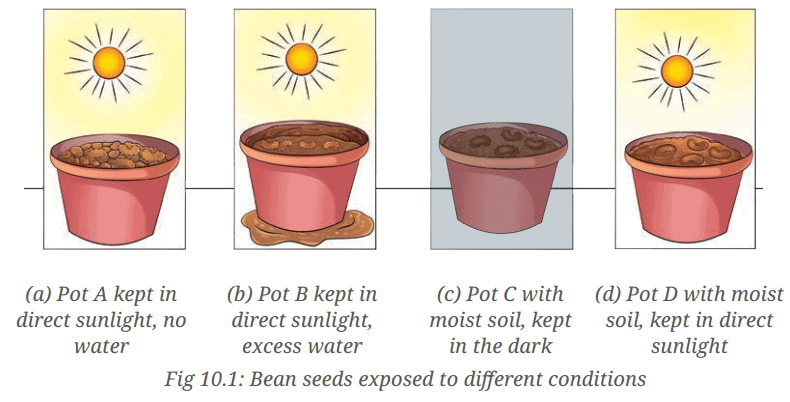
- Indicate the availability of air, sunlight and water for the seeds in each of these cases in Table 10.2.
- When a seed turns into a sprout, it is said to have germinated. Predict whether the seeds in each pot will germinate. Record your predictions for each pot kept under different conditions in Table 10.2.
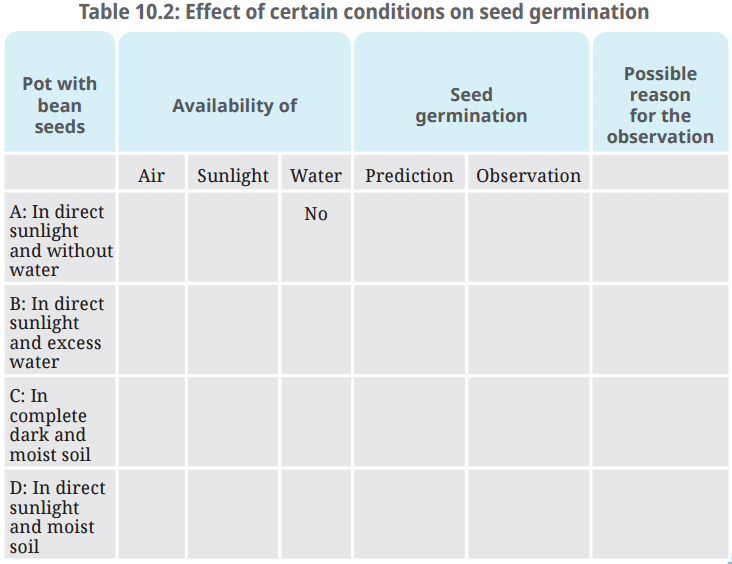
Q: Indicate the availability of air, sunlight and water for the seeds in each of these cases in Table 10.2. Predict whether the seeds in each pot will germinate. Record your predictions for each pot kept under different conditions in Table 10.2. Regularly observe the pots for 7-10 days to check the status of germination of the seeds. Record your observations in Table 10.2. Write possible reasons in favour of your observations in Table 10.2.
Ans:
Q: Compare your predictions with your observations.
Ans: The observations match the predictions. Seeds in pots that had the right amount of water and air germinated, while those that lacked water or lacked air did not. This confirms that both air and an appropriate amount of water are important for germination.
Q: Do you think sunlight is necessary for germination of seeds?
Ans: Light is not essential for the germination of bean seeds. Germination mainly needs water and air; the seed uses its stored food to start growth. Light becomes important later when the young shoot needs to make food by photosynthesis.
Q: Do the seeds in all the pots receive air, water and sunlight?
Ans: No. The conditions in each pot differ:
Pot A: Air - yes; Water - no; Sunlight - yes.
Pot B: Air - no (soil pores filled with water); Water - excess; Sunlight - yes.
Pot C: Air - yes; Water - moderate (soil moist); Sunlight - no (kept in dark).
Pot D: Air - yes; Water - moderate; Sunlight - yes.
Q: Is there any pot in which air is not available to the seeds? If so, why is it not available?
Ans: In Pot B air is not available because the soil is waterlogged. Excess water fills the spaces between soil particles so oxygen cannot reach the seed; seeds need oxygen for respiration during germination.
Q: What happens to the seeds in the pot where water is provided in excess?
Ans: Seeds do not germinate in very wet or waterlogged soil. Excess water prevents air from reaching the embryo, and the seeds may rot instead of growing.
Q: Which seeds receive both air and water?
Ans: Seeds in Pot C and Pot D receive both air and a suitable amount of water. These conditions allow the seeds to respire and use their stored food to grow.
Q: Identify the pots where you can notice the germination of seeds.
Ans: Germination is noticed in Pot C and Pot D, where there is a moderate supply of water and air. Pot C germinates even without light, showing light is not required initially.
Q: Do your observations match with your predictions?
Ans: Yes, the observations match the predictions. Pots with suitable air and water showed germination while pots lacking one of these failed to germinate.
Q: Based on your observations, state the conditions which favour seed germination.
Ans: Conditions that favour germination are:
- A suitable amount of water (enough to soften the seed coat and activate the embryo).
- Air (oxygen) in the soil for respiration.
- A suitable temperature. Light is not required at the start for many seeds.
Q: Which of the following are essential for seed germination-air, water and sunlight?
Ans: Air and water are essential for the germination of bean seeds. Sunlight is not essential during the initial germination stage but becomes important later for the growing seedling.
Q: Compare the available conditions in each pot.
Ans: Pot A: no water, so no germination though air and sunlight are available. Pot B: excess water, so air is lacking and seeds do not germinate. Pot C: moderate water and air present, no sunlight; seeds germinate. Pot D: moderate water, air and sunlight present; seeds germinate.
Q: Why do seeds require these conditions for germination?
Ans: Water softens the seed coat and activates the embryo, allowing it to use stored food to grow. Air (oxygen) is needed for respiration so the embryo can get energy from the stored food. Suitable temperature helps these processes proceed at the right rate.
Q: Do you think that the absence of one or more of these conditions will affect seed germination?
Ans: Yes. Lack of water will prevent the seed coat from softening and the embryo from starting growth. Lack of air will stop respiration and energy release. Very low or very high temperatures can also prevent germination.
Activity 10.3: Let us design
- Take some bean or gram seeds and allow them to germinate on a moist cloth or a moist tissue paper.
- Let them germinate until each of them develop into a seedling having a small root and a small shoot.
- Now, take three glass beakers or tumblers, and label them as A, B and C.
- Take three glass plates and attach a thick blotting paper to one side of each plate using a thick soft cotton thread.
- Fix one seedling on each plate using a thick soft cotton thread, as shown in Fig. 10.2, ensuring that the plant is not damaged.
- Now, place one glass plate upright with a seedling attached into each of the beaker A and beaker C, as shown in Fig. 10.2a and Fig. 10.2c.
- In beaker B, arrange the plate such that the shoot of a seedling is directed downwards and the root is directed upwards, as shown in Fig. 10.2b.
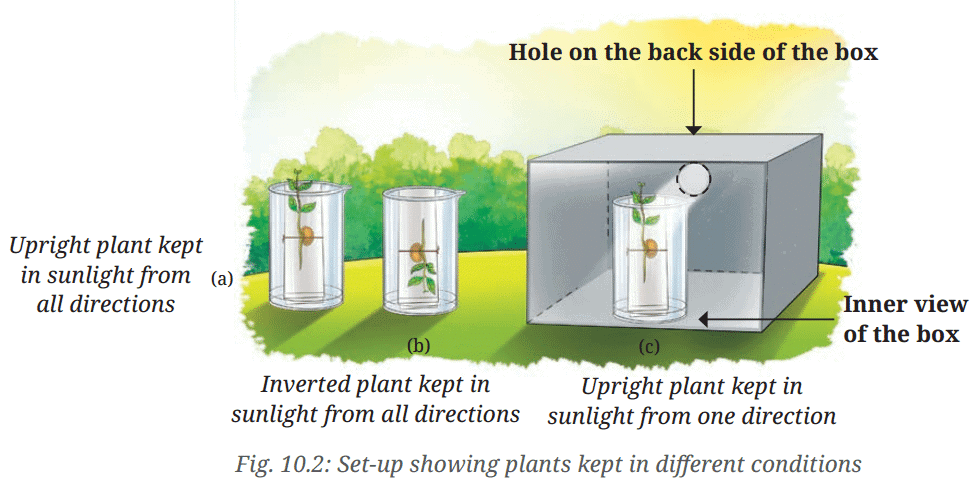
- Pour water into all the three beakers to ensure that the seedling in each beaker remains above the water level.
- In each case, let the bottom of the blotting paper get completely wet by soaking in the water. In this way, the seedling will get the moisture from the wet blotting paper.
- Place beaker A and beaker B in sunlight as shown in Fig. 10.2a and Fig. 10.2b.
- Position beaker C as shown in Fig. 10.2c. Place a cardboard box in such a way that the seedling gets light from one direction only through a small circular hole.
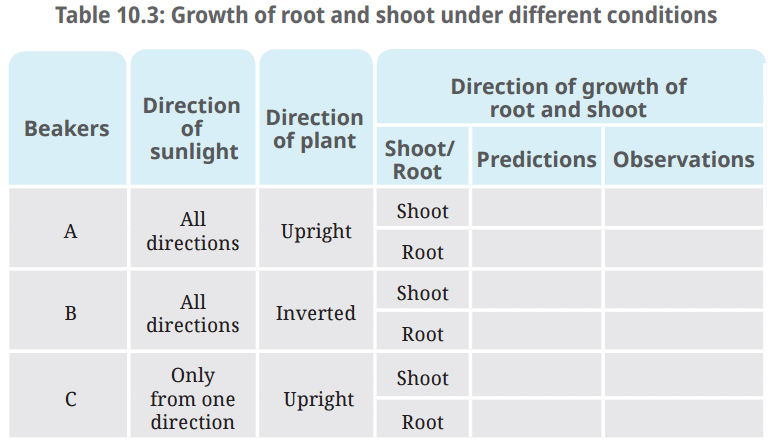
Q: Fill Table 10.3 with your predictions and observations.
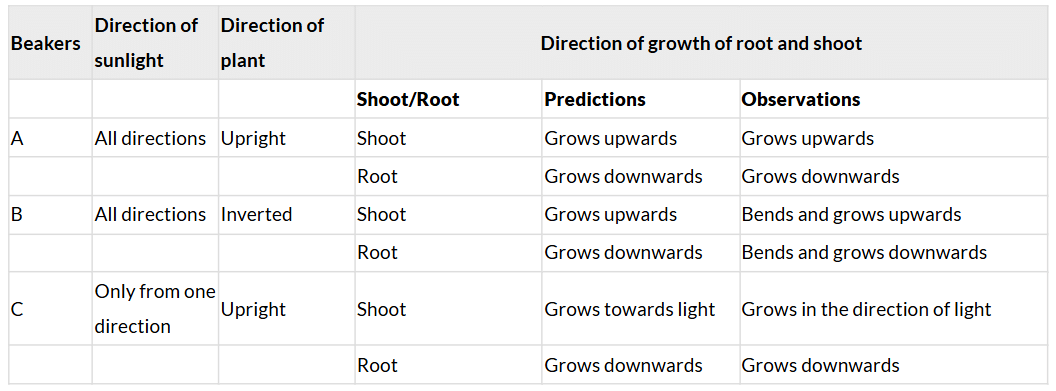
Q: What is the direction of growth of root and shoot in beakers A, B and C based on your observations?
Ans: Observed directions of growth are:
Beaker A (upright): Root grows downwards and the shoot grows upwards.
Beaker B (inverted): Root bends and grows downwards; the shoot bends and grows upwards. The plant changes its growth direction so that the shoot reaches above and the root goes down.
Beaker C (light from one side): The shoot bends and grows towards the light while the root continues to grow downwards.
Q: Do your predictions match your observations?
Ans: Yes. The actual growth matched the predictions: shoots move upwards and towards light, while roots grow downwards.
Q: What do you conclude from this activity?
Ans: Shoots of plants grow upward and show movement towards light, while roots grow downward. Even if a plant is placed upside down, the shoot will bend to grow upwards and the root will bend to grow downwards.
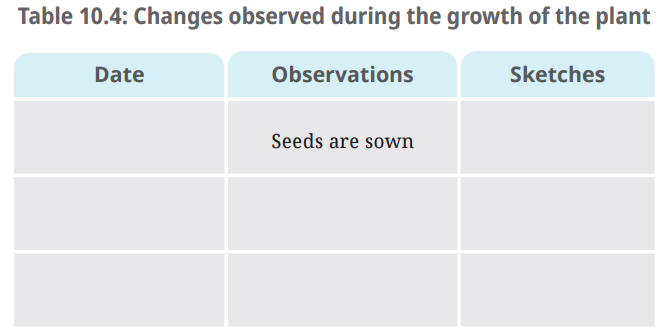
Activity 10.4: Let us explore
- Plant a bean seed and provide suitable conditions for its growth. Observe regularly for three months.
- Record your observations in Table 10.4 as and when changes become visible.
- Note the date when any change is observed. Record answers for the following questions-
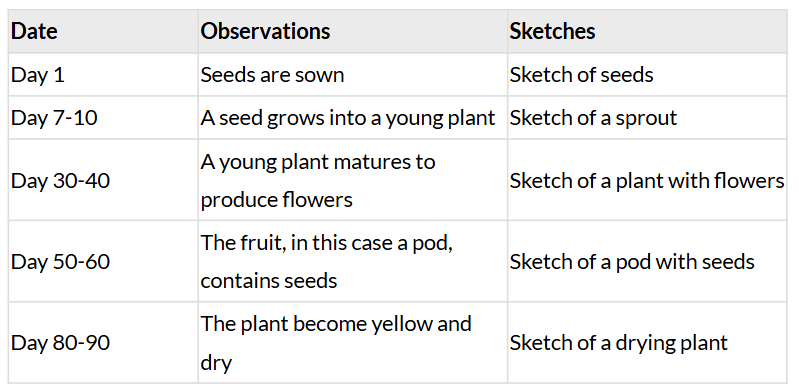
Q: Record your observations in Table 10.4 as and when changes become visible. Note the date when any change is observed. Make sketches of various changes that you observe in Table 10.4.
Ans:
Q: How long does it take for any change to occur?
Ans: It usually takes about 7-10 days for a seed to grow into a young plant under suitable conditions.
Q: After how many days does the first flower appear?
Ans: The first flower typically appears after about 30-40 days, depending on the plant and growing conditions.
Q: After some parts of the flower have dried, can you see any further growth?
Ans: Yes. After the petals and some other parts of the flower dry and fall off, the remaining part (especially the ovary) continues to grow and develops into a pod or fruit.
Q: Which structure do the remaining parts of flower develop into?
Ans: The ovary of the flower develops into the pod (or fruit). The pod contains the seeds that develop from the fertilised ovules.
Q: Can you notice a pod or a fruit with seeds develop from a flower?
Ans: Yes. After flowering and fertilisation, a pod or fruit develops which contains seeds formed from the flower's ovules.
Q: What happens to the plant after the fruits containing seeds are formed?
Ans: After the fruits and seeds form, the plant may begin to yellow and dry as it completes its life cycle. This happens even if watering continues, because the plant has finished producing seeds and its growth slows down.
Activity 10.5: Let us analyse
- Let us solve an interesting puzzle.
- How will you decide which stage (larva or pupa) comes immediately after the egg stage?
- Suppose you are given a container with water from a puddle containing larvae and pupae. Design an activity to find out the correct sequence of these stages.
You can take help of the following activity designed by Avadhi to create your own activity-
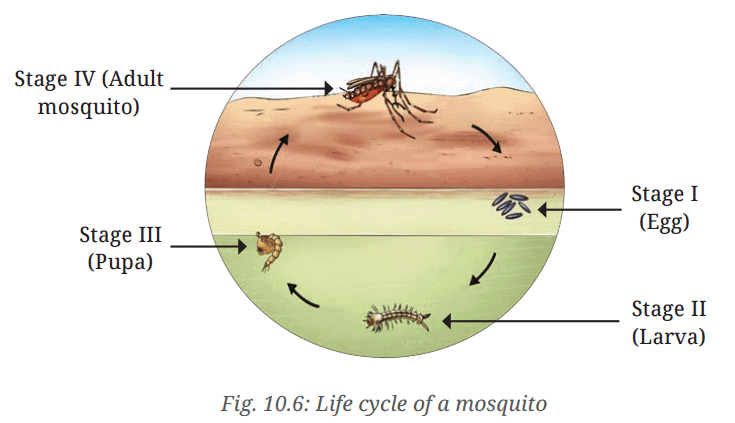
- Step 1: I have a water container with mosquito larvae and pupae.
- Step 2: I will separate 4-5 larvae and pupae into two separate containers with the same water.
- Step 3: I will observe them every day until I see them changing to the next stage.
- Step 4: If the larvae change into pupae, it would mean that the larval stage comes before the pupal stage or vice-versa.
- Step 5: I will keep watching both the containers to see in which one a mosquito appears first.
Q: How will you decide which stage (larva or pupa) comes immediately after the egg stage?
Ans: By observing the changes. If you see eggs hatching into larvae first, and then larvae changing into pupae, it shows that the larval stage comes after the egg stage and before the pupal stage. Daily observation of the stages will reveal the correct order.
Q: Suppose you are given a container with water from a puddle containing larvae and pupae. Design an activity to find out the correct sequence of these stages.
Ans:
- Step 1: I have a water container with mosquito larvae and pupae.
- Step 2: I will separate 4-5 larvae and 4-5 pupae into two separate, labelled containers using the same puddle water.
- Step 3: I will observe and record their forms every day until I see them change to the next stage.
- Step 4: If the larvae change into pupae and later into adult mosquitoes, it shows the sequence is egg → larva → pupa → adult.
- Step 5: I will compare both containers to confirm the order and note the time taken for each change.
Q: Now, suppose you are given a container filled with water from a puddle which contains larvae and pupae. Without separating them from the container, how would you design an activity to decide which stage, out of the two, gives way to the next?
Ans:
- Step 1: I have a water container with mosquito larvae and pupae.
- Step 2: I will observe the same container every day and record which individuals change their form.
- Step 3: I will note when larvae become pupae and when pupae transform into adult mosquitoes.
- Step 4: If larvae are observed changing into pupae first, this shows the larval stage comes before the pupal stage.
- Step 5: Continued observation will confirm that pupae later change into adult mosquitoes, completing the sequence.
Activity 10.6: Let us analyse
- Avadhi and Aayush are dressed up in full sleeves shirts and full pants today. It has been raining intermittently for a week. They are going out with their classmates for an activity. After a brief walk led by their science teacher, they reach a shallow pond. It is surrounded by trees and tall grasses. The teacher cautions them to watch everything from a distance without causing any disturbance. You may also go to a small water body during the rainy season with a facilitator and explore it by taking due safety precautions.
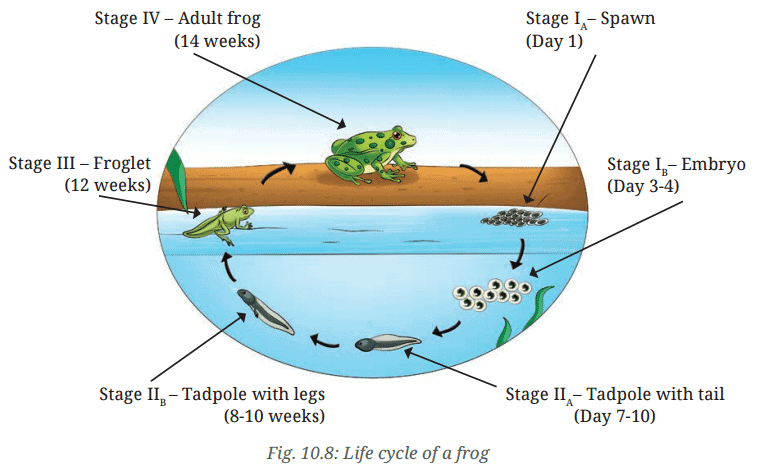
- You may notice a white jelly-like substance on the surface of water towards the edge of the pond (Fig. 10.7). This may also be attached to plants growing in or around the water. This jelly-like substance is actually a cluster of eggs of a frog and is known as spawn.
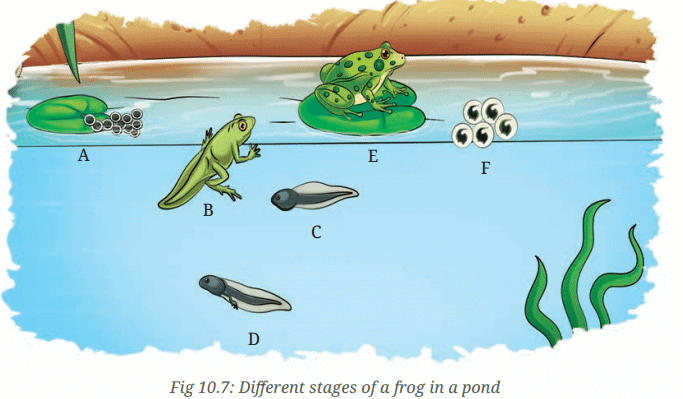
- Observe the features of all the stages of a frog shown in Fig. 10.7. How will you decide the sequence of the given stages (A, B, C, D, E, F)? Some of the stages show distinct changes in their initial and final shapes. Record these changes in Table 10.5.

- Based on the observations listed in Table 10.5, draw the life cycle of a frog. Compare the figure drawn by you with Fig. 10.8.
Q: Observe the features of all the stages of a frog shown in Fig. 10.7. How will you decide the sequence of the given stages (A, B, C, D, E, F)?
Ans: The stages are identified by the changes that occur. The sequence is:
Egg (spawn) → Embryo inside egg → Tadpole (early, with tail and no legs) → Tadpole (later, with hind legs) → Froglet (small frog with tail reducing) → Adult frog. These stages show a clear change from water-bound, tail-bearing young to a four-legged adult that can live on land and in water.
Q: Record these changes in Table 10.5.
Ans:
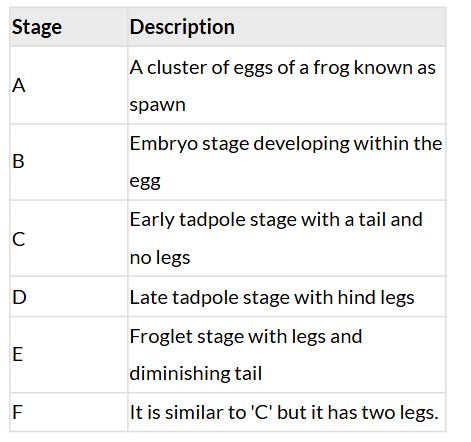
Ans: The life cycle of a frog is: Egg (spawn) → Embryo → Tadpole → Tadpole with legs → Froglet → Adult frog. Each stage shows changes in form and habitat, and your drawing should match Fig. 10.8 in showing this sequence.
Q: How are these eggs of a frog different from the other eggs that you may have seen?
Ans: Frog eggs are covered with a jelly-like material and are usually found in water or attached to water plants. They do not have a hard shell like bird eggs. The jelly protects the eggs and keeps them moist.
Q: Which stage has the shortest duration?
Ans: The froglet stage (the short transitional stage when the tadpole is changing into a small frog) is usually the shortest. It lasts only a short time compared with the longer tadpole and adult stages.
Q: Is there a change in the habitat during the various stages in the life cycle of a frog?
Ans: Yes. Most stages begin in water: eggs, embryos and tadpoles live in water. As tadpoles develop legs and become froglets, they begin to spend some time on land. Adult frogs live both on land and in water.
Q: How do the special features support that stage?
Ans: Special features match the needs of each stage. Tadpoles have tails and gills that help them swim and breathe in water. As they grow, legs develop for movement on land and lungs develop for breathing air. The tail becomes smaller and is finally lost as the frog becomes an adult capable of living on land as well as in water.
FAQs on NCERT Based Activity: Living Creatures: Exploring Their Characteristics
| 1. What are the key characteristics of living creatures? |  |
| 2. How do we classify living organisms? | |
| 3. What is the significance of studying living creatures in science? | |
| 4. How do living creatures adapt to their environment? | |
| 5. What role do living organisms play in the ecosystem? | |