Chapter Notes: Construction of Polygons


Introduction
Geometry is like a treasure hunt where precision and creativity meet! In this exciting chapter, we dive into the art of constructing polygons using just a ruler and compass. From quadrilaterals to regular hexagons, you'll learn how to bring shapes to life with simple tools and clear steps. Whether it's drawing a parallelogram with specific sides or crafting a perfect square, this chapter unlocks the secrets of geometric construction, making it both fun and rewarding. Get ready to sharpen your skills and create polygons with confidence!
Construction of Quadrilaterals
- A quadrilateral is constructed by locating its four vertices.
- Always start with a rough free-hand sketch to plan the construction.
- Different methods are used based on given measurements like sides, angles, or diagonals.
Case 1: Four Sides and One Angle
- Draw one side as the base.
- Construct the given angle at one end of the base.
- Measure the adjacent side from the angle.
- Use the remaining sides as radii to draw arcs from two vertices, intersecting at the fourth vertex.
- Join the vertices to complete the quadrilateral.
Example: Construct quadrilateral ABCD with AB = 3.5 cm, BC = 4.0 cm, CD = 5.0 cm, DA = 4.0 cm, and ∠B = 45°.
- Draw BC = 4.0 cm.
- At B, draw BP such that ∠PBC = 45°.
- From BP, measure BA = 3.5 cm.
- With A as center and radius 4.0 cm, and C as center with radius 5.0 cm, draw arcs to intersect at D.
- Join AD and CD to form quadrilateral ABCD.
Case 2: Three Sides and Two Consecutive Angles
- Draw one side as the base.
- Construct the first given angle at one end of the base and measure the adjacent side.
- Construct the second angle at the other end of the base.
- Draw an arc from one vertex with the third side's length to intersect the angle line at the fourth vertex.
- Join the vertices to complete the quadrilateral.
Example: Construct quadrilateral ABCD with AB = 4.0 cm, BC = 4.5 cm, CD = 4.7 cm, ∠B = 60°, and ∠A = 120°.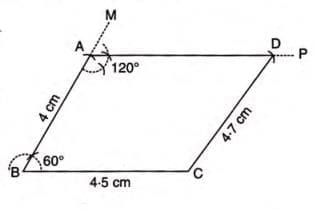
- Draw BC = 4.5 cm.
- At B, construct ∠MBC = 60° and measure BA = 4.0 cm along BM.
- At A, draw AP such that ∠BAP = 120°.
- With C as center and radius 4.7 cm, draw an arc to intersect AP at D.
- Join C to D to form quadrilateral ABCD.
Case 3: Four Sides and One Diagonal
- Construct a triangle using three sides, including the given diagonal.
- Construct another triangle using the remaining two sides and the diagonal.
- Join the appropriate vertices to complete the quadrilateral.
Example: Construct quadrilateral ABCD with AB = 3.0 cm, BC = 4.0 cm, CD = 5.0 cm, DA = 3.5 cm, and diagonal AC = 4.5 cm.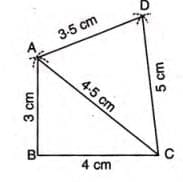
- Construct triangle ABC using AB = 3.0 cm, BC = 4.0 cm, and AC = 4.5 cm.
- Construct triangle ADC using AD = 3.5 cm, DC = 5.0 cm, and AC = 4.5 cm.
- Join the vertices to form quadrilateral ABCD.
Case 4: Three Sides and Two Diagonals
- Construct a triangle using two sides and one diagonal.
- Construct another triangle using the third side and the other diagonal.
- Join the vertices to complete the quadrilateral.
Example: Construct quadrilateral ABCD with AB = 3.5 cm, BC = 3.0 cm, AD = 3.8 cm, diagonal AC = 5.0 cm, and diagonal BD = 4.5 cm.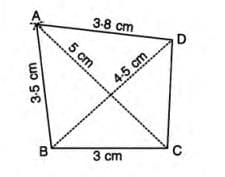
- Construct triangle ABC using AB = 3.5 cm, BC = 3.0 cm, and AC = 5.0 cm.
- Construct triangle ABD using AB = 3.5 cm, AD = 3.8 cm, and BD = 4.5 cm.
- Join C to D to form quadrilateral ABCD.
Construction of Parallelograms
- A parallelogram has opposite sides equal and parallel.
- Diagonals of a parallelogram bisect each other.
Case 1: Two Consecutive Sides and Included Angle
- Construct a triangle with two given sides and the included angle.
- Construct another triangle using the opposite sides (equal to the given sides).
- Join the vertices to form the parallelogram.
Example: Construct parallelogram ABCD with AB = 3.0 cm, BC = 4.0 cm, and ∠B = 60°.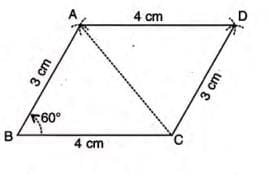
- Construct triangle ABC with AB = 3.0 cm, BC = 4.0 cm, and ∠ABC = 60°.
- Construct triangle ADC with DC = 3.0 cm (equal to AB) and AD = 4.0 cm (equal to BC).
- Join the vertices to form parallelogram ABCD.
Case 2: One Side and Both Diagonals
- Use half the lengths of the diagonals since they bisect each other.
- Construct a triangle with the given side and half-lengths of the diagonals.
- Extend the diagonal segments to locate the remaining vertices.
- Join the vertices to form the parallelogram.
Example: Construct parallelogram ABCD with BC = 4.5 cm, diagonal AC = 5.6 cm, and diagonal BD = 5.0 cm.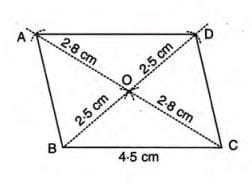
- Construct triangle OBC with OB = ½ × 5.0 cm = 2.5 cm, OC = ½ × 5.6 cm = 2.8 cm, and BC = 4.5 cm.
- Extend BO to D such that OD = OB = 2.5 cm.
- Extend CO to A such that OA = OC = 2.8 cm.
- Join AB, AD, and CD to form parallelogram ABCD.
Case 3: Two Consecutive Sides and One Diagonal
- Construct a triangle with two sides and the given diagonal.
- Construct another triangle using the opposite sides and the same diagonal.
- Join the vertices to form the parallelogram.
Example: Construct parallelogram ABCD with AB = 3.5 cm, BC = 4.5 cm, and diagonal BD = 5.5 cm.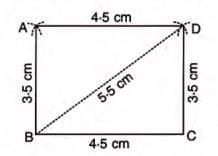
- Construct triangle BCD with BC = 4.5 cm, CD = 3.5 cm (equal to AB), and BD = 5.5 cm.
- Construct triangle BAD with AB = 3.5 cm, AD = 4.5 cm (equal to BC), and BD = 5.5 cm.
- Join the vertices to form parallelogram ABCD.
Case 4: Two Diagonals and Included Angle
- Draw one diagonal and find its midpoint.
- Construct the given angle at the midpoint and measure half the length of the other diagonal.
- Join the vertices to form the parallelogram.
Example: Construct parallelogram ABCD with diagonal AC = 5.4 cm, diagonal BD = 4.8 cm, and angle between diagonals = 60°.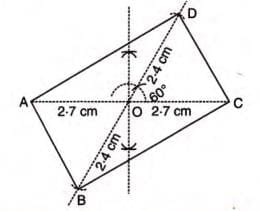
- Draw AC = 5.4 cm and find its midpoint O.
- Draw line BOD such that ∠DOC = 60°, with OB = OD = ½ × 4.8 cm = 2.4 cm.
- Join AB, BC, CD, and DA to form parallelogram ABCD.
Alternate Method for Case 4 (When Half Diagonal is Not Easily Measurable)
- If half the diagonal length (e.g., 2.25 cm) is hard to measure, start with the other diagonal.
- Draw the second diagonal and find its midpoint.
- Construct the given angle at the midpoint and measure half the length of the first diagonal.
- Join the vertices to form the parallelogram.
Example: Construct parallelogram ABCD with diagonal AC = 5.4 cm, diagonal BD = 4.5 cm, and angle between diagonals = 60°.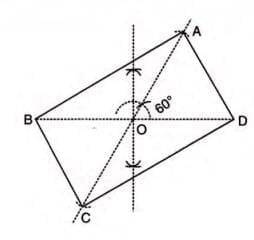
- Draw BD = 4.5 cm and find its midpoint O using the perpendicular bisector.
- Draw line AOC such that ∠AOD = 60°.
- From AOC, measure OA = OC = ½ × 5.4 cm = 2.7 cm.
- Join AB, BC, CD, and DA to form parallelogram ABCD.
Case 5: Two Adjacent Sides and Height
- Draw one side as the base.
- Construct a perpendicular from one end of the base and measure the given height.
- Draw a line parallel to the base through the height point.
- Use the other side's length to locate the remaining vertices on the parallel line.
- Join the vertices to form the parallelogram.
Example: Construct parallelogram ABCD with AB = 3.6 cm, BC = 4.6 cm, and height corresponding to BC = 2.6 cm.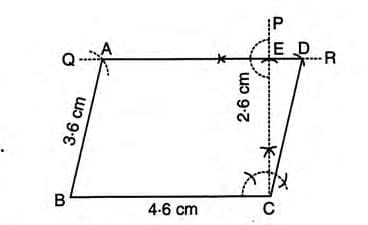
- Draw BC = 4.6 cm.
- At C, draw CP perpendicular to BC.
- From CP, measure CE = 2.6 cm (height).
- Through E, draw QR parallel to BC.
- With B as center and radius 3.6 cm, draw an arc to intersect QR at A.
- With C as center and radius 3.6 cm (equal to AB), draw an arc to intersect QR at D.
- Join AB, AD, and CD to form parallelogram ABCD.
Construction of Trapezium
- A trapezium has one pair of parallel sides.
- Construct the trapezium using the lengths of all four sides, with one pair specified as parallel.
Example: Construct trapezium ABCD with AD parallel to BC, AD = 3.0 cm, AB = 2.5 cm, BC = 5.0 cm, and CD = 2.8 cm.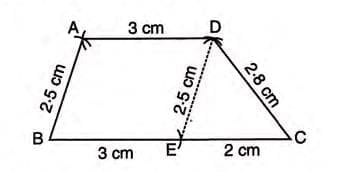
- Draw BC = 5.0 cm.
- From BC, measure BE = 3.0 cm (equal to AD).
- Construct triangle DEC with DE = 2.5 cm (equal to AB) and CD = 2.8 cm.
- With B as center and radius 2.5 cm, and D as center with radius 3.0 cm, draw arcs to intersect at A.
- Join AB and AD to form trapezium ABCD.
Construction of Rectangles
- A rectangle has opposite sides equal and all angles 90°.
- Construct by forming two right-angled triangles sharing a common side.
Case 1: Adjacent Sides
- Construct a right-angled triangle with the two given sides.
- Construct another right-angled triangle using the opposite sides.
- Join the vertices to form the rectangle.
Example: Construct rectangle ABCD with AB = 3.0 cm and BC = 5.0 cm.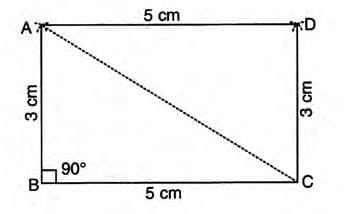
- Construct triangle ABC with AB = 3.0 cm, BC = 5.0 cm, and ∠ABC = 90°.
- Construct triangle ADC with AD = 5.0 cm (equal to BC) and DC = 3.0 cm (equal to AB).
- Join the vertices to form rectangle ABCD.
Case 2: One Side and One Diagonal
- Construct a right-angled triangle with the given side and diagonal.
- Construct another right-angled triangle to complete the rectangle.
- Join the vertices to form the rectangle.
Example: Construct rectangle ABCD with BC = 4.5 cm and diagonal AC = 6.0 cm.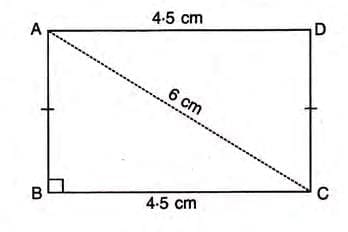
- Construct right-angled triangle ABC with BC = 4.5 cm, AC = 6.0 cm, and ∠ABC = 90°.
- Construct right-angled triangle ADC with DC = 4.5 cm (equal to AB) and AC = 6.0 cm.
- Join the vertices to form rectangle ABCD.
Construction of Rhombus
- A rhombus has all sides equal, and diagonals bisect each other at right angles.
- Construct using the diagonals, as they determine the vertices.
Example: Construct rhombus ABCD with diagonal AC = 6.0 cm and diagonal BD = 4.6 cm.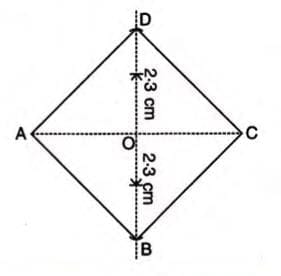
- Draw AC = 6.0 cm.
- Draw the perpendicular bisector of AC to find midpoint O.
- From O, measure OD = OB = ½ × 4.6 cm = 2.3 cm along the bisector.
- Join AB, BC, CD, and DA to form rhombus ABCD.
Alternate Cases for Rhombus
- If one diagonal is not easily divisible (e.g., BD = 4.6 cm gives 2.3 cm, but BD = 4.7 cm gives 2.35 cm, which is hard to measure):
- Start with the measurable diagonal and proceed similarly.
Construction of Square
- A square has equal sides and diagonals that bisect each other at right angles.
- Construct using the same method as a rhombus, as diagonals are equal.
Example: Construct a square with a diagonal of 5.4 cm (same method as rhombus).
- Draw one diagonal, say AC = 5.4 cm.
- Draw the perpendicular bisector of AC to find midpoint O.
- From O, measure OB = OD = ½ × 5.4 cm = 2.7 cm.
- Join AB, BC, CD, and DA to form the square.
Construction of Regular Hexagon
- A regular hexagon has six equal sides and each interior angle is 120°.
- Opposite sides are parallel.
- Three methods are used to construct a regular hexagon.
Method 1: Using Interior Angles
- Draw a side and construct 120° angles at both ends.
- Measure equal sides along these angles.
- Continue constructing 120° angles and sides until all six vertices are located.
- Join the vertices to form the hexagon.
Example: Construct a regular hexagon with side 3.0 cm.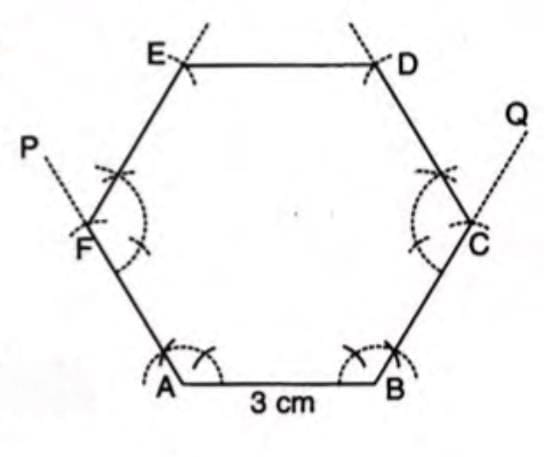
- Draw AB = 3.0 cm.
- At A, draw AP such that ∠PAB = 120°; at B, draw BQ such that ∠ABQ = 120°.
- From AP, measure AF = 3.0 cm; from BQ, measure BC = 3.0 cm.
- At C, construct CD = 3.0 cm with ∠BCD = 120°.
- At F, construct FE = 3.0 cm with ∠AFE = 120°.
- Join E to D to form hexagon ABCDEF.
Method 2: Using Circumcircle
- The side of a regular hexagon equals the radius of its circumcircle.
- Draw a circle with the side length as radius.
- Mark one point on the circumference and use the same radius to mark five more points.
- Join the points to form the hexagon.
Example: Construct a regular hexagon with side 3.0 cm.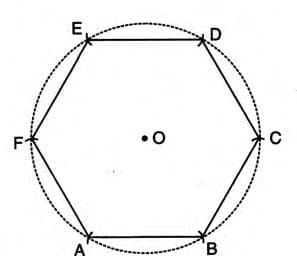
- Draw a circle with radius 3.0 cm.
- Mark point A on the circumference.
- With A as center and radius 3.0 cm, draw arcs to intersect the circle at B and F.
- With B and F as centers, draw arcs to intersect the circle at C and E.
- With C or E as center, draw an arc to intersect the circle at D.
- Join AB, BC, CD, DE, EF, and FA to form hexagon ABCDEF.
Method 3: Using Central Angle
- Each side subtends 60° at the center of the circumcircle (360° ÷ 6 = 60°).
- Construct an isosceles triangle with a 60° angle at the center.
- Draw a circle with the side length as radius.
- Mark points on the circle using the side length as radius.
- Join the points to form the hexagon.
Example: Construct a regular hexagon with side 3.0 cm.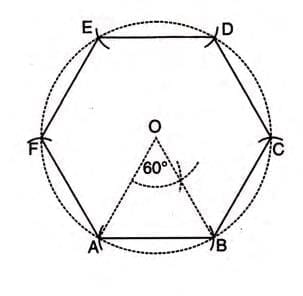
- Draw a circle with center O and radius 3.0 cm.
- Construct isosceles triangle AOB with AB = 3.0 cm and ∠AOB = 60°.
- With B as center and radius 3.0 cm, draw an arc to intersect the circle at C.
- With C as center and radius 3.0 cm, draw an arc to intersect the circle at D.
- Continue to get points E and F.
- Join AB, BC, CD, DE, EF, and FA to form hexagon ABCDEF.
FAQs on Chapter Notes: Construction of Polygons
| 1. What are the steps involved in constructing a parallelogram? |  |
| 2. How can a rectangle be constructed using only a compass and a straightedge? | |
| 3. What distinguishes a rhombus from other quadrilaterals in terms of construction? | |
| 4. Can you explain the procedure for constructing a regular hexagon? | |
| 5. What are the key characteristics of a trapezium that should be considered during construction? | |