How to Walk Into Any Room Like You Belong There


Body language and presence are critical non-verbal communication tools that shape how others perceive you and how confident you feel. Research shows that 55% of communication impact comes from body language, 38% from tone of voice, and only 7% from words. Mastering your physical presence can dramatically boost your confidence and social effectiveness. These skills are especially important during social interactions, presentations, interviews, and daily conversations.
1. Posture and Its Impact
Posture is the position and alignment of your body when standing, sitting, or moving. Good posture communicates confidence, alertness, and respect. Poor posture signals low energy, disinterest, or lack of self-assurance.
1.1 Power Posture Basics
- Standing Posture: Keep your spine straight, shoulders rolled back and down (not hunched), chin parallel to ground. Weight should be evenly distributed on both feet, hip-width apart. Avoid locking knees.
- Sitting Posture: Sit upright with back against chair support. Both feet flat on floor, knees at 90-degree angle. Avoid slouching or leaning too far back. Keep shoulders relaxed but not rounded forward.
- Walking Posture: Head up, eyes forward (not down at feet), shoulders back. Take purposeful steps with steady pace. Swing arms naturally at sides.
- The Two-Minute Rule: Holding a confident posture for just 2 minutes before important events can increase testosterone (dominance hormone) by 20% and decrease cortisol (stress hormone) by 25%.
1.2 Common Posture Mistakes
- Slouching or Hunching: Rounded shoulders and bent spine signal low confidence and tiredness. Creates impression of trying to make yourself smaller.
- Crossed Arms Barrier: While comfortable, crossed arms create a defensive barrier. Others perceive you as closed-off, unapproachable, or disagreeable.
- Fidgeting and Shifting: Constantly shifting weight, swaying, or bouncing shows nervousness and lack of groundedness. Stand or sit still with purpose.
- Head Down Position: Looking down frequently or keeping chin tucked suggests submissiveness, shame, or lack of confidence.
1.3 Power Poses for Confidence Boost
Power poses are body positions that occupy more space and signal dominance. Practice these before important events:
- The Superman/Wonder Woman: Stand with feet wide apart, hands on hips, chest out, chin lifted. Hold for 2 minutes.
- The Victory Stance: Stand with arms raised in a V-shape above head, chin up. Mimics celebration posture of winners.
- The Executive Lean: While sitting, lean back in chair with hands behind head, elbows out. Projects authority and relaxation.
- The Expansive Stance: Take up more space by spreading out belongings, stretching legs forward when sitting, using armrests fully.
2. Eye Contact Mastery
Eye contact is direct visual connection between two people's eyes. It is one of the most powerful non-verbal communication tools. Proper eye contact builds trust, shows confidence, and creates connection.
2.1 Eye Contact Rules and Guidelines
- The 50-70% Rule: Maintain eye contact for 50-70% of conversation duration. Too little appears shifty or disinterested; too much feels aggressive or intense.
- The 4-5 Second Hold: Hold eye contact for 4-5 seconds, then briefly look away naturally. This prevents staring while maintaining engagement.
- Triangle Technique: If direct eye contact feels intense, look at an imaginary triangle formed by both eyes and mouth. Switch focus points naturally within this triangle.
- While Speaking vs Listening: Make eye contact 40-60% of time while speaking (you need to organize thoughts). Make eye contact 60-70% while listening (shows attention and respect).
2.2 Eye Contact in Different Situations
- One-on-One Conversations: Maintain steady eye contact with natural breaks. Look away briefly when thinking, then return focus to speaker.
- Group Conversations: Distribute eye contact among all participants. Spend 3-5 seconds with each person while speaking. Focus on person currently speaking when listening.
- Presentations or Public Speaking: Use the 3-Second Sweep Method. Make eye contact with one person for 3 seconds, then move to another section of audience. Creates feeling of personal connection with everyone.
- First Meetings or Introductions: Make strong initial eye contact during handshake and greeting. This creates positive first impression and signals confidence.
2.3 Common Eye Contact Mistakes
- The Darting Eyes: Constantly shifting gaze around room suggests nervousness, dishonesty, or discomfort. Signals lack of confidence and trustworthiness.
- The Floor Gazer: Looking down frequently or avoiding eye contact appears submissive, ashamed, or disinterested. Especially damaging in conversations.
- The Intense Stare: Unbroken, unwavering eye contact for too long feels aggressive, intimidating, or inappropriate. Makes others uncomfortable.
- Looking Over Shoulder: Glancing past person or around room while they speak signals disinterest, rudeness, or desire to be elsewhere.
2.4 Building Eye Contact Confidence
- Mirror Practice: Practice maintaining eye contact with yourself in mirror for 30 seconds daily. Gradually increase duration.
- TV Exercise: Watch news anchors or interviewers and practice maintaining eye contact with screen. Notice their natural patterns.
- Color Recognition Game: When meeting someone, try to remember their eye color. This forces you to make eye contact naturally.
- Progressive Exposure: Start with brief eye contact with strangers (shopkeepers, bus drivers), then friends, then challenging situations.
3. Effective Gestures and Hand Movements
Gestures are purposeful hand and arm movements used to emphasize speech, express emotions, and communicate meaning. Effective gestures enhance communication; poor gestures distract or undermine your message.
3.1 Positive and Confident Gestures
- Open Palm Gestures: Showing palms while speaking signals honesty, openness, and trustworthiness. Use when explaining or persuading.
- Steepling Fingers: Fingertips touching to form pyramid shape shows confidence, authority, and thoughtfulness. Common in business settings.
- Hand at Chest Level: Gesturing between waist and shoulder height appears natural and engaging. This is the truth plane where honest communication happens.
- Purposeful Pointing: Using index finger to emphasize points shows conviction and clarity. Use sparingly to highlight key messages.
- Counting on Fingers: Enumerating points using fingers helps audience follow your structure and makes you appear organized.
3.2 Negative Gestures to Avoid
- Hidden Hands: Keeping hands in pockets, behind back, or under table suggests nervousness, dishonesty, or withholding information.
- Self-Touching Gestures: Touching face, neck, or hair repeatedly signals anxiety, discomfort, or lying. Includes rubbing neck, covering mouth, scratching.
- Finger-Pointing Aggressively: Jabbing finger toward others appears accusatory, aggressive, or hostile. Replace with open-palm gestures.
- Fidgeting Movements: Playing with pen, tapping fingers, clicking pen, adjusting clothes constantly shows nervousness and distracts listeners.
- Fig Leaf Position: Holding hands clasped at groin level creates protective barrier and signals vulnerability or discomfort.
3.3 The Gesture Box Technique
The Gesture Box is an imaginary space where your hand movements should stay for maximum effectiveness:
- Top Boundary: Shoulder height. Gestures above this appear exaggerated or overly emotional.
- Bottom Boundary: Waist level. Gestures below this lose visibility and impact.
- Side Boundaries: Slightly wider than body width. Gestures too wide appear uncontrolled; too narrow appears restricted.
- Depth Boundary: Keep hands within arm's length in front of body. Gestures too close to body appear nervous; too far appears aggressive.
3.4 Matching Gestures to Communication
- Descriptive Gestures: Use hands to show size, shape, direction, or quantity of what you're describing. Makes abstract concepts concrete.
- Emphatic Gestures: Use downward palm movements or closed fist to emphasize important points. Adds weight to key messages.
- Inclusive Gestures: Use open, sweeping arm movements when referring to groups or audiences. Creates sense of connection and belonging.
- Rhythm Gestures: Use hand movements that match speech rhythm and cadence. Creates natural flow and keeps audience engaged.
4. Creating Strong First Impressions
First impressions are initial judgments formed about a person within the first few seconds of meeting. Research shows people form first impressions in just 7 seconds, and these impressions are hard to change later. Your body language dominates this crucial window.
4.1 The First 7 Seconds
The critical elements that create immediate impression:
- Entry and Approach: Walk confidently with head up, shoulders back. Move with purpose, not rushing or hesitating. Your entrance sets the tone.
- The Greeting Triangle: Three simultaneous elements create powerful greeting: (1) Smile genuinely, (2) Make direct eye contact, (3) Offer firm handshake. This combination signals warmth and confidence.
- The Confident Handshake: Use full palm contact (not just fingers), firm grip (not crushing), 2-3 pumps, maintain eye contact throughout, release promptly.
- Initial Positioning: Stand at comfortable distance (arm's length for professional settings, closer for social). Face person directly with open stance.
4.2 The Halo Effect in First Impressions
The Halo Effect means one positive trait influences perception of all other traits. Confident body language creates positive halo:
- Confidence = Competence Assumption: People who display confident body language are automatically assumed to be more capable, intelligent, and skilled.
- Attractiveness Spillover: Good posture and presence make you appear more physically attractive, which influences other judgments positively.
- Authority Perception: Taking up appropriate space and using purposeful gestures makes others perceive you as more authoritative and leadership-worthy.
- Likability Factor: Open body language, genuine smile, and good eye contact create immediate likability that colors all subsequent interactions.
4.3 Body Language Checklist for First Meetings
Use this mental checklist before important first meetings:
- Pre-Meeting Power Pose: Spend 2 minutes in power pose before entering. Boosts confidence hormones.
- Entry Posture Check: Shoulders back, chin up, relaxed face. Take deep breath before entering room.
- Smile Activation: Activate genuine smile (think of something pleasant). Genuine smiles engage eye muscles (crow's feet appear).
- Eye Contact Commitment: Decide to hold eye contact for first 3-5 seconds of greeting without breaking.
- Handshake Ready: Keep right hand free and accessible. Wipe hands if sweaty. Prepare for full palm contact.
- Voice Preparation: Clear throat if needed. Plan first sentence. Ensure voice comes from diaphragm (deeper, more confident).
4.4 Reading Others' First Impression Signals
Recognize how others perceive you based on their body language responses:
- Positive Reception Signs: They lean slightly toward you, maintain eye contact, smile genuinely, mirror your posture, face you directly with open stance.
- Neutral Reception Signs: Polite but minimal eye contact, slight distance maintained, formal posture, limited mirroring, professional but not warm.
- Negative Reception Signs: Body angled away, arms crossed, minimal eye contact, no smile, creating physical distance, checking phone or watch.
- Adjustment Strategy: If receiving negative signals, increase warmth (smile more), reduce intensity (give more space), match their energy level initially before gradually lifting it.
5. Presence and Personal Space Management
Presence is the quality of commanding attention and respect through your physical being. Personal space management involves understanding and respecting invisible boundaries around people's bodies.
5.1 The Four Zones of Personal Space
Understanding spatial zones helps you position yourself appropriately:
- Intimate Zone (0-45 cm): Reserved for close relationships (family, romantic partners, very close friends). Entering uninvited feels invasive.
- Personal Zone (45 cm - 1.2 m): For friends and friendly social interactions. Comfortable conversation distance for people you know.
- Social Zone (1.2 m - 3.6 m): Professional interactions, casual acquaintances, group settings. Standard for classrooms, meetings, parties.
- Public Zone (3.6 m+): For public speaking, performances, addressing groups. One person speaks to many listeners.
5.2 Building Commanding Presence
- Grounding Technique: Feel your feet firmly planted on ground. Imagine roots growing from feet into earth. This physical sensation creates mental stability and presence.
- Centered Breathing: Breathe from diaphragm (belly expands, not chest). Slow, deep breaths calm nervous system and enhance presence. Visible shallow chest breathing signals anxiety.
- Deliberate Movement: Move purposefully, not frantically. Pause before responding. Avoid rushed movements that signal nervousness. Controlled movement suggests confidence.
- Spatial Awareness: Be conscious of how much space you occupy. Confident people take appropriate space without apologizing. Avoid making yourself smaller unnecessarily.
- Vocal Grounding: Lower pitch slightly (not artificially). Speak from chest/diaphragm, not throat. Deeper voices are perceived as more authoritative and confident.
5.3 Mirroring and Rapport Building
Mirroring is subtly matching another person's body language to build rapport and connection. When done naturally, it creates unconscious sense of familiarity and trust:
- Posture Matching: If they sit forward, you sit forward after brief delay. If they lean back, you gradually do same. Don't copy immediately or obviously.
- Gesture Mirroring: Match general energy level and gesture frequency. If they use animated gestures, increase yours moderately. If reserved, tone yours down.
- Pace Synchronization: Match their speaking speed and movement tempo. Fast talkers prefer faster pace; thoughtful speakers prefer slower pace.
- The 5-Second Delay Rule: Wait 5-10 seconds before mirroring to avoid obvious copying. Make it natural and selective, not exact imitation.
- Breaking Rapport Consciously: To signal disagreement or end conversation, deliberately break mirroring pattern. Change posture, create distance, shift body angle.
5.4 Territorial Confidence
How you occupy physical space signals your confidence level:
- Claiming Your Space: In new environments, place belongings to mark your territory. Spread out appropriately. Don't huddle into smallest possible area.
- Furniture Usage: Use chair fully (back support, armrests). Don't perch on edge unless intentionally showing temporary presence.
- Standing Territory: Stand still and grounded rather than shifting constantly. Plant feet firmly rather than staying on toes ready to flee.
- Table Territory: In meetings, place notepad, water bottle, or hands on table surface. This stakes your legitimate claim to space.
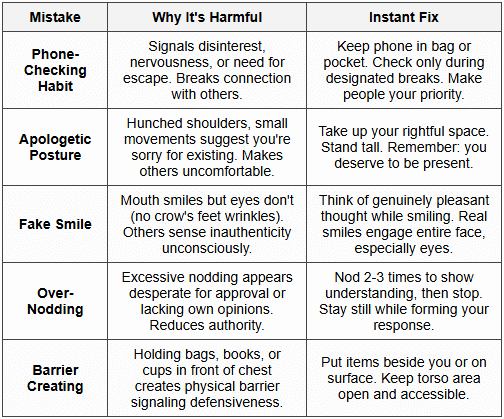
6. Common Body Language Traps and Solutions
These are frequent mistakes teenagers make that undermine their confidence and presence:
6.1 The Confidence Killers
6.2 The Anxiety Leakage Points
Anxiety shows through specific body language tells. Recognize and eliminate these:
- Face Touching: Rubbing nose, covering mouth, touching ear signals discomfort or dishonesty. Keep hands away from face.
- Neck Stress: Rubbing back of neck, massaging throat shows stress and vulnerability. Resist this self-soothing gesture.
- Pacifying Behaviors: Playing with jewelry, hair-twirling, adjusting clothes are nervous energy releases. Channel energy into purposeful gestures instead.
- Foot Movements: Tapping feet, bouncing legs, pointing feet toward exit reveals desire to escape. Ground feet firmly.
- Ventilating Actions: Pulling collar away from neck, fanning yourself suggests overheating from stress. Use slow breathing to cool down instead.
6.3 The Confidence-Anxiety Paradox
Trap Alert: Many students think they need to feel confident first before displaying confident body language. Reality is opposite: confident body language creates confident feelings. This is called embodied cognition.
- Act First, Feel Later: Your brain receives feedback from your body posture. Standing powerfully triggers brain to release confidence chemicals.
- Fake It Till You Make It: Research proves that adopting confident posture for 2 minutes changes your hormone levels, even if you feel anxious.
- The 60-Second Rule: Maintaining confident body language for just 60 seconds starts shifting your internal emotional state.
- Feedback Loop: Confident body → Brain registers safety → Reduces anxiety → Easier to maintain confident body → Cycle reinforces.
7. Practice Techniques for Body Language Mastery
Consistent practice transforms conscious effort into automatic habits. These techniques build lasting body language skills.
7.1 Mirror Training Routine
- Daily Posture Check (2 minutes): Stand before full-length mirror. Adjust posture to ideal position. Memorize how correct posture feels physically.
- Expression Practice (3 minutes): Practice different expressions (friendly, serious, enthusiastic). Ensure eyes match mouth in emotional expression.
- Gesture Rehearsal (3 minutes): Practice gestures you'll use in upcoming presentation or conversation. Check they stay within gesture box.
- Eye Contact Exercise (2 minutes): Maintain eye contact with mirror reflection for gradually increasing durations. Build tolerance for sustained contact.
7.2 Video Recording Analysis
- Record Yourself: Use phone to record yourself having conversation or giving presentation. Watch without sound first to see pure body language.
- Identify Patterns: Note repeated nervous gestures, poor posture moments, weak eye contact instances. List top 3 issues to address.
- Weekly Comparison: Record same situation weekly. Track improvement in targeted areas. Celebrate progress to maintain motivation.
- Model Analysis: Watch videos of confident speakers or leaders. Note their body language patterns. Practice incorporating their effective techniques.
7.3 Real-World Progressive Practice
Build skills gradually through increasingly challenging situations:
- Level 1 - Low Stakes: Practice confident body language with family members, close friends, or in front of mirror. Build foundation safely.
- Level 2 - Public Practice: Use confident posture and eye contact with shopkeepers, bus conductors, restaurant staff. Brief, low-consequence interactions.
- Level 3 - Social Situations: Apply skills in classroom discussions, group projects, casual social gatherings. Moderate stakes, familiar people.
- Level 4 - High Stakes: Use all techniques in presentations, interviews, meeting new people, leadership situations. High impact opportunities.
7.4 The Habit Stacking Method
Link body language practice to existing daily habits:
- Doorway Posture Reset: Every time you pass through doorway, do quick posture check (shoulders back, chin up). Multiple daily reminders.
- Conversation Eye Contact Goal: In each conversation, set goal to notice other person's eye color. Forces intentional eye contact.
- Morning Power Pose Ritual: Add 2-minute power pose to morning routine. Link it to existing habit (after brushing teeth, before breakfast).
- Phone Check Replacement: Instead of checking phone during waiting time, practice observing people's body language. Builds awareness.
Mastering body language and presence is not about becoming someone else-it's about removing barriers that hide your natural confidence. Your body language should align with your genuine emotions and intentions. As you practice these techniques consistently, they become automatic and authentic. Remember that everyone feels nervous sometimes; the difference is that confident people have trained their bodies to project calm and capability despite internal feelings. Start with one or two areas (perhaps posture and eye contact), master those, then gradually expand your skills. Small improvements in body language create surprisingly large improvements in how others perceive you and, more importantly, how you perceive yourself.