State Management


State management is the system of controlling how data flows through your SwiftUI app and how changes to that data trigger UI updates. In SwiftUI, the UI is a function of state-when state changes, SwiftUI automatically recomputes and redraws the affected views. Understanding state management is essential because almost every interactive app needs to respond to user input, update data, and reflect those changes on screen. This document covers the core property wrappers and patterns SwiftUI provides for managing state at different scopes, from simple view-local state to shared app-wide data.
1. Overview
1.1 What State Management Is
State management refers to how you store, update, and share data that affects what users see on screen. In SwiftUI, views are structs, which are value types and immutable by default. This means you cannot directly change properties inside a view. SwiftUI solves this with special property wrappers that let you declare mutable state and automatically refresh the UI when that state changes.
1.2 Why It Matters in Real iOS Development
- Dynamic UIs: Most apps need to respond to user actions-tapping buttons, typing text, toggling settings. State management is how you handle these interactions.
- Data Flow: Apps often need to share data between multiple screens or components. Proper state management prevents bugs, duplicate data, and spaghetti code.
- Performance: SwiftUI only re-renders views whose state has changed. Understanding state helps you build efficient, responsive apps.
- SwiftUI's Declarative Nature: You describe what the UI should look like for a given state, not how to change it step-by-step. State management is the glue that makes this work.
1.3 Where It Fits in the Bigger Picture
State management sits at the heart of SwiftUI app architecture. It connects your data model to your views and controls how data flows through your app's hierarchy. When building iOS apps, you'll use state management for:
- Form inputs and validation
- Navigation and modal presentation
- Fetching and displaying data from APIs
- User preferences and settings
- Shopping carts, to-do lists, and any app-specific data
1.4 Prerequisites
Before diving into state management, you should already understand:
- Swift basics: structs, classes, properties, functions, closures
- SwiftUI fundamentals: creating views, using basic modifiers, understanding the view hierarchy
- The difference between value types (structs) and reference types (classes)
- Basic understanding of SwiftUI's declarative syntax
2. Core Concepts
2.1 The Problem: Views Are Immutable Structs
SwiftUI views are structs. Structs are value types, meaning their properties are immutable by default. If you try to change a property inside a view's body, Swift will throw a compiler error. This is intentional-SwiftUI views are meant to be lightweight, disposable descriptions of the UI, not long-lived objects that hold state.
2.2 The Solution: Property Wrappers for State
SwiftUI provides several property wrappers that manage state for you. A property wrapper is a Swift feature that adds extra behavior to a property. When you mark a property with a state property wrapper, SwiftUI handles storing and updating that value, and automatically refreshes any views that depend on it.
2.3 Key Property Wrappers for State Management
2.3.1 @State
@State is used for simple, view-local state that is owned by a single view. It tells SwiftUI to store this value separately and allow the view to mutate it. When the @State property changes, SwiftUI re-renders the view.
- Scope: Private to the view that declares it
- Ownership: The view owns and controls this state
- Use case: Temporary UI state like toggle switches, text field inputs, counters
- Type: Value types (Int, String, Bool, custom structs)
2.3.2 @Binding
@Binding creates a two-way connection to a @State property owned by another view. It allows a child view to read and write a value owned by its parent. Think of it as a reference to someone else's state-you can read it and change it, but you don't own it.
- Scope: Passed from parent to child
- Ownership: The parent owns the state; the child borrows it
- Use case: Reusable components that need to modify state owned by their parent
- Syntax: Pass a @State property using the $ prefix to create a binding
2.3.3 @StateObject
@StateObject is used for reference type objects (classes) that conform to the ObservableObject protocol. It tells SwiftUI that this view owns the object and should keep it alive for the lifetime of the view. When properties marked with @Published inside the object change, SwiftUI refreshes the view.
- Scope: Owned by the view that declares it
- Ownership: The view creates and owns the object
- Use case: Complex state, view models, business logic, network managers
- Type: Classes conforming to ObservableObject
2.3.4 @ObservedObject
@ObservedObject is similar to @StateObject, but the view does not own the object-it's passed in from outside. Use this when a parent view creates an ObservableObject and passes it to a child.
- Scope: Passed from parent to child
- Ownership: The parent or a higher-level view owns the object
- Use case: Sharing an observable object across multiple views
- Warning: If the parent view recreates, the object might be lost unless owned by a @StateObject higher up
2.3.5 @EnvironmentObject
@EnvironmentObject allows you to share an ObservableObject across many views without passing it explicitly through every initializer. You inject the object into the environment at a high level, and any descendant view can access it.
- Scope: Available to all descendant views in the hierarchy
- Ownership: Typically owned by the app or root view
- Use case: App-wide shared state like user authentication, theme settings, global data models
- Caution: The object must be injected using
.environmentObject()or the app will crash at runtime
2.3.6 @AppStorage
@AppStorage is a property wrapper that reads and writes values to UserDefaults automatically. It's a convenient way to persist simple user preferences without manually managing UserDefaults.
- Scope: Persisted across app launches
- Use case: User settings, preferences, small pieces of saved data
- Type: Supports Int, Double, String, Bool, Data, and URL
2.4 ObservableObject and @Published
For complex state, you create a class that conforms to the ObservableObject protocol. Inside this class, mark properties with @Published to tell SwiftUI to watch them for changes. Whenever a @Published property changes, SwiftUI notifies all views observing this object and refreshes them.
2.5 How SwiftUI Detects Changes
SwiftUI uses a dependency graph to track which views depend on which pieces of state. When state changes:
- SwiftUI marks the affected views as needing an update
- SwiftUI recomputes the body of those views
- SwiftUI compares the new view hierarchy to the old one (diffing)
- SwiftUI applies only the changes to the actual UI on screen
This process is automatic and extremely fast, allowing for smooth, reactive UIs.
3. Code Examples
3.1 @State - View-Local State
3.1.1 Minimal Example: Counter
Demonstrates: Using @State to store and update a simple integer
swift import SwiftUI struct CounterView: View { @State private var count = 0 // @State allows this view to mutate count var body: some View { VStack { Text("Count: \(count)") .font(.largeTitle) Button("Increment") { count += 1 // Mutating @State triggers a view refresh } } .padding() } }Expected Behavior: Displays "Count: 0" initially. Each tap on "Increment" increases the number by 1 and updates the Text view automatically.
3.1.2 Realistic Example: Toggle Switch
Demonstrates: Using @State to control a toggle and conditionally display content
swift import SwiftUI struct SettingsView: View { @State private var notificationsEnabled = false var body: some View { VStack(alignment: .leading, spacing: 20) { Toggle("Enable Notifications", isOn: $notificationsEnabled) .padding() if notificationsEnabled { Text("You will receive push notifications") .foregroundColor(.green) .padding() } else { Text("Notifications are turned off") .foregroundColor(.gray) .padding() } } .padding() } }Expected Behavior: The toggle switch controls the boolean. When on, the green message appears; when off, the gray message appears. The UI updates instantly when the toggle is tapped.
3.2 @Binding - Two-Way Data Flow
3.2.1 Minimal Example: Reusable Text Field
Demonstrates: Using @Binding to allow a child view to modify a parent's @State
swift import SwiftUI // Child view that accepts a Binding struct CustomTextField: View { @Binding var text: String // This is a reference to the parent's @State var placeholder: String var body: some View { TextField(placeholder, text: $text) .textFieldStyle(RoundedBorderTextFieldStyle()) .padding() } } // Parent view that owns the state struct ParentView: View { @State private var username = "" // Parent owns this state var body: some View { VStack { CustomTextField(text: $username, placeholder: "Enter username") // The $ creates a Binding from @State Text("Hello, \(username)") .padding() } } }Expected Behavior: Typing in the text field updates the username @State in ParentView, which then updates the Text view below. The child component modifies the parent's state via the Binding.
3.2.2 Realistic Example: Volume Slider Component
Demonstrates: Binding used for a reusable slider control
swift import SwiftUI struct VolumeSlider: View { @Binding var volume: Double var body: some View { VStack { Text("Volume: \(Int(volume))%") .font(.headline) Slider(value: $volume, in: 0...100, step: 1) .padding() } } } struct AudioPlayerView: View { @State private var currentVolume: Double = 50 var body: some View { VStack(spacing: 30) { Text("Audio Player") .font(.title) VolumeSlider(volume: $currentVolume) Text("Current system volume: \(Int(currentVolume))%") .foregroundColor(.secondary) } .padding() } }Expected Behavior: Dragging the slider changes the currentVolume @State in AudioPlayerView. Both the slider label and the text below update in real time.
3.3 @StateObject - Owning an Observable Object
3.3.1 Minimal Example: Simple View Model
Demonstrates: Using @StateObject to own a class-based data model
swift import SwiftUI // ObservableObject class with @Published property class CounterViewModel: ObservableObject { @Published var count = 0 // When count changes, SwiftUI updates views func increment() { count += 1 } } struct CounterWithViewModelView: View { @StateObject private var viewModel = CounterViewModel() // @StateObject ensures the view owns and keeps this object alive var body: some View { VStack { Text("Count: \(viewModel.count)") .font(.largeTitle) Button("Increment") { viewModel.increment() } } .padding() } }Expected Behavior: Identical to the simple @State counter, but the logic is now in a separate ViewModel class. The view owns the ViewModel and updates when the @Published count changes.
3.3.2 Realistic Example: Task List Manager
Demonstrates: Using @StateObject for a more complex data model with business logic
swift import SwiftUI struct Task: Identifiable { let id = UUID() var title: String var isCompleted: Bool } class TaskListViewModel: ObservableObject { @Published var tasks: [Task] = [] func addTask(_ title: String) { let newTask = Task(title: title, isCompleted: false) tasks.append(newTask) } func toggleCompletion(for task: Task) { if let index = tasks.firstIndex(where: { $0.id == task.id }) { tasks[index].isCompleted.toggle() } } } struct TaskListView: View { @StateObject private var viewModel = TaskListViewModel() @State private var newTaskTitle = "" var body: some View { NavigationView { VStack { HStack { TextField("New task", text: $newTaskTitle) .textFieldStyle(RoundedBorderTextFieldStyle()) Button("Add") { viewModel.addTask(newTaskTitle) newTaskTitle = "" } .disabled(newTaskTitle.isEmpty) } .padding() List(viewModel.tasks) { task in HStack { Image(systemName: task.isCompleted ? "checkmark.circle.fill" : "circle") .foregroundColor(task.isCompleted ? .green : .gray) .onTapGesture { viewModel.toggleCompletion(for: task) } Text(task.title) .strikethrough(task.isCompleted) } } } .navigationTitle("Tasks") } } }Expected Behavior: Users can type a task title and tap "Add" to add it to the list. Tapping the circle icon toggles completion status, updating the checkmark and strikethrough styling. All state is managed in the ViewModel.
3.4 @ObservedObject - Observing a Passed Object
3.4.1 Minimal Example: Passing a ViewModel to Child
Demonstrates: Using @ObservedObject when the parent owns the object
swift import SwiftUI class SharedCounter: ObservableObject { @Published var count = 0 } struct ParentCounterView: View { @StateObject private var counter = SharedCounter() // Parent owns var body: some View { VStack { Text("Parent View") .font(.headline) Text("Count: \(counter.count)") Button("Increment in Parent") { counter.count += 1 } Divider().padding() ChildCounterView(counter: counter) // Pass to child } .padding() } } struct ChildCounterView: View { @ObservedObject var counter: SharedCounter // Child observes var body: some View { VStack { Text("Child View") .font(.headline) Text("Count: \(counter.count)") Button("Increment in Child") { counter.count += 1 } } } }Expected Behavior: Both parent and child display the same count. Tapping the button in either view updates the count everywhere, because they share the same ObservableObject instance.
3.5 @EnvironmentObject - App-Wide Shared State
3.5.1 Minimal Example: User Authentication State
Demonstrates: Using @EnvironmentObject to share data across the app
swift import SwiftUI class AuthManager: ObservableObject { @Published var isLoggedIn = false @Published var username = "" func login(username: String) { self.username = username self.isLoggedIn = true } func logout() { self.username = "" self.isLoggedIn = false } } struct ContentView: View { @StateObject private var authManager = AuthManager() var body: some View { Group { if authManager.isLoggedIn { HomeView() } else { LoginView() } } .environmentObject(authManager) // Inject into environment } } struct LoginView: View { @EnvironmentObject var authManager: AuthManager // Access from environment @State private var usernameInput = "" var body: some View { VStack(spacing: 20) { Text("Login") .font(.largeTitle) TextField("Username", text: $usernameInput) .textFieldStyle(RoundedBorderTextFieldStyle()) .padding() Button("Log In") { authManager.login(username: usernameInput) } .disabled(usernameInput.isEmpty) } .padding() } } struct HomeView: View { @EnvironmentObject var authManager: AuthManager var body: some View { VStack(spacing: 20) { Text("Welcome, \(authManager.username)!") .font(.title) Button("Log Out") { authManager.logout() } } .padding() } }Expected Behavior: The app shows LoginView if not logged in. After entering a username and tapping "Log In", the app switches to HomeView. Tapping "Log Out" returns to LoginView. The AuthManager object is shared across all views via @EnvironmentObject.
3.6 @AppStorage - Persisting User Preferences
3.6.1 Minimal Example: Dark Mode Toggle
Demonstrates: Using @AppStorage to save a boolean preference
swift import SwiftUI struct ThemeSettingsView: View { @AppStorage("isDarkMode") private var isDarkMode = false // Automatically reads/writes to UserDefaults with key "isDarkMode" var body: some View { VStack(spacing: 20) { Text("App Theme") .font(.title) Toggle("Dark Mode", isOn: $isDarkMode) .padding() Text("Your preference is saved automatically") .font(.caption) .foregroundColor(.secondary) } .padding() .preferredColorScheme(isDarkMode ? .dark : .light) } }Expected Behavior: The toggle state is saved to UserDefaults. If you close the app and reopen it, the toggle will be in the same position. The color scheme changes based on the toggle.
3.6.2 Realistic Example: User Settings Panel
Demonstrates: Multiple @AppStorage properties for different preferences
swift import SwiftUI struct UserSettingsView: View { @AppStorage("username") private var username = "Guest" @AppStorage("notificationsEnabled") private var notificationsEnabled = true @AppStorage("fontSize") private var fontSize = 16.0 var body: some View { NavigationView { Form { Section(header: Text("Profile")) { TextField("Username", text: $username) } Section(header: Text("Notifications")) { Toggle("Enable Notifications", isOn: $notificationsEnabled) } Section(header: Text("Display")) { Stepper("Font Size: \(Int(fontSize))", value: $fontSize, in: 12...24) Text("Sample Text") .font(.system(size: fontSize)) } } .navigationTitle("Settings") } } }Expected Behavior: All changes are persisted automatically. Quitting and relaunching the app preserves username, notification preference, and font size. Each @AppStorage property maps to a separate UserDefaults key.
4. Common Mistakes & Pitfalls
4.1 Mistake: Using @ObservedObject Instead of @StateObject for Ownership
❌ WRONG:
swift struct ContentView: View { @ObservedObject var viewModel = MyViewModel() // Bug! // This object can be destroyed and recreated unexpectedly var body: some View { Text("Count: \(viewModel.count)") } }Why it's wrong: When SwiftUI recreates the view (which happens often), it will create a new instance of MyViewModel, losing the previous state. @ObservedObject does not have ownership semantics.
✅ CORRECT:
swift struct ContentView: View { @StateObject var viewModel = MyViewModel() // Correct! // SwiftUI ensures this object survives view updates var body: some View { Text("Count: \(viewModel.count)") } }Rule: Use @StateObject when you create the object. Use @ObservedObject only when the object is passed in from outside.
4.2 Mistake: Forgetting the $ Prefix for Bindings
❌ WRONG:
swift struct ParentView: View { @State private var text = "" var body: some View { ChildView(inputText: text) // Compiler error: expected BindingWhy it's wrong: The child expects a Binding, but you're passing the raw value. Bindings allow two-way communication.
✅ CORRECT:
swift struct ParentView: View { @State private var text = "" var body: some View { ChildView(inputText: $text) // $ creates a Binding } }Rule: Use the $ prefix to project a @State or @StateObject property into a Binding.
4.3 Mistake: Missing .environmentObject() Injection
❌ WRONG:
swift @main struct MyApp: App { var body: some Scene { WindowGroup { ContentView() // Forgot to inject environment object } } } struct ContentView: View { @EnvironmentObject var settings: AppSettings // Will crash at runtime! var body: some View { Text("Hello") } }Why it's wrong: If you use @EnvironmentObject but never inject the object with .environmentObject(), the app will crash with a fatal error at runtime.
✅ CORRECT:
swift @main struct MyApp: App { @StateObject private var settings = AppSettings() var body: some Scene { WindowGroup { ContentView() .environmentObject(settings) // Inject here } } }Rule: Always inject @EnvironmentObject instances at the root or at a high-level ancestor view.
4.4 Mistake: Mutating @State Directly in Initializer
❌ WRONG:
swift struct ContentView: View { @State private var count = 0 init() { count = 10 // Compiler error: cannot mutate @State in init } var body: some View { Text("Count: \(count)") } }Why it's wrong: @State is a property wrapper that manages storage internally. You cannot set it directly in the initializer.
✅ CORRECT:
swift struct ContentView: View { @State private var count = 0 init() { _count = State(initialValue: 10) // Use the underscore to access the wrapper } var body: some View { Text("Count: \(count)") } }Better approach: Set the initial value inline when declaring the property, or use .onAppear to set state after the view appears.
4.5 Mistake: Making @State Properties Non-Private
❌ WRONG:
swift struct ContentView: View { @State var isOn = false // Should be private var body: some View { Toggle("Switch", isOn: $isOn) } }Why it's wrong: @State is meant to be internal to the view. Exposing it publicly breaks encapsulation and makes it unclear who owns the state.
✅ CORRECT:
swift struct ContentView: View { @State private var isOn = false // Keep it private var body: some View { Toggle("Switch", isOn: $isOn) } }Rule: Always mark @State and @StateObject properties as private unless you have a specific reason to expose them.
5. Best Practices
5.1 Apple's Recommended Guidelines
- Use @State for simple, local UI state that belongs to a single view (WWDC 2019, "Data Flow Through SwiftUI").
- Use @StateObject for object ownership when the view should create and own the ObservableObject.
- Use @ObservedObject for object sharing when the object is created and owned elsewhere.
- Use @EnvironmentObject sparingly for truly global state like user sessions, themes, or app-wide settings.
- Keep views lightweight: Move complex logic into ObservableObject classes (view models) rather than cluttering the view body.
5.2 Performance Considerations
- Minimize @Published properties: Only mark properties with @Published if views actually need to observe them. Unnecessary @Published properties trigger extra view updates.
- Use structs for @State when possible: Value types are efficient and work well with SwiftUI's diffing algorithm.
- Avoid large @State objects: If your state is complex or shared, use @StateObject with an ObservableObject instead.
- Break down views: Extract subviews that depend on specific pieces of state. This limits the scope of updates and improves performance.
5.3 Code Style and Naming Conventions
- Name @State properties as nouns or adjectives:
isLoading,username,selectedTab - Name ObservableObject classes with "Manager", "ViewModel", "Controller", or "Store":
AuthManager,TaskListViewModel,DataController - Group related @State properties together at the top of the struct for readability.
- Use private access control for @State and @StateObject properties to enforce encapsulation.
- Prefix Boolean state with "is" or "has":
isLoggedIn,hasNotifications,isEditing
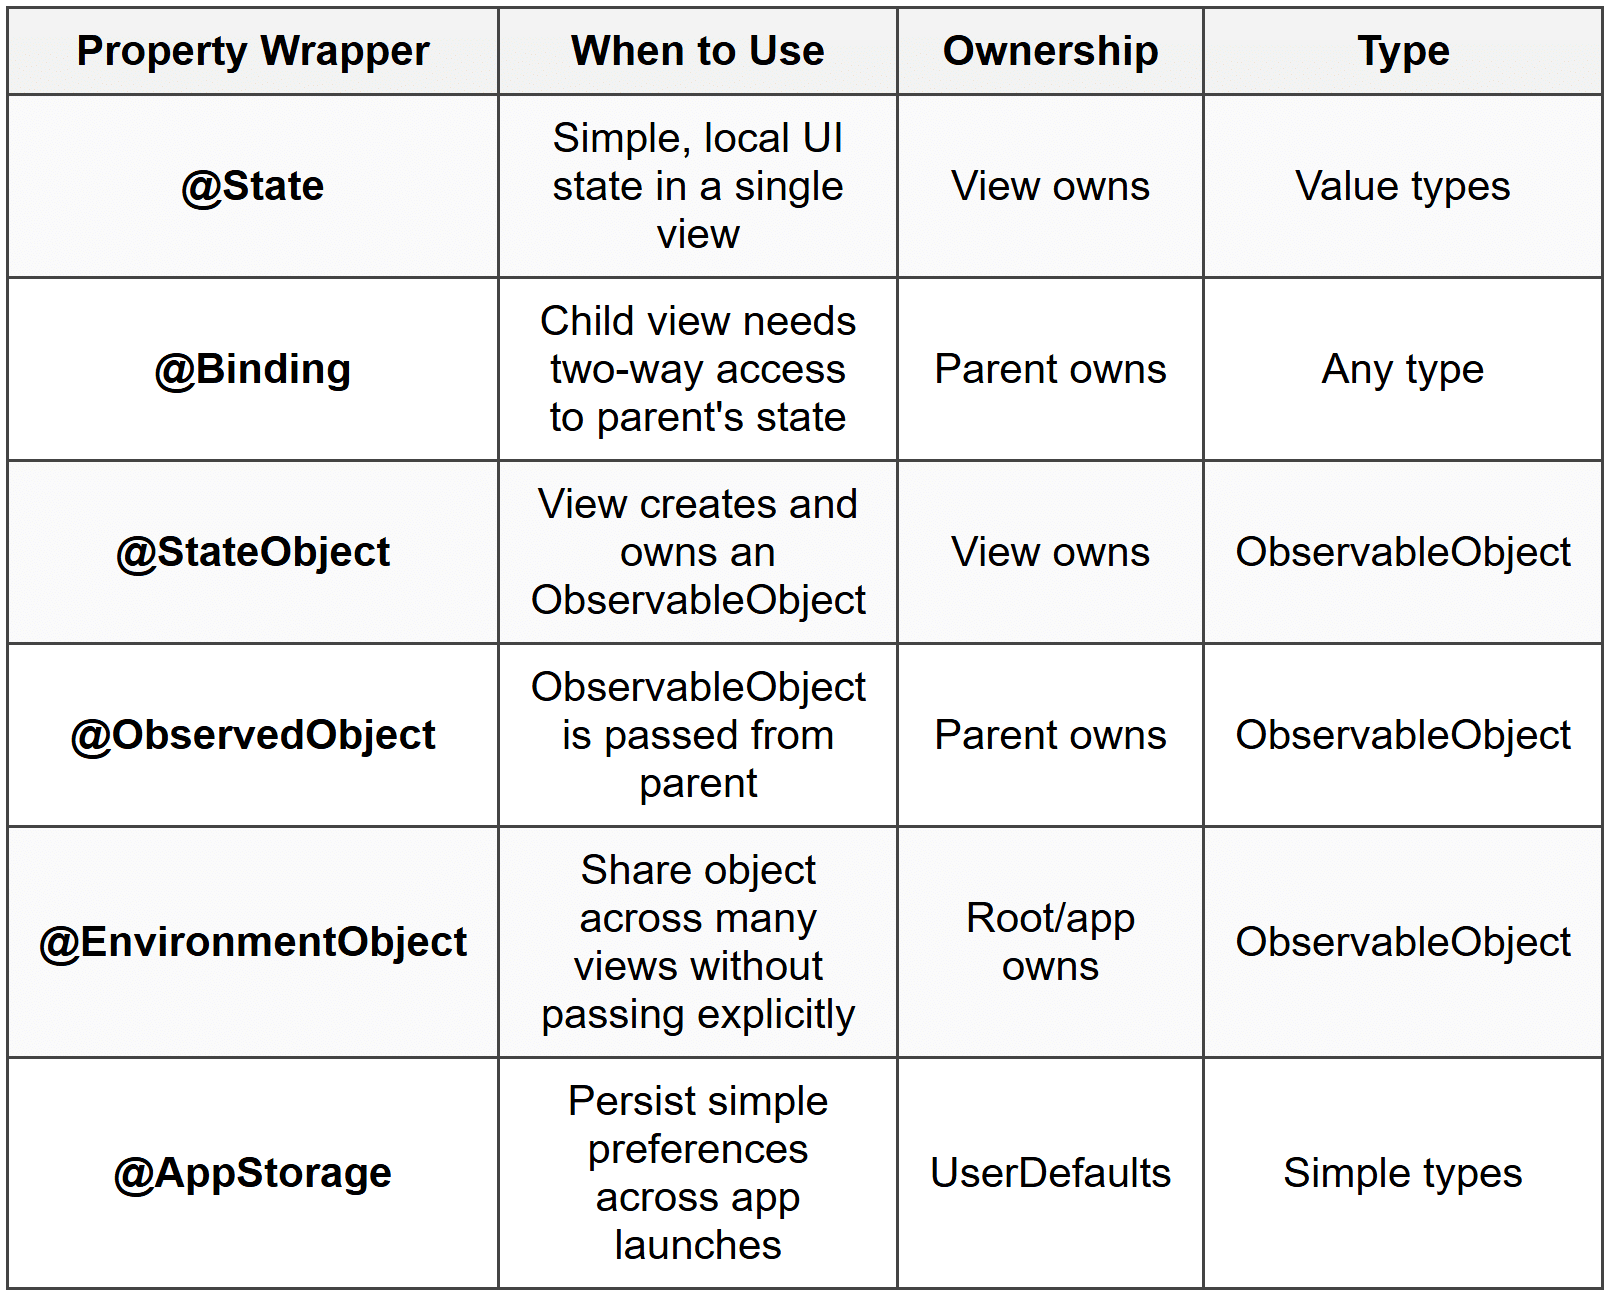
5.4 When to Use Each Property Wrapper
6. Mini Project: To-Do List with Multiple State Patterns
6.1 Problem Statement
Build a fully functional to-do list app that demonstrates all the key state management patterns. The app should:
- Allow users to add new tasks
- Mark tasks as complete/incomplete
- Delete tasks
- Filter tasks by completion status
- Persist the task list using a view model
- Save the selected filter using @AppStorage
6.2 Step-by-Step Instructions
Step 1: Define the Task Model
Create a simple Task struct that conforms to Identifiable.
swift import Foundation struct Task: Identifiable, Codable { let id: UUID var title: String var isCompleted: Bool init(id: UUID = UUID(), title: String, isCompleted: Bool = false) { self.id = id self.title = title self.isCompleted = isCompleted } }Step 2: Create the ViewModel (ObservableObject)
Create a TaskManager class to handle all business logic.
swift import Foundation import Combine class TaskManager: ObservableObject { @Published var tasks: [Task] = [] func addTask(title: String) { let newTask = Task(title: title) tasks.append(newTask) } func toggleCompletion(task: Task) { if let index = tasks.firstIndex(where: { $0.id == task.id }) { tasks[index].isCompleted.toggle() } } func deleteTask(at offsets: IndexSet) { tasks.remove(atOffsets: offsets) } func filteredTasks(filter: TaskFilter) -> [Task] { switch filter { case .all: return tasks case .active: return tasks.filter { !$0.isCompleted } case .completed: return tasks.filter { $0.isCompleted } } } } enum TaskFilter: String, CaseIterable { case all = "All" case active = "Active" case completed = "Completed" }Step 3: Create the Add Task View
Build a reusable component that uses @Binding to add tasks.
swift import SwiftUI struct AddTaskView: View { @Binding var isPresented: Bool var onAdd: (String) -> Void @State private var taskTitle = "" var body: some View { NavigationView { VStack { TextField("Task title", text: $taskTitle) .textFieldStyle(RoundedBorderTextFieldStyle()) .padding() Spacer() } .navigationTitle("New Task") .toolbar { ToolbarItem(placement: .cancellationAction) { Button("Cancel") { isPresented = false } } ToolbarItem(placement: .confirmationAction) { Button("Add") { onAdd(taskTitle) isPresented = false } .disabled(taskTitle.isEmpty) } } } } }Step 4: Create the Main Task List View
Build the main view using @StateObject, @State, and @AppStorage.
swift import SwiftUI struct TaskListView: View { @StateObject private var taskManager = TaskManager() @State private var showingAddTask = false @AppStorage("taskFilter") private var selectedFilter = TaskFilter.all.rawValue private var currentFilter: TaskFilter { TaskFilter(rawValue: selectedFilter) ?? .all } var body: some View { NavigationView { VStack { // Filter Picker Picker("Filter", selection: $selectedFilter) { ForEach(TaskFilter.allCases, id: \.self) { filter in Text(filter.rawValue).tag(filter.rawValue) } } .pickerStyle(SegmentedPickerStyle()) .padding() // Task List List { ForEach(taskManager.filteredTasks(filter: currentFilter)) { task in TaskRowView(task: task) { taskManager.toggleCompletion(task: task) } } .onDelete { indexSet in // Need to map filtered indices back to original let filtered = taskManager.filteredTasks(filter: currentFilter) let idsToDelete = indexSet.map { filtered[$0].id } taskManager.tasks.removeAll { idsToDelete.contains($0.id) } } } .listStyle(InsetGroupedListStyle()) } .navigationTitle("Tasks") .toolbar { ToolbarItem(placement: .primaryAction) { Button(action: { showingAddTask = true }) { Image(systemName: "plus") } } } .sheet(isPresented: $showingAddTask) { AddTaskView(isPresented: $showingAddTask) { title in taskManager.addTask(title: title) } } } } } struct TaskRowView: View { let task: Task let onToggle: () -> Void var body: some View { HStack { Image(systemName: task.isCompleted ? "checkmark.circle.fill" : "circle") .foregroundColor(task.isCompleted ? .green : .gray) .onTapGesture { onToggle() } Text(task.title) .strikethrough(task.isCompleted) .foregroundColor(task.isCompleted ? .secondary : .primary) } } }6.3 Complete Finished Code
All the code from Steps 1-4 combined forms the complete app. To run it:
swift import SwiftUI @main struct TodoApp: App { var body: some Scene { WindowGroup { TaskListView() } } }6.4 Challenge Extensions
- Persistence: Save tasks to UserDefaults or use Core Data so they persist across app launches. Hint: encode/decode the tasks array as JSON.
- Edit Tasks: Add the ability to edit a task's title by tapping on it and showing an edit sheet.
- Priority Levels: Add a priority property (high, medium, low) to each task and allow sorting by priority. Use an enum and add a Picker in the AddTaskView.
7. Quick Reference Summary
7.1 Key Property Wrappers
- @State: View-local, simple value types, private
- @Binding: Two-way reference to @State, passed with $
- @StateObject: View owns ObservableObject, use when creating
- @ObservedObject: View observes ObservableObject, use when passed from parent
- @EnvironmentObject: Inject globally, access anywhere in hierarchy
- @AppStorage: Persist simple types to UserDefaults automatically
7.2 Key Syntax
- Declare @State:
@State private var count = 0 - Create Binding:
$count(projects @State to Binding) - ObservableObject class:
class MyViewModel: ObservableObject { @Published var data = "" } - Inject environment:
.environmentObject(myObject) - Access environment:
@EnvironmentObject var myObject: MyClass
7.3 Key Rules
- Mark @State and @StateObject as private
- Use @StateObject when you create the object; @ObservedObject when it's passed in
- Always inject @EnvironmentObject at a parent level with
.environmentObject() - Use the $ prefix to create a Binding from @State
- ObservableObject classes must mark properties with @Published to trigger view updates
7.4 When to Use What: Quick Decision Tree
- Is it simple data (Bool, Int, String)? → Use @State
- Does a child need to modify parent's state? → Use @Binding
- Is it complex logic or a data model? → Use ObservableObject
- Am I creating it here? → @StateObject
- Is it passed from parent? → @ObservedObject
- Do many unrelated views need it? → @EnvironmentObject
- Should it persist across launches? → Use @AppStorage
8. Warning: Common Student Mistakes to Avoid
⚠️ Trap Alert: @StateObject vs @ObservedObject Confusion
The Mistake: Students often use @ObservedObject when they create the object in the view, causing state to reset unexpectedly.
Remember: If you write = MyClass() in the view, use @StateObject. If it's passed in as a parameter, use @ObservedObject.
⚠️ Trap Alert: Forgetting to Inject @EnvironmentObject
The Mistake: Declaring @EnvironmentObject in a view but forgetting to inject it with .environmentObject() at the root. This causes a runtime crash.
Remember: Always inject environment objects high in the view hierarchy, typically in your App struct or root view.
⚠️ Trap Alert: Mutating @State Directly in init()
The Mistake: Trying to set @State in the initializer like self.count = 10 causes a compiler error.
Remember: Use _count = State(initialValue: 10) to access the underlying property wrapper, or set initial values inline when declaring the property.
⚠️ Trap Alert: Missing $ When Passing Bindings
The Mistake: Passing a @State property directly to a child that expects @Binding, like ChildView(value: myValue) instead of ChildView(value: $myValue).
Remember: The $ prefix projects @State into a Binding. Without it, you're passing a read-only copy, not a two-way connection.
State management is the backbone of interactive SwiftUI apps. By mastering @State, @Binding, @StateObject, @ObservedObject, @EnvironmentObject, and @AppStorage, you gain complete control over how data flows through your app. Practice these patterns in small projects, pay close attention to ownership, and always think about which component truly owns each piece of state. With these tools, you can build clean, maintainable, and reactive iOS apps.
