State Management


State Management in SwiftUI
State management is how your app remembers and updates information while someone is using it. When you tap a button to like a post, toggle dark mode, or add items to a shopping cart, state management makes sure the app remembers your choices and updates the screen instantly. Without it, every interaction would disappear the moment you look away.
1. Understanding State with @State
When you build an interactive app, things need to change based on what the user does. SwiftUI uses @State to track values that can change over time, like a score in a game or whether a switch is on or off. Every time a @State variable changes, SwiftUI automatically redraws the parts of your screen that depend on it.
▶ SwiftUI - State Management
import SwiftUI struct GameScoreView: View { @State private var player_score = 0 // tracks the current score var body: some View { VStack { Text("Score: \(player_score)") // displays current score Button("Add Point") { player_score += 1 // increases score when tapped } } } }
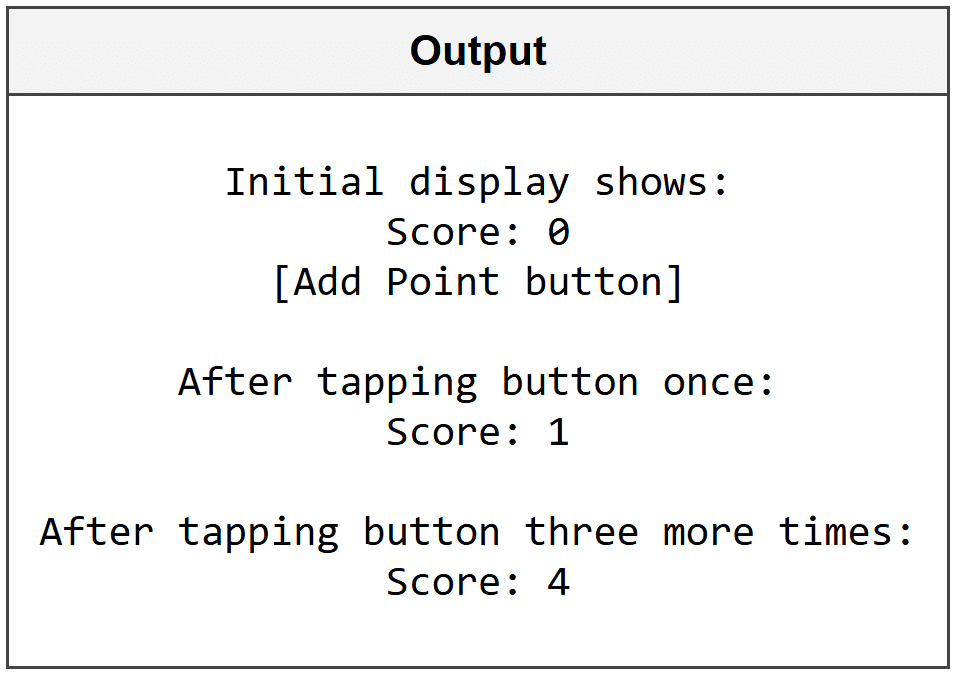
The @State keyword tells SwiftUI to watch this variable for changes. When player_score increases, the Text view automatically updates to show the new number. You always mark @State variables as private because they belong only to this specific view.
Think of @State like a scoreboard that automatically updates whenever the score changes - you don't have to manually refresh it.
Toggle State with Boolean Values
Boolean @State variables work perfectly for things that have two options: on or off, shown or hidden, enabled or disabled.
▶ SwiftUI - State Management
import SwiftUI struct NotificationView: View { @State private var notifications_enabled = false // tracks toggle state var body: some View { VStack { Toggle("Enable Notifications", isOn: $notifications_enabled) // $ creates a binding Text(notifications_enabled ? "Notifications ON" : "Notifications OFF") // shows current state } .padding() } }
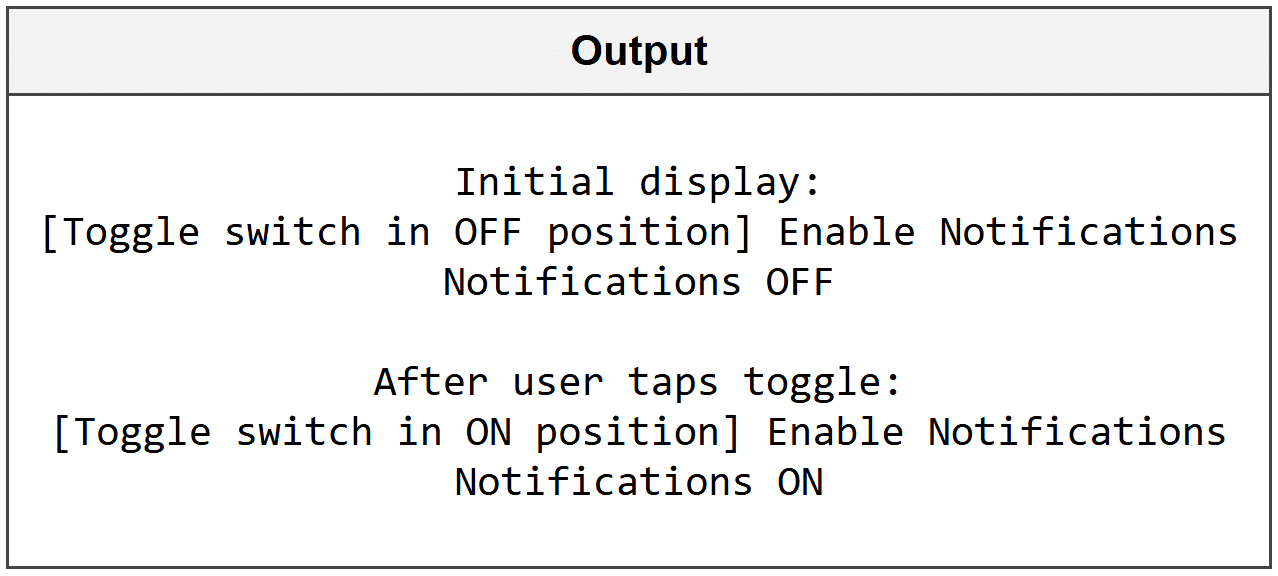
The dollar sign ($) before notifications_enabled creates a binding, which lets the Toggle control both read and write the value. When the toggle switches, it directly updates the @State variable, and the Text below instantly reflects the change.
Multiple State Variables Working Together
You can use several @State variables in the same view to track different pieces of information independently.
▶ SwiftUI - State Management
import SwiftUI struct CharacterCreatorView: View { @State private var character_name = "" // stores text input @State private var character_level = 1 // stores numeric level @State private var is_ready = false // tracks completion status var body: some View { VStack { TextField("Enter name", text: $character_name) // binds to text state Stepper("Level: \(character_level)", value: $character_level, in: 1...100) // binds to number Toggle("Ready to play", isOn: $is_ready) // binds to boolean Text("Character: \(character_name), Level \(character_level)") } .padding() } }
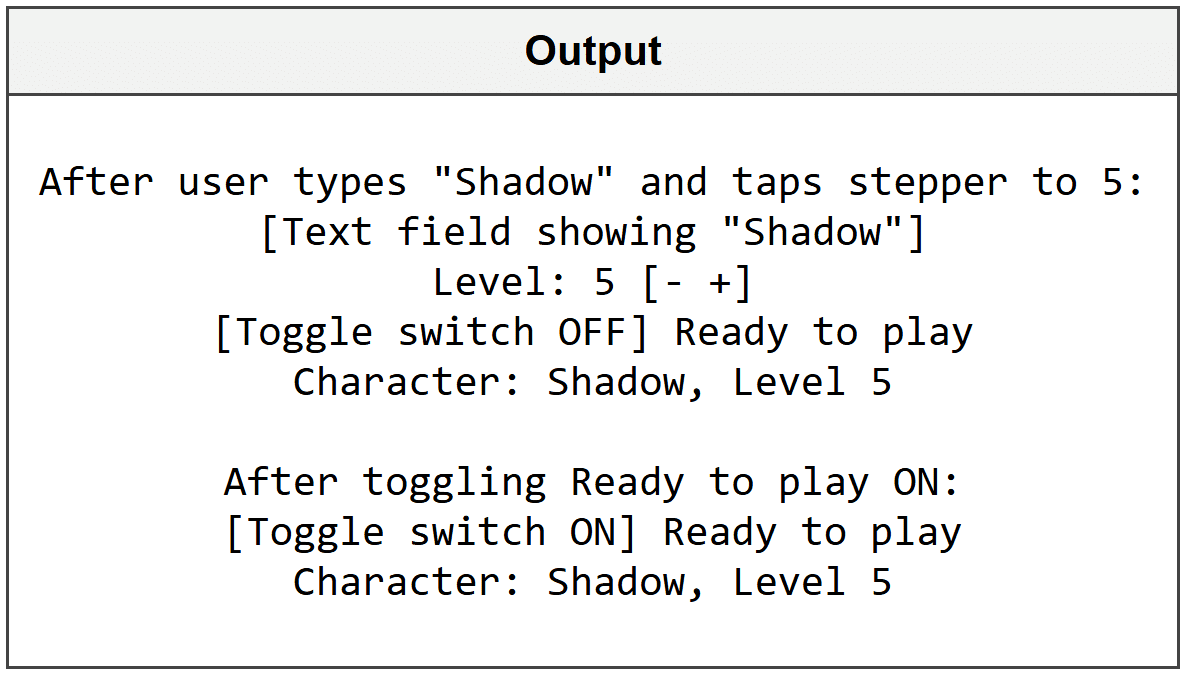
Each @State variable is independent - changing one doesn't affect the others unless you write code to connect them.
2. Sharing State with @Binding
Sometimes you need a child view to modify a value that belongs to its parent view. That's where @Binding comes in - it creates a two-way connection so changes in the child view instantly update the parent. This is essential when building reusable components like custom controls or modal sheets.
▶ SwiftUI - State Management
import SwiftUI struct VolumeSlider: View { @Binding var current_volume: Double // receives a binding from parent var body: some View { VStack { Text("Volume: \(Int(current_volume))%") Slider(value: $current_volume, in: 0...100) // modifies parent's state } } } struct MusicPlayerView: View { @State private var volume_level = 50.0 // owns the state var body: some View { VolumeSlider(current_volume: $volume_level) // passes binding with $ .padding() } }
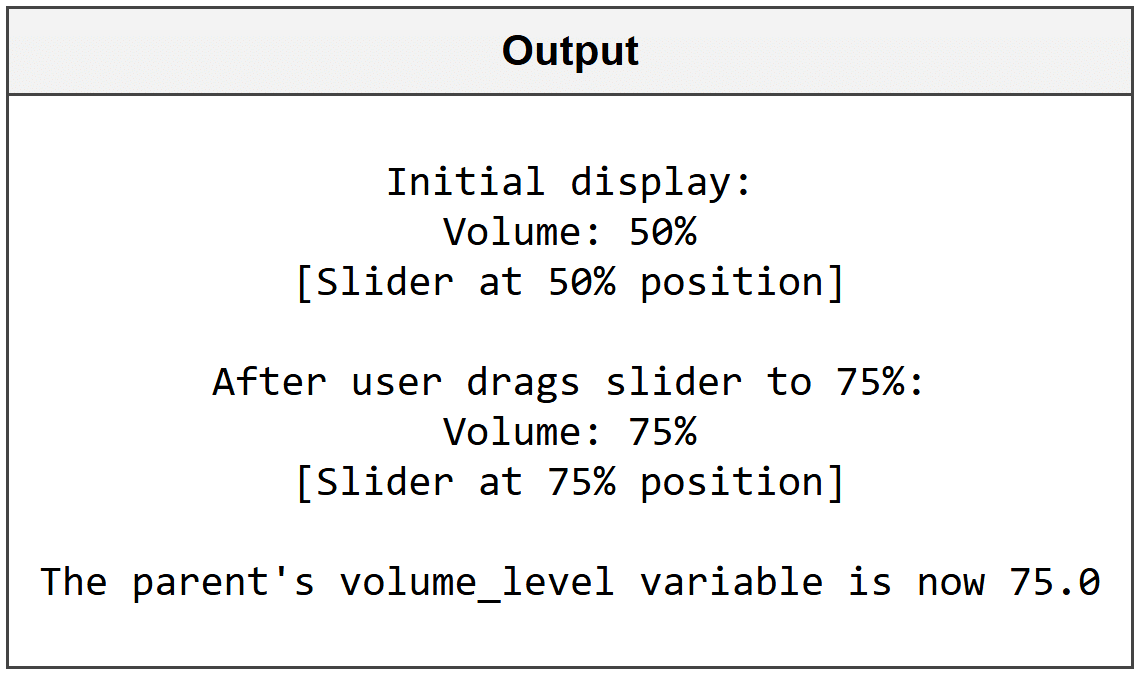
The parent view (MusicPlayerView) owns the actual data with @State. It passes a binding using the $ symbol to the child view (VolumeSlider), which accepts it with @Binding. When the slider changes in the child, the parent's volume_level automatically updates.
@Binding is like giving someone the key to your house - they can go in and change things, and you'll see those changes immediately.
Creating Reusable Components with Binding
@Binding makes it easy to build custom controls that work just like SwiftUI's built-in ones.
▶ SwiftUI - State Management
import SwiftUI struct CustomToggleButton: View { @Binding var is_active: Bool // binding allows parent control var label_text: String var body: some View { Button(action: { is_active.toggle() }) { // toggles the bound value Text(label_text) .foregroundColor(is_active ? .green : .gray) } } } struct SettingsView: View { @State private var dark_mode_enabled = false var body: some View { CustomToggleButton(is_active: $dark_mode_enabled, label_text: "Dark Mode") } }

3. Observing External Data with @ObservedObject
When your data is more complex than a single number or string, you need a way to store it in a separate class that multiple views can watch. @ObservedObject lets a view subscribe to changes in an external object that conforms to the ObservableObject protocol. This is perfect for managing shopping carts, user profiles, or game inventories.
▶ SwiftUI - State Management
import SwiftUI class ShoppingCart: ObservableObject { @Published var item_count = 0 // automatically notifies observers when changed @Published var total_price = 0.0 func addItem(price: Double) { item_count += 1 total_price += price } } struct CartView: View { @ObservedObject var cart = ShoppingCart() // observes the cart object var body: some View { VStack { Text("Items: \(cart.item_count)") Text("Total: $\(cart.total_price, specifier: "%.2f")") Button("Add $9.99 Item") { cart.addItem(price: 9.99) // updates trigger view refresh } } } }
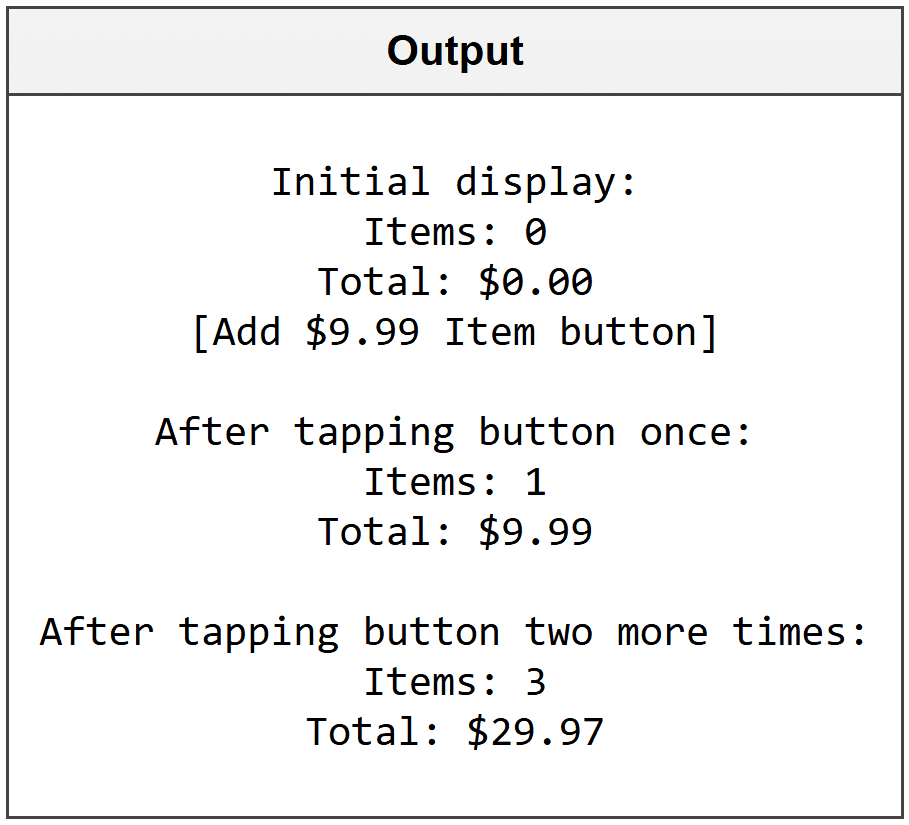
The @Published keyword inside the ShoppingCart class tells SwiftUI which properties to watch. When item_count or total_price changes, any view using @ObservedObject automatically redraws. The class must conform to ObservableObject protocol to work with this system.
Use @ObservedObject when your data needs custom logic (like calculations) or when multiple views need to share the same information.
Sharing ObservedObject Between Multiple Views
You can pass the same observed object to different views so they all stay in sync.
▶ SwiftUI - State Management
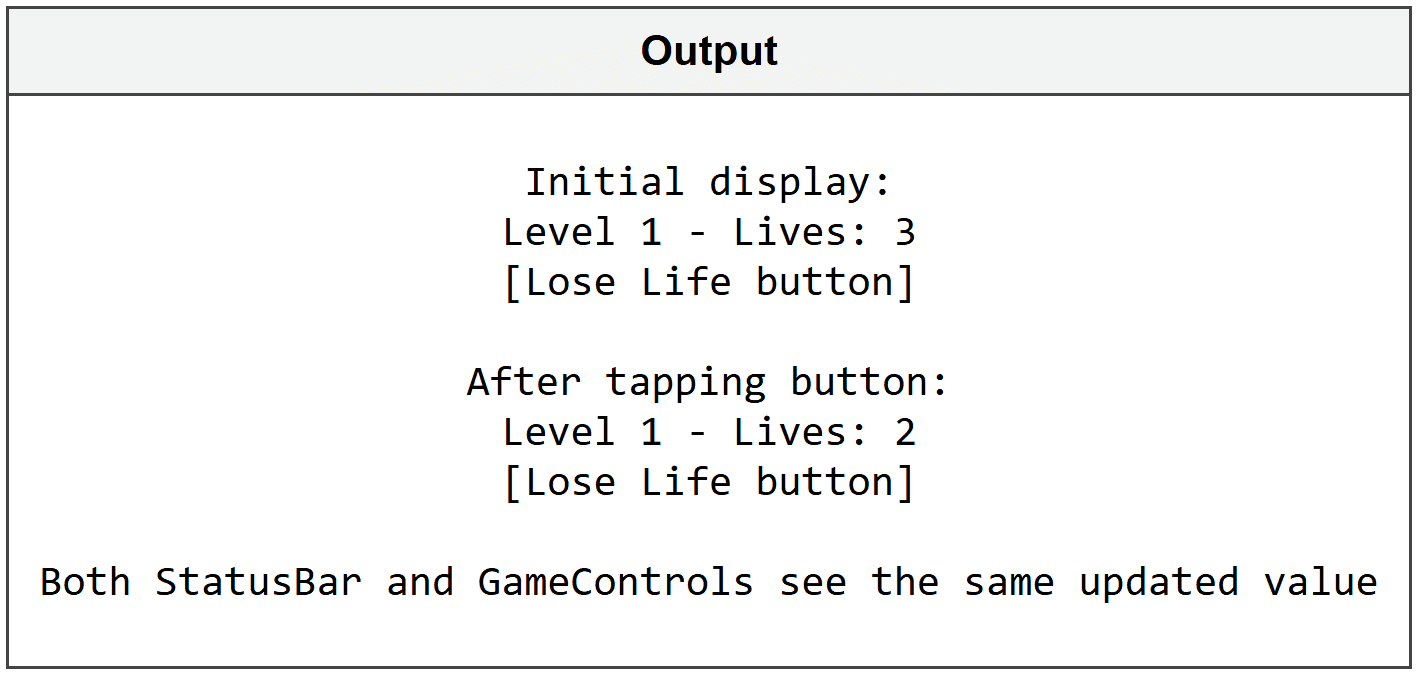
import SwiftUI class GameProgress: ObservableObject { @Published var current_level = 1 @Published var lives_remaining = 3 } struct StatusBar: View { @ObservedObject var progress: GameProgress var body: some View { Text("Level \(progress.current_level) - Lives: \(progress.lives_remaining)") } } struct GameControls: View { @ObservedObject var progress: GameProgress var body: some View { Button("Lose Life") { progress.lives_remaining -= 1 } } } struct GameView: View { @ObservedObject var game = GameProgress() // single source of truth var body: some View { VStack { StatusBar(progress: game) GameControls(progress: game) } } }
4. App-Wide State with @StateObject and @EnvironmentObject
When you need data that lives throughout your entire app - like user authentication status, theme settings, or a global timer - you need @StateObject and @EnvironmentObject. @StateObject creates and owns an observable object that stays alive for the lifetime of the view, while @EnvironmentObject lets you access shared data anywhere in your view hierarchy without passing it through every single view.
▶ SwiftUI - State Management
import SwiftUI class UserSettings: ObservableObject { @Published var username = "Guest" @Published var theme_color = "Blue" } struct ContentView: View { @StateObject private var settings = UserSettings() // creates and owns the object var body: some View { NavigationView { ProfileView() .environmentObject(settings) // makes available to all child views } } } struct ProfileView: View { @EnvironmentObject var settings: UserSettings // receives from environment var body: some View { Text("Welcome, \(settings.username)!") } }

@StateObject creates the object once and keeps it alive even when the view redraws. You use environmentObject() to inject it into the view hierarchy, and any descendant view can grab it with @EnvironmentObject without you having to pass it as a parameter through every intermediate view.
Think of @EnvironmentObject like Wi-Fi - once you connect to it at the top level, every room (view) in the house has access without running cables through walls.
Modifying Environment Objects from Any View
Any view that accesses an @EnvironmentObject can modify it, and all other views watching that object will update instantly.
▶ SwiftUI - State Management
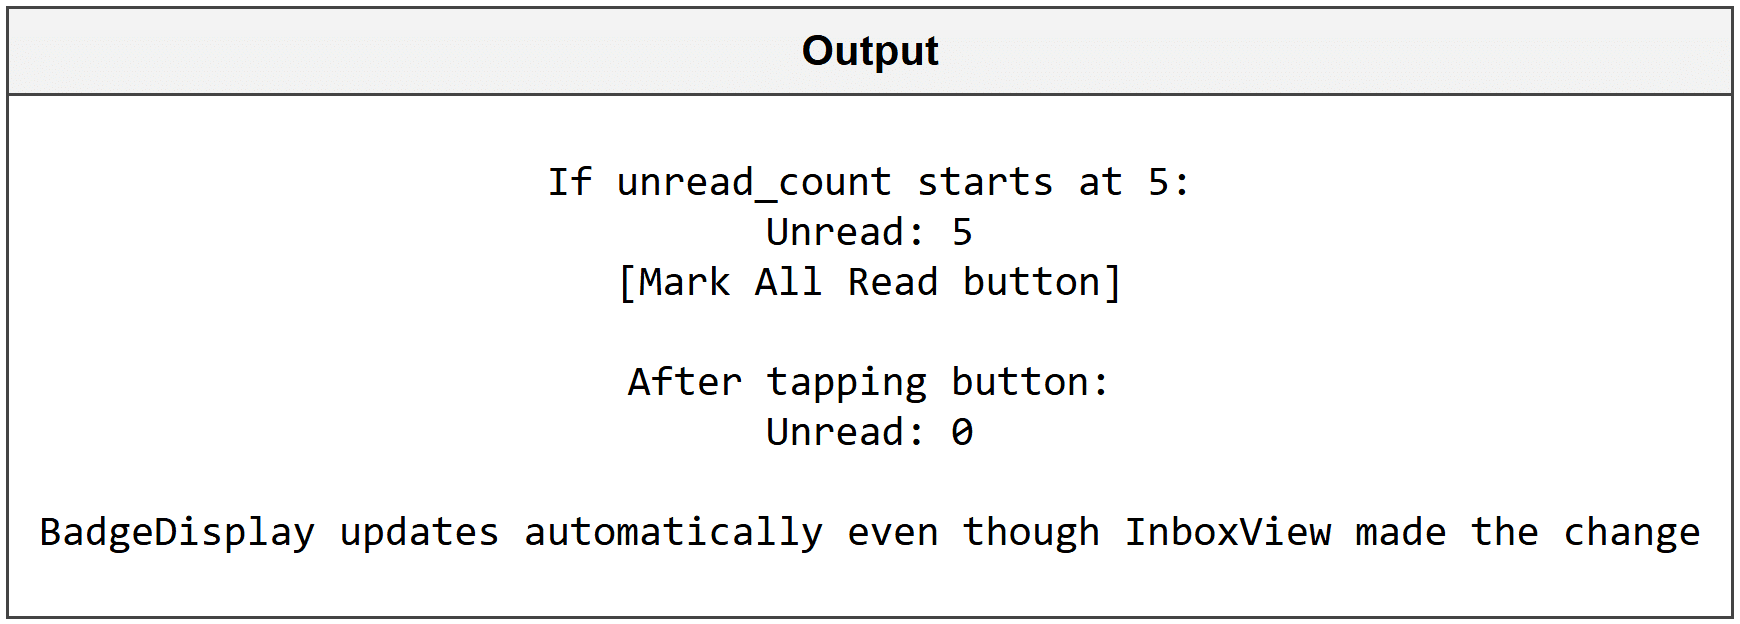
import SwiftUI class NotificationBadge: ObservableObject { @Published var unread_count = 0 } struct BadgeDisplay: View { @EnvironmentObject var badge: NotificationBadge var body: some View { Text("Unread: \(badge.unread_count)") } } struct InboxView: View { @EnvironmentObject var badge: NotificationBadge var body: some View { VStack { BadgeDisplay() Button("Mark All Read") { badge.unread_count = 0 // changes visible everywhere } } } }
5. Understanding When to Use Each Property Wrapper
SwiftUI gives you several tools for state management, and knowing which one to use makes your code cleaner and prevents bugs. Each property wrapper solves a specific problem, and using the wrong one can cause memory issues or broken updates.
▶ SwiftUI - State Management
import SwiftUI // Example showing appropriate usage of each wrapper struct ParentView: View { @StateObject private var app_data = AppData() // owns the object for entire app @State private var local_counter = 0 // simple value for this view only var body: some View { VStack { ChildView(counter: $local_counter) // passes binding .environmentObject(app_data) // shares object with descendants } } } struct ChildView: View { @Binding var counter: Int // borrows counter from parent @EnvironmentObject var app_data: AppData // receives shared object var body: some View { Button("Increment") { counter += 1 } } } class AppData: ObservableObject { @Published var global_setting = true }

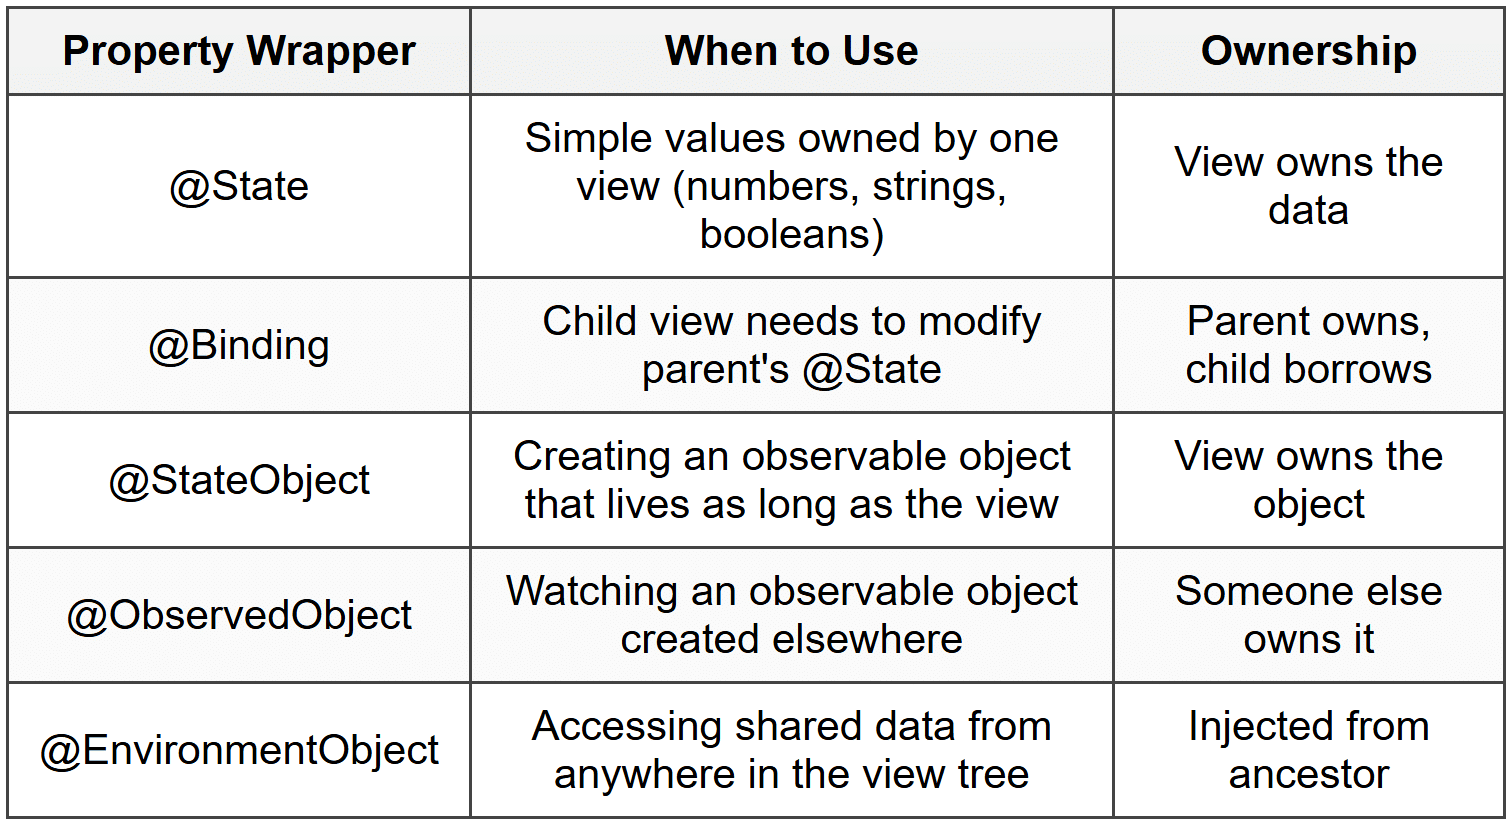
A good rule: use @State for simple values, @StateObject when you create an object, @ObservedObject when you receive an object, and @EnvironmentObject for app-wide data.
🛠 Mini-Project: Build a Task Manager
You're going to build a complete task tracking app that demonstrates all the state management concepts together. Users can add tasks, mark them complete, and see statistics update in real time across multiple views.
Step 1 - Create the Task Model and Manager
First, define what a task looks like and create an observable object to manage the collection of tasks.
▶ SwiftUI - State Management
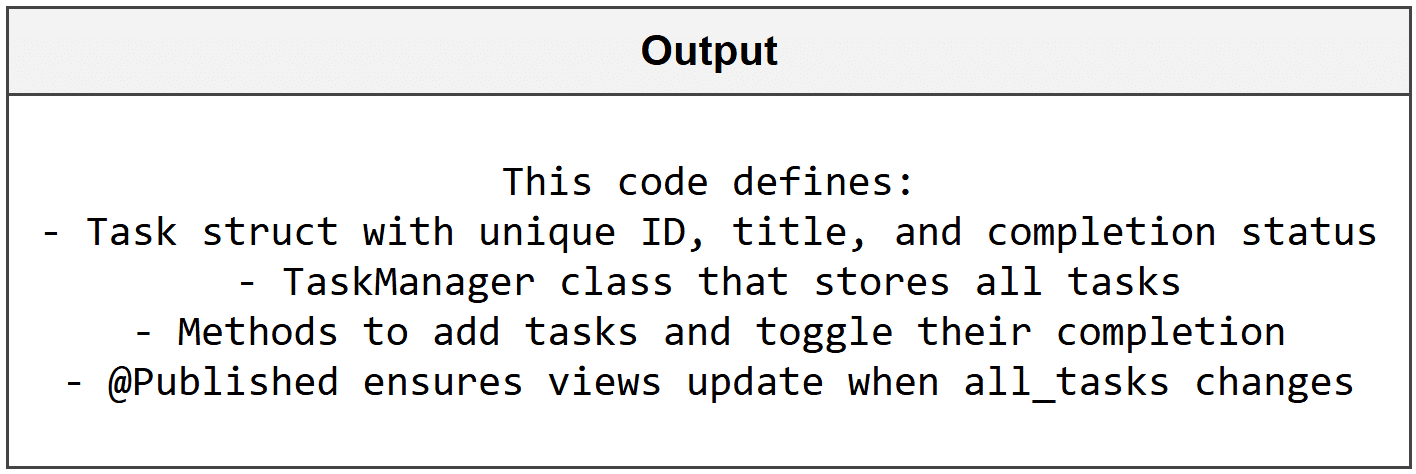
import SwiftUI struct Task: Identifiable { let id = UUID() var title: String var is_completed: Bool = false } class TaskManager: ObservableObject { @Published var all_tasks: [Task] = [] func addTask(title: String) { let new_task = Task(title: title) all_tasks.append(new_task) } func toggleCompletion(task: Task) { if let index = all_tasks.firstIndex(where: { $0.id == task.id }) { all_tasks[index].is_completed.toggle() } } }
Step 2 - Build the Task Input View
Create a view where users can type a task name and add it to the list.
▶ SwiftUI - State Management
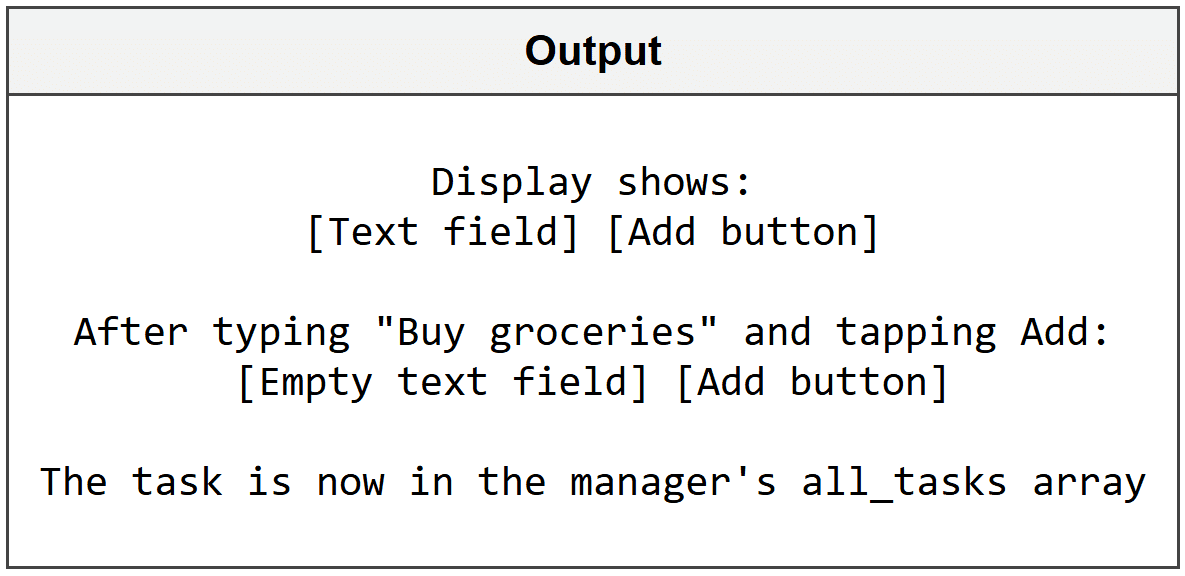
import SwiftUI struct TaskInputView: View { @EnvironmentObject var manager: TaskManager @State private var new_task_title = "" // temporary storage for text input var body: some View { HStack { TextField("Enter task", text: $new_task_title) Button("Add") { manager.addTask(title: new_task_title) new_task_title = "" // clears input after adding } .disabled(new_task_title.isEmpty) // prevents empty tasks } .padding() } }
Step 3 - Display the Task List
Show all tasks in a list where users can tap to mark them complete.
▶ SwiftUI - State Management
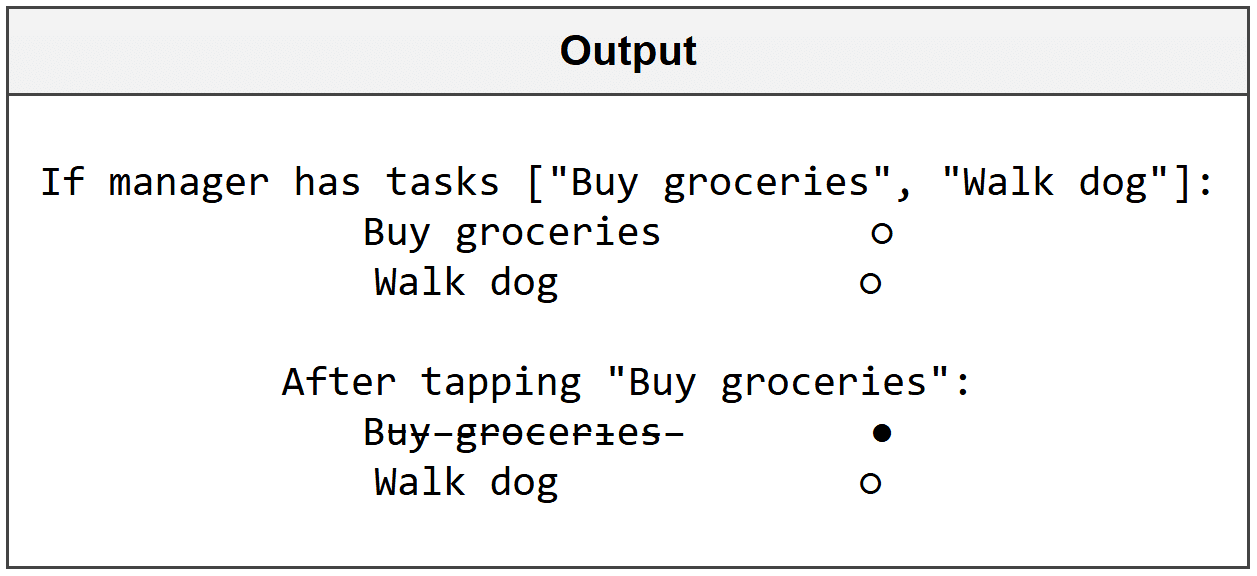
import SwiftUI struct TaskListView: View { @EnvironmentObject var manager: TaskManager var body: some View { List(manager.all_tasks) { task in HStack { Text(task.title) .strikethrough(task.is_completed) // shows completion visually Spacer() Image(systemName: task.is_completed ? "checkmark.circle.fill" : "circle") } .onTapGesture { manager.toggleCompletion(task: task) // marks complete on tap } } } }
Step 4 - Add Statistics Display
Create a separate view that shows how many tasks are complete, demonstrating how @EnvironmentObject keeps everything in sync.
▶ SwiftUI - State Management
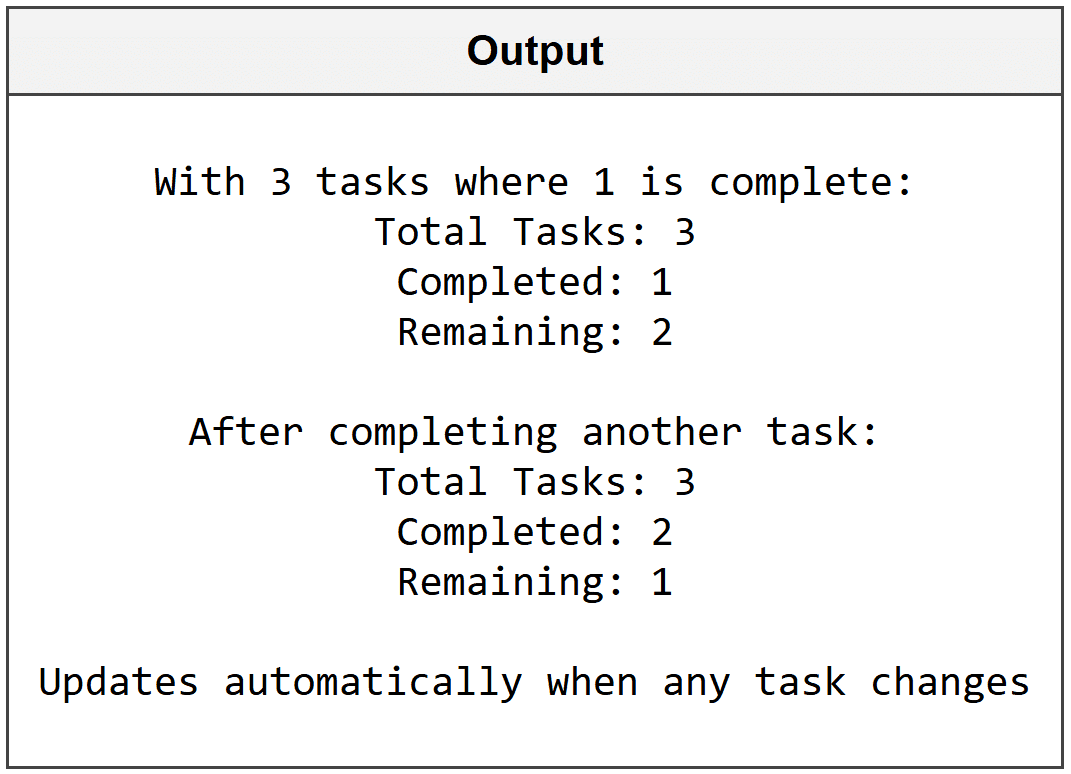
import SwiftUI struct TaskStatsView: View { @EnvironmentObject var manager: TaskManager var completed_count: Int { manager.all_tasks.filter { $0.is_completed }.count // counts completed tasks } var body: some View { VStack { Text("Total Tasks: \(manager.all_tasks.count)") Text("Completed: \(completed_count)") Text("Remaining: \(manager.all_tasks.count - completed_count)") } .padding() } }
Step 5 - Combine Everything in Main View
Put all the pieces together with the TaskManager as an environment object available to all views.
▶ SwiftUI - State Management
import SwiftUI struct TaskManagerApp: View { @StateObject private var task_manager = TaskManager() // creates the shared manager var body: some View { NavigationView { VStack { TaskStatsView() TaskInputView() TaskListView() } .navigationTitle("My Tasks") .environmentObject(task_manager) // shares with all child views } } }

What You Just Built: A fully functional task manager that demonstrates @StateObject for creating shared data, @State for temporary input, @EnvironmentObject for app-wide access, and computed properties that automatically update when underlying data changes.
📋 Quick Reference - State Management
▶ SwiftUI - State Management
import SwiftUI // ─── SIMPLE STATE ─── @State private var counter = 0 // view owns this value @State private var is_enabled = true @State private var username = "" // ─── BINDING ─── struct ChildView: View { @Binding var shared_value: Int // receives binding from parent } // Pass binding: ChildView(shared_value: $counter) // ─── OBSERVABLE OBJECT ─── class DataModel: ObservableObject { @Published var items: [String] = [] // triggers updates @Published var selected_item: String? } // ─── CREATING OBJECTS ─── @StateObject private var model = DataModel() // view creates and owns // ─── OBSERVING OBJECTS ─── @ObservedObject var model: DataModel // receives from elsewhere // ─── ENVIRONMENT OBJECTS ─── // Inject: .environmentObject(model) // Receive: @EnvironmentObject var model: DataModel // ─── TOGGLING ─── Toggle("Label", isOn: $boolean_value) boolean_value.toggle() // flips true/false // ─── TEXT INPUT ─── TextField("Placeholder", text: $text_variable) // ─── SLIDER ─── Slider(value: $numeric_value, in: 0...100)
Try It Yourself
Exercise 1 - Recall: Create a Counter
Build a simple view with a number that increases when you tap a button. Use @State to track the count.
▶ SwiftUI - State Management
import SwiftUI struct CounterView: View { @State private var count = ___ // start at zero var body: some View { VStack { Text("Count: \(___)") Button("___") { // label the button ___ += 1 // increment the count } } } }
Exercise 2 - Apply: Build a Light Switch
Create a toggle that switches between "Lights On" and "Lights Off" using a boolean @State variable.
▶ SwiftUI - State Management
import SwiftUI struct LightSwitchView: View { @State private var lights_on = ___ // boolean starting false var body: some View { VStack { Text(lights_on ? "___" : "___") // show different text Toggle("___", isOn: $___) // create the switch } } }
Exercise 3 - Analyse: Fix the Binding Bug
This code tries to let a child view modify the parent's value but has an error. Identify what's wrong and explain how to fix it.
▶ SwiftUI - State Management
import SwiftUI struct ParentView: View { @State private var temperature = 20 var body: some View { TemperatureControl(temp: temperature) // BUG: missing something } } struct TemperatureControl: View { @Binding var temp: Int var body: some View { Stepper("Temp: \(temp)", value: $temp) } }
Exercise 4 - Challenge: Build a Color Picker
Create an app with three sliders for red, green, and blue values (0-255). Display a preview of the resulting color. Use @State for the color values and show them updating in real time.
▶ SwiftUI - State Management
import SwiftUI struct ColorPickerView: View { @State private var red_value: Double = ___ @State private var green_value: Double = ___ @State private var blue_value: Double = ___ var body: some View { VStack { Rectangle() .fill(Color(red: ___ / 255, green: ___ / 255, blue: ___ / 255)) .frame(height: 100) Slider(value: $___, in: 0...255) Slider(value: $___, in: 0...255) Slider(value: $___, in: 0...255) Text("RGB(\(Int(___)), \(Int(___)), \(Int(___)))") } .padding() } }
What You Learned
- @State creates simple values that belong to a single view and automatically trigger updates when they change
- @Binding lets child views read and modify values owned by their parent views using the $ syntax
- @ObservedObject watches external objects that conform to ObservableObject and have @Published properties
- @StateObject creates and owns an observable object for the lifetime of the view
- @EnvironmentObject provides app-wide access to shared data without passing it through every view layer
- Choosing the right property wrapper prevents bugs and makes your state management clean and predictable
Next Chapter → Navigation and Routing