Quantization


Quantization
1. What Quantization Really Means
Picture this: you're recording yourself playing a simple beat on a MIDI keyboard. You tap out the rhythm, trying your best to stay in time, but like any human, you're not a machine. Some notes land a tiny bit early, others drag just a fraction late. When you play it back, you can hear those little imperfections-maybe they add character, or maybe they make the groove feel sloppy.
Now imagine you could magically snap every note you played to the nearest beat, like a grid. That eighth note that landed 20 milliseconds too early? It jumps forward to sit perfectly on the grid line. The kick drum that came in slightly late? It slides back to lock in with the downbeat. This magical process is called quantization, and it's one of the most powerful tools in modern music production.
At its core, quantization is the process of aligning musical events to a rhythmic grid. Think of it as auto-correct for timing. You tell your Digital Audio Workstation (DAW) what the grid should be-maybe sixteenth notes, maybe eighth notes, maybe triplets-and it moves your recorded notes to the nearest grid position.
Let's be clear: quantization applies to MIDI data, not audio recordings directly. When you record yourself singing or playing a guitar, you're creating an audio waveform. Quantization can't help you there without some extra steps. But when you're working with MIDI-virtual instruments, drum machines, synthesizers controlled by a keyboard-quantization becomes your rhythmic best friend.
2. Why Quantization Exists
Before computers entered the studio, timing was entirely in the hands (and ears) of musicians. If you listen to recordings from the 1960s and 70s, you'll notice that the tempo often speeds up during exciting sections and slows down during quieter moments. Drummers played slightly ahead or behind the beat to create feel. Think of Led Zeppelin's "When the Levee Breaks"-John Bonham's drumming has a powerful human swing that no machine could replicate.
But when drum machines and sequencers arrived in the late 1970s and early 1980s, something changed. Suddenly producers like Giorgio Moroder were creating tracks like Donna Summer's "I Feel Love" (1977) with perfectly locked, robotic rhythms. The consistency was thrilling-it created a hypnotic, driving energy perfect for dance music.
The problem came when musicians tried to perform with these machines. A human playing along with a drum machine would inevitably drift in and out of time. MIDI, introduced in 1983, allowed electronic instruments to talk to each other and to computers. Now you could record your performance as data-which notes you played, when you played them, how hard you hit the keys-and then edit that data afterward.
Quantization emerged as a solution to a simple question: How do we let humans perform with the expressiveness we naturally have, but then tighten up the timing to match electronic precision?
3. How Quantization Works in Practice
Let's walk through what actually happens when you quantize. Imagine you've just recorded a simple four-bar drum pattern in your DAW using a MIDI controller. You programmed kick drums on beats 1 and 3, and snares on beats 2 and 4-a classic backbeat pattern.
When you look at the MIDI piano roll (that grid-like editor in your DAW), you see that your kick drums didn't land exactly on beats 1 and 3. One is a bit early, another is late. Your snare hits are similarly scattered around beats 2 and 4.
Here's what you do:
- Select the notes you want to quantize (or select all of them)
- Choose your quantize value-in this case, you'd probably select quarter notes since your pattern is based on four beats per bar
- Apply quantization by hitting the quantize button or keyboard shortcut
Your DAW now performs a calculation for each note. It looks at when the note actually occurred, finds the nearest quarter-note grid line, and moves the note to that position. If your kick drum was at 1.05 (five hundredths of a beat after beat 1), it snaps back to exactly 1.00. If your snare was at 3.94 (slightly before beat 4), it jumps forward to exactly 4.00.
Quantization moves each MIDI event to the nearest point on a defined rhythmic grid, correcting timing variations in your performance.
The result? Your drum pattern now sits perfectly on the beat, locked to the grid with machine-like precision. Whether this sounds better or worse is a matter of taste and musical context-we'll explore that more in a moment.
4. Quantization Values and Grid Resolution
The quantize value determines how fine your grid is. Think of it like choosing the size of squares on graph paper. Large squares give you less precision but a looser feel; tiny squares let you control every detail.
Here are the most common quantize values you'll encounter:
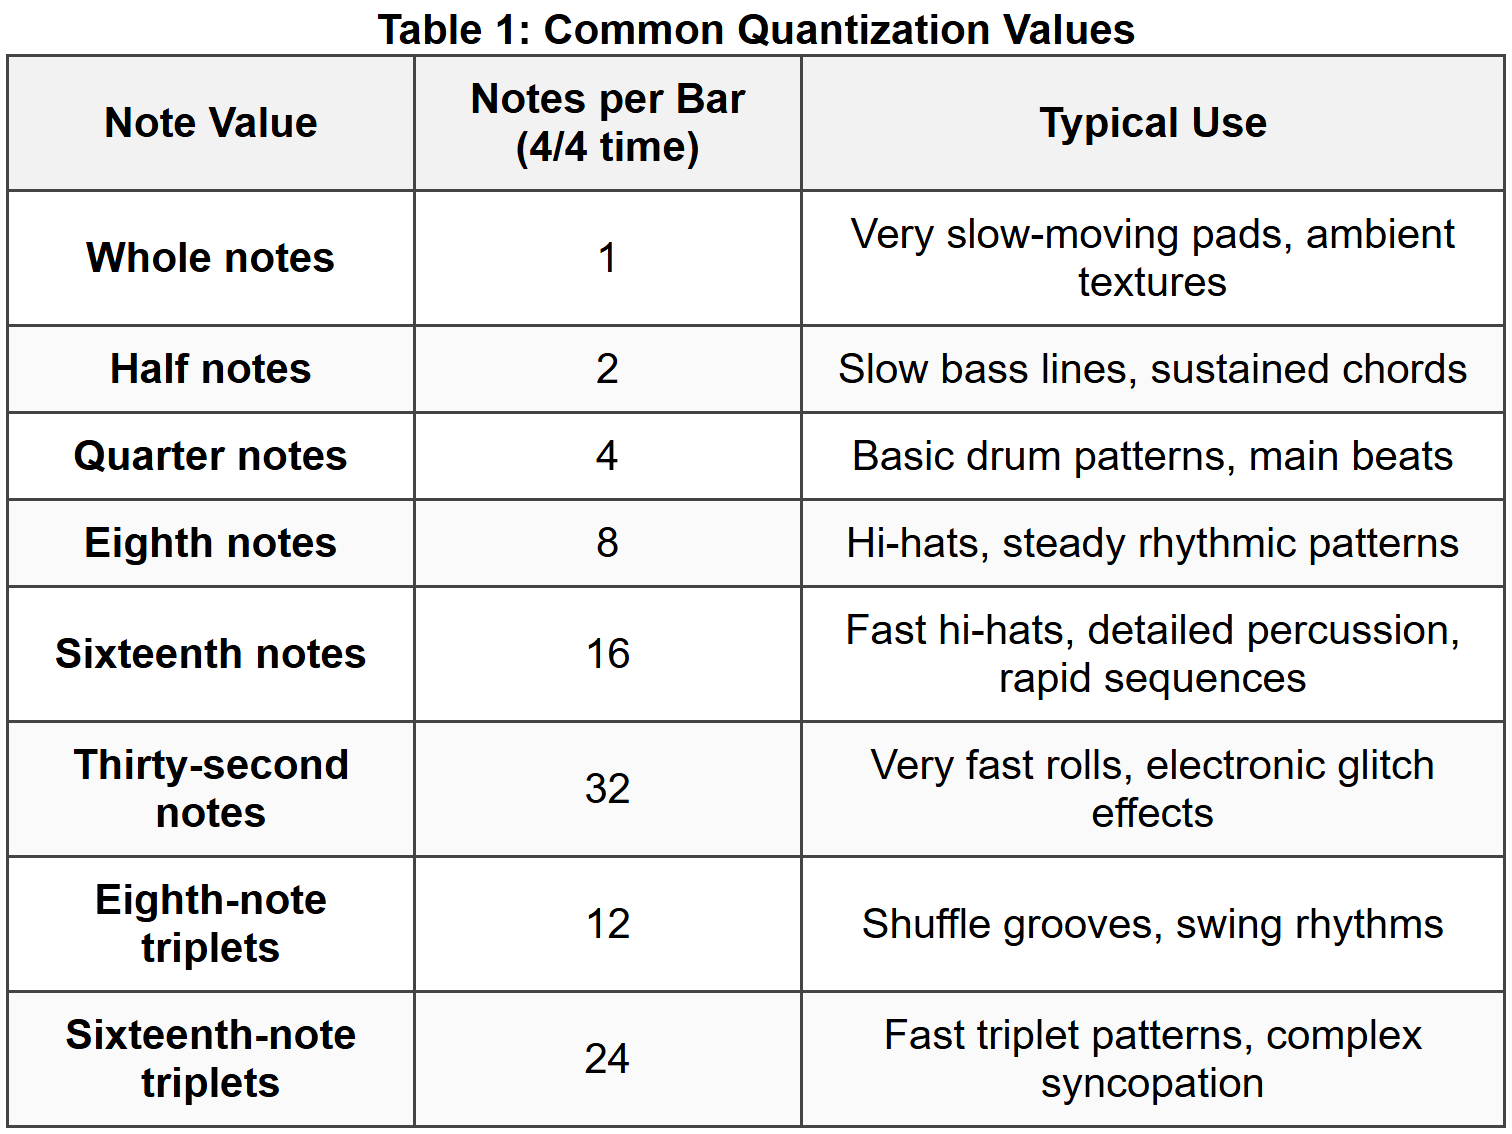
Choosing the right quantize value is crucial. If you recorded a hi-hat pattern playing steady eighth notes, quantizing to eighth notes makes perfect sense. But if you recorded a complex pattern mixing eighth notes and sixteenth notes, you'd need to quantize to sixteenth notes-otherwise, all your sixteenth notes would get snapped to the nearest eighth, destroying half your pattern.
Try this exercise: Tap out a simple rhythm on your desk-four evenly spaced taps per bar. Now tap twice as fast between each of those beats. You've just played eighth notes. Now try tapping three times evenly between your original beats. That's the feel of eighth-note triplets, and you'd need to choose that specific quantize value to preserve that rhythmic character.
4.1. Straight vs. Swing/Triplet Grids
Not all grids are created equal. So far, we've been talking about straight quantization-dividing beats into equal portions. But much of the music you love doesn't divide time equally at all.
Listen to any classic jazz recording, like Duke Ellington's "Take the A Train". The ride cymbal pattern doesn't go "ding-ding-ding-ding" in perfectly even eighth notes. Instead, it swings: "DING-da-DING-da," where the first note of each pair is longer and the second is shorter. This is swing, and it's based on triplet subdivision.
In swing timing, each beat is divided into three equal parts (triplets), but you only play the first and third subdivision, skipping the middle one. This creates that distinctive "long-short, long-short" pattern. Many DAWs offer swing quantization presets with labels like "50%" (straight), "60%" (light swing), or "66%" (hard swing, true triplets).
Hip-hop producers often use this feature to create that laid-back, slightly drunk feel. Listen to J Dilla's work on "Donuts"-his grooves sit somewhere between perfectly straight and fully swung, creating a human, soulful rhythm that became his signature sound.
5. Strength and Humanization
Here's where quantization gets really interesting. Most modern DAWs don't just offer an "on" or "off" switch for quantization. They give you control over how much quantization to apply, and they even let you add back some controlled randomness to make things sound more human.
5.1. Quantize Strength
Quantize strength (sometimes called "amount" or "intensity") determines how far each note moves toward the grid. At 100% strength, every note snaps completely to the nearest grid position-this is full, hard quantization. At 50% strength, each note moves only halfway from where it actually is to the nearest grid line.
Let's use numbers to make this concrete. Imagine you played a note at position 2.10 (one-tenth of a beat after beat 2), and the nearest grid line is at 2.00:
- 100% strength: The note moves completely to 2.00
- 50% strength: The note moves halfway from 2.10 to 2.00, landing at 2.05
- 25% strength: The note moves only a quarter of the way, landing at 2.075
Why would you ever use less than 100%? Because sometimes you want to tighten up the timing without losing all the human feel. A singer performing with real emotion might rush slightly during an exciting phrase or drag a bit during a tender moment. Quantizing at 60-70% strength pulls those notes closer to the grid, making the performance more consistent, while preserving some of that expressive timing.
This technique is common in modern pop production. Listen carefully to vocal production on tracks by Ariana Grande or The Weeknd-the performances feel human and emotional, but the timing is suspiciously tight. That's often partial quantization at work, combined with careful editing.
5.2. Humanization
Now for something that seems paradoxical: after you've quantized your MIDI to the grid, many producers immediately apply humanization-a process that adds small, random variations to push notes slightly off the grid again.
Why quantize only to un-quantize? Because humanization adds controlled randomness, not the uncontrolled mistakes from your original performance. When you played that drum pattern, maybe your left hand was consistently weaker than your right, or you rushed every single snare hit. Quantization fixes those problems. Humanization then adds back tiny timing variations (usually just a few milliseconds) and velocity differences (how hard each note is hit) that make the performance sound less robotic.
The key word is tiny. Humanization typically moves notes by amounts you can't consciously hear-maybe 5-15 milliseconds-but your brain picks up on the subtle variation and perceives the result as more natural.
Try this: If you have access to a DAW, program a simple drum pattern with every note at exactly the same velocity (volume) and perfectly quantized. Listen to it. Then use your DAW's randomize or humanize function to vary the velocity by 10-20% and shift timing by 5-10 milliseconds. The pattern will suddenly come alive, even though you can't point to any single note that sounds obviously different.
6. When to Quantize and When Not To
This is the million-dollar question, and the answer depends entirely on context and taste. Let's think through some scenarios.
6.1. When Quantization Usually Helps
- Electronic dance music (EDM): Genres like house, techno, trance, and dubstep typically demand locked-in, grid-based timing. The whole point is to create a hypnotic, machine-precise groove. Listen to any track by Daft Punk, like "Around the World"-every element is quantized to perfection, and that's exactly why it works. The precision is the aesthetic.
- Pop and hip-hop: Modern chart-topping tracks usually feature heavily quantized drums and bass. The vocals might retain more natural timing, but the rhythm section is typically locked tight. Check out tracks produced by Max Martin or Metro Boomin-the pocket is always solid.
- When you're learning: If you're just starting to work with MIDI and you're not confident in your keyboard skills, quantization is your safety net. You can focus on playing the right notes without worrying about perfect timing.
- When layering multiple parts: If you're stacking several synthesizer parts to create one thick sound, having them all perfectly in time with each other creates maximum impact. Even small timing differences between layers can create a muddy, phase-y sound.
6.2. When to Avoid Full Quantization
- Jazz, blues, and soul: These genres live and breathe on human timing. The way a jazz drummer plays slightly behind the beat, or a blues guitarist bends a note and holds it just a bit longer than expected-that's where the emotion lives. Heavy quantization can suck the soul right out. Listen to Bill Evans Trio's "Sunday at the Village Vanguard"-the interplay between bass, piano, and drums is all about subtle push and pull against the beat.
- Classical and orchestral music: A string section naturally breathes together, with tiny timing variations that create warmth. Quantized strings sound stiff and fake. If you're programming orchestral MIDI, use very light quantization (if any) and extensive humanization.
- When the "mistakes" are the magic: Some of the most iconic drum performances in rock history are technically "wrong." John Bonham on "When the Levee Breaks", Keith Moon on The Who's "Won't Get Fooled Again"-these drummers played with wild abandon, rushing and dragging in ways that created excitement. If you quantized these performances, you'd destroy what makes them special.
- When you've captured a great performance: If you recorded a MIDI keyboard part and it already feels great, has energy, and sits in the pocket, leave it alone. Not everything needs fixing. Trust your ears.
6.3. The Middle Path
Most professional producers don't think in terms of "quantize everything" or "quantize nothing." They use quantization selectively:
- Quantize the kick and snare tightly to establish a solid foundation
- Quantize hi-hats and percussion more lightly (50-70%) to keep some groove
- Leave musical elements like bass lines and chord stabs with minimal quantization
- Don't quantize lead vocals or solo instruments at all
Think of it like mixing: you don't set every instrument to the same volume. You make choices based on what each element needs. Quantization works the same way.
7. Quantization in Different Musical Contexts
Let's look at how quantization applies in specific genres and production scenarios. Understanding these contexts will help you make better decisions in your own work.
7.1. Hip-Hop and the Art of Groove
Hip-hop has a complex relationship with quantization. On one hand, many contemporary trap and drill productions feature ultra-quantized hi-hats playing rapid sixteenth-note and thirty-second-note patterns-listen to anything produced by Southside or TM88. These hi-hats are often 100% quantized and then processed with unusual effects.
On the other hand, the most revered hip-hop producers are known for their un-quantized grooves. J Dilla, who we mentioned earlier, famously created beats that sat in an ambiguous space-not quite straight sixteenth notes, not quite swung, but somewhere in between. He'd often play his drum parts in manually, then adjust individual notes by tiny amounts to create a specific feel. This "Dilla time" became hugely influential.
Similarly, DJ Premier is known for sampling old drum breaks and leaving them raw and unquantized, letting the original drummer's feel shine through. His production on Gang Starr's "Mass Appeal" exemplifies this approach-the drums have a loose, organic bounce that comes from human performance.
The lesson? In hip-hop, it's not about whether to quantize, but how to quantize to achieve the specific groove you're after.
7.2. EDM and Perfect Precision
If hip-hop sits in a grey area, electronic dance music generally doesn't. The vast majority of house, techno, trance, and other club-oriented genres rely on rock-solid, fully quantized timing.
This isn't laziness-it's functional. When a DJ is mixing two tracks together in a club, they need those beats to align perfectly. If your kick drums are wandering around the beat, the DJ can't smoothly transition between your track and another. The grid-locked timing of EDM is what makes DJ culture possible.
Listen to Deadmau5's "Strobe" or Eric Prydz's "Opus". Every element is quantized perfectly, but these tracks don't sound robotic or lifeless. That's because the producers create interest through other means: evolving timbres, building arrangements, subtle filter movements, and clever sound design. The rhythm stays constant and precise, while everything else provides the human touch.
7.3. Rock and Live Instrumentation
When rock bands started incorporating programmed elements in the 1980s, quantization became a point of tension. Acoustic drums, bass, and guitars all have natural timing variations. When you add a perfectly quantized synthesizer or drum machine, it can clash with the human instruments.
Some bands leaned into this tension. Nine Inch Nails often combines rigid, quantized industrial beats with loose, aggressive live guitars and vocals. On "Closer" or "March of the Pigs", the machine elements and human elements intentionally pull against each other, creating excitement.
Other producers try to bridge the gap. When programming drums for a rock track, they might:
- Use light quantization (50-60%) so parts tighten up but don't feel robotic
- Apply heavy humanization to add natural variation
- Manually adjust certain hits-like pushing a snare slightly ahead of the beat for urgency, or pulling it back for weight
- Match the quantization feel to the tempo variations of the live instruments
8. Advanced Quantization Techniques
Once you understand basic quantization, you can explore more sophisticated techniques that professional producers use to craft specific grooves and feels.
8.1. Groove Templates and Extraction
Many DAWs allow you to create or load groove templates-pre-designed timing patterns that go beyond simple straight or swung grids. Instead of quantizing to a mathematically perfect grid, you quantize to a groove that has its own built-in timing personality.
For example, Ableton Live includes groove templates extracted from classic drum machines like the MPC60 and Linn LM-1. These machines had slight timing imperfections and signature swing characteristics that became part of their sound. By quantizing to an MPC groove template, you're making your MIDI performance emulate how a beat would feel if programmed on that legendary hardware.
Even better, you can extract groove from existing audio. Say you find a drum break with an amazing feel. You can analyze its timing, extract the groove as a template, and then apply that exact timing pattern to your MIDI drums. Suddenly your programmed drums have the same pocket as the original recording.
This technique bridges the gap between programmed and live feels. You get the control and editability of MIDI with the groove of a great human performance.
8.2. Selective Quantization
You don't have to quantize all notes equally. Most DAWs let you quantize different notes by different amounts, or exclude certain notes entirely.
Here's a practical example: You've recorded a drum pattern with kicks, snares, and hi-hats. You want the kicks perfectly on the grid for maximum punch, the snares mostly on the grid but with a bit of looseness, and the hi-hats relatively free to create a natural shuffle feel.
You would:
- Select only the kick drum notes and quantize them at 100% strength
- Select only the snare notes and quantize them at 60% strength
- Select the hi-hat notes and quantize them at 30% strength, or not at all
This creates a hierarchical approach: your low-end foundation is solid, your backbeat is mostly solid, and your higher-frequency elements have more freedom to create groove and movement.
8.3. Intentional Offsets and Feel
Sometimes you want to deliberately shift notes away from the grid in a consistent direction. This is different from humanization's random variations-it's a purposeful timing choice.
For example, many producers push hi-hat notes slightly ahead of the beat (by 5-15 milliseconds) to create urgency and forward motion. Or they might pull bass notes slightly behind the kick drum to create a heavier, more laid-back feel.
In reggae and dub music, the classic "one drop" feel comes partly from timing offsets. The snare and bass hit on beats 2 and 4, but they often sit slightly behind where you'd expect them, creating that characteristic heavy, hypnotic groove. Listen to Bob Marley & The Wailers' "No Woman, No Cry" to hear this in action.
You can achieve this in your DAW by quantizing first, then manually shifting certain notes by a consistent amount, or by using your DAW's track delay feature to offset an entire instrument by a few milliseconds.
9. Common Quantization Mistakes
Let's talk about what can go wrong and how to avoid it. These are mistakes nearly everyone makes when starting out with quantization.
9.1. Over-Quantizing
The most common mistake is quantizing too much, too hard, too often. It's tempting to hit that quantize button on everything because it makes your timing look perfect in the piano roll. But perfection isn't always musical.
Music breathes. Great performers naturally speed up slightly during exciting sections and pull back during quiet ones. They lean into certain notes and ghost others. When you crush everything to a perfect grid at 100% strength, you remove these micro-expressions.
The result sounds stiff and lifeless-what musicians call "robotic" or "playing to the click." Your parts might be technically perfect, but they lack soul.
Solution: Start with lighter quantization (50-70%) and only increase if necessary. Listen carefully-if it already feels good, stop. Use the "undo" button liberally. Compare the quantized version to the original, and trust your ears about which sounds better.
9.2. Wrong Quantize Value
Choosing the wrong grid resolution can destroy your performance. Imagine you played a part mixing quarter notes, eighth notes, and sixteenth notes. If you quantize to eighth notes, all your sixteenth notes get rounded to the nearest eighth, and half your pattern disappears.
Or picture this: you played a triplet-based shuffle groove, but you quantize to straight sixteenth notes. Your DAW tries to snap your triplets to the wrong grid, and instead of tightening things up, it pushes notes to bizarre locations that sound completely wrong.
Solution: Before quantizing, look at your MIDI in the piano roll and identify the smallest rhythmic value you used. If you see sixteenth notes, quantize to sixteenths (or thirty-seconds if you're paranoid). If you played triplets, make sure you select a triplet quantize value. When in doubt, choose a finer grid-you can always use lighter quantization strength to avoid pulling notes too far.
9.3. Quantizing Everything Uniformly
Treating every instrument and every part the same is a missed opportunity. Different instruments serve different roles in your mix, and they benefit from different quantization approaches.
Your kick drum and bass typically lock together tightly to form the low-end foundation. Your hi-hats and percussion often groove more loosely on top. Your pads and strings might swell and breathe without any strict timing at all. If you quantize everything identically, you lose these relationships.
Solution: Think about the function of each part. What needs to be solid? What needs to groove? What needs to be free? Quantize accordingly, using different strengths and sometimes different values for different instruments.
9.4. Ignoring Velocity
Quantization fixes timing, but many beginners forget that MIDI also records velocity-how hard you hit each note. You can have perfect timing but still sound robotic if every note has the exact same velocity.
Human drummers don't hit every hi-hat with identical force. Pianists don't play every chord at the same volume. Natural accents and dynamics are crucial to musicality.
Solution: After quantizing timing, look at your velocity values. Vary them deliberately, adding accents where appropriate. Most DAWs let you randomize velocity slightly, or you can manually adjust important notes. A good rule of thumb: downbeats and stressed syllables should be louder, off-beats and passing notes should be softer.
10. Quantization Workflow and Best Practices
Let's bring everything together with practical workflow advice. Here's how professional producers typically approach quantization in their daily work.
10.1. The Recording Phase
Some DAWs offer input quantization (sometimes called "real-time quantization"), which quantizes your notes as you play them. While this sounds convenient, most professionals turn this off. Why?
Because you can't undo it. If input quantization is on and you play something, those notes snap to the grid immediately and your original timing is lost forever. You can't go back and say, "Actually, I liked the feel before I quantized it."
Better approach: Record with input quantization off, capturing your natural performance. Then you can quantize afterward with as much or as little strength as you want, and you always have the original to return to.
10.2. The Editing Phase
Here's a professional workflow:
- Listen first: Before touching anything, play back your recording several times. Where does it feel good? Where does it feel sloppy? Maybe only certain sections need help.
- Identify problem areas: Use your DAW's piano roll or event list to look at timing visually. You'll often see that one or two notes are way off, while others are fine. Maybe you just need to fix those few notes manually rather than quantizing everything.
- Try light quantization first: Start with 50% strength and listen. Does it help? Do you need more? Or did you lose something important?
- Quantize in passes: Maybe do a first pass at 60%, listen, then do another pass at 40% on sections that still need help. Building up gradually gives you more control than one aggressive pass.
- Compare A/B: Use your DAW's undo function to quickly switch between the quantized and original versions. Which sounds better? Be honest with yourself.
- Consider humanization: If your quantized result sounds too stiff, try your DAW's humanize function. Small amounts can make a huge difference.
10.3. Genre-Specific Defaults
As you work more, you'll develop default approaches for different genres. Here are some starting points:
- House/Techno: 100% quantization to sixteenth notes, minimal humanization
- Hip-Hop: 70-80% quantization to sixteenth notes, moderate humanization, possible manual adjustments for feel
- Pop: 80-90% quantization to sixteenth notes on drums/bass, lighter (50-60%) on melodic elements
- Rock/Alternative: 50-60% quantization, heavy humanization, or just manual fixes of obvious problems
- Jazz/Blues: Light quantization (30-40%) if any, mostly manual editing, preserve original feel
- Classical: Minimal quantization (20-30%) on background parts only, never on soloistic elements
These are starting points, not rules. Your specific track might need something completely different.
10.4. When to Use Manual Editing Instead
Sometimes quantization isn't the answer at all. If you have just a few notes that are obviously wrong, it's often faster and more musical to simply grab them with your mouse and move them by hand.
Manual editing gives you surgical precision. You can move one kick drum 10 milliseconds earlier without affecting anything else. You can adjust the timing of a phrase to match the natural decay of a previous note. You can create custom rhythmic feels that no quantize function could produce.
Professional productions often combine both approaches: quantize to get 90% of the way there, then manually adjust specific notes that need special attention.
11. Technical Considerations and DAW Specifics
While the concepts we've discussed apply universally, different DAWs implement quantization somewhat differently. Let's look at a few specifics without getting too deep into any single platform.
11.1. Destructive vs. Non-Destructive Quantization
This is a critical distinction. Destructive quantization permanently changes your MIDI data. Once you apply it and save your project, your original timing is gone forever. Non-destructive quantization applies the quantization as a temporary layer-your original MIDI data is preserved underneath, and you can turn the quantization on or off, or adjust its strength at any time.
Most modern DAWs support non-destructive quantization to some degree. Ableton Live, for instance, has a groove pool where you can apply grooves to clips without altering the underlying MIDI. Logic Pro has both destructive (the quantize menu option) and non-destructive (the inspector's quantize drop-down) methods.
Best practice: When possible, use non-destructive quantization while you're working. You can always "print" or render it to make it permanent later if you're sure. This gives you maximum flexibility to make changes as your track develops.
11.2. Latency and Monitoring
Here's something that catches beginners: sometimes what sounds like bad timing isn't actually bad playing-it's latency in your audio interface or monitoring system.
If you're hearing what you play delayed by 20-30 milliseconds (or more), you'll naturally compensate by playing slightly early. When you play back the recording, it'll sound fine-because you unconsciously adjusted for the delay. But the MIDI data will look early in your piano roll.
If you then quantize this performance, you might actually be making it worse, pushing notes that felt right away from where they should be.
Solution: Minimize latency as much as possible when recording MIDI. Use ASIO drivers (on Windows) or Core Audio (on Mac), set your buffer size as low as your computer can handle without crackling, and use your DAW's latency compensation features. If you can't eliminate latency, many DAWs offer input delay compensation, which automatically shifts recorded MIDI back by the amount of latency in your system.
Key Terms
- Quantization
- The process of aligning MIDI events to a rhythmic grid, correcting timing variations by moving notes to the nearest specified grid position.
- MIDI
- Musical Instrument Digital Interface; a protocol that communicates musical performance data (notes, timing, velocity, etc.) between electronic instruments and computers.
- Piano Roll
- A visual editor in DAWs that displays MIDI notes as rectangles on a grid, with pitch on the vertical axis and time on the horizontal axis.
- Quantize Value
- The rhythmic resolution used for quantization, determining the spacing of the grid (e.g., quarter notes, eighth notes, sixteenth notes).
- Quantize Strength
- A parameter controlling how far notes move toward the grid, expressed as a percentage; 100% moves notes completely to the grid, lower values move them only partway.
- Humanization
- The process of adding small, random variations in timing and velocity to quantized MIDI data to make it sound more natural and less mechanical.
- Velocity
- A MIDI parameter representing how hard a note is struck or played, affecting the volume and sometimes the timbre of the resulting sound.
- Swing
- A timing feel where alternating notes have unequal durations, typically based on triplet subdivisions; the first note is longer, the second shorter, creating a "long-short" pattern.
- Groove Template
- A predefined or extracted timing pattern that contains specific rhythmic characteristics, used to quantize MIDI to a particular feel rather than a mathematically perfect grid.
- Input Quantization
- Real-time quantization that snaps notes to the grid as you play them, rather than after recording; this is generally discouraged because it's irreversible.
- Destructive Quantization
- Quantization that permanently alters the original MIDI data, removing the possibility of returning to the original timing.
- Non-Destructive Quantization
- Quantization applied as a temporary effect that can be adjusted or removed, preserving the original MIDI timing underneath.
- Grid
- The invisible framework of rhythmic positions in a DAW, typically aligned with measures, beats, and subdivisions, to which MIDI events can be snapped.
- Latency
- The delay between when you perform an action (like pressing a MIDI key) and when you hear the resulting sound; high latency can affect timing accuracy during recording.
- DAW
- Digital Audio Workstation; software used for recording, editing, and producing audio and MIDI, such as Ableton Live, Logic Pro, Pro Tools, or FL Studio.