Registering Navigation Menus


Registering Navigation Menus
Welcome to this comprehensive guide on registering navigation menus! In this document, we'll explore one of the most fundamental aspects of building dynamic websites: creating flexible, customizable navigation systems. Whether you're building a simple blog or a complex business website, understanding how to properly register and implement navigation menus is essential for creating user-friendly, maintainable websites.
Think of navigation menus as the roadmap of your website. Just as a shopping mall has directories that help visitors find different stores, your website needs clear navigation to help users find the content they're looking for. But here's the key difference: while a physical directory is fixed and requires maintenance crews to update it, digital navigation menus can be easily updated by website administrators without touching any code-if they're properly registered.
Understanding Navigation Menu Registration
Before we dive into the technical details, let's understand what we mean by registering a navigation menu. Registration is the process of telling your website's theme that certain locations exist where menus can be placed. It's like reserving parking spaces in a parking lot-you're designating specific spots where something (in this case, navigation menus) can be placed later.
When you register a navigation menu location, you're doing two important things:
- Creating a placeholder in your theme where a menu can appear
- Making that location available in the admin interface so non-technical users can assign menus to it
This separation between registration (done by developers) and assignment (done by administrators) is what makes modern content management systems so powerful and flexible.
The Real-World Analogy
Imagine you're setting up a restaurant. As the owner (developer), you need to decide where different types of signs will go: one at the entrance showing today's specials, one in the dining room showing the main menu, and one in the bar area showing drinks. You install the frames and mounting hardware (registration), but you don't permanently attach specific menus to them. Instead, your manager (administrator) can easily swap out different menus as needed-breakfast menu in the morning, lunch menu at noon, dinner menu in the evening-all without calling a contractor.
This is exactly how navigation menu registration works. You set up the locations once, and then administrators can assign, change, and update menus whenever needed through a simple interface.
The Basic Registration Process
Registering navigation menus involves working with your theme's functions file. This file acts as a control center for your theme's features and capabilities. Let's break down the process step by step.
The register_nav_menus() Function
The core function for registering navigation menus is register_nav_menus(). This function takes an array of menu locations as its parameter. Each location consists of a location identifier (a slug or key) and a description (a human-readable label).
Here's the basic structure:
 register_nav_menus( array(
 'location-slug' => 'Human Readable Description',
 'another-location' => 'Another Description'
 ) );
Breaking Down the Components
Let's examine each part of this structure:
- Location slug: This is a unique identifier used in code. It should be lowercase, contain no spaces (use hyphens instead), and be descriptive. Examples: 'primary-menu', 'footer-navigation', 'mobile-menu'
- Description: This is what administrators see in the admin panel. It should be clear and descriptive. Examples: 'Primary Menu', 'Footer Navigation', 'Mobile Menu'
The location slug is for developers (you'll use it in your theme code), while the description is for content managers who will be assigning menus to these locations.
A Practical Example
Let's say you're building a business website that needs three navigation areas:
- A main navigation menu in the header
- A secondary menu in the footer with legal links
- A social media links menu
Here's how you would register these locations:
 function register_my_menus() {
 register_nav_menus( array(
 'header-menu' => 'Header Menu',
 'footer-menu' => 'Footer Menu',
 'social-menu' => 'Social Media Menu'
 ) );
 }
 add_action( 'after_setup_theme', 'register_my_menus' );
Notice that we've wrapped our registration code inside a custom function called register_my_menus and then hooked it to the after_setup_theme action. This timing is important-we'll explore why in the next section.
Proper Timing with Action Hooks
You can't just place your menu registration code anywhere in your functions file and expect it to work. Just like you can't frost a cake before you bake it, you need to register menus at the right time in the website loading process.
The after_setup_theme Action Hook
The after_setup_theme action hook is the recommended place to register navigation menus. This hook fires after the theme is loaded but before any content is rendered. Think of it as the theme's initialization phase-the perfect time to declare what features your theme supports.
The pattern always follows this structure:
- Create a custom function that contains your registration code
- Use add_action() to hook that function to 'after_setup_theme'
 function my_custom_function_name() {
 // Registration code goes here
 }
 add_action( 'after_setup_theme', 'my_custom_function_name' );
Why Timing Matters
If you try to register menus too early, certain features of the system might not be available yet. If you register them too late, the admin interface might not be properly informed about available menu locations. The after_setup_theme hook ensures your registration happens at exactly the right moment.
Think of it like setting up a conference room. You need to arrange the chairs and tables (register menu locations) after the room is unlocked and cleaned (theme setup) but before attendees arrive and the meeting starts (content rendering).
Single Menu Registration
While register_nav_menus() (plural) is used for registering multiple menu locations at once, there's also a function for registering a single menu location: register_nav_menu() (singular).
Using register_nav_menu()
The singular version takes two separate parameters instead of an array:
register_nav_menu( 'location-slug', 'Description' ); Here's a practical example:
 function register_primary_menu() {
 register_nav_menu( 'primary', 'Primary Menu' );
 }
 add_action( 'after_setup_theme', 'register_primary_menu' );
When to Use Which Function
Both functions accomplish the same goal, so which should you use?
- Use register_nav_menus(): When registering multiple locations (most common scenario). It's cleaner and more maintainable to have all menu locations defined in one place.
- Use register_nav_menu(): When you only need a single menu location, or when you're adding menu locations conditionally based on certain criteria.
In practice, most developers use register_nav_menus() even for single menus because it maintains consistency and makes it easier to add more locations later.
Naming Conventions and Best Practices
Choosing good names for your menu locations is more important than you might think. These names will be used in your code and seen by administrators, so they need to be both technically sound and user-friendly.
Location Slug Guidelines
When creating location slugs, follow these best practices:
- Use lowercase letters: 'primary-menu' not 'Primary-Menu' or 'PRIMARY-MENU'
- Use hyphens, not underscores: 'footer-menu' not 'footer_menu' (though underscores work, hyphens are the standard)
- Be descriptive but concise: 'header-menu' is better than 'menu1' or 'the-main-navigation-menu-in-the-header'
- Indicate location or purpose: Names like 'footer-menu', 'sidebar-menu', or 'mobile-menu' clearly indicate where the menu appears
- Avoid generic numbers: 'menu1', 'menu2', 'menu3' tells you nothing about what the menu is for
Description Guidelines
For the human-readable descriptions that appear in the admin panel:
- Use title case: 'Primary Navigation' not 'primary navigation'
- Be clear and specific: 'Footer Legal Links' is more helpful than 'Footer'
- Think about your end users: If a content manager sees this label, will they understand where this menu appears?
- Include context when helpful: 'Mobile Menu (Appears on screens under 768px)' provides useful information
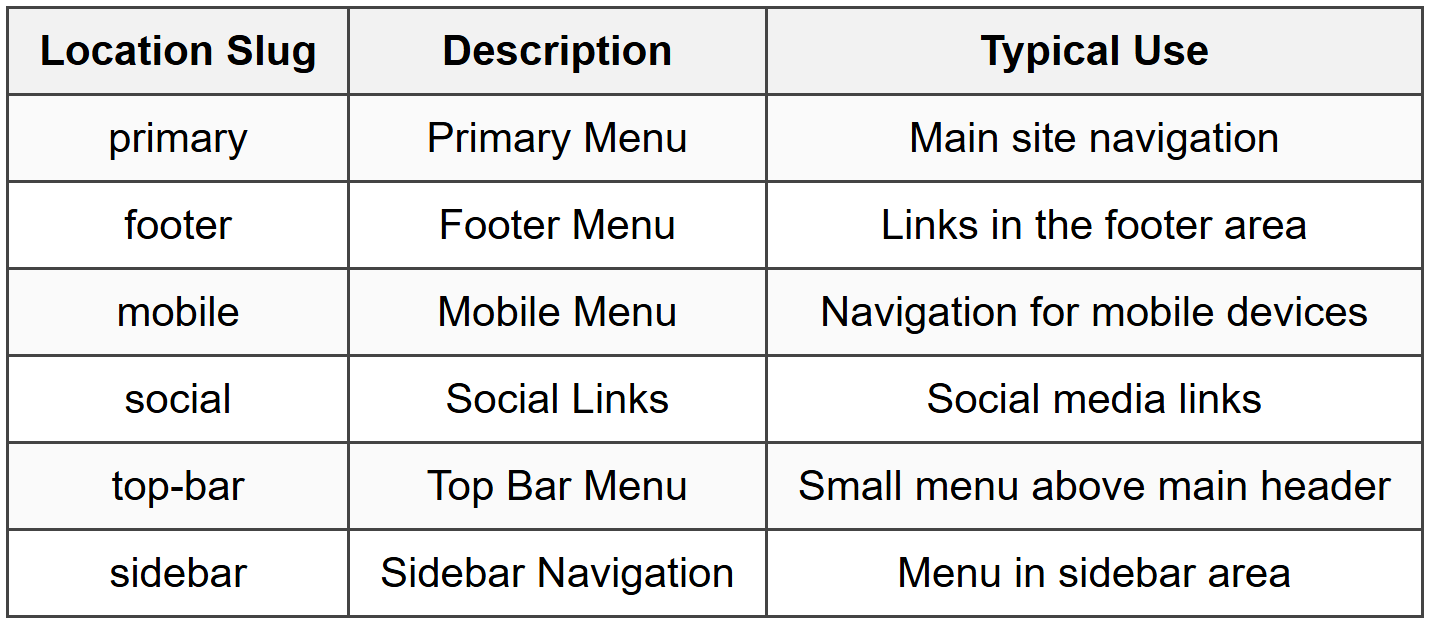
Common Naming Patterns
Here are some commonly used menu location names you might encounter or use:
Displaying Registered Menus
Registering a menu location is only half the job. You also need to tell your theme where to actually display the menu. This is done using the wp_nav_menu() function in your theme template files.
The wp_nav_menu() Function
The wp_nav_menu() function is what actually outputs a navigation menu on your website. It takes an array of parameters that control how the menu appears and behaves.
Here's the basic structure for displaying a registered menu location:
 wp_nav_menu( array(
 'theme_location' => 'your-location-slug'
 ) );
The theme_location parameter tells the function which registered location to display. This must match the slug you used when registering the menu.
Practical Example: Header Menu
Let's say you registered a header menu location like this:
 register_nav_menus( array(
 'header-menu' => 'Header Menu'
 ) );
To display this menu in your header template file (header.php), you would add:
 <nav>
 <?php
 wp_nav_menu( array(
 'theme_location' => 'header-menu'
 ) );
 ?>
 </nav>
Additional wp_nav_menu() Parameters
The wp_nav_menu() function accepts many parameters to customize the menu output. Here are some of the most useful ones:
- menu_class: CSS class for the menu container (ul element)
- container: HTML element to wrap the menu in (default is 'div')
- container_class: CSS class for the container element
- fallback_cb: Function to call if no menu is assigned to the location
- depth: How many levels of hierarchy to display
Here's a more complete example:
 wp_nav_menu( array(
 'theme_location' => 'header-menu',
 'menu_class' => 'main-navigation',
 'container' => 'nav',
 'container_class' => 'primary-menu-container',
 'depth' => 2
 ) );
Checking if a Menu Location Has a Menu Assigned
Sometimes you want to check whether an administrator has actually assigned a menu to a registered location before trying to display it. This is helpful for providing fallback content or avoiding empty navigation containers.
The has_nav_menu() Function
The has_nav_menu() function checks whether a menu has been assigned to a specific location. It returns true if a menu is assigned, false if not.
 if ( has_nav_menu( 'header-menu' ) ) {
 // Menu is assigned, display it
 wp_nav_menu( array( 'theme_location' => 'header-menu' ) );
 } else {
 // No menu assigned, show fallback content
 echo '<p>Please assign a menu to the Header Menu location.</p>';
 }
Practical Use Cases
This checking function is valuable in several scenarios:
- Development phase: Display helpful messages to remind administrators to assign menus
- Conditional layouts: Adjust your layout if certain menus aren't assigned
- Fallback navigation: Automatically display a page list if no menu is assigned
- Clean markup: Avoid outputting empty navigation containers
Example with automatic fallback to page list:
 if ( has_nav_menu( 'header-menu' ) ) {
 wp_nav_menu( array( 'theme_location' => 'header-menu' ) );
 } else {
 wp_list_pages( array( 'title_li' => '' ) );
 }
Multiple Menu Locations in Practice
Most modern websites have multiple navigation menus serving different purposes. Let's walk through a complete, realistic example of a website with multiple menu locations.
Complete Multi-Menu Example
Imagine you're building a corporate website that needs:
- A primary navigation menu in the header
- A utility menu in the top bar (login, account, etc.)
- A footer menu with legal links
- A social media menu in the footer
Here's how you would register all four locations in your functions file:
 function corporate_theme_menus() {
 register_nav_menus( array(
 'primary' => 'Primary Navigation',
 'utility' => 'Utility Menu (Top Bar)',
 'footer-legal' => 'Footer Legal Links',
 'social' => 'Social Media Links'
 ) );
 }
 add_action( 'after_setup_theme', 'corporate_theme_menus' );
Displaying These Menus in Templates
Now, let's see how these menus would be displayed in different template files.
In header.php (top utility menu and primary navigation):
 <!-- Top utility bar -->
 <div class="utility-bar">
 <?php
 wp_nav_menu( array(
 'theme_location' => 'utility',
 'menu_class' => 'utility-menu',
 'container' => 'nav',
 'depth' => 1
 ) );
 ?>
 </div>

 <!-- Primary navigation -->
 <header>
 <nav class="primary-navigation">
 <?php
 wp_nav_menu( array(
 'theme_location' => 'primary',
 'menu_class' => 'main-menu'
 ) );
 ?>
 </nav>
 </header>
In footer.php (footer legal and social menus):
 <footer>
 <div class="footer-menus">
 <!-- Legal links -->
 <?php
 wp_nav_menu( array(
 'theme_location' => 'footer-legal',
 'menu_class' => 'legal-links',
 'container' => 'nav',
 'depth' => 1
 ) );
 ?>

 <!-- Social media links -->
 <?php
 wp_nav_menu( array(
 'theme_location' => 'social',
 'menu_class' => 'social-links',
 'container' => 'nav',
 'link_before' => '<span class="screen-reader-text">',
 'link_after' => '</span>',
 'depth' => 1
 ) );
 ?>
 </div>
 </footer>
Understanding the Admin Interface Connection
Once you've registered menu locations in your code, these locations automatically become available in the admin interface. Understanding this connection helps you see the full picture of how menu registration works.
What Happens in the Admin Panel
When you register menu locations, the system creates entries in the Menus admin screen. Administrators can then:
- Create new menus with custom names
- Add pages, posts, custom links, and categories to these menus
- Arrange menu items in any order and create hierarchies
- Assign these created menus to your registered locations
Think of it this way: you (the developer) create the empty frames on the wall (registered locations), and the administrator fills those frames with pictures (menu content). The administrator can change which picture goes in which frame at any time without your help.
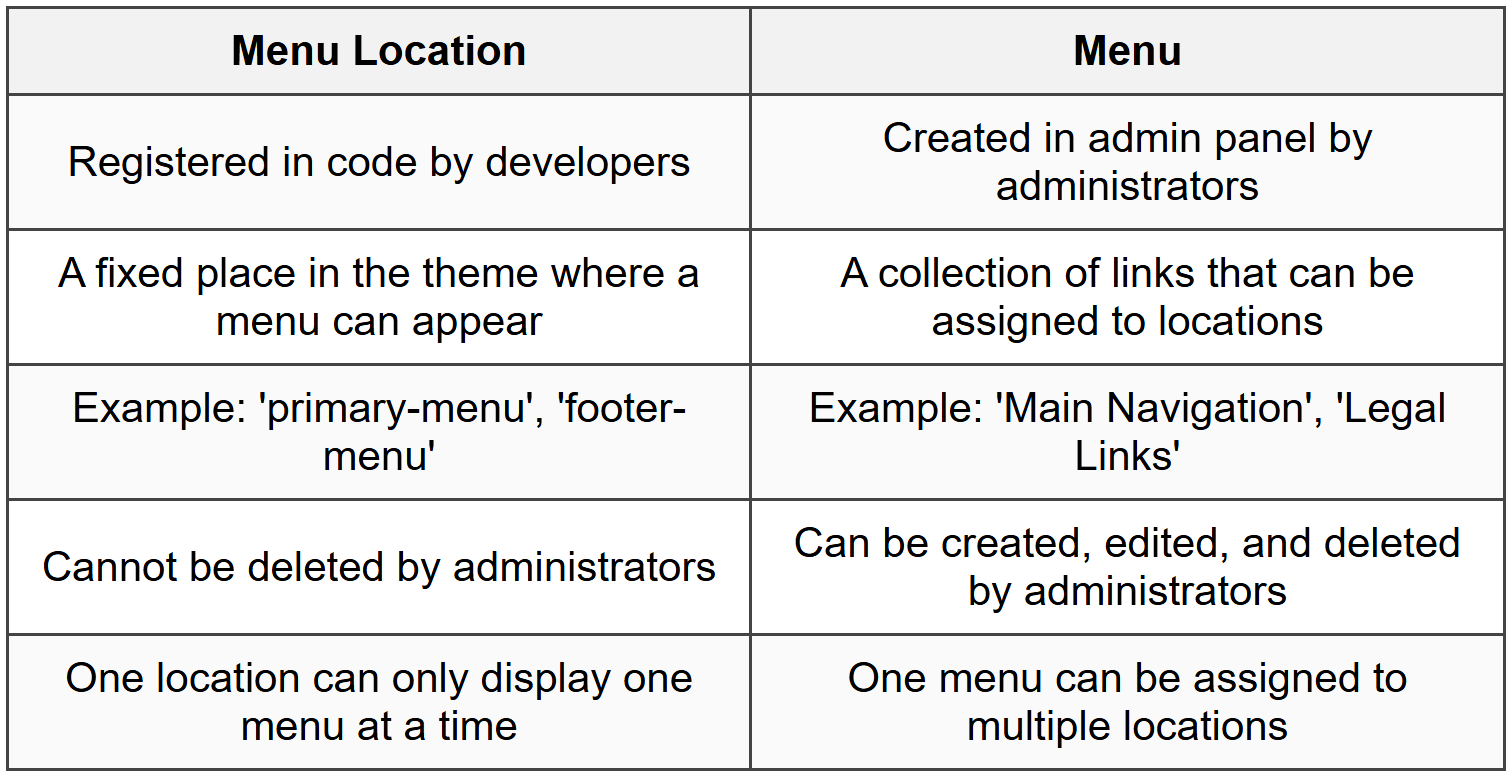
Menu vs. Menu Location
It's crucial to understand the difference between these two concepts:
The Assignment Process
Here's what happens when an administrator assigns a menu to a location:
- Administrator creates a menu and adds items to it
- Administrator selects which registered location(s) this menu should appear in
- The system stores this assignment in the database
- When a page loads and wp_nav_menu() is called with that location, the assigned menu is displayed
This separation of concerns is powerful: developers control the structure and placement of navigation areas, while content managers control what links appear in those areas.
Advanced Registration Scenarios
Now that you understand the basics, let's explore some more advanced scenarios you might encounter in real-world projects.
Conditional Menu Registration
Sometimes you might want to register menu locations only under certain conditions. For example, you might have a menu location that only appears on e-commerce pages.
 function conditional_menu_registration() {
 $menus = array(
 'primary' => 'Primary Menu',
 'footer' => 'Footer Menu'
 );

 // Only register shop menu if WooCommerce is active
 if ( class_exists( 'WooCommerce' ) ) {
 $menus['shop-menu'] = 'Shop Navigation';
 }

 register_nav_menus( $menus );
 }
 add_action( 'after_setup_theme', 'conditional_menu_registration' );
Child Theme Menu Registration
When working with child themes, you might want to add additional menu locations without removing the parent theme's locations. You can do this by registering additional menus in your child theme's functions file.
The parent theme might have:
 register_nav_menus( array(
 'primary' => 'Primary Menu'
 ) );
Your child theme can add more:
 function child_theme_menus() {
 register_nav_menus( array(
 'sidebar-menu' => 'Sidebar Menu',
 'mobile-menu' => 'Mobile Menu'
 ) );
 }
 add_action( 'after_setup_theme', 'child_theme_menus' );
Both sets of menu locations will be available-the child theme's registrations don't overwrite the parent's.
Theme Setup Function Pattern
In professional theme development, menu registration is typically part of a larger theme setup function that handles multiple theme features. Here's a more complete example:
 function my_theme_setup() {
 // Enable featured images
 add_theme_support( 'post-thumbnails' );

 // Enable automatic feed links
 add_theme_support( 'automatic-feed-links' );

 // Register navigation menus
 register_nav_menus( array(
 'primary' => 'Primary Navigation',
 'footer' => 'Footer Menu'
 ) );

 // Enable HTML5 markup
 add_theme_support( 'html5', array( 'navigation-widgets' ) );
 }
 add_action( 'after_setup_theme', 'my_theme_setup' );
This pattern keeps all theme setup tasks organized in one function, making your code more maintainable.
Common Issues and Troubleshooting
Even with straightforward code, you might encounter issues when working with navigation menus. Let's address the most common problems and their solutions.
Menu Location Not Appearing in Admin
Problem: You've registered a menu location, but it doesn't show up in the admin panel.
Common causes and solutions:
- Wrong hook: Make sure you're using 'after_setup_theme', not 'init' or another hook
- Syntax error: Check for missing commas, parentheses, or quotes in your registration code
- Function not hooked: Verify you've included the add_action() line to hook your function
- Caching: Clear any caching plugins or browser cache and refresh
Wrong Menu Displaying
Problem: A different menu than expected appears in your theme location.
Common causes and solutions:
- Slug mismatch: The theme_location in wp_nav_menu() must exactly match the slug used in registration (case-sensitive)
- Multiple assignments: Check if the same menu is assigned to multiple locations
- Fallback behavior: If no menu is assigned, wp_nav_menu() shows a page list by default
Menu Not Displaying at All
Problem: Nothing appears where the menu should be.
Common causes and solutions:
- No menu assigned: An administrator needs to assign a menu to the location in the admin panel
- Missing wp_nav_menu(): Registering a location doesn't automatically display it-you must call wp_nav_menu() in your template
- Template file not being used: Verify the correct template file is being loaded for the page you're viewing
- PHP errors: Check for PHP errors that might be preventing code execution
Debugging Tips
When troubleshooting menu issues, try these debugging techniques:
- Check registered locations: Use get_registered_nav_menus() to see what locations are actually registered
- Verify menu assignment: Use has_nav_menu() to check if a menu is assigned to a location
- Enable debugging: Turn on WP_DEBUG to see PHP errors and warnings
- Test with default theme: Switch to a default theme to determine if the issue is with your code or something else
Example debugging code you can temporarily add to your template:
 <?php
 // Display all registered menu locations
 $locations = get_registered_nav_menus();
 echo '<pre>';
 print_r( $locations );
 echo '</pre>';

 // Check if a specific location has a menu assigned
 if ( has_nav_menu( 'primary' ) ) {
 echo 'Primary menu is assigned';
 } else {
 echo 'No menu assigned to primary location';
 }
 ?>
Responsive and Mobile Considerations
Modern websites need to work well on all device sizes. Menu registration plays an important role in creating responsive navigation experiences.
Separate Mobile Menu Locations
One common approach is to register a separate menu location specifically for mobile devices. This allows administrators to create a simplified navigation structure for small screens.
 register_nav_menus( array(
 'primary' => 'Desktop Primary Menu',
 'mobile' => 'Mobile Menu (Simplified)'
 ) );
In your template, you might conditionally display different menus based on device detection, or include both and use CSS to show/hide them appropriately.
Menu Depth for Mobile
When displaying menus on mobile devices, you might want to limit the depth to prevent overly complex navigation. This is controlled in the wp_nav_menu() function, not during registration:
 wp_nav_menu( array(
 'theme_location' => 'mobile',
 'depth' => 2 // Only show top level and one sub-level
 ) );
Hamburger Menu Locations
If you're implementing a hamburger menu pattern, you still register the location normally. The visual presentation (hamburger icon, slide-out drawer, etc.) is handled through CSS and JavaScript, not through menu registration.
 register_nav_menus( array(
 'hamburger' => 'Hamburger Menu (Mobile Navigation)'
 ) );
Best Practices Summary
As we conclude this guide, let's consolidate the best practices for registering navigation menus:
Code Organization
- Always register menus inside a function hooked to after_setup_theme
- Use descriptive, consistent naming for both slugs and descriptions
- Group menu registration with other theme setup tasks in a single function
- Comment your code to explain what each menu location is for
Naming and Documentation
- Use lowercase slugs with hyphens for location identifiers
- Write clear descriptions that help administrators understand where menus appear
- Choose names that indicate location or purpose, not arbitrary labels
- Document any special considerations in code comments
Template Implementation
- Use has_nav_menu() to check for menu assignment before displaying
- Provide sensible fallbacks for when no menu is assigned
- Use appropriate wp_nav_menu() parameters for your design needs
- Wrap menus in semantic HTML (nav elements) for accessibility
User Experience
- Register enough menu locations to support your design without overwhelming administrators
- Consider mobile-specific menu locations for better responsive design
- Think about the administrator experience when choosing location names and descriptions
- Test menu registration with real content at various screen sizes
Maintenance and Updates
- Keep menu registration code in the theme's functions file or a dedicated include file
- Document any dependencies (like conditional registration based on plugins)
- Test thoroughly after adding or removing menu locations
- Consider backward compatibility when modifying existing menu locations
Real-World Complete Example
Let's bring everything together with a complete, real-world example that you might use in an actual theme project. This example includes registration, display, and error checking.
In functions.php
 /**
 * Register navigation menu locations
 * These locations will be available in Appearance → Menus
 */
 function mytheme_register_nav_menus() {
 register_nav_menus( array(
 'primary' => 'Primary Navigation (Main header menu)',
 'footer-main' => 'Footer Main Menu (Links in footer columns)',
 'footer-legal' => 'Footer Legal Menu (Small links at bottom)',
 'social' => 'Social Media Links'
 ) );
 }
 add_action( 'after_setup_theme', 'mytheme_register_nav_menus' );
In header.php
 <header class="site-header">
 <div class="site-branding">
 <!-- Logo and site title -->
 </div>

 <?php if ( has_nav_menu( 'primary' ) ) : ?>
 <nav class="primary-navigation" role="navigation" aria-label="Primary Navigation">
 <?php
 wp_nav_menu( array(
 'theme_location' => 'primary',
 'menu_class' => 'primary-menu',
 'container' => false,
 'depth' => 3
 ) );
 ?>
 </nav>
 <?php endif; ?>
 </header>
In footer.php
<footer class="site-footer">
<div class="footer-menus">
<?php if ( has_nav_menu( 'footer-main' ) ) : ?>
<nav class="footer-navigation" aria-label="Footer Navigation">
<?php
wp_nav_menu( array(
'theme_location' => 'footer-main',
'menu_class' => 'footer-menu',
'depth' => 1
) );
?>
</nav>
<?php endif; ?>
<?php if ( has_nav_menu( 'social' ) ) : ?>
<nav class="social-navigation" aria-label="Social Media Links">
<?php
wp_nav_menu( array(
'theme_location' => 'social',
'menu_class' => 'social-links',
'depth' => 1
) );
?>
</nav>
<?php endif; ?>
</div>
<div class="footer-legal">
<?php
if ( has_nav_menu( 'footer-legal' ) ) {
wp_nav_menu( array(
'theme_location' => 'footer-legal',
'menu_class' => 'legal-menu',
'container' => false,
'depth' => 1
) );
}
?>
<p class="copyright">© <?php echo date('Y'); ?> Your Site Name</p>
</div>
</footer> This complete example demonstrates proper registration, conditional checking, semantic HTML, accessibility attributes, and appropriate menu parameters for different locations. It represents professional-quality code you can adapt for your own projects.
You now have a comprehensive understanding of how to register navigation menus in your themes. Remember that menu registration is about creating a flexible system where the technical structure (defined by developers) and the content (managed by administrators) remain separate. This separation is what makes modern content management systems so powerful and user-friendly.
As you build themes, think carefully about where navigation menus make sense in your design, register those locations with clear, descriptive names, and implement them properly in your templates with appropriate checks and fallbacks. With these skills, you'll create themes that are both developer-friendly to build and administrator-friendly to manage.


