Basic Song Production


Basic Song Production
1. Understanding the Demo Recording Process
Think about the first time you heard Billie Eilish's Ocean Eyes. That track started as a bedroom recording, created with minimal equipment but maximum creativity. A demo is your song's first real life outside your head-it's where melody, lyrics, and rhythm come together in recorded form.
When you're recording a demo, you're not aiming for perfection. You're capturing the essence of your song so others can hear what you're imagining. Let's say you've written a beautiful chorus but you can't explain how it should feel-a demo shows it. Producers, bandmates, or even just future-you will thank you for having a clear reference to work from.
The demo process follows a natural flow:
- Pre-production: Planning your song structure, choosing instruments, and preparing your space
- Tracking: Recording individual parts (vocals, guitar, drums, etc.)
- Editing: Cleaning up mistakes and arranging your takes
- Mixing: Balancing all the elements so they work together
- Bouncing: Exporting your final file
Here's something crucial: your demo doesn't need to sound like a finished album. The Beatles' early demos of Strawberry Fields Forever were radically different from the final version, but they communicated the core idea. That's your goal.
1.1 Setting Realistic Goals
Before you hit record, ask yourself: what's this demo for? Are you pitching it to a band? Sending it to a music supervisor? Just keeping a record of your idea? Each purpose demands different quality levels.
A voice memo on your phone can be a demo. So can a multi-track production. What matters is clarity-can someone understand your song's melody, harmony, rhythm, and emotional intent? If yes, you've succeeded.
Try this exercise right now: Hum or sing the chorus of your favourite song. Record it on your phone. Play it back. You'll notice you can still recognize the song even without instruments. That's the power of a simple demo-it preserves the musical DNA.
2. Essential Equipment and Setup
Let's talk about what you actually need. The good news? You probably already own enough to start. Remember that Bon Iver's For Emma, Forever Ago was recorded in a cabin with minimal gear, yet it launched a career.
2.1 The Absolute Basics
At minimum, you need three things:
- A recording device: This could be your smartphone, a computer, a tablet, or a dedicated recorder
- A way to capture sound: The built-in microphone works, but an external mic improves quality significantly
- Recording software: Also called a DAW (Digital Audio Workstation)
Your computer or phone likely came with recording software. iPhones have GarageBand. Windows computers have options like Audacity (which is free). These are completely legitimate tools for demo recording.
2.2 Microphones: Your First Investment
Picture the difference between hearing someone speak through a phone versus hearing them in person. That's what microphone quality does to your recording. You don't need expensive gear, but you do need something that captures your voice or instrument clearly.
There are two main types of microphones for home recording:
- Dynamic microphones: Durable, good for loud sources like guitar amps or energetic vocals. The Shure SM58 is the industry standard-you've seen it at every live concert.
- Condenser microphones: More sensitive, captures detail and nuance. Better for gentle vocals and acoustic instruments. These need power (called phantom power) which your audio interface provides.
For most singer-songwriters starting out, a simple USB condenser microphone plugs straight into your computer and gives you far better results than built-in mics. The Audio-Technica AT2020 USB is a popular choice because it's affordable and reliable.
2.3 Audio Interfaces
Think of an audio interface as a translator. It converts the analog sound waves from your microphone into digital information your computer understands, and vice versa when you play back.
If you're using a USB microphone, you don't need a separate interface-it's built in. But if you want to record with professional microphones or multiple instruments simultaneously, an interface becomes essential.
A basic two-channel interface (like the Focusrite Scarlett 2i2) lets you plug in a microphone and a guitar at the same time. This is perfect for recording yourself singing while playing acoustic guitar-exactly how Ed Sheeran started.
2.4 Headphones vs. Monitors
You need to hear what you're recording. Studio monitors are specialized speakers designed for accurate sound reproduction, but they're not essential for demos. What you absolutely need are decent headphones.
Here's the key: use closed-back headphones while recording. These prevent sound from leaking out and being picked up by your microphone. When you're mixing later, open-back headphones or monitors give you a more accurate picture of your sound.
The headphones you use for casual listening might color the sound-bass-boosted consumer headphones make you think your mix has more low end than it does. Try your demo on multiple listening devices: headphones, phone speaker, car stereo. If it sounds good everywhere, you're on the right track.
2.5 Your Recording Space
Clap your hands in your room right now. Hear that echo? That's room reverb, and your microphone picks it up. Professional studios minimize this with acoustic treatment, but you can work with what you have.
Simple improvements that cost nothing:
- Record in a smaller room-bathrooms and closets have less echo
- Hang blankets or duvets on walls to absorb sound
- Record in a closet full of clothes-the fabric dampens reflections
- Avoid rooms with hard, parallel walls (like empty bedrooms)
Billie Eilish and her brother Finneas recorded her debut album in his bedroom. They used the space's natural characteristics rather than fighting them. Your room has a sound-learn it and use it creatively.
3. Choosing and Using Your DAW
A Digital Audio Workstation is where all your recording, editing, and mixing happens. It's your virtual studio. Think of it as a blank canvas where you paint with sound.
3.1 Popular DAW Options
Let's look at the main choices, from free to professional:
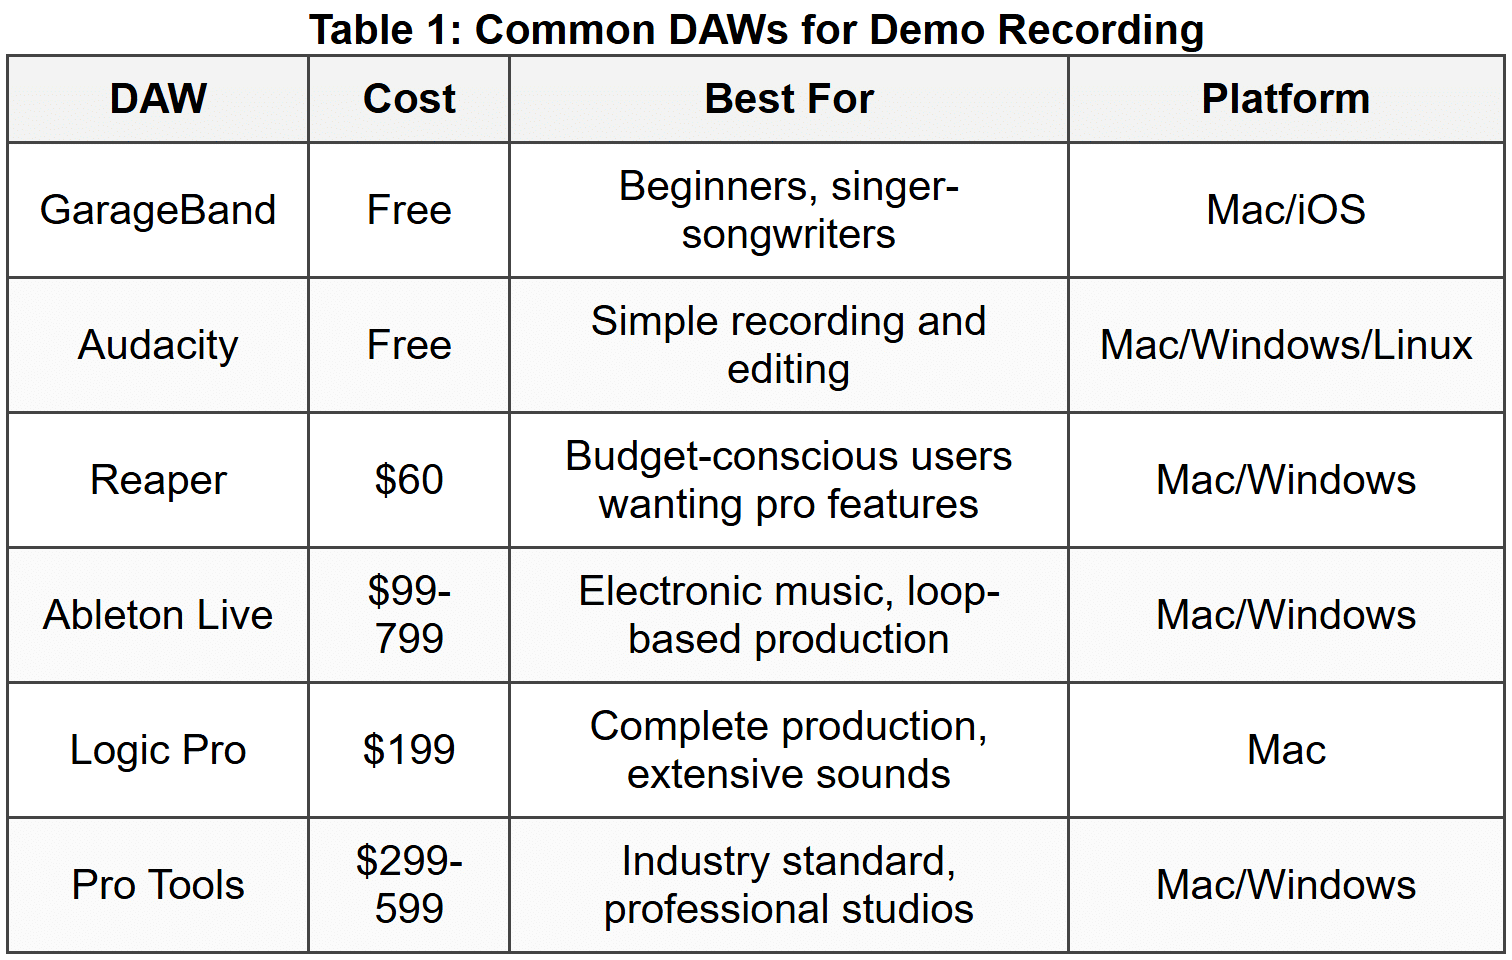
For demo recording, start with whatever's free on your system. GarageBand is incredibly powerful-plenty of chart-topping songs began there. The DAW doesn't make your song good; your ideas do.
3.2 Understanding the DAW Interface
When you first open a DAW, it might look overwhelming. But every DAW has the same basic components. Let's break them down:
The Timeline: This horizontal space represents time moving from left to right. Each vertical line is a track-one for vocals, one for guitar, one for drums, etc. Think of it like a score in sheet music, but instead of notes, you see audio waveforms.
The Mixer: This section shows volume faders and controls for each track. Imagine a mixing desk you've seen at concerts-that's what this emulates digitally.
The Transport Controls: Play, stop, record, rewind. Just like the buttons on an old tape deck.
The Track Header: On the left side of each track, you'll see controls for recording, muting, soloing, and input selection.
3.3 Setting Up Your First Session
Let's walk through setting up a basic recording session. Open your DAW and follow along:
- Create a new project: Give it a clear name like "Song Demo - [Your Song Title] - [Date]"
- Set your sample rate: Choose 44.1 kHz (CD quality) or 48 kHz (video standard). Higher isn't always better for demos.
- Set your bit depth: Use 24-bit. This gives you more dynamic range than 16-bit without huge file sizes.
- Set your tempo: Click on the BPM (beats per minute) display and enter your song's tempo. If you don't know it, tap along to your song idea and use a metronome app to find it.
- Create your first track: Add an audio track and select your microphone as the input source.
Try this now: Create a track, arm it for recording (press the record-enable button on the track), and say "testing one two three" while watching the level meter. See those bars bouncing? That's your audio signal. Aim for levels that peak around -12 dB to -6 dB-giving you headroom before distortion.
4. Recording Your First Takes
This is where ideas become reality. But first, let's address the anxiety: your first take won't be perfect. That's not just okay-it's expected. Paul McCartney has said The Beatles often did dozens of takes. You're in good company.
4.1 Preparing to Record
Before you hit that red button, do these things:
- Warm up your voice or fingers: Sing scales, play through chord progressions, get comfortable
- Set up a click track: This is a metronome that plays in your headphones, keeping you in tempo
- Adjust your monitoring level: You should hear the click and any backing tracks clearly without them being painfully loud
- Check your mic position: For vocals, position yourself about 6-8 inches from the mic, slightly off-axis to avoid plosives (the "p" and "b" sounds that create pops)
Here's a professional trick: record a few seconds, stop, and play it back. How does it sound? Is your level right? Can you hear yourself clearly? This ten-second test saves hours of frustration later.
4.2 The Click Track Debate
A click track (or metronome) is controversial. Some artists swear by it; others feel it makes their music robotic. Here's the truth: for demo recording, especially if you'll add more instruments later, a click track is your friend.
Think about Fleetwood Mac's Dreams. That steady groove lets every instrument lock together. Without tempo consistency, adding a drum part later becomes nearly impossible-the tempo drifts and nothing lines up.
However, if you're recording a solo acoustic performance meant to breathe and flex naturally, skip the click. Joni Mitchell's Blue album has tempo fluctuations that serve the emotion. Know your goal.
Try this exercise: Record yourself playing or singing a verse twice-once with a click, once without. Compare them. Which feels more natural? Which would be easier to build upon? There's no wrong answer, just different approaches for different songs.
4.3 Recording Vocals
Your voice is likely the most important element of your demo-it carries the melody and lyrics. Let's get it right.
Mic technique matters: Stand consistently at the same distance. When you back away from the mic, you sound far away (which can be an effect, but usually isn't what you want). When you get too close, you get proximity effect-an exaggerated bass boost that can sound muddy.
Sing past the microphone, not directly into it. Angle yourself about 30 degrees off-axis. This prevents those harsh "p" and "t" sounds from hitting the diaphragm directly.
Managing your performance: You don't need to record the entire song in one take. Professional recordings rarely do. You can record verse by verse, or even line by line if needed. This is called punching in.
Let's say your second verse keeps tripping you up. Record verses one and three first, then punch in just verse two separately. When you play them back together, they'll sound seamless if you maintain consistent tone and distance from the mic.
4.4 Recording Instruments
Each instrument has its own recording considerations. Let's cover the most common scenarios:
Acoustic Guitar
Position your microphone 12-15 inches from the guitar, aimed at the 12th fret (where the neck meets the body). This captures a balanced tone-not too boomy from the sound hole, not too thin from the neck.
If your guitar sounds too bright and scratchy, move the mic closer to the sound hole. Too muddy? Move it toward the neck. Make small adjustments and listen critically.
Listen to James Taylor's Fire and Rain-that intimate, present guitar sound comes from careful mic placement and a quiet recording environment.
Electric Guitar
If you're mic'ing an amplifier, place the microphone 2-4 inches from the speaker cone. Point it directly at the center for brightness, or angle it toward the edge for warmth.
Alternatively, use a direct input (DI) box or amp simulator software. Many classic guitar sounds on modern records are actually direct recordings run through software amplifiers. The guitar parts on many Daft Punk tracks were recorded direct and processed later.
Piano and Keyboards
For an acoustic piano, you'll need two microphones to capture the full range-but for demos, one mic positioned above the open lid, pointed at the strings around middle C, works fine.
For digital keyboards, just plug directly into your audio interface using a standard ¼-inch cable. No microphone needed. This is how Billy Joel records most keyboard parts-clean, direct, no room sound.
4.5 The Art of Multiple Takes
Here's a secret from professional studios: you'll record the same part multiple times and choose the best sections from each take. This is called comping (short for compositing).
Record your lead vocal three to five times all the way through. Don't stop for small mistakes-capture complete performances. Then go back and listen. Take the best verse one from take two, the best chorus from take four, and so on. Assemble your "perfect" performance from real, heartfelt takes.
This is how Adele got those powerful, emotional vocals on 21. Producer Paul Epworth recorded many complete takes, then they selected the most compelling moments from each.
5. Basic Editing Techniques
You've recorded your parts. Now it's time to clean them up and make them shine. Editing is where good recordings become great ones.
5.1 Trimming and Arranging
Look at your recorded tracks. You'll see the waveform-the visual representation of your audio. Silence looks flat; sound shows as peaks and valleys.
First task: trim the excess. Remove the countdown before you started singing, the cough between takes, the five seconds of silence at the end. Click at the start of unwanted audio, drag to the end of it, and delete. Keep only what serves the song.
Now arrange your sections. Most DAWs let you cut, copy, and paste audio just like text in a word processor. If you recorded your chorus once but it appears three times in your song, copy that audio region to the other chorus positions. This ensures consistency and saves time.
5.2 Fades and Crossfades
When you cut audio or punch in a new section, you might hear clicks or pops at the edit points. Fades eliminate these.
A fade in gradually increases volume from silence to full level. A fade out does the opposite. Apply tiny fades (just 5-10 milliseconds) at the start and end of every audio region. You won't hear them as fades-they just prevent clicks.
When two audio regions meet, use a crossfade. This fades out the first region while fading in the second, creating a smooth transition. Most DAWs have an automatic crossfade function.
5.3 Timing Correction
Let's say you recorded to a click track but your guitar strums are slightly off-beat in places. Modern DAWs can help without making you re-record.
Grid-based editing lets you snap audio to the beat grid. Zoom in close, find a guitar strum that's late, and slide it left until it aligns with the beat. Be careful-overusing this makes music feel stiff and lifeless. Correct only the obviously wrong notes.
For drums or rhythmic parts, some DAWs have quantize functions that automatically align hits to the grid. Daft Punk uses heavy quantization for their robotic precision. Jack White deliberately avoids it for human feel. Both approaches are valid-choose based on your song's needs.
5.4 Vocal Tuning Basics
Pitch correction is common in modern production, but it's a tool, not a requirement. Cher's Believe made Auto-Tune famous as an obvious effect. But most vocal tuning is invisible-just subtle correction of pitchy notes.
Many DAWs include basic pitch correction tools. Logic has Flex Pitch, Ableton has Auto-Tune (as a plugin), and there are free options like GSnap.
Here's the approach: listen to your vocal take. If one or two notes are obviously flat or sharp and it distracts from the performance, correct them. If the whole take is pitchy, record it again-tuning software can't add emotion or good phrasing.
When you apply pitch correction, use subtle settings. You want it to sound like you sang it correctly, not like a robot. Set the retune speed to slower values (30-50 milliseconds) for natural results.
5.5 Dealing with Background Noise
You've recorded a perfect vocal take, but there's a hum from your computer fan, or traffic noise from outside. What now?
First, try to prevent noise at the source. Turn off fans and AC during recording. Close windows. Record at quiet times of day.
If noise made it into your recording, many DAWs have noise reduction tools. These work by analyzing a section of pure noise, then removing that frequency profile from your recording. Use this sparingly-aggressive noise reduction makes vocals sound underwater.
Sometimes the best solution is embracing imperfection. Bob Dylan's early recordings have ambient noise. So do many classic blues recordings. If the noise doesn't obscure your song's essence, leave it. Authenticity often trumps clinical cleanliness in demos.
6. Introduction to Mixing
Mixing is balancing all your recorded elements so they work together harmoniously. Think of an orchestra-every instrument plays at the right volume, in the right position, creating a cohesive whole. You're the conductor.
6.1 Understanding Levels and Balance
Start with the most important element-usually the lead vocal-and build around it. This is your reference point.
Here's a simple workflow:
- Pull all your faders (volume controls) down to zero
- Bring up the lead vocal to a comfortable level (around -10 dB on the master output)
- Add the most important accompaniment (often the main guitar or piano)
- Layer in other elements one by one, adjusting each to support rather than compete
Try this exercise: Close your eyes and listen to Imagine by John Lennon. Notice how the piano and vocal are perfectly balanced-neither overpowers the other. That's the balance you're seeking.
The master output should never exceed 0 dB. If it does, you get clipping-digital distortion that sounds harsh and broken. Leave about -3 to -6 dB of headroom for safety.
6.2 Panning for Space
Panning positions sounds in the stereo field-left speaker, right speaker, or anywhere between. In the real world, sounds come from different locations. Panning recreates this in recordings.
Basic panning strategy:
- Center: Lead vocal, bass, kick drum, snare-the foundation of your song
- Left and right: Guitars, keyboards, backing vocals, percussion
- Extreme left and right: Special effects, ambient sounds, stereo widening
Listen to The Beatles' Here Comes the Sun. The acoustic guitars are panned left and right, creating width. The vocal sits in the center, immediately grabbing your attention. This isn't random-it's intentional spatial design.
A common technique: record a guitar part twice and pan one hard left, one hard right. This creates a wide, immersive sound. This is how the rhythm guitars in AC/DC's Back in Black achieve their massive wall of sound.
6.3 Basic EQ (Equalization)
EQ shapes the frequency content of your sounds-the bass, midrange, and treble. Think of it like the tone controls on a stereo, but much more precise.
The frequency spectrum divides like this:
- Sub-bass (20-60 Hz): The deepest rumble, felt more than heard
- Bass (60-250 Hz): Where bass guitar and kick drum live
- Low-mids (250-500 Hz): Warmth and body, but also muddiness if excessive
- Mids (500-2000 Hz): Where most instruments sit, including vocal fundamentals
- Upper-mids (2-4 kHz): Presence and clarity, helps vocals cut through
- Treble (4-8 kHz): Brilliance and definition
- Air (8-20 kHz): Sparkle and space
For demos, you only need simple EQ moves:
On vocals: Apply a high-pass filter around 80-100 Hz to remove low-end rumble that adds nothing. Boost slightly around 3-5 kHz for presence if the vocal sounds buried.
On acoustic guitar: High-pass around 100 Hz to avoid competing with bass. A gentle boost around 5 kHz adds sparkle.
On bass: High-pass around 40 Hz to remove unusable sub-frequencies. Boost around 80 Hz for thickness if needed.
Here's the golden rule: cut rather than boost. If your vocal sounds muddy, cut around 300 Hz rather than boosting the highs. Cutting sounds more natural and preserves headroom.
6.4 Adding Reverb and Delay
Reverb simulates acoustic space-the sound reflections in a room, hall, or cathedral. Delay is distinct repetitions of the sound, like an echo.
Every vocal you've heard on the radio has reverb. Completely dry vocals sound unnatural and amateurish. But too much reverb sounds like you're singing in a bathroom (unless that's the effect you want-some songs use this creatively).
For a natural demo sound:
- Add a subtle room reverb to vocals-just enough that you don't notice it consciously, but its absence would feel wrong
- Set the decay time short (0.8-1.5 seconds) so it doesn't blur your words
- Mix the reverb quietly-start at 10% wet/dry mix and increase until you feel the space
Delay adds depth and interest. The Edge's guitar parts in U2's Where the Streets Have No Name are defined by delay. The original notes are clear, but the rhythmic echoes create movement.
For a simple vocal delay effect, set a delay time that matches your song's tempo. If your song is 120 BPM, a quarter-note delay is 500 milliseconds. Many DAWs let you sync delay to tempo automatically.
6.5 Reference Mixing
Professional mixers constantly reference their work against commercial recordings. You should too.
Find a professionally produced song in a similar style to yours. Import it into your DAW on its own track. A/B between your mix and the reference-switch back and forth.
Ask yourself:
- Is my vocal as clear and present as theirs?
- Does my mix have similar bass level?
- Is my mix as wide, or does it sound narrow?
- Does my mix have similar brightness?
Don't expect to match a professional mix exactly-you're making a demo, they spent thousands of dollars and many days. But this comparison reveals obvious problems you might have missed.
7. Exporting Your Final Demo
You've recorded, edited, and mixed. Now you need to create a file you can share. This process is called bouncing or exporting.
7.1 Choosing Export Settings
Your DAW will ask for several specifications. Here's what they mean and what to choose:
File format: Use WAV or AIFF for the highest quality master file. These are uncompressed formats. Also export an MP3 at 320 kbps for easy sharing via email or messaging.
Sample rate: Export at the same rate you recorded (44.1 kHz or 48 kHz). Don't upsample-it doesn't improve quality and creates larger files.
Bit depth: Export at 24-bit if you might do further processing later, or 16-bit for final distribution. The difference is negligible in demos.
7.2 Final Checks Before Export
Before you bounce, run through this checklist:
- Listen to the entire mix start to finish: Don't just check sections-hear the whole journey
- Check for clicks, pops, or glitches: Sometimes these hide in transitions
- Verify your levels: The loudest section should peak around -3 to -1 dB on the master
- Mute any scratch tracks: That guide vocal you recorded first? Make sure it's not accidentally included
- Add fades: A short fade-in at the very beginning (0.1 seconds) and a musical fade-out at the end sound professional
7.3 The Export Process
In your DAW, look for "Bounce," "Export," or "Mixdown" in the File menu. Select these options:
- Source: Choose your master output or final mix bus
- Range: Set the start and end points to capture your entire song with a bit of silence before and after
- Normalize: Leave this off-it changes your careful level balance
- Dither: If exporting from 24-bit to 16-bit, enable dither (most DAWs do this automatically)
Name your file clearly: "Song Title - Artist Name - Demo - Date.wav"
The export process might take a few minutes, especially for longer songs with many plugins. Your DAW is rendering every effect, every level change, into a single stereo file.
7.4 Listening on Multiple Systems
Once your demo is exported, your work isn't quite done. Now comes the reality check.
Listen to your demo on at least three different systems:
- Your studio headphones or monitors: What you've been working on
- Phone or laptop speakers: How most people will first hear it
- Car stereo or portable speaker: A third perspective
Each system reveals different aspects. Phone speakers expose whether your vocal is clear and prominent. Car stereos show if your bass is too heavy or too light. If something sounds wrong on all three systems, go back and fix it.
Professional producers check mixes in their car because it's a familiar, honest environment. You know how good music sounds in your car-does your demo measure up?
8. Common Demo Recording Mistakes
Let's address the pitfalls so you can avoid them. These mistakes have plagued everyone from beginners to professionals at some point.
8.1 Over-Complicating the Arrangement
You have access to hundreds of instrument sounds. That doesn't mean you should use them all. A common beginner mistake is layering too many parts, creating a cluttered, confusing mix.
Listen to Tracy Chapman's Fast Car. It's primarily just acoustic guitar and vocal for most of the song, yet it's powerful and complete. Sometimes less is more.
For every part you add, ask: "Does this serve the song, or am I adding it because I can?" If you can't answer clearly, try muting that track and listening. If the song loses something essential, keep it. If not, delete it.
8.2 Recording Too Quietly
Fear of clipping leads many beginners to record with levels too low. Then they boost it in mixing, which also boosts the noise floor-the background hiss.
Aim for your loudest sections to peak between -12 and -6 dB while recording. This gives you headroom (space before clipping) while maintaining a strong signal-to-noise ratio.
Modern digital systems handle this better than old analog gear, but the principle remains: get a healthy level going in.
8.3 Ignoring Room Acoustics
You can't hear room problems while you're recording in that room-your brain filters them out. But the microphone doesn't. That echo you ignore sounds terrible in recordings.
Fix: Always record a test and listen back with headphones before doing a full take. If you hear excessive reverb or echo, add acoustic treatment (even temporary blankets help) or move to a different room.
8.4 Over-Editing and Losing Feel
Modern tools let you perfect every note and rhythm. But perfect isn't always better. Music breathes, pushes, pulls. When you quantize every note and auto-tune every syllable, you can strip away the humanity.
Norah Jones' Don't Know Why has timing and tuning imperfections. They make it feel real and intimate. Your demo should feel like a person performing, not a machine.
Use editing tools to fix problems, not to create robotic perfection. If a note's timing or pitch contributes to the emotional expression, leave it alone.
8.5 Mixing Too Loud
There's a tendency to keep turning everything up, making your mix louder and louder until it's distorting. This is called the loudness war, and it's counterproductive in demos.
Your goal is clarity and balance, not volume. Streaming services like Spotify normalize loudness anyway, so an overly loud demo just sounds distorted compared to professional tracks.
Leave headroom. Aim for your final mix to peak around -3 dB. This sounds quieter than commercial releases, but it's correct for a demo that might need mastering later.
9. Workflow and Organization
Technical skills matter, but so does efficient workflow. Professional producers finish projects because they work smart, not just hard.
9.1 File Management
Create a folder structure you'll thank yourself for later. Here's a proven system:
- Project folder: "Song Title - Demo"
- Audio Files: All recorded takes and samples
- Project Files: Your DAW's session files
- Exports: Bounced mixes and versions
- Notes: Lyrics, chord charts, ideas
Name your tracks clearly in your DAW: "Lead Vocal," "Acoustic Guitar - Rhythm," "Piano - Chorus." Six months from now, you won't remember what "Audio 47" was supposed to be.
9.2 Saving Versions
Before making major changes, save a new version of your project. Don't keep working on the same file forever. Use version numbers or dates:
- Song Demo v1 - Initial Recording
- Song Demo v2 - Added Harmonies
- Song Demo v3 - Final Mix
This seems tedious until you delete something important and can't get it back. Then you'll understand.
9.3 Take Breaks
Your ears fatigue. After an hour of focused listening, your judgment degrades. That's not weakness-it's biology.
Professional mixing engineers take breaks every 45-60 minutes. When you return with fresh ears, problems become obvious and solutions clearer.
Also, never make final mixing decisions late at night. That "brilliant" bass boost at midnight often sounds ridiculous the next morning. Sleep on it, literally.
9.4 Getting Feedback
You're too close to your own work to judge it objectively. Share your demo with trusted listeners-not your mom who thinks everything you do is perfect, but musicians or music fans who'll give honest feedback.
Ask specific questions:
- "Can you understand the lyrics?"
- "Does the second verse drag?"
- "Is the guitar too loud?"
Vague questions get vague answers. Specific questions give you actionable information.
But remember: feedback is data, not commands. If one person says the drums are too loud and three others say they're perfect, that's useful information. You're the artist-make the final call.
10. Moving Beyond the Demo
Your demo is complete. What now? Understanding what comes next helps you make better decisions during the demo process.
10.1 When a Demo Is Enough
Sometimes your demo is the final product. Many successful artists release demos as finished songs. Elliott Smith's early albums were essentially high-quality demos-sparse, intimate, powerful.
If your demo:
- Communicates your song clearly
- Captures the emotion you intended
- Sounds good on multiple playback systems
- Serves your purpose (whether that's pitching, sharing, or archiving)
...then it's done. Don't let perfectionism prevent you from moving on to the next song.
10.2 When to Invest in Professional Recording
If your demo reveals a song with real potential-something you want to release commercially or pitch to artists-consider professional recording.
Professional studios offer:
- Better acoustics: Treated rooms that sound clean and controlled
- Professional engineers: Experienced ears and technical expertise
- Quality equipment: Microphones and gear that capture nuance
- Objective perspective: Fresh ears not fatigued by the process
But go in with a completed demo. The studio is not the place to figure out your song structure or try different choruses. That's expensive experimentation. Use studio time efficiently by knowing exactly what you want.
10.3 The Demo as a Learning Tool
Every demo teaches you something. Maybe you discover you're better at recording guitar than vocals. Maybe you realize your songs need stronger bridges. Maybe you learn that simple arrangements serve your style best.
Keep your demos. In a year, listen back. You'll hear mistakes you didn't catch before-that's growth. You'll also hear moments of brilliance you didn't appreciate then-that's confidence-building.
Paul McCartney has hundreds of demos he never released. They're his musical diary, his laboratory for ideas. Your demos serve the same purpose.
10.4 Building Your Skills Progressively
Don't expect your first demo to sound like a professional release. This is a craft that takes time.
Set realistic goals for each project:
- Demo 1: Just capture the song idea clearly
- Demo 2: Improve mic technique and get cleaner takes
- Demo 3: Focus on better arrangement choices
- Demo 4: Develop mixing skills-balance and EQ
- Demo 5: Add professional polish with effects
Each demo builds on the last. This isn't a race. Billie Eilish and Finneas spent years making bedroom recordings before Ocean Eyes went viral. The viral hit was built on foundations of skill they'd developed through countless earlier demos.
Key Terms
- Audio Interface
- A device that converts analog audio signals (from microphones and instruments) into digital data for your computer, and vice versa for playback through speakers or headphones.
- Bit Depth
- The number of bits used to represent each audio sample, affecting dynamic range and noise floor. Common values are 16-bit (CD quality) and 24-bit (professional recording).
- Bouncing
- The process of exporting your multi-track project as a single stereo audio file, rendering all effects and automation into the final mix.
- Click Track
- A metronome sound that plays in your headphones during recording, helping you maintain consistent tempo throughout the song.
- Clipping
- Digital distortion that occurs when audio levels exceed 0 dB, cutting off (clipping) the peaks of the waveform and creating harsh, unpleasant sound.
- Comping
- Creating a composite performance by selecting the best sections from multiple recorded takes and combining them into one "perfect" track.
- Condenser Microphone
- A sensitive microphone type that requires power (phantom power) and excels at capturing detail and high frequencies, ideal for vocals and acoustic instruments.
- Crossfade
- An edit where one audio region fades out while another simultaneously fades in, creating a smooth transition between the two.
- DAW (Digital Audio Workstation)
- Software used for recording, editing, mixing, and producing audio. Examples include GarageBand, Logic Pro, Ableton Live, and Pro Tools.
- Delay
- An audio effect that creates distinct repetitions of a sound, like an echo, often synchronized to the song's tempo for rhythmic effect.
- Demo
- A preliminary recording of a song meant to capture the essential musical ideas, used for reference, pitching, or as a foundation for professional recording.
- Dither
- A low-level noise added when reducing bit depth (e.g., from 24-bit to 16-bit) to minimize quantization distortion and preserve audio quality.
- Dynamic Microphone
- A durable microphone type that doesn't require power, good for handling loud sources and less sensitive to room noise than condenser mics.
- EQ (Equalization)
- The process of adjusting the balance of frequency content in audio-boosting or cutting bass, midrange, and treble frequencies to shape tone.
- Headroom
- The space between your loudest audio peaks and the maximum level (0 dB) before clipping occurs, typically maintained at 3-6 dB for safety.
- High-Pass Filter
- An EQ setting that removes frequencies below a specified point, commonly used to eliminate low-end rumble and noise without affecting the main sound.
- Panning
- Positioning a sound in the stereo field from left speaker to right speaker, creating spatial dimension and separation in a mix.
- Phantom Power
- The +48V electrical power supplied through microphone cables to condenser microphones, enabling them to function.
- Proximity Effect
- The increase in bass response that occurs when a directional microphone is placed very close to the sound source, often within a few inches.
- Punching In
- Recording over a specific section of an existing track while keeping the rest intact, useful for fixing mistakes without re-recording the entire performance.
- Quantize
- Automatically aligning recorded notes or hits to a rhythmic grid, correcting timing imperfections but potentially reducing natural feel if overused.
- Reverb
- An audio effect that simulates the sound reflections of acoustic spaces, adding depth and dimension to dry recordings.
- Sample Rate
- The number of times per second that audio is sampled during recording, measured in Hz. Common rates are 44.1 kHz (CD quality) and 48 kHz (video standard).
- Track
- A single channel in your DAW containing one recorded element (e.g., one track for lead vocal, another for guitar), all of which combine to create the full mix.
- Waveform
- The visual representation of audio in your DAW, showing amplitude (loudness) over time as peaks and valleys on the screen.