Peripheral Devices


Overview
This chapter covers input/output devices, connection types, and interface standards tested heavily on CompTIA A+ Core 1. You need to know connector types, speeds, power delivery specs, and troubleshooting symptoms for USB, Thunderbolt, display connections, and common peripherals. Expect questions on cable selection, compatibility issues, and identifying proper connections for specific devices.
Core Concepts
USB Standards
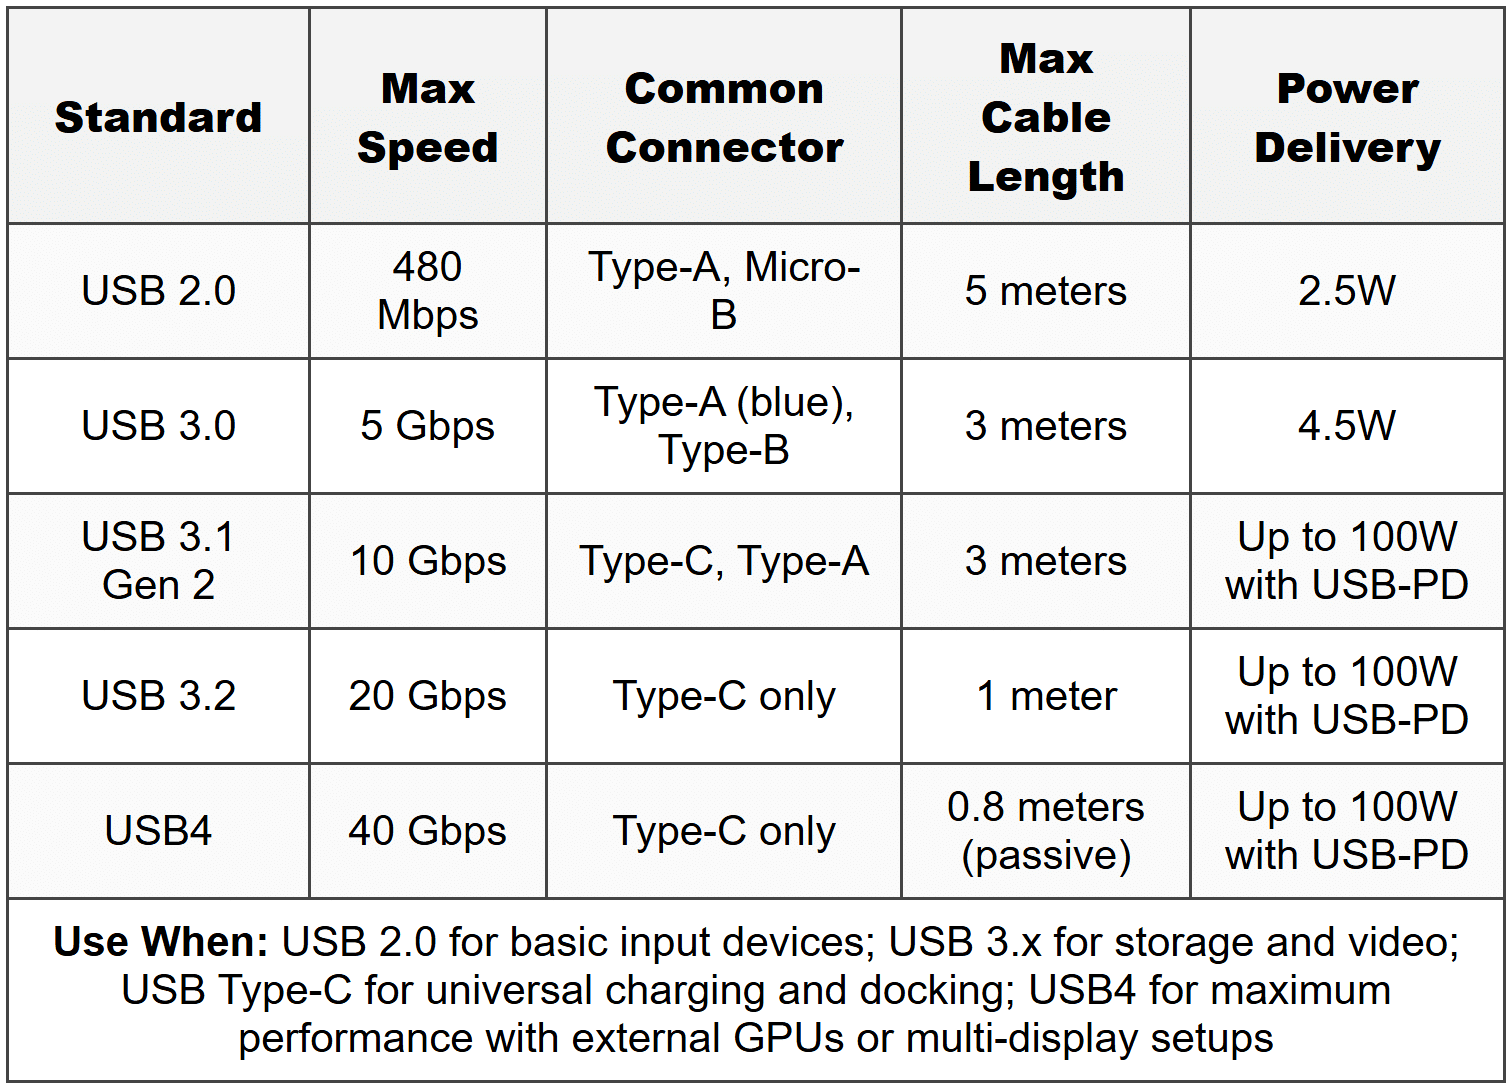
USB (Universal Serial Bus) is the dominant connection standard for peripherals, storage, and mobile devices. Each version has specific speed ratings and connector types that appear frequently on exam questions.
USB 2.0: Maximum speed 480 Mbps (60 MB/s actual throughput). Uses Type-A and Type-B connectors plus Mini and Micro variants. Maximum cable length 5 meters. Power delivery up to 2.5W (5V at 0.5A).
USB 3.0/3.1 Gen 1: Maximum speed 5 Gbps. Blue-colored ports indicate USB 3.0. Backward compatible with USB 2.0 devices. Power delivery up to 4.5W (5V at 0.9A). Type-A connectors have additional pins inside.
USB 3.1 Gen 2: Maximum speed 10 Gbps. Often uses USB Type-C connectors but can use Type-A. Power delivery specifications vary by implementation.
USB 3.2: Maximum speed 20 Gbps using dual-lane operation. Requires USB Type-C cables and connectors. Backward compatible with earlier standards.
USB4: Maximum speed 40 Gbps. Mandatory USB Type-C connector. Compatible with Thunderbolt 3. Requires USB-C cables rated for USB4 speeds.
USB Type-C: Reversible connector that works in any orientation. Supports alternate modes for DisplayPort, HDMI, and Thunderbolt. Not all Type-C ports support the same speeds-check the controller specification. A Type-C port may only support USB 2.0 speeds depending on implementation.
USB Power Delivery (USB-PD): Allows charging up to 100W (20V at 5A) through USB Type-C cables. Requires negotiation between device and charger. Used for laptop charging and high-power peripherals.
When to Use This
- Choose USB 2.0 for keyboards, mice, and low-speed peripherals where cost matters
- Choose USB 3.0 or higher for external storage, video capture, or any high-bandwidth device
- Choose USB Type-C with USB-PD when you need single-cable docking or laptop charging
- Choose USB4 when connecting high-resolution displays or fast external SSDs requiring 40 Gbps
Thunderbolt
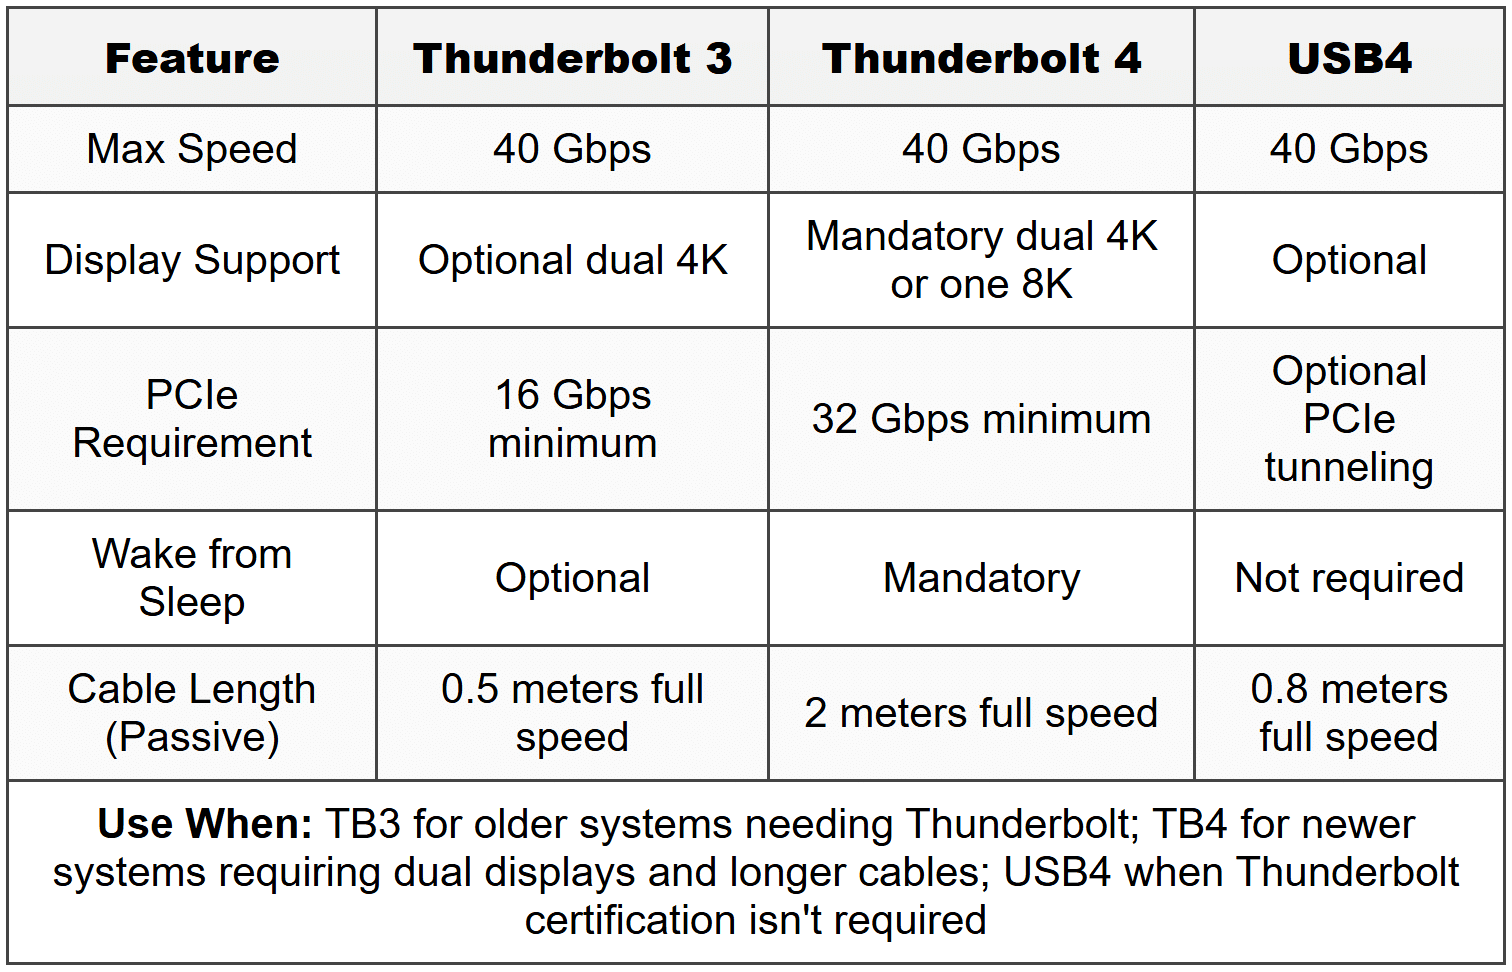
Thunderbolt is a high-speed interface combining PCIe and DisplayPort into a single connection. Developed by Intel and Apple, it delivers much higher bandwidth than standard USB.
Thunderbolt 3: Maximum speed 40 Gbps. Uses USB Type-C connector exclusively. Supports two 4K displays at 60 Hz or one 5K display. Power delivery up to 100W. Maximum cable length 0.5 meters for passive cables at full speed, 2 meters for active cables. Backward compatible with USB devices but at USB speeds only.
Thunderbolt 4: Maximum speed 40 Gbps (same as TB3 but with stricter requirements). Must support two 4K displays or one 8K display. Minimum PCIe data requirement 32 Gbps. Must support USB4. Requires Intel VT-d based direct memory access protection. Maximum cable length 2 meters for passive cables.
Thunderbolt ports display a lightning bolt icon next to the USB-C port. Not all USB-C ports support Thunderbolt-check system specifications.
When to Use This
- Use Thunderbolt for external GPU enclosures requiring full PCIe bandwidth
- Use Thunderbolt for professional video editing with multiple high-resolution displays
- Use Thunderbolt for daisy-chaining up to 6 devices from a single port
- Use Thunderbolt when you need guaranteed performance with certified cables and docks
Display Connections
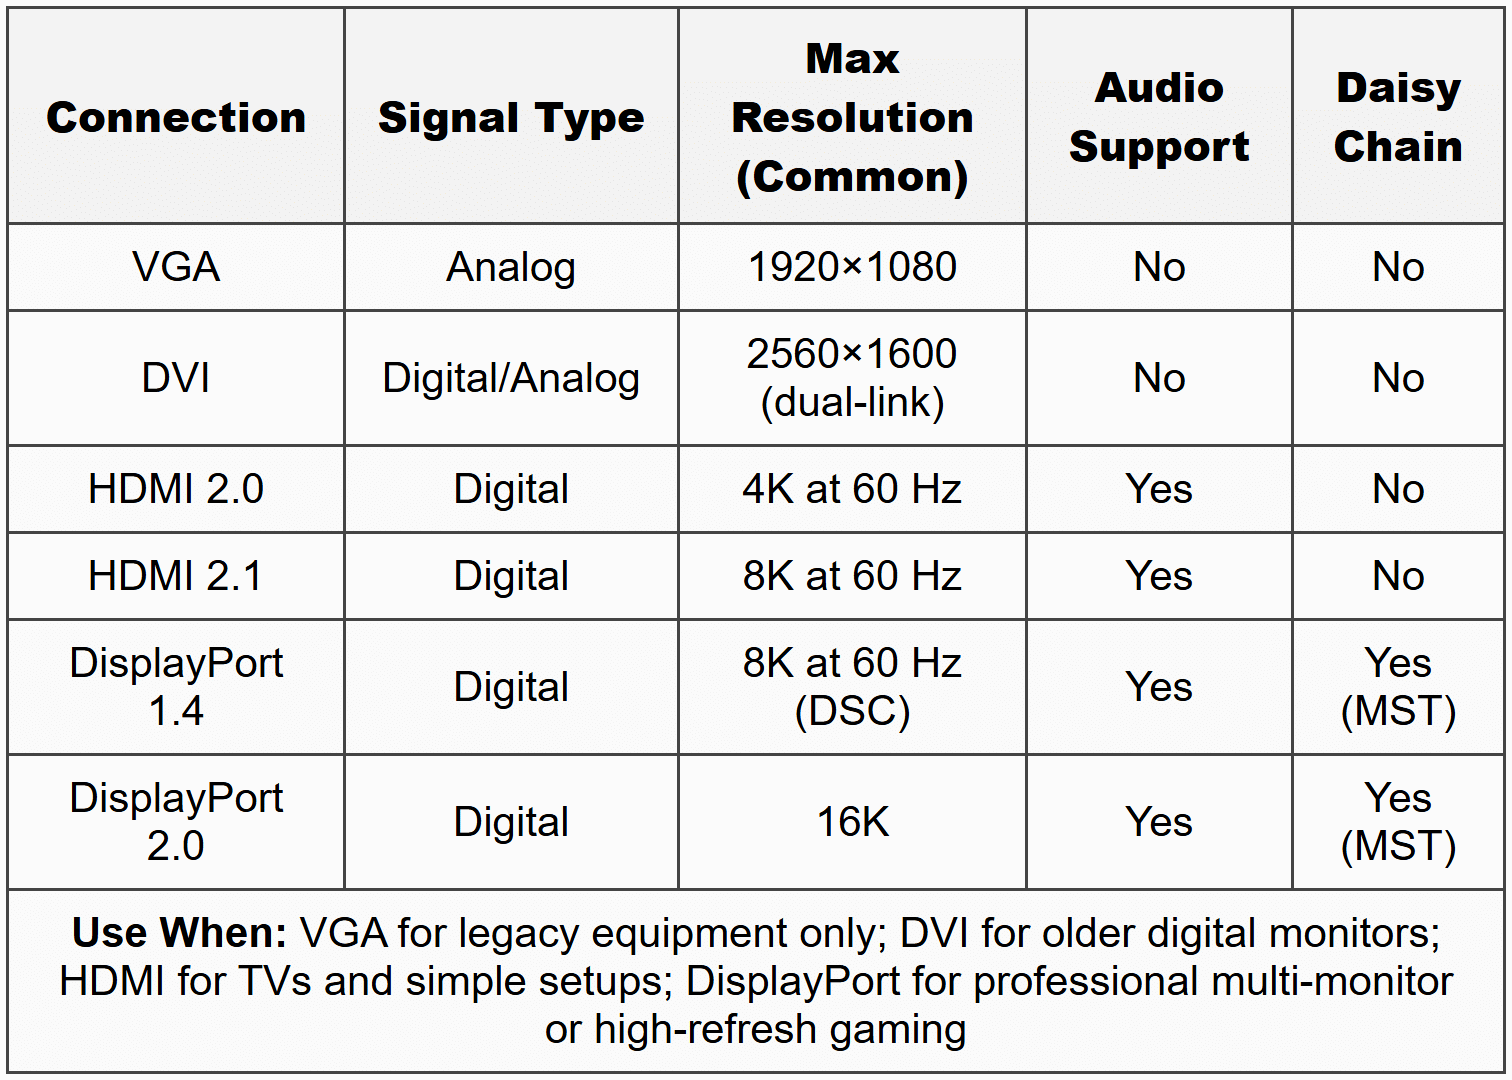
Display interfaces transfer video signals from computer to monitor. Each has specific capabilities for resolution, refresh rate, and audio support.
HDMI (High-Definition Multimedia Interface): Most common digital video/audio interface. HDMI 1.4 supports 4K at 30 Hz. HDMI 2.0 supports 4K at 60 Hz and 5K at 30 Hz. HDMI 2.1 supports 8K at 60 Hz and 10K, with bandwidth up to 48 Gbps. HDMI carries audio and video in one cable. Maximum cable length approximately 15 meters for standard cables without signal boosters. Type-A connector is standard; Type-C (Mini) and Type-D (Micro) exist for mobile devices.
DisplayPort: Alternative digital interface favored for computer monitors. DisplayPort 1.2 supports 4K at 60 Hz. DisplayPort 1.4 supports 8K at 60 Hz and 4K at 120 Hz using Display Stream Compression. DisplayPort 2.0 supports up to 16K resolution with bandwidth of 80 Gbps. Supports daisy-chaining multiple monitors from one output using Multi-Stream Transport (MST). Can carry audio. Maximum cable length 2 meters for passive cables at full bandwidth.
Mini DisplayPort: Smaller connector with identical capabilities to full-size DisplayPort. Common on older MacBooks and some laptops. Requires adapter for standard DisplayPort or HDMI monitors.
DVI (Digital Visual Interface): Older digital video standard being phased out. DVI-D (digital only), DVI-I (integrated digital and analog), and DVI-A (analog only) variants exist. Maximum resolution 1920×1200 at 60 Hz for single-link DVI, 2560×1600 at 60 Hz for dual-link DVI. Does not carry audio. Maximum cable length 5 meters.
VGA (Video Graphics Array): Legacy analog video connection using DB-15 connector. Maximum practical resolution 1920×1080 but quality degrades at high resolutions. No audio support. Susceptible to interference and signal degradation. Maximum cable length 5 meters for acceptable quality. Still found on projectors and older displays.
When to Use This
- Use HDMI for connecting to TVs, home theater systems, or single-display setups where audio is needed
- Use DisplayPort for high refresh rate gaming monitors, multi-monitor professional workstations, or daisy-chaining displays
- Use DVI only when connecting to older monitors lacking HDMI or DisplayPort
- Use VGA only as last resort for legacy projectors or very old displays
Input Devices
Keyboard: Primary text input device. Connection types include USB (most common), Bluetooth wireless, PS/2 (legacy connector, purple-colored, cannot be hot-swapped). Mechanical keyboards use individual switches; membrane keyboards use pressure pads. Backlit keyboards require additional power, often drawing more than basic USB 2.0 power budget-use powered USB hub or direct motherboard connection if issues occur.
Mouse: Pointing device using optical or laser sensors. USB or Bluetooth wireless connections standard. PS/2 mice used green connector on older systems. Mouse DPI (dots per inch) settings affect sensitivity-higher DPI means cursor moves farther per physical inch of movement. Polling rate measured in Hz determines how often position updates are sent; gaming mice use 500-1000 Hz.
Touchpad: Integrated pointing device on laptops. Uses capacitive touch sensing. Multi-touch gestures supported on modern touchpads. Disable when external mouse connected to prevent accidental input. Usually controlled through function key combinations or device settings.
Trackpoint: Pointing stick between keyboard keys on some laptops (ThinkPad series). Allows cursor control without moving hands from keyboard. Uses pressure-sensitive nub.
Touchscreen: Direct input on display surface. Capacitive touchscreens detect electrical conductivity changes from finger touch-more accurate, support multi-touch, but don't work with regular styluses. Resistive touchscreens detect physical pressure-work with any stylus or gloved hands but less accurate and no multi-touch. Calibration required if touch points don't align with display elements.
Digitizer/Stylus: Precise input device for drawing tablets or 2-in-1 laptops. Active styluses contain electronics and require battery; passive styluses have no power. Pressure sensitivity levels (1024, 2048, 4096+ levels) determine drawing precision. Palm rejection prevents hand touches from registering while drawing.
Scanner: Converts physical documents to digital images. Flatbed scanners have glass surface for document placement. Sheet-fed scanners pull documents through rollers. Resolution measured in DPI; 300 DPI minimum for text documents, 600 DPI or higher for photo scanning. Connects via USB; larger professional scanners may use Ethernet.
Barcode/QR Code Reader: Reads linear barcodes or two-dimensional QR codes. Laser scanners use laser beam; imaging scanners use camera sensor. USB, Bluetooth, or serial connections. Some operate in keyboard wedge mode-act like keyboard, typing scanned data directly into active field.
Biometric Devices: Authenticate users through physical characteristics. Fingerprint readers most common, integrated into laptops or USB peripherals. Facial recognition cameras require infrared sensor (Windows Hello). Retina/iris scanners used in high-security environments. Smart cards with embedded chips combine with card readers for two-factor authentication.
When to Use This
- Use wired USB keyboards/mice for desktop workstations requiring reliability without battery concerns
- Use Bluetooth input devices for mobile setups or when reducing cable clutter matters
- Use capacitive touchscreen for retail point-of-sale or interactive kiosks requiring multi-touch
- Use resistive touchscreen for industrial environments where gloves are worn
- Use active stylus with high pressure levels for professional digital art or design work
- Use biometric readers for secure authentication in business environments handling sensitive data
Multimedia Devices
Webcam: Video camera for conferencing and streaming. Resolution specifications: 720p (1280×720), 1080p (1920×1080), 4K (3840×2160). Frame rate important-minimum 30 fps for smooth video, 60 fps for higher quality. Most connect via USB; built-in laptop webcams use internal USB or proprietary connections. Auto-focus and low-light performance vary significantly by price point. Privacy shutters or covers recommended.
Microphone: Audio input device. Dynamic microphones use electromagnetic induction, durable, no power needed. Condenser microphones use capacitance changes, higher quality, require phantom power or USB power. Polar patterns determine pickup direction: omnidirectional (all directions), cardioid (front), bidirectional (front and rear). USB microphones have built-in analog-to-digital converters; XLR microphones require audio interface. Headset microphones combine headphones and mic in single unit.
Speakers: Audio output devices. Analog speakers connect via 3.5mm TRS jack (tip-ring-sleeve connector, often color-coded green). Digital speakers use USB or optical TOSLINK connection. Powered/active speakers contain built-in amplifiers and require power connection. Passive speakers require external amplifier. Surround sound configurations: 2.0 (stereo), 2.1 (stereo + subwoofer), 5.1 (five speakers + subwoofer), 7.1 (seven speakers + subwoofer).
Headphones/Headset: Personal audio output. 3.5mm connectors standard for wired: TRS (3-conductor) for stereo headphones, TRRS (4-conductor) for headsets with microphone. USB headsets include audio processing in headset itself. Wireless headsets use Bluetooth or proprietary 2.4 GHz RF dongles. Impedance measured in ohms-low impedance (16-32Ω) for mobile devices, high impedance (250Ω+) for professional audio requiring dedicated amplifier.
VR Headsets: Virtual reality display and input system. Require high-performance GPU for rendering. Tethered VR connects via HDMI/DisplayPort plus USB; standalone VR contains internal processor. Position tracking via external sensors, inside-out cameras, or hybrid systems. Motion controllers provide hand input. Minimum PC requirements typically include recent GPU, 16GB RAM, and multiple USB ports.
When to Use This
- Use USB webcam when laptop integrated camera fails or higher resolution needed
- Use dynamic microphone for recording in noisy environments or podcast recording
- Use condenser USB microphone for streaming and home studio recordings where quality matters
- Use 2.1 speakers for desktop PC when bass response matters but space is limited
- Use USB headset when integrated audio jack produces static or noise interference
Printers and Output Devices
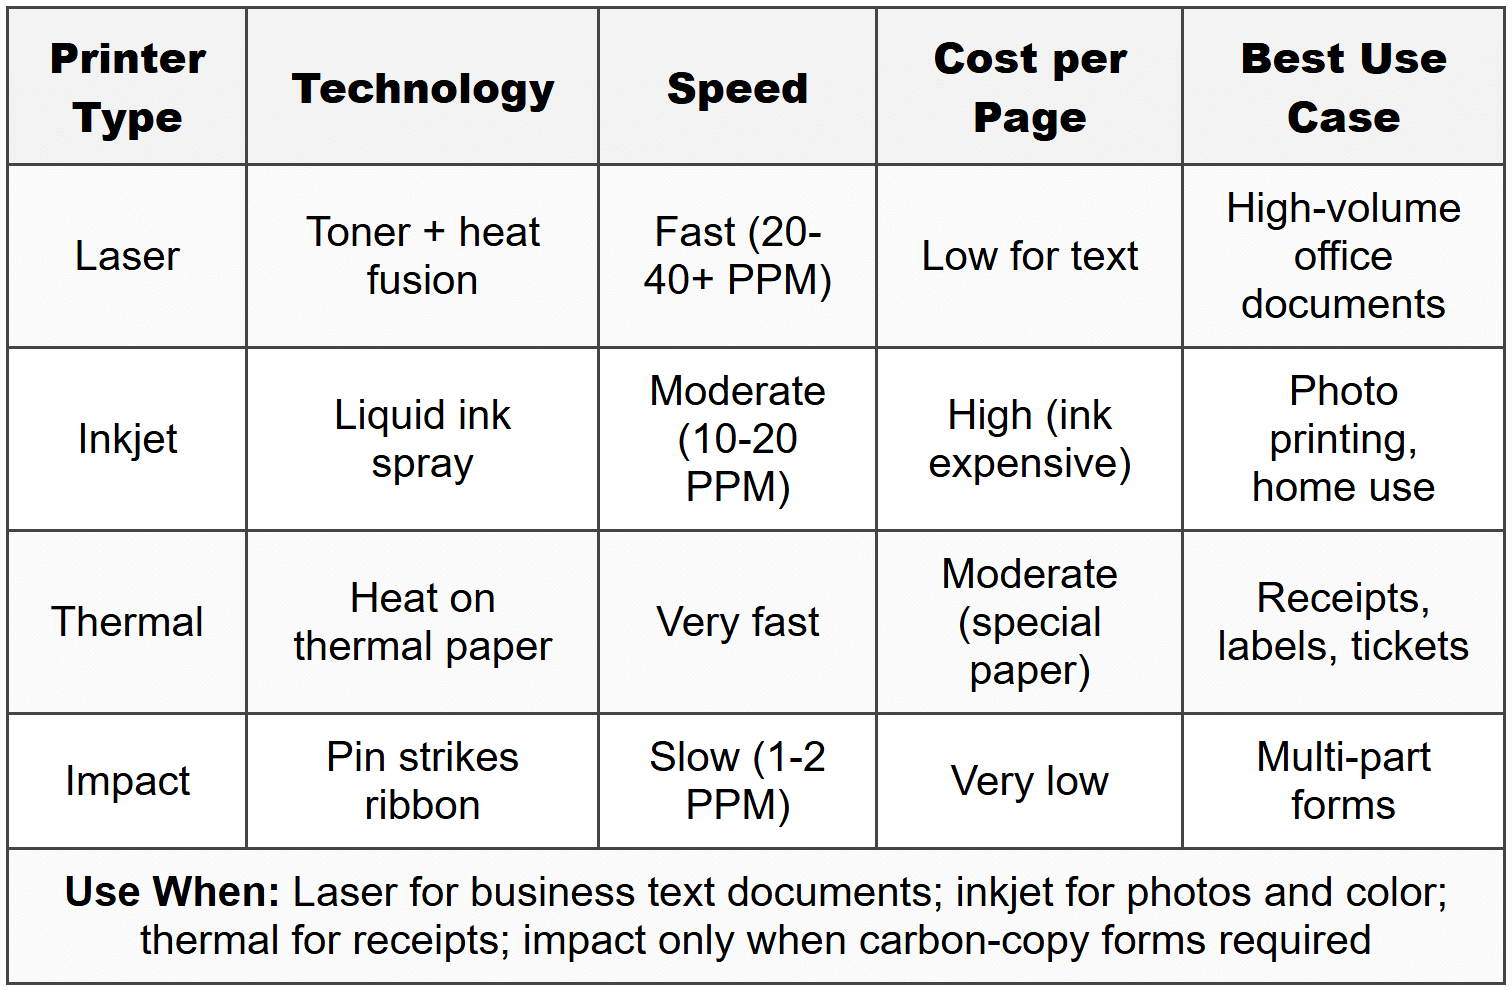
Laser Printer: Uses electrostatic charge and toner powder fused to paper with heat. Seven-step imaging process: processing, charging, exposing, developing, transferring, fusing, cleaning. Fast printing speed measured in pages per minute (PPM). Monochrome laser printers common for office documents; color laser printers use four toner cartridges (CMYK: cyan, magenta, yellow, black). Connect via USB, Ethernet, or Wi-Fi. Requires high power during fusing-typically 500-1000W during printing. Maintenance includes replacing toner cartridges, cleaning drums, replacing transfer belt and fuser assembly.
Inkjet Printer: Sprays liquid ink droplets through nozzles onto paper. Slower than laser but better photo printing quality. Ink cartridges dry out if unused-suitable for frequent use, problematic for occasional printing. Black plus color cartridge setup or individual CMYK cartridges. Print head either integrated with cartridge or separate permanent component. Connect via USB or Wi-Fi. Lower power consumption than laser. Maintenance includes print head cleaning cycles, alignment, cartridge replacement.
Thermal Printer: Uses heat to create image on special thermal paper. Common for receipts, shipping labels, and barcode labels. Direct thermal printers apply heat directly to thermal paper-no ribbons needed but printouts fade over time. Thermal transfer printers use heated ribbon to transfer ink to paper-more durable output. Very fast and reliable. Low maintenance-no ink or toner. Paper cost higher than plain paper. Connect via USB, serial, or Ethernet.
Impact/Dot Matrix Printer: Strikes ink ribbon with pins to transfer ink to paper. Can print carbon-copy multi-part forms-unique capability other printer types can't do. Very loud operation. Low cost per page. Slow printing. Uses continuous tractor-feed paper or sheet feeder. 9-pin or 24-pin print heads determine quality. Connect via parallel port (legacy) or USB adapter. Still used in industrial and retail environments requiring multi-part forms.
3D Printer: Creates three-dimensional objects by depositing material layer by layer. FDM (Fused Deposition Modeling) melts plastic filament-most common and affordable. SLA (Stereolithography) cures liquid resin with UV laser-higher detail. SLS (Selective Laser Sintering) fuses powder material-industrial applications. File formats: STL most common. Slicing software converts 3D models to printer instructions. Connect via USB or SD card. Requires ventilation and temperature control. Bed leveling critical for successful prints.
When to Use This
- Use laser printer for high-volume office document printing where speed and text quality matter
- Use inkjet printer for color photos, occasional home printing, or wide-format poster printing
- Use thermal printer for point-of-sale receipt printing or shipping label generation
- Use impact printer when carbon-copy multi-part forms are required (invoices, work orders)
- Use 3D printer for prototyping, custom parts manufacturing, or creating physical models from CAD designs
External Storage Devices
External Hard Drive: Portable storage using traditional magnetic platters or solid-state flash memory. HDD (Hard Disk Drive) uses spinning magnetic platters-higher capacity, lower cost, slower speeds, mechanical failure risk. SSD (Solid State Drive) uses flash memory-faster, more durable, more expensive per GB, no moving parts. Common capacities: 500GB to 5TB for consumer drives. Connection interfaces: USB 3.0/3.1/3.2 most common, Thunderbolt for high-performance needs, eSATA (legacy). Bus-powered drives draw power from USB; desktop drives require separate power adapter. Speed limited by USB version and drive technology-USB 3.0 SSD reaches approximately 400-500 MB/s; USB 3.1 Gen 2 reaches approximately 800-1000 MB/s.
Flash Drive/Thumb Drive: Small portable solid-state storage using USB connection. Capacities from 8GB to 1TB+. USB 2.0 versions very slow for large files (10-30 MB/s write speeds); USB 3.0+ required for reasonable performance. Easily lost or stolen-encryption recommended for sensitive data. Limited write cycles-not suitable for continuous rewriting. Some include hardware encryption or fingerprint readers.
Memory Cards: Removable flash storage for cameras, phones, portable devices. SD (Secure Digital) most common format: standard SD up to 2GB, SDHC (High Capacity) up to 32GB, SDXC (Extended Capacity) up to 2TB. Speed classes indicate minimum sustained write speed: Class 10 = 10 MB/s minimum, UHS-I (U1/U3) for high-definition video, V30/V60/V90 video speed classes for 4K/8K recording. microSD smaller form factor with same capacity and speed classifications. Card readers connect via USB; some computers have built-in SD slots. CompactFlash (CF) older, larger format still used in professional cameras.
Optical Drives: Read and write optical discs. CD (Compact Disc) stores 700MB, DVD (Digital Versatile Disc) stores 4.7GB single-layer or 8.5GB dual-layer, Blu-ray stores 25GB single-layer or 50GB dual-layer. External optical drives connect via USB. Read-only drives (ROM) cannot write; write-capable drives (R) write once; rewritable drives (RW) can erase and rewrite. Burning speed (e.g., 16× DVD) indicates how fast compared to original playback speed. Being phased out-many modern systems ship without optical drives.
When to Use This
- Use external HDD for large backup storage where cost per GB matters more than speed
- Use external SSD for frequent file transfers, video editing scratch disk, or portable OS boot drive
- Use flash drive for small file transfers between systems without network access
- Use SD card matching speed class to device requirements (V30+ for 4K camera recording)
- Use optical drive only when accessing legacy media or required for specific software installation
KVM Switches and Docking Stations
KVM Switch (Keyboard Video Mouse): Hardware device allowing multiple computers to share single set of keyboard, monitor, and mouse. User switches between computers via button press or keyboard hotkey. Reduces desk clutter when managing multiple systems. Types include 2-port, 4-port, 8-port configurations. Video connections must match (HDMI, DisplayPort, DVI)-mixed types require adapters or converter switches. Some models include audio switching and USB peripheral sharing. Does not share data between computers-only input/output devices. Enterprise models support network-based remote switching.
Docking Station: Expands laptop connectivity through single connection. Legacy docking stations use proprietary laptop-specific connectors; modern universal docks use USB-C or Thunderbolt. Typical dock provides multiple USB ports, Ethernet jack, display outputs (HDMI/DisplayPort), audio jacks, and sometimes SD card reader. USB-C docks limited by USB bandwidth-may not support full dual-4K displays unless using DisplayLink compression technology. Thunderbolt docks provide full bandwidth for dual high-resolution displays without compression. Docks typically provide 60-100W power delivery to charge laptop via same cable carrying data. Port replicators simpler than docks-usually just copy laptop ports without adding functionality.
When to Use This
- Use KVM switch when technician needs to control multiple servers or test systems from single workstation
- Use USB-C dock for general office laptop setup requiring basic peripherals and single display
- Use Thunderbolt dock for power users needing dual 4K displays, external GPU, or high-speed storage arrays
- Use port replicator when user only needs quick connection to existing peripherals without power delivery
Troubleshooting
1. Error: USB device repeatedly connects and disconnects, making repeated connection sounds. Device appears in Device Manager briefly then disappears.
Resolve: Insufficient USB power. Device draws more current than port can supply, causing system to reset the port. Connect device to powered USB hub or directly to motherboard rear USB port rather than front panel header or unpowered hub. Some high-power devices (external HDDs, RGB keyboards) need dedicated power adapters.
Check first: Try different USB port directly on motherboard-front panel ports often share limited power budget. Check if device has auxiliary power connector.
Do NOT do first: Do not reinstall USB drivers-power issue won't be fixed by software. This wastes time and often causes students to overlook the hardware power limitation.
Why other options are wrong: Cable replacement won't help with power issues unless cable is damaged preventing power delivery; updating firmware addresses software compatibility not power budget; disabling USB selective suspend only affects power management policy not total available current.
2. Error: External monitor shows "No Signal" when connected via HDMI. Monitor works with other devices. Computer outputs video to other monitors.
Resolve: HDMI cable or port HDCP (High-bandwidth Digital Content Protection) handshake failure, or computer not detecting display. Press Windows + P (or equivalent display toggle function key on laptop) to force output selection to "Extend" or "Duplicate" rather than "PC screen only." Also verify HDMI cable is fully seated on both ends-partial connection prevents detection signal.
Check first: Press display mode toggle key combination to cycle through output modes. Verify cable is completely inserted and locked if using locking HDMI connector.
Do NOT do first: Do not enter BIOS/UEFI settings to change graphics settings-this won't help with HDMI handshake at OS level and student wastes time.
Why other options are wrong: Installing new graphics drivers rarely fixes immediate detection unless driver was completely missing; monitor OSD settings won't affect input detection signal; replacing cable premature before verifying output mode selection.
3. Error: Touchscreen input is offset-touching one location registers input 2 inches to the right. All touch inputs shifted by same amount.
Resolve: Touchscreen calibration incorrect or lost. Run touchscreen calibration utility in Control Panel > Tablet PC Settings > Calibrate or Settings > Devices > Touchscreen > Calibrate. Follow on-screen prompts to touch calibration points. This realigns touch sensor coordinate system with display pixels.
Check first: Verify screen resolution matches native panel resolution-running non-native resolution can cause calibration mismatch. Then run calibration tool.
Do NOT do first: Do not reinstall touch drivers immediately-calibration data is separate from driver installation and existing driver likely functional.
Why other options are wrong: Replacing touchscreen assembly expensive and unnecessary for calibration issue; updating BIOS won't affect touchscreen coordinate mapping; disabling and re-enabling touch device in Device Manager doesn't reset calibration data.
4. Error: Wireless keyboard and mouse intermittently stop responding for several seconds, then resume. Happens more frequently when other wireless devices are in use.
Resolve: RF interference on 2.4 GHz band. Wireless keyboard/mouse USB receivers operating on same frequency as Wi-Fi, Bluetooth, cordless phones, or microwave ovens. Move USB receiver closer to devices using USB extension cable, change Wi-Fi router to 5 GHz band if possible, or replace with Bluetooth devices that use adaptive frequency hopping to avoid interference.
Check first: Move USB wireless receiver to front of computer within direct line-of-sight of keyboard/mouse. Try USB extension cable to position receiver on desk surface away from metal computer case that blocks signal.
Do NOT do first: Do not replace batteries first-intermittent interference causes connection drops with normal battery levels. Complete battery failure would cause total non-function, not intermittent drops.
Why other options are wrong: Reinstalling mouse/keyboard drivers won't fix RF interference; updating firmware addresses features not wireless channel congestion; disabling USB power management prevents sleep issues not signal interference.
5. Error: Laser printer prints completely blank pages. Printer goes through full print cycle, paper feeds normally, but output is blank. Toner cartridge is new.
Resolve: Toner cartridge sealing tape still installed. New toner cartridges have protective tape or plastic strip preventing toner release until removed. Remove cartridge and check for orange/yellow pull tab or plastic sealing strip. Pull tab completely out before reinstalling cartridge. Alternative: toner cartridge defective or transfer corona wire failed (much less common with new cartridge).
Check first: Remove toner cartridge and visually inspect for sealing tape or protective strips. Look for pull-tab still present or not fully removed.
Do NOT do first: Do not immediately order new fuser assembly-blank pages from new toner indicates consumable installation issue, not fuser failure which causes different symptoms (unfused toner smearing).
Why other options are wrong: Fuser problems cause toner to smear or not adhere, not completely blank output; transfer belt issues typically cause inconsistent printing or spots, not uniform blank pages; drum issues create lines or repetitive defects at specific intervals based on drum circumference.
Step-by-Step Procedures
Task: Install and Configure USB Printer
- Unpack printer and remove all packing materials, protective tape, and shipping locks (especially from ink carriage on inkjet printers).
- Connect power cable to printer and wall outlet. Power on printer.
- Install ink cartridges or toner cartridge following manufacturer instructions. Close all covers.
- Load paper into main tray. Adjust paper guides to match paper size.
- Connect USB cable between printer and computer. Use USB 2.0 or higher port.
- Windows will detect new printer and attempt automatic driver installation via Windows Update.
- If automatic installation fails, download manufacturer drivers from printer support website matching exact model number.
- Run downloaded driver installer. Follow on-screen prompts. Installer typically includes driver, configuration utility, and scanning software.
- After installation, open Settings > Devices > Printers & Scanners. Verify printer appears in list.
- Click printer name, select "Manage," then "Print Test Page" to verify functionality.
- If network printing needed, enable printer sharing: Printer Properties > Sharing tab > check "Share this printer" > assign share name.
- Configure default print settings: Printer Properties > Preferences > set default paper size, orientation, quality, duplex settings.
Task: Connect Multiple Displays to Desktop Computer
- Verify graphics card has required number of video outputs. Identify output types (HDMI, DisplayPort, DVI).
- Check maximum resolution and refresh rate supported by GPU for multi-monitor configuration (some ports may have limitations).
- Connect first monitor to primary output (usually DisplayPort or HDMI closest to motherboard I/O).
- Connect second monitor to secondary output. Use same cable type if possible for consistency.
- Power on both monitors. Boot computer.
- Right-click desktop > Display Settings. Windows should detect both displays.
- If display not detected, click "Detect" button. Check cable connections and monitor input source selection.
- Click and drag display icons to match physical monitor arrangement on desk.
- Select display mode: "Extend these displays" for expanded workspace, "Duplicate" for mirrored output.
- For each monitor, click display icon and scroll down to set individual resolution and scaling percentage.
- Click "Identify" to show number on each screen confirming which is Display 1 vs Display 2.
- Select which monitor is primary (shows taskbar and Start menu) by clicking display and checking "Make this my main display."
- Apply settings and test by dragging windows between monitors.
Task: Set Up Docking Station for Laptop
- Verify docking station compatibility with laptop model. Check if proprietary dock or universal USB-C/Thunderbolt dock required.
- Connect docking station power adapter to dock and wall outlet.
- Connect peripherals to dock: monitor(s) to video outputs, keyboard/mouse to USB ports, Ethernet cable to network jack, audio devices to audio jacks.
- For proprietary dock: align laptop with docking connector and press down firmly until locking mechanism engages. For USB-C/Thunderbolt dock: connect USB-C cable to laptop's Thunderbolt/USB-C port (verify port supports video output-not all USB-C ports do).
- Power on laptop if not already on.
- Windows should detect dock and install drivers automatically. Allow installation to complete.
- If external monitors not working, press Windows + P and select "Extend" or "Duplicate."
- Verify Ethernet connection active: check taskbar network icon or Settings > Network & Internet > Ethernet.
- Test all USB ports by connecting devices.
- Configure monitor arrangement in Display Settings if using multiple external displays.
- Set dock USB-C/Thunderbolt port as preferred charging source if laptop prompts about power delivery.
- For Thunderbolt dock, verify Thunderbolt controller recognizes dock: Control Panel > Devices and Printers or Thunderbolt software utility.
Practice Questions
Q1: A user reports their new external USB 3.0 hard drive transfers files extremely slowly, achieving only 40 MB/s. The drive specifications claim 400 MB/s transfer speed. What is the most likely cause?
(a) The USB cable is defective and must be replaced
(b) The drive is connected to a USB 2.0 port instead of USB 3.0
(c) The external drive needs separate power adapter to reach full speed
(d) Windows is indexing the drive, slowing performance temporarily
Ans: (b)
USB 2.0 maximum throughput is 480 Mbps (approximately 60 MB/s theoretical, 40 MB/s practical), matching the observed speed. USB 3.0 ports required for 5 Gbps capability. (a) is wrong because defective cable typically causes connection failure not consistently slow speed at exactly USB 2.0 rates; (c) is wrong because bus-powered USB 3.0 drives don't need external power for speed, only higher-capacity drives need power for operation; (d) is wrong because indexing causes intermittent slowdowns not consistent low speed matching USB 2.0 specification.
Q2: A technician needs to connect a laptop to three external 4K monitors running at 60 Hz each, plus provide laptop charging through a single cable. Which connection type must the laptop support?
(a) USB 3.2 Gen 2 with DisplayPort Alt Mode
(b) HDMI 2.1 with USB-C adapter
(c) Thunderbolt 3 or Thunderbolt 4
(d) DisplayPort 1.4 with MST hub
Ans: (c)
Thunderbolt 3/4 provides 40 Gbps bandwidth sufficient for three 4K displays at 60 Hz plus supports 100W USB-PD charging through same USB-C cable. (a) is wrong because USB 3.2 Gen 2 provides only 10 Gbps, insufficient bandwidth for three 4K60 displays simultaneously; (b) is wrong because HDMI 2.1 is output standard not cable interface and doesn't provide charging; (d) is wrong because while DisplayPort MST can drive multiple displays, DisplayPort alone doesn't provide power delivery or single-cable docking solution.
Q3: A laser printer produces pages with a repeating black mark appearing every 3 inches down the page. What component is most likely defective?
(a) Fuser assembly
(b) Transfer roller
(c) Imaging drum
(d) Primary corona wire
Ans: (c)
Repetitive defects at consistent intervals indicate cylindrical component circumference problem. Imaging drum diameter creates specific repeat distance as drum rotates-damage or debris on drum surface repeats each revolution. (a) is wrong because fuser problems cause smearing or toner not adhering, not repeating marks; (b) is wrong because transfer roller defects typically cause inconsistent density or blank spots, not repetitive marked pattern; (d) is wrong because corona wire issues create charging problems manifesting as completely light or blank areas, not repetitive marks.
Q4: Performance-Based Task: A user's desktop computer has one available HDMI port and one available DisplayPort output. They need to connect two monitors-one 1080p monitor with HDMI input only, and one 4K monitor with both HDMI and DisplayPort inputs. Describe the optimal cable configuration and explain your reasoning.
Ans: Connect the 4K monitor to the DisplayPort output using DisplayPort cable. Connect the 1080p monitor to the HDMI port using HDMI cable. Reasoning: DisplayPort typically provides higher bandwidth than HDMI (especially older HDMI versions), making it better suited for 4K resolution requirements. The 1080p monitor has lower bandwidth needs that HDMI can easily handle, and it has no alternative since it only accepts HDMI input. This configuration ensures each display receives adequate bandwidth and uses compatible connections without adapters. Using adapter cables (DisplayPort to HDMI) introduces potential compatibility issues and signal degradation that direct connections avoid.
Q5: What should a technician check FIRST when a USB-C docking station provides working USB peripherals and Ethernet, but the external monitors connected to the dock show no signal?
(a) Update graphics card drivers on the laptop
(b) Verify the laptop's USB-C port supports DisplayPort Alt Mode or Thunderbolt
(c) Replace the dock's power adapter with higher wattage model
(d) Install the docking station manufacturer's configuration software
Ans: (b)
Not all USB-C ports support video output-some only provide USB data and power. If USB and Ethernet work but video doesn't, the laptop's USB-C port likely doesn't support DisplayPort Alt Mode or Thunderbolt required for display signals. Check laptop specifications before assuming dock failure. (a) is wrong because graphics drivers don't affect whether USB-C port supports video Alt Mode, which is hardware limitation; (c) is wrong because power adapter wattage doesn't affect video signal capability, only charging speed and peripheral power; (d) is wrong because while some docks need software, basic display output should work without additional software if port supports video.
Q6: A thermal receipt printer is producing faded, barely readable printouts. The printer was working normally yesterday. What should the technician check first?
(a) Replace the thermal print head
(b) Verify thermal paper is loaded correctly with thermal coating side facing print head
(c) Clean paper path sensors
(d) Update printer firmware
Ans: (b)
Thermal paper has coating on one side only. If loaded upside down, heat cannot activate coating and printout appears blank or extremely faded. This is most common cause of sudden print quality loss. (a) is wrong because print head failure is gradual and rare, not sudden overnight failure; (c) is wrong because sensor issues cause paper feed problems not print quality issues; (d) is wrong because firmware doesn't degrade overnight causing print quality loss.
Quick Review
- USB 2.0 = 480 Mbps; USB 3.0 = 5 Gbps; USB 3.1 Gen 2 = 10 Gbps; USB 3.2 = 20 Gbps; USB4 = 40 Gbps-know these speeds cold for exam cable selection questions
- USB-C connectors don't guarantee speed or features-Type-C only describes physical connector, not protocol. Can be USB 2.0 or Thunderbolt depending on implementation
- Thunderbolt 3 and 4 both run at 40 Gbps but TB4 requires dual 4K display support and 32 Gbps PCIe minimum; TB3 makes these optional
- DisplayPort supports daisy-chaining via MST; HDMI does not-choose DisplayPort when multiple monitors connect from single output
- USB Power Delivery delivers up to 100W (20V × 5A) through USB-C for laptop charging
- Blue USB ports indicate USB 3.0; lightning bolt icon indicates Thunderbolt capability next to USB-C port
- Laser printer blank pages with new toner = sealing tape still installed-most common rookie mistake on printer questions
- Repetitive defects at consistent intervals = drum or roller problem; measure distance between defects to identify which cylindrical component
- Wireless keyboard/mouse dropouts = 2.4 GHz RF interference-move USB receiver closer using extension cable or switch to Bluetooth/5 GHz solutions
- Touchscreen offset/misalignment = run calibration tool in Control Panel > Tablet PC Settings or Settings > Touchscreen calibration