Hardware Troubleshooting


Overview
This chapter covers the systematic diagnosis and repair of hardware failures across desktops, laptops, mobile devices, printers, and peripherals. The CompTIA A+ Core 1 exam heavily tests your ability to identify symptoms, isolate root causes, and apply the correct fix without causing further damage. Mastering this section means understanding component failure patterns, using the right diagnostic tools, and following methodical troubleshooting procedures that save time and prevent costly mistakes.
Core Concepts
Troubleshooting Methodology
CompTIA tests a six-step troubleshooting process that must be followed in order. This is the framework for all hardware diagnosis questions on the exam.
- Step 1: Identify the problem - gather information, duplicate the issue, question users, identify symptoms, determine recent changes, approach multiple problems individually
- Step 2: Establish a theory of probable cause - question the obvious, consider multiple approaches starting with the easiest first
- Step 3: Test the theory to determine the cause - confirm the theory or establish a new one, escalate if necessary
- Step 4: Establish a plan of action to resolve the problem and implement the solution
- Step 5: Verify full system functionality and implement preventive measures
- Step 6: Document findings, actions, and outcomes
When to Use This
- Apply this methodology to every troubleshooting scenario on the exam-questions frequently test which step comes next
- Use when multiple problems exist simultaneously-address them individually, not all at once
- Reference this process when a question asks "what should you do first" or "what is the next step"
Power Issues
Power-related failures manifest as no power, intermittent shutdowns, or boot failures. These are among the most frequently tested hardware scenarios.
- No power at all: completely dead system, no lights, no fans spinning
- Intermittent shutdown: system powers off randomly during operation
- Continuous reboot: system powers on but immediately cycles off and on repeatedly
- PSU failure indicators: burning smell, loud fan noise, clicking sounds
- Common causes: failed PSU, loose power cables, defective motherboard, incorrect input voltage (110V vs 220V switch)
When to Use This
- Check power connections and PSU when the system shows absolutely no signs of life
- Test the PSU with a multimeter or power supply tester before replacing the motherboard-PSU failures are more common and cheaper to fix
- Verify the voltage selector switch matches your region before concluding the PSU is defective
POST and BIOS Issues
Power-On Self-Test (POST) runs automatically when you turn on a computer. It checks critical hardware before loading the operating system.
- POST beep codes: audible patterns indicating specific hardware failures (one beep usually means success, multiple beeps indicate RAM, GPU, or other component failures)
- No POST: system powers on but does not complete hardware initialization-no video output, no beep codes
- Continuous beeping: typically indicates RAM failure or improperly seated memory modules
- Common POST failures: RAM not detected, video card failure, CPU not detected, motherboard failure
- BIOS/UEFI settings issues: incorrect boot order, disabled integrated peripherals, secure boot blocking OS installation
When to Use This
- Listen for beep codes when the system powers on but produces no video-the pattern tells you which component failed
- Reseat RAM and expansion cards when you hear continuous beeping before replacing any components
- Clear CMOS by removing the battery or using the motherboard jumper when POST settings prevent booting
RAM Issues
Memory failures cause system instability, blue screens, application crashes, and boot failures.
- Symptoms: random crashes, blue screen of death (BSOD), applications freezing, POST beep codes, system not recognizing full RAM capacity
- Diagnostic tool: Windows Memory Diagnostic or Memtest86+ (bootable utility that runs outside the OS)
- Physical indicators: RAM not fully seated in slots, bent pins in the slot, mismatched RAM speeds or types
- Compatibility issues: mixing DDR3 and DDR4, exceeding maximum supported capacity, incorrect speed for motherboard
When to Use This
- Run memory diagnostics when experiencing frequent BSODs with error codes mentioning memory addresses
- Reseat RAM modules when the system beeps continuously at startup or fails to POST
- Test RAM sticks individually in different slots to isolate whether the problem is a bad stick or a bad slot
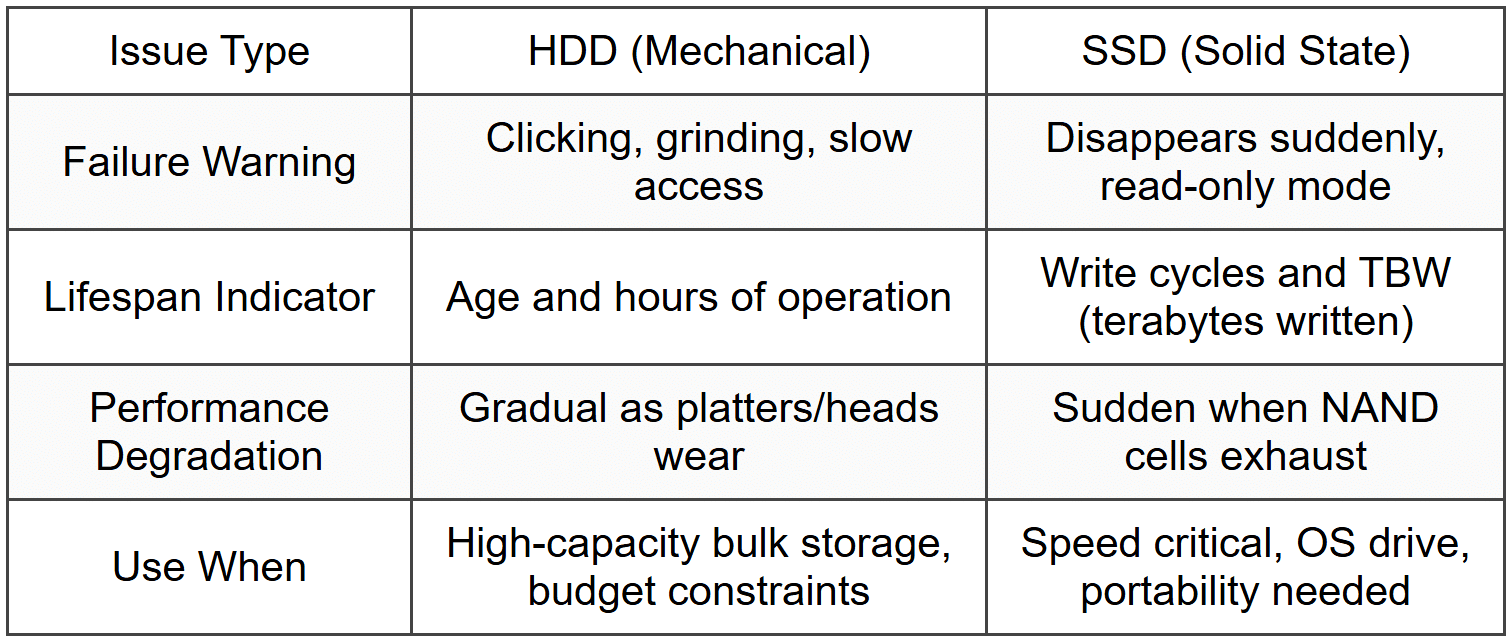
Hard Drive and Storage Issues
Storage failures present as data loss, slow performance, boot failures, or clicking/grinding noises.
- Common symptoms: slow read/write speeds, file corruption, operating system not found errors, loud clicking (HDD only), overheating
- Diagnostic tools: CHKDSK (Windows), Disk Utility (macOS), S.M.A.R.T. monitoring utilities, manufacturer-specific diagnostic tools
- Physical failures (HDD): clicking or grinding noises indicate mechanical head failure-immediate data recovery needed
- SSD-specific issues: sudden disappearance from system, read-only mode, dramatic performance degradation
- Boot issues: "Operating system not found," "No bootable device," BSOD during startup
When to Use This
- Check S.M.A.R.T. status before concluding a drive is defective-early warnings appear here first
- Use CHKDSK with /F and /R parameters when Windows reports file system errors or bad sectors
- Verify boot order in BIOS/UEFI when receiving "No bootable device" errors before replacing the drive
Display and Video Issues
Video problems range from complete display failure to distorted images, flickering, or incorrect resolution.
- No display: system powers on, fans spin, but monitor shows no image
- Distorted or flickering display: screen shows artifacts, horizontal/vertical lines, color distortion, or intermittent flickering
- Dim display: laptop screen very faint, barely visible-indicates backlight or inverter failure
- Incorrect resolution or refresh rate: display appears stretched, blurry, or unstable
- Common causes: loose cable connections, failed GPU, bad monitor, incorrect display settings, failed laptop backlight/inverter
When to Use This
- Connect to an external monitor when troubleshooting laptop display issues-if the external works, the problem is the laptop screen or backlight, not the GPU
- Reseat the video cable and test with a different cable before replacing the GPU or monitor
- Check display settings and update GPU drivers when the image appears but at wrong resolution or with artifacts
Overheating Issues
Overheating causes spontaneous shutdowns, performance throttling, system instability, and permanent component damage.
- Symptoms: unexpected shutdowns during high CPU/GPU load, system slower than normal, hot air from vents, high fan noise, BIOS temperature warnings
- Common causes: dust accumulation in vents/fans, failed cooling fan, dried thermal paste, blocked air vents, ambient temperature too high
- Monitoring tools: HWMonitor, Core Temp, manufacturer BIOS/UEFI temperature readouts
- Safe temperature ranges: CPU typically under 80°C under load, GPU typically under 85°C, sudden shutdown often occurs at 90-100°C
- Laptop-specific: vents blocked by soft surfaces (beds, couches), worn-out thermal paste on older systems
When to Use This
- Clean dust from vents and fans when the system shuts down during demanding tasks or when fans run constantly at high speed
- Reapply thermal paste between CPU and heatsink when temperatures rise significantly over time on an older system
- Replace the cooling fan when it makes grinding noises or stops spinning-continued operation will damage the CPU
Battery and Charging Issues (Laptops and Mobile Devices)
Battery failures prevent portable devices from operating untethered or charging properly.
- Battery not charging: device works on AC power but battery percentage does not increase
- Rapid discharge: battery drains much faster than expected, even with minimal use
- Swollen battery: physical bulging of the battery-this is a fire hazard and requires immediate replacement
- AC adapter issues: laptop only works when adapter is plugged in at a specific angle, or not at all
- Diagnostic steps: test with known-good AC adapter, check charging port for debris, verify battery health in OS settings or BIOS
When to Use This
- Replace the battery immediately if it is swollen-do not attempt to charge or use the device further
- Test with a different AC adapter before replacing the battery or charging port
- Calibrate the battery (full discharge then full charge) if the OS reports inaccurate battery percentage
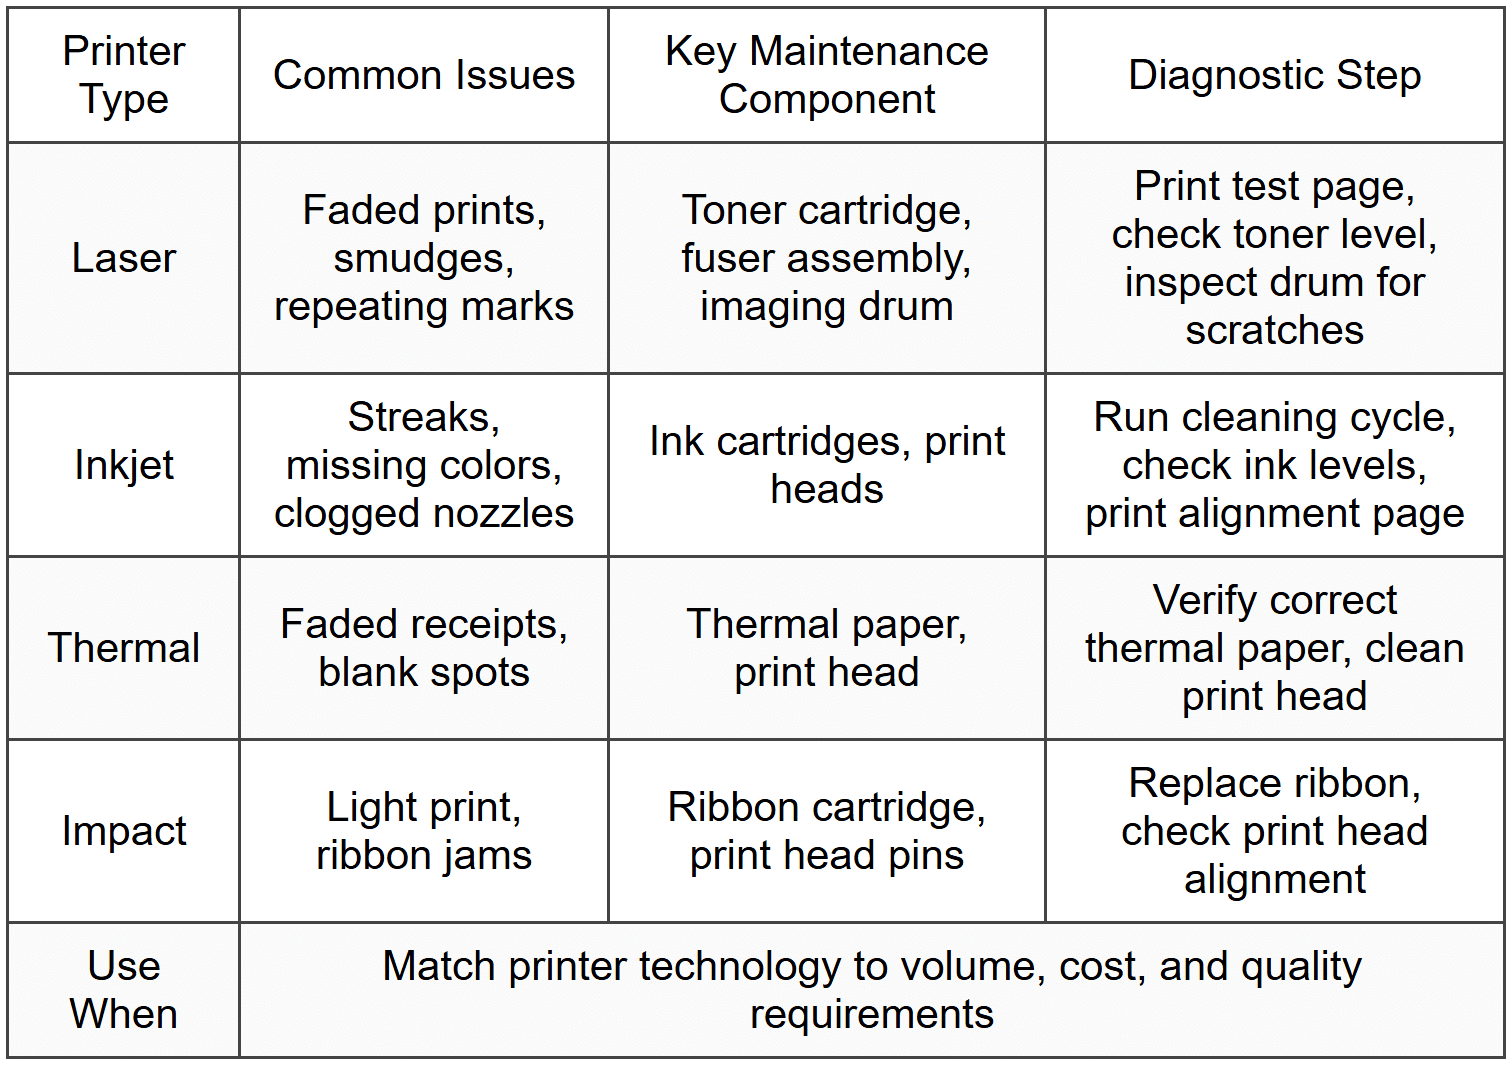
Printer Issues
Printer troubleshooting involves mechanical, connectivity, and print quality problems across inkjet, laser, thermal, and impact printers.
- Paper jams: paper stuck in rollers, feed path, or fuser assembly (laser printers)
- Print quality issues: faded prints, streaks, smudges, incorrect colors, blank pages
- Connectivity issues: printer not found, offline status, print jobs stuck in queue
- Error lights/messages: toner low, paper out, maintenance required, firmware errors
- Laser printer-specific: fuser assembly failures (smudges that can be wiped off), drum scratches (repeating marks at regular intervals), toner not fusing
- Inkjet-specific: clogged print heads, dried ink, color misalignment
When to Use This
- Run the printer's self-cleaning cycle when prints show streaks or missing colors-clogged nozzles are the most common inkjet issue
- Replace the fuser assembly in laser printers when toner smudges easily or does not adhere to paper
- Clear the print queue and restart the print spooler service when jobs are stuck or the printer shows as offline despite being connected
Mobile Device Hardware Issues
Smartphones and tablets experience unique hardware failures related to touchscreens, charging ports, cameras, and physical damage.
- Touchscreen not responsive: partial or complete failure to register touch input
- Digitizer vs. LCD: digitizer handles touch input, LCD displays the image-either can fail independently
- Charging port failure: loose connection, requires cable at specific angle, or no charging at all
- Overheating: device becomes excessively hot during normal use, often due to failing battery or background processes
- Physical damage indicators: cracked screen, liquid damage (check liquid contact indicators), bent housing
- Poor battery life: rapid discharge, unexpected shutdowns at high battery percentages
When to Use This
- Replace the digitizer if the screen displays correctly but does not respond to touch
- Clean the charging port with compressed air when connection is intermittent before replacing the port or cable
- Perform a factory reset to rule out software causes before replacing hardware components for overheating or poor battery performance
Peripheral and Expansion Card Issues
External devices and internal expansion cards can fail due to driver issues, physical connection problems, or hardware defects.
- Device not recognized: USB device, external drive, or expansion card not appearing in Device Manager or OS
- Intermittent connection: device disconnects and reconnects randomly
- Driver issues: yellow exclamation mark in Device Manager, error code 43 (device has stopped)
- Physical inspection: bent pins on connectors, damaged cables, improperly seated expansion cards
- USB-specific: insufficient power from port (use powered hub), wrong USB standard (USB 2.0 device in 3.0 port usually works, but 3.0 device may not work fully in 2.0 port)
When to Use This
- Test the device on another computer or port before concluding it is defective
- Reseat expansion cards and verify they are fully inserted and secured with screws
- Update or reinstall drivers when Device Manager shows errors, but only after verifying the device is detected at the hardware level (appears in BIOS/UEFI)
Troubleshooting
1. Error: Desktop computer powers on, fans spin, but there is no display on the monitor. The monitor's power light is on, and you hear no POST beep codes.
Resolve: Reseat the RAM modules. Improperly seated or failed RAM is the most common cause of no POST with no beep codes. Remove each stick, clean the contacts with isopropyl alcohol, and reinstall firmly until the retention clips click into place.
Check first: Verify the monitor is set to the correct input source and the video cable is securely connected to both the GPU and monitor. Test with a different cable or monitor if possible.
Do NOT do first: Do not immediately replace the motherboard or GPU. RAM issues are far more common and much less expensive to fix. Replacing major components without isolating the failure wastes time and money.
Why other options are wrong: Replacing the power supply would be incorrect because the fans spin and the system powers on, indicating the PSU is providing power. A failed monitor would not prevent beep codes from sounding.
2. Error: Laptop screen is extremely dim-you can barely see the image if you shine a flashlight on it. An external monitor connected to the laptop displays perfectly.
Resolve: Replace the backlight inverter (older CCFL laptops) or the LED backlight cable/module (modern LED laptops). The LCD panel itself is fine because the image is present; only the illumination has failed.
Check first: Verify brightness settings are at maximum and test the function key combination to increase brightness. Some laptops disable the internal display when an external monitor is connected.
Do NOT do first: Do not replace the entire LCD assembly. The LCD panel displays the image correctly; only the backlight component has failed. Replacing the whole assembly is much more expensive and unnecessary.
Why other options are wrong: Updating graphics drivers will not fix a hardware failure of the backlight. Replacing the motherboard or GPU is incorrect because the external display works perfectly, proving those components function properly.
3. Error: Computer shuts down randomly during gaming or video editing, but works fine during light web browsing. The system does not display any error messages before shutdown.
Resolve: Clean dust from vents and fans, and verify the CPU cooling fan is spinning. The system is overheating under load and triggering thermal shutdown protection. Use monitoring software to confirm CPU temperatures exceed 90°C before shutdown.
Check first: Boot into BIOS/UEFI and monitor CPU temperature while idle. If already high (above 60°C at idle), the cooling system is compromised. Also check if the CPU fan spins at POST.
Do NOT do first: Do not reinstall the operating system or update GPU drivers. This is a thermal hardware issue, not a software problem. The symptom pattern (fails under load, works during light use) clearly indicates overheating.
Why other options are wrong: Replacing the power supply would be wrong because PSU failures typically cause instant shutdowns regardless of load, or prevent the system from powering on at all. RAM issues cause crashes with error messages or BSODs, not clean shutdowns.
4. Error: Laser printer produces pages with toner that smudges when touched. The printed text appears complete but rubs off easily.
Resolve: Replace the fuser assembly. The fuser heats and bonds toner to paper. When it fails or does not reach proper temperature (typically 180-200°C), toner sits on the surface without permanently adhering.
Check first: Print a test page and wait 30 seconds. If toner still smudges after cooling, the fuser is defective. Also verify the printer is not in "draft" or "toner save" mode, which might reduce fuser temperature.
Do NOT do first: Do not replace the toner cartridge. The toner is clearly reaching the paper and producing a complete image-the issue is bonding, not toner depletion or distribution.
Why other options are wrong: Cleaning the imaging drum will not solve fuser temperature problems. Updating printer firmware rarely affects mechanical heating elements. A paper type mismatch might affect print quality but would not cause toner to smudge uniformly across all media.
5. Error: Smartphone charges very slowly and the charging cable must be held at a specific angle to work. The cable works perfectly with other devices.
Resolve: Clean the charging port with compressed air and a wooden or plastic toothpick. Lint, dust, and debris accumulate in the port over time, preventing the cable from fully inserting and making proper contact.
Check first: Inspect the charging port with a flashlight. Look for visible debris, bent pins, or corrosion. Gently remove any compacted lint with a non-metallic tool to avoid shorting the contacts.
Do NOT do first: Do not immediately replace the charging port assembly. This requires disassembly and often soldering. Over 80% of "bad port" diagnoses are actually debris buildup that can be cleaned in seconds.
Why other options are wrong: Replacing the battery would not fix a physical connection issue-the cable must be angled because the port is obstructed or damaged. Replacing the cable is wrong because it works on other devices, proving the cable itself is functional.
Step-by-Step Procedures
Task: Replacing a Failed Power Supply Unit (PSU)
- Power down the computer completely and unplug the AC power cable from the wall outlet and PSU
- Press and hold the power button for 5 seconds to discharge residual power from capacitors
- Open the case by removing side panel screws (typically on the back edge)
- Disconnect all PSU cables from the motherboard (24-pin ATX, 4/8-pin CPU, PCIe power), drives (SATA, Molex), and peripherals. Photograph connections before removing for reference.
- Unscrew the four PSU mounting screws from the rear of the case
- Slide the PSU out from the rear, supporting its weight to prevent it from falling
- Position the new PSU in the case with the fan oriented correctly (usually facing down toward a bottom vent, or facing inside the case in older designs)
- Secure the PSU with four mounting screws, ensuring it is level and fully seated
- Reconnect the 24-pin ATX motherboard power connector, pressing firmly until the clip engages
- Reconnect the 4-pin or 8-pin CPU power connector near the processor socket
- Reconnect PCIe power cables to the graphics card (6-pin, 8-pin, or 6+2 pin configurations)
- Reconnect SATA power to drives and Molex connectors to any legacy devices
- Route cables neatly to avoid blocking airflow and fans
- Close the case and secure the side panel
- Plug in the AC power cable, turn on the PSU switch (if equipped), and power on the system
- Verify POST completes successfully and all drives and peripherals are detected in BIOS
Task: Diagnosing RAM Failure with Memtest86+
- Download Memtest86+ ISO from the official website and create a bootable USB drive using Rufus or similar tool
- Insert the USB drive and restart the computer
- Enter BIOS/UEFI setup (typically by pressing Delete, F2, or F12 during POST)
- Change boot order to prioritize the USB drive, or select it from the one-time boot menu
- Save changes and exit BIOS-the system will boot into Memtest86+
- Allow the memory test to run through at least one complete pass (this can take 30 minutes to several hours depending on RAM capacity)
- Observe the test results in real time-any red errors indicate failing memory
- If errors appear, note which test and memory address range is failing
- Power down and remove one RAM stick at a time, testing each individually to isolate the defective module
- If all modules pass individually but fail together, test each DIMM slot by moving a known-good stick to each slot
- Replace any module that produces errors, ensuring the replacement matches speed, type (DDR3, DDR4, DDR5), and capacity specifications
Task: Clearing CMOS to Reset BIOS/UEFI Settings
- Power down the computer and unplug the AC power cable
- Press the power button for 5 seconds to discharge residual power
- Open the case and locate the CMOS battery on the motherboard (usually a CR2032 coin cell)
- Alternatively, locate the Clear CMOS jumper (often labeled CLR_CMOS, JBAT1, or similar) near the battery
- Battery method: Use a fingernail or plastic tool to gently release the battery retention clip and remove the battery. Wait 5-10 minutes, then reinsert the battery.
- Jumper method: Move the jumper from pins 1-2 to pins 2-3 (or as specified in the motherboard manual). Wait 10 seconds, then return the jumper to the original position.
- Close the case, reconnect power, and boot the system
- Enter BIOS/UEFI setup immediately (settings will be at factory defaults)
- Reconfigure critical settings: boot order, date/time, SATA mode, and any overclocking or custom configurations
- Save changes and exit to boot normally
Practice Questions
Q1: A user reports that their desktop computer beeps continuously when powered on, and nothing appears on the monitor. The computer was working fine yesterday. What is the most likely cause?
(a) Failed power supply
(b) Improperly seated or failed RAM
(c) Defective monitor
(d) Corrupt operating system
Ans: (b)
Continuous beeping during POST indicates a RAM issue-either a module is not seated properly or has failed. This is the most common cause of this symptom. (a) is wrong because the system is powering on and beeping, indicating the PSU provides power. (c) is wrong because the beeping occurs during POST, before any video signal is sent; a bad monitor would not prevent POST from completing. (d) is wrong because POST happens before the OS loads, so OS corruption cannot cause POST beep codes.
Q2: You are troubleshooting a laser printer that produces faded prints even after installing a new toner cartridge. What should you check first?
(a) Replace the fuser assembly
(b) Clean the transfer corona wire or roller
(c) Update the printer firmware
(d) Replace the imaging drum
Ans: (d)
A worn or scratched imaging drum causes faded prints and fails to hold a proper charge for toner transfer. Since the toner is new, the drum is the next most likely component. (a) is wrong because fuser failures cause smudging, not fading. (b) is wrong because transfer issues typically cause uneven toner distribution or blank spots, not uniform fading. (c) is wrong because firmware does not affect mechanical print quality issues like fading.
Q3: A technician is troubleshooting a laptop that shuts down after 10 minutes of use. The shutdown happens faster when running demanding applications. External temperature is normal. What should the technician do FIRST?
(a) Replace the motherboard
(b) Reinstall the operating system
(c) Check BIOS/UEFI for CPU temperature and clean cooling vents
(d) Replace the battery
Ans: (c)
Shutdowns that occur faster under load indicate thermal issues. Checking temperature and cleaning vents is the first, non-invasive diagnostic step. (a) is wrong because motherboard replacement is a last resort after ruling out overheating, which is far more common. (b) is wrong because this is clearly a hardware thermal issue, not software corruption. (d) is wrong because battery issues cause loss of power when unplugged, not shutdowns while connected to AC power.
Q4: A user complains that their smartphone will not charge. You test with a known-good cable and adapter, but the issue persists. The phone works fine when powered on. What is the next best step?
(a) Replace the battery
(b) Inspect and clean the charging port
(c) Perform a factory reset
(d) Replace the charging port assembly
Ans: (b)
Inspecting and cleaning the charging port is a simple, non-invasive step that resolves the majority of charging issues caused by lint and debris. (a) is wrong because the phone powers on and operates, indicating the battery holds some charge; the issue is charging, not power retention. (c) is wrong because a factory reset addresses software, not physical connection problems. (d) is wrong because replacing hardware should only occur after cleaning and inspection confirm physical damage or defect.
Q5: Performance-Based Task: You are troubleshooting a desktop that powers on but does not display anything on the monitor. List the correct order of troubleshooting steps according to CompTIA methodology.
(a) Replace the graphics card → Test the monitor on another system → Reseat RAM → Check power supply
(b) Verify monitor power and cable connections → Listen for POST beep codes → Reseat RAM and GPU → Test with external monitor → Replace faulty component
(c) Reinstall the operating system → Update BIOS → Replace motherboard → Test RAM
(d) Replace power supply → Replace motherboard → Install new RAM → Replace monitor
Ans: (b)
This follows the correct troubleshooting methodology: verify simple/external issues first (cable, power), gather information (beep codes), test theories (reseat components, test with external display), then replace the confirmed faulty component. (a) is wrong because it starts with replacement instead of verification and reseating. (c) is wrong because it immediately jumps to software and expensive hardware replacement without basic checks. (d) is wrong because it replaces multiple expensive components without isolating the actual failure.
Q6: A technician installs a new PCIe graphics card, but the system does not POST and emits one long beep followed by two short beeps. What does this indicate?
(a) RAM failure
(b) Video card failure or not seated properly
(c) CPU failure
(d) Power supply failure
Ans: (b)
One long beep followed by two short beeps is a standard POST code indicating a video card issue. Since the card was just installed, it is likely not fully seated or incompatible. (a) is wrong because RAM failures typically produce continuous beeping or a different pattern. (c) is wrong because CPU failures usually prevent POST entirely with no beeps or a different code. (d) is wrong because PSU failures prevent the system from powering on or producing beeps at all.
Quick Review
- POST beep codes: continuous beeping = RAM issue; one long + two short = video card issue; no beep with no display = check RAM seating first
- Overheating shutdown: occurs under load, no error message, check CPU temperature in BIOS (safe under 80°C under load), clean fans/vents, reapply thermal paste
- Laptop dim screen (image visible with flashlight): backlight or inverter failure, NOT the LCD panel-external monitor works fine, confirming GPU is functional
- Laser printer smudging toner: fuser assembly failure-toner does not bond permanently; faded prints = worn imaging drum or low toner
- No power at all: verify AC connection, check PSU voltage switch (110V/220V), test with multimeter, replace PSU before motherboard
- Smartphone charging issues: clean the port with compressed air first (most common fix), test with known-good cable/adapter, check for swollen battery (immediate replacement required)
- Troubleshooting methodology order: identify problem → establish theory → test theory → plan and implement solution → verify functionality → document findings
- RAM diagnostics: use Windows Memory Diagnostic or Memtest86+, test modules individually in different slots to isolate bad stick vs. bad slot
- Clear CMOS: remove CR2032 battery for 5-10 minutes OR move jumper to reset position for 10 seconds-resets BIOS to factory defaults
- Hard drive clicking noise (HDD): mechanical head failure, imminent drive death, back up data immediately-do not attempt to repair