NCERT Based Activity: Sound Waves: Characteristics and Applications


Activity 10.1 : Let us explore - Vibrating Rubber Band
1. Take a cardboard box with one side open and a rubber band.
2. Stretch the rubber band across the open side of the box (Fig. 10.2).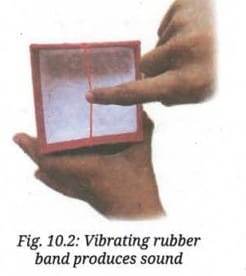
3. Holding the box steady with one hand, pluck the rubber band with a finger. Do you hear any sound?
4. Pluck the rubber band again and watch it carefully. Is it vibrating?
5. Wait till the rubber band stops vibrating. Do you still hear the sound?
6. Change the tension in the rubber band by stretching it more or loosening it slightly and plucking it each time. Does the sound change? What changes do you notice?
7. Remove the rubber band from the box. Stretch it between two fingers and pluck it near your ear. Is the sound still produced? Is it as loud as before?
Observation:
As long as the rubber band is stretched and vibrating, sound is produced. Once vibration stops, so does the sound. When tension is increased, the sound has a higher pitch. When the rubber band is removed from the box and plucked in open air, sound is still produced but much softer, because the box was acting as a resonator.
Explanation:
Sound is produced by vibrations. Vibration refers to the periodic to and fro motion (oscillations) of an object. The box amplifies the sound by resonance, which is why the sound is louder when the rubber band is on the box than when held freely. Changing the tension changes the frequency of vibration, which changes the pitch of the sound produced.
Conclusion: Sound is produced by vibrating objects. When vibration stops, sound stops. The object that produces sound is called the 'source' of the sound.
Activity 10.2 : Let us explore - Tuning Fork
1. Take a tuning fork and a soft rubber pad.
2. Hold the tuning fork by its stem.
3. Strike one of the prongs of the tuning fork gently against the rubber pad (Fig. 10.4b) and bring it close to your ear. Do you hear a sound? (Take care not to strike the tuning fork against a hard surface.)
4. Now, gently touch a water surface with one of the vibrating prongs of the tuning fork. Do you see waves forming on the surface of water?
5. Repeat step 3 a few times while bringing the prongs of the tuning fork near your ear in different orientations. Do you hear the sound?
Observation:
When the tuning fork is struck against the rubber pad and held near the ear, a clear sound is heard. When the vibrating prong touches the water surface, ripples (waves) are seen. Sound is heard in all orientations of the tuning fork near the ear.
Explanation:
The tuning fork vibrates when struck. The vibrating prong disturbs the water surface, producing waves - this confirms that the prongs are indeed vibrating. Sound is heard in multiple orientations because sound propagates outward in multiple directions from the vibrating source. This activity confirms that sound is produced by vibrating objects.
Conclusion: A tuning fork is a U-shaped metal bar with prongs (tines) that vibrate when struck. Nearly single-frequency sounds can be produced by striking a tuning fork.
Activity 10.3 : Let us investigate - Sound Through Solids
1. You and your friend stand on opposite sides of a desk in the classroom. Let your friend gently knock or scratch on the desk. Listen carefully to the sound produced with your ear in the air.
2. Now, place your ear against the desk, close your other ear and listen again (as shown in Fig. 10.5). Are you able to hear the sound through the table?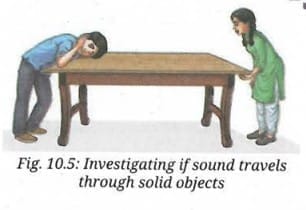
Observation:
When your ear is in the air, you hear the sound of knocking but it is faint. When you place your ear directly against the desk (solid), the sound heard is much louder and clearer.
Explanation:
Sound can travel through solids. In fact, sound travels faster and more efficiently through solids than through air. The solid desk acts as a medium that transmits the sound vibrations from the source (knocking point) to your ear. This is why the sound is louder when heard through the desk.
Conclusion: Sound can propagate through solid materials. This shows that solids are good conductors of sound.
Activity 10.4 : Let us investigate
1. Take a large tub or bucket of water filled to the brim and two metal spoons.
2. Tap the spoons against one another and listen to the sound produced (Fig. 10.6a).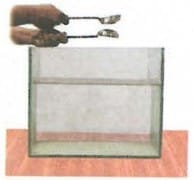 Fig. 10.6(a): Tapping two spoons against eachother in air
3. Now, submerge the two metal spoons in water without touching the sides or bottom of the bucket and tap them against one another again (Fig. 10.6b). Do you again hear the sound produced?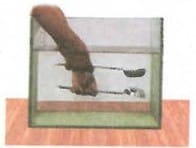 Fig. 10.6(b): Tapping two spoons against eachother in water
Observation:
When spoons are tapped in air, you hear the metallic clinking sound clearly. When the spoons are tapped while submerged in water, you can still hear the sound - it travels through water and then air to reach your ears.
Explanation:
The sound of the submerged spoons reaches you after travelling through water and then through air. This demonstrates that sound can travel or propagate through liquids as well. The material through which sound propagates is called a medium. Sound can travel through solids, liquids, and gases.
Conclusion: Sound can travel through liquids (water). Sound needs a material medium (solid, liquid, or gas) to propagate. It cannot travel through vacuum.
Activity 10.5 : Let us observe
1. Take a slinky and a marker.
2. Make a mark on a turn of the slinky with the marker. Lay out the slinky horizontally on a table or floor.
3. Ask a friend to hold one end of the slinky fixed while you hold the other end keeping the slinky slightly stretched.
4. Give the slinky at your end a sharp push towards your friend and then quickly pull it back again (Fig. 10.8). Do you observe a disturbance created in the slinky which moves towards your friend?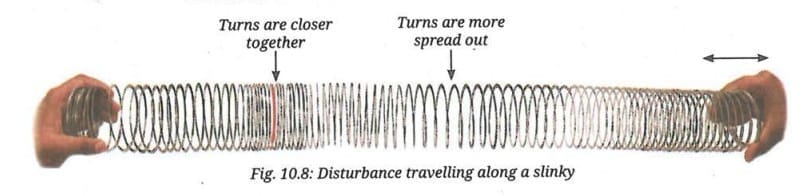
5. Now, push and pull the slinky end multiple times in quick succession. Are a series of disturbances produced in the slinky? Do these disturbances move across the length of the slinky? Does the mark on the slinky move back and forth parallel to the direction of the disturbance?
Observation:
When one end of the slinky is pushed and pulled, a disturbance travels along its length towards the other end. Regions where the turns are closer together (compressions) and regions where they are spread out (rarefactions) can be seen. The marked turn does NOT travel along the slinky - it only oscillates back and forth about its own position, parallel to the direction in which the disturbance travels.
Explanation:
This slinky activity is an analogy for how sound waves travel through a medium. The regions of turns closer together represent compressions (C) - regions of higher density. The regions of turns spread out represent rarefactions (R) - regions of lower density. The disturbance (wave) travels from one end to the other while individual turns (particles) only vibrate about their mean positions. This is the nature of a longitudinal wave, where particles vibrate parallel to the direction of wave propagation. Sound waves are longitudinal mechanical waves.
Conclusion: In a sound wave, it is the disturbance (energy) that travels through the medium, not the particles themselves. The particles only vibrate about their mean positions.
Activity 10.6 : Let us experiment
1. Take a wide mouthed container, a cellophane or rubber sheet (such as that of a balloon) of size larger than its opening, a loud sound source (such as a metal plate and a beater) and some grains or particles (such as rice, semolina, salt, or chalk powder).
2. Stretch the sheet over the edges of the container tightly and fix it with tape or a rubber band (Fig. 10.14).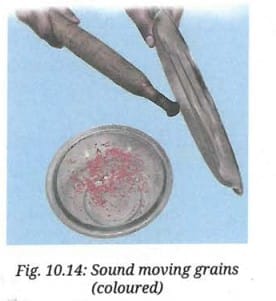
3. Sprinkle the grains evenly over the sheet, ensuring they are not clumped together.
4. Produce a loud sound near the bowl without touching it. Observe the grains on the sheet. Does the sound have any effect on the grains?
5. Repeat step 4 with different sources of sounds and observe the effect on the grains. You can try increasing or reducing the volume of sound. Try with different grains.
Do you observe the grains over the sheet move or jump? Why does this happen, even though the source of sound is not touching the sheet or the container?
Observation:
The grains on the stretched sheet move and jump when a loud sound is produced nearby, even though the sound source is not touching the sheet or the container. When louder sounds are produced, the grains jump higher. When softer sounds are produced, the grains barely move.
Explanation:
Sound is a form of energy. When the source of sound vibrates, it transfers energy to the surrounding medium (air). As sound waves propagate through air, they reach the stretched sheet and cause it to vibrate. This vibration causes the grains to move. The fact that the sound source is not physically touching the sheet but the grains still move confirms that energy is being transferred by the sound wave through the air. Louder sounds carry more energy, causing greater displacement of the sheet and higher jumps of the grains - this corresponds to larger amplitude of the sound wave.
Conclusion: Sound is a form of energy. Sound waves transfer energy from the source to the medium as they propagate.
Activity 10.7 : Let us experiment (Demonstration Activity)
This activity is recommended to be performed as a classroom group activity facilitated by the teacher.
1. Use a mobile app, such as Phyphox, that can identify frequencies of sounds. Use the 'Audio Spectrum' option that displays the frequency graphically or in hertz (Hz).
2. Try to sing the musical notes 'Sa, Re, Ga, Ma, Pa, Dha, Ni, Sa' one after another, or use a music or tone generating app on another phone to produce those notes. Observe how the frequency changes as each note is produced.
3. Record the approximate frequency values for each musical note.
4. Compare the musical notes by taking the ratio of each frequency with respect to the 'Sa'. Do you observe any pattern?
5. If both voice and mobile-generated notes are used, compare their frequencies for the same musical notes.
Observation:
The frequency is lowest for 'Sa' and gradually increases for the other notes. Each musical note has a distinct frequency. The higher 'Sa' has approximately double the frequency of the lower 'Sa' - this interval is called an octave.
Observed Frequency Table (approximate values):
| Musical Note | Approximate Frequency (Hz) | Ratio with respect to Sa |
|---|---|---|
| Sa (lower) | ~240 Hz | 1.00 |
| Re | ~270 Hz | 1.12 |
| Ga | ~300 Hz | 1.25 |
| Ma | ~320 Hz | 1.33 |
| Pa | ~360 Hz | 1.50 |
| Dha | ~400 Hz | 1.67 |
| Ni | ~450 Hz | 1.87 |
| Sa (higher) | ~480 Hz | 2.00 |
Explanation:
Each musical note corresponds to a specific frequency of sound. A higher pitch corresponds to a higher frequency. The ratio pattern shows that musical notes follow a mathematical relationship - the higher 'Sa' has exactly double the frequency of the lower 'Sa', forming one octave. Voice-generated and mobile-generated notes for the same note should have approximately the same frequency, although individual voice frequencies may vary slightly.
Conclusion: Each musical note has a distinct and characteristic frequency. Higher notes have higher frequencies. The higher octave 'Sa' has approximately double the frequency of the lower 'Sa'.
Activity 10.8 : Let us experiment (Demonstration Activity)
This activity is recommended to be performed as a classroom group activity facilitated by the teacher.
1. Open a mobile app that can generate sounds.
2. Set the frequency to 100 Hz, tap 'play', and listen carefully.
3. Increase the frequency in steps of 100 Hz up to 1000 Hz and describe how the sound changes.
4. Next, set the frequency to 50 Hz. Reduce the frequency till about 20 Hz or the point where you cannot hear the sound anymore.
Observation:
As frequency is increased from 100 Hz to 1000 Hz in steps, the sound becomes progressively higher in pitch (shriller). At 100 Hz the sound is deep and rumbling; at 1000 Hz it is much sharper and higher. When the frequency is reduced below about 20 Hz, the sound can no longer be heard - it falls below the human audible range.
Explanation:
Pitch is how frequency is perceived by humans. Higher frequency → higher pitch (shrill sounds like a whistle or siren). Lower frequency → lower pitch (deep sounds like thunder or aircraft rumble). The human audible range is from 20 Hz to 20,000 Hz (20 kHz). Sound waves with frequency below 20 Hz are called infrasonic waves; those above 20 kHz are called ultrasonic waves. Humans cannot hear infrasound or ultrasound, but dogs, cats, bats, and dolphins can detect ultrasound, while elephants can detect infrasound.
Conclusion: Higher frequency corresponds to higher pitch. The human audible range is 20 Hz to 20 kHz. Sounds below 20 Hz are infrasonic and above 20 kHz are ultrasonic - both are inaudible to humans.
FAQs on NCERT Based Activity: Sound Waves: Characteristics and Applications
| 1. What is the purpose of Activity 10.1: Vibrating Rubber Band? |  |
| 2. How does a tuning fork help in understanding sound waves as described in Activity 10.2? | |
| 3. What do students learn from Activity 10.3: Sound Through Solids? | |
| 4. Why is observation important in Activity 10.5? | |
| 5. What is the main objective of the demonstration activities in Activities 10.7 and 10.8? | |