NCERT Based Activity: How Life Continues


Activity 11.1 : Let us explore
1. Interact with gardeners working in your school garden or farmers working in a field.
2. Observe the techniques of cutting, grafting and layering followed by them. Discuss these techniques with them and record your observations in your notebook.
Cutting
1. Note the following points while observing the technique of cutting in the field:
- (i) Does the gardener, scientist or horticulturist cut the overgrown branches of a plant at the end of its growing season? (Different plants have different growing seasons.)
- (ii) Observe them prepare the cuttings from a plant for the purpose of growing new plants. Note the average length of the cuttings.
- (iii) Count the number of nodes and internodes on the cuttings.
2. Collect the cuttings of the shoots in the morning for planting.
3. Remove leaves from the lower half of each cutting.
4. Insert the cuttings up to approximately half of their length in the soil mixed with compost at an angle of about 45-60° from the soil surface (Fig. 11.2).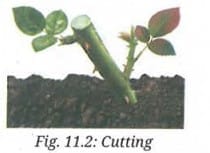
5. Water them regularly and observe the change, if any.
Observation:
After a few days, new roots emerge from the nodes at the buried end of the cutting. New leaves and shoots begin to grow from the nodes above the soil. The cutting gradually develops into a new, independent plant genetically identical to the parent plant.
Explanation:
Cutting is a method of vegetative propagation where a portion of a plant (stem, leaf, or root) is removed and planted in soil to grow into a new plant. The nodes on the cutting contain meristematic tissue capable of producing both roots (below soil) and shoots (above soil). Since this is asexual reproduction, the new plant is a genetic clone of the parent. Rose, sugarcane, money plant, and many ornamental plants are commonly propagated by this method.
Grafting
1. For grafting, take a healthy rooted plant (Plant A) (Fig. 11.3a) (for example, a wild rose variety) and a healthy stem piece from another plant (Plant B) of other varieties (for example, a yellow rose plant and/or a pink rose plant) (Fig. 11.3c and Fig. 11.3d).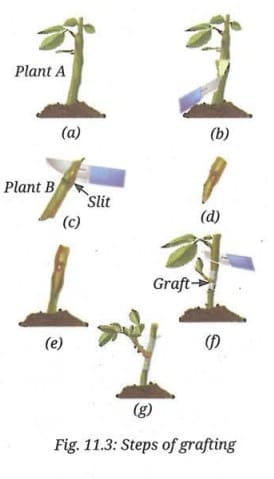
2. Create a wound or a slit on a twig of Plant A (Fig. 11.3b).
3. Insert and fit the cutting of stem of Plant B into the slit of stem of Plant A (Fig. 11.3e).
4. Protect the wound or slit by using a cotton cloth or by wrapping film to avoid pests entering the graft until it heals (Fig. 11.3f). Cut the other branches of Plant A.
5. Water the plant regularly and observe the growth of Plant B along with Plant A.
Observation:
After a few weeks, the graft heals and the cutting of Plant B (scion) begins to grow leaves and shoots, drawing water and nutrients from the root system of Plant A (stock). The graft union becomes firm and the plant grows with the combined features - the hardy root system of Plant A and the desirable flowering/fruiting traits of Plant B.
Explanation:
Grafting is a technique where a stem piece (scion) from one plant is joined to the rooted stem (stock) of another plant of the same or closely related species. The cambium tissues of both plants must align for the graft to succeed. Grafting is widely used in horticulture to combine the desirable traits of two plants - for example, disease-resistant roots with high-quality fruit-bearing branches. Mango, apple, and rose plants are commonly propagated by grafting. Various Krishi Vigyan Kendras (KVKs) under ICAR allow farmers to gain vocational skills in modern grafting techniques to grow high-yield fruits and boost their income.
Layering
1. For layering, select a flexible, thin twig of a tree or a shrub, such as a lemon and bury the middle part of the twig under the soil surface (Fig. 11.4).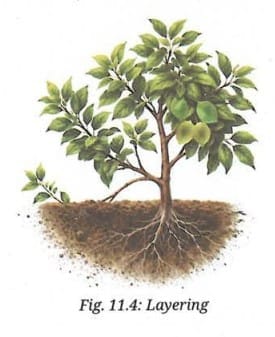
2. Water it regularly and observe the growth of new leaves on the twig buried in the soil.
3. After 10-15 days, the roots will develop from the area of the twig buried in the soil.
4. Once roots have developed, cut the twig from the parent plant, so that it can grow as a new plant.
Observation:
After 10-15 days, roots develop from the buried portion of the twig (at the node region). New leaves appear, indicating that the layered twig is growing independently. Once cut from the parent plant, it grows as a completely new, independent plant.
Explanation:
Layering is a method of vegetative propagation where a branch of the parent plant is bent and buried in the soil while still attached to the parent. The buried portion develops roots from the nodes. Once sufficient roots form, the branch is cut from the parent and grows as a new plant. This method is advantageous because the developing plant continues to receive water and nutrients from the parent during root development, increasing its chances of survival. Jasmine, lemon, and guava are commonly propagated by layering.
Conclusion: Cutting, grafting, and layering are artificial methods of vegetative propagation that produce genetically identical plants (clones) from a single parent. These methods are widely used in agriculture and horticulture to efficiently propagate plants with desirable traits on a large scale.
Activity 11.2 : Let us explore - Budding in Yeast
1. Take 20 mL of sugar solution (1 g in 10 mL) in a test tube.
2. Add a pinch of yeast granules to it and then place a cotton plug on the mouth of the test tube.
3. Keep it undisturbed in a warm place to allow the yeast to become active.
4. After 1-2 hours, place a small drop of the yeast mixture from the test tube onto a glass slide and mount it with a coverslip.
5. Observe the slide under a compound microscope at different magnifications and draw a diagram of what you observe.
Do you observe any small, round outgrowths (buds) emerging from the parent yeast cells as shown in Fig. 11.6? Do these features indicate that the yeast is duplicating? How do these observations help you in understanding reproduction in yeast?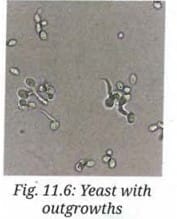
Observation:
Under the microscope, small, round outgrowths (buds) are seen emerging from the parent yeast cells (as shown in Fig. 11.6). The buds appear as smaller, round projections attached to the larger parent cell. Multiple buds at different stages of development can be seen on a single parent cell. Some buds may still be attached while others have separated to form independent cells.
Explanation:
Yeast reproduces asexually by a process called budding. In budding, a small outgrowth (bud) develops from the parent cell at a specific site due to repeated cell division. The bud enlarges, receives a copy of the genetic material, and eventually separates from the parent to grow as an independent individual. This process involves mitosis - the same type of cell division that produces two identical daughter cells with the same number of chromosomes as the parent. Since only one parent is involved, all offspring are genetically identical to the parent (clones). Budding allows yeast to reproduce rapidly when nutrients (sugar) and warm temperatures are available.
Conclusion: Yeast reproduces asexually through budding. The new individual (bud) is genetically identical to the parent. The central process of asexual reproduction is mitosis.
Activity 11.3 : Let us experiment
1. Take a small slice of bread or a roti and lightly moisten it with a few drops of water.
2. Prepare a moist chamber using a plastic box or steel dabba. Place a thin layer of cotton in it, cover it with tissue paper and moisten it with pre-boiled water. Put the slice of bread or roti on the wet cotton bed covered with tissue paper.
3. Keep the moist chamber in a warm and dark place, away from direct sunlight (if the bread or roti starts drying, add a few drops of water to keep it moist).
4. Observe the bread or roti every day for any changes. Record your observations without touching it directly.
5. After three days, observe the surface of the bread or roti carefully using a magnifying glass. Do you notice the growth of mould?
6. When enough mould grows and spreads on it, carefully take the box to the school laboratory.
7. With the help of a needle, carefully transfer a little mould onto a microscope slide. Under the guidance of your teacher, add cotton blue stain - a coloured dye to help see it better.
8. Observe the mould under the microscope and draw its diagram based on your observations.
9. Compare the diagram you have drawn with Fig. 11.8 and share your observations with your classmates.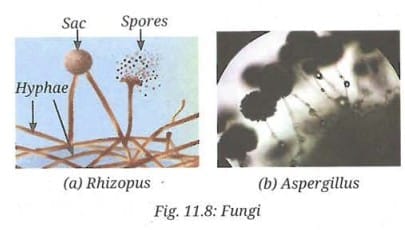
Observation:
After 2-3 days in the warm, moist, dark chamber, black or greyish-green patches of mould appear on the surface of the bread or roti. The mould spreads gradually and covers more area with each passing day. Under the microscope, thread-like structures called hyphae are visible with round, dark sac-like structures (sporangia) at their tips. Tiny round structures (spores) are visible inside or around the sacs. The observed structure matches Rhizopus (black bread mould) or Aspergillus as shown in Fig. 11.8.
Explanation:
The mould on the bread grew from fungal spores already present in the air, which settled on the moist bread and began reproducing rapidly in warm, dark, and moist conditions. We kept the moist chamber warm (25-35°C) because spores of mould present in the air need warmth and moisture to grow. Spores are produced in huge numbers (millions from one mould colony) in sac-like structures called sporangia. Spores are lightweight, usually single-celled, and float easily through air currents, waiting for moisture and nutrients to germinate quickly into a new individual. This is an example of asexual reproduction by spore formation. The central process is mitosis, producing offspring genetically identical to the parent. Refrigeration prevents mould growth by slowing or stopping spore germination - this is why we refrigerate perishable food.
Conclusion: Fungi like bread mould reproduce asexually by spore formation. Spores germinate under favourable conditions (warmth, moisture, darkness) to grow into new organisms.
Activity 11.4 : Let us explore
1. Take three pairs of beads of different colours (Fig. 11.9), each pair representing two contrasting characters on different chromatids of different chromosomes, such as:
- Pair 1 (green): One light green bead and one dark green bead representing blonde and black hair colour, respectively on different chromatids of chromosome 1.
- Pair 2 (blue): One light blue bead and one dark blue bead representing straight and curly hair, respectively on different chromatids of chromosome 2.
- Pair 3 (red): One light red bead and one dark red bead representing brown and black eye colour, respectively on different chromatids of chromosome 3.

2. Make a combination from it by randomly picking one bead from each pair.
3. Write your combination as 'light green, light blue, light red'.
4. How many combinations can you make with just these three pairs of characters? Each time you make a combination using beads, you will get either the same combination or a different one. With just three pairs of characters, eight combinations are possible.
5. Imagine how many combinations are possible with 23 pairs of chromosomes, each carrying genetic information for many characters.
Observation:
With 3 pairs of beads (3 pairs of chromosomes), 8 (= 2³) different combinations are possible. Each random picking gives a different combination of traits. With 23 pairs of human chromosomes, the number of possible gamete combinations is 2²³ = 8,388,608 (over 8 million). This means every human gamete carries a unique combination of genetic information.
Explanation:
During meiosis, the chromosomes of each pair separate so that each gamete receives only one chromosome from each pair. This random separation of chromosome pairs during meiosis is called independent assortment. Each gamete thus carries a unique combination of chromosomes. When two such gametes (sperm and egg) fuse during fertilisation, the zygote carries a unique combination of characters from both parents. This random mixing creates variation among individuals, which is important for the survival of a species - variation helps some individuals adapt better to changing environments and contributes to evolution over time.
Conclusion: Meiosis produces gametes with unique combinations of chromosomes through independent assortment. This creates genetic variation among offspring, making children genetically different from their parents and siblings.
Activity 11.5 : Let us explore - Parts of a Flower
1. Collect different types of flowers from your surroundings.
2. Carefully observe each part of the flowers you have collected, starting from the outer whorl to the inner one.
3. Record the presence of various floral parts in the different flowers that you collected in Table 11.1.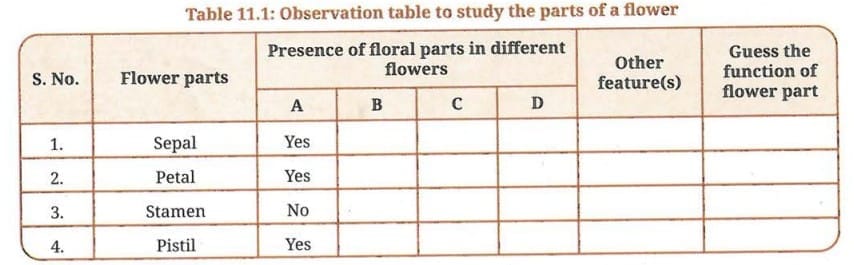
4. Analyse the function of each part of the flower based on visible characters.
5. Cut a transverse and a longitudinal section of the ovary (swollen base of the pistil) and observe it under a dissecting microscope.
6. Record any other feature(s) in Table 11.1.
7. Draw a diagram of the structure you observed under the microscope.
Observation:
Table 11.1: Observation table to study the parts of a flower
| S. No. | Flower parts | Presence of floral parts in different flowers | Other feature(s) | Guess the function of flower part | |||
|---|---|---|---|---|---|---|---|
| A | B | C | D | ||||
| 1. | Sepal | Yes | Yes | Yes | Yes | Green, leaf-like, outermost whorl | Protects the flower bud before it opens |
| 2. | Petal | Yes | Yes | Yes | No (in some) | Coloured, fragrant, attracts pollinators | Attracts insects/birds for pollination |
| 3. | Stamen | No (in female flowers) | Yes | Yes | Yes | Has filament + anther; anther produces pollen | Male reproductive part; produces pollen (male gametes) |
| 4. | Pistil | Yes | Yes | No (in male flowers) | Yes | Has stigma, style, ovary; ovary contains ovules | Female reproductive part; receives pollen, contains eggs |
A complete flower has four whorls: sepals (outermost), petals, stamens, and pistil (innermost). Not all flowers have all four parts - flowers with only stamens are called male flowers and those with only pistil are called female flowers. The stamen consists of a filament (stalk) and an anther (which produces pollen grains containing male gametes). The pistil has three parts - the sticky stigma at the top for receiving pollen, the style (thin tube) connecting stigma to ovary, and the ovary at the base which contains ovules. Each ovule contains an egg cell (female gamete). Under the dissecting microscope, the cut ovary section shows small, round ovules attached to the inner wall.
Explanation:
Flowers are the reproductive organs of angiosperms (flowering plants). The petals are often brightly coloured and/or fragrant to attract pollinators. Sepals protect the flower in the bud stage. The stamen is the male reproductive organ and the pistil is the female reproductive organ. The transfer of pollen from the anther of the stamen to the stigma of the pistil is essential for fertilisation and fruit formation. This transfer is called pollination.
Conclusion: A flower has four main parts - sepal, petal, stamen (male), and pistil (female). The stamen produces pollen and the pistil receives it. The ovary develops into a fruit and ovules develop into seeds after fertilisation.
Activity 11.6 : Let us investigate
1. Identify sweet pea (matar) or garden pea plants in a garden or a nearby field.
2. Select two juvenile (less developed) flower buds and three freshly blossomed flowers on the same pea plant.
3. Carefully remove the stamens from one of the two selected flower buds and one of the three selected flowers.
4. Take muslin cloth bags and loosely wrap them around the flower bud, the flower bud of which stamens are removed, the flower of which stamens are removed and a freshly blossomed flower (Fig. 11.12).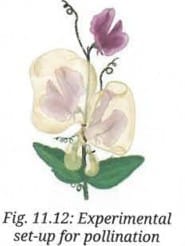
5. Leave one freshly blossomed flower uncovered (without muslin cloth bag).
6. Observe them regularly and notice the development of fruits in place of the flowers that were not covered with muslin cloth. Allow them to grow for a few more days.
7. Once the pods are fully developed in the flowers without muslin cloth, remove the muslin cloth from all the wrapped flowers and observe them.
8. Note your observations in Table 11.2.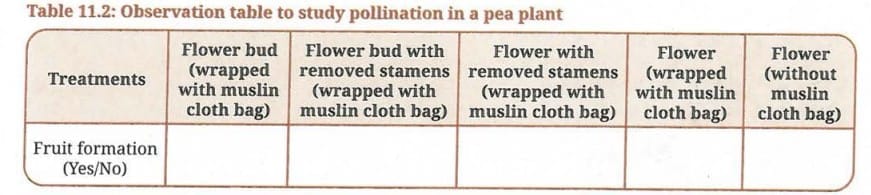
Observation:
Table 11.2: Observation table to study pollination in a pea plant
| Treatments | Flower bud (wrapped with muslin cloth bag) | Flower bud with removed stamens (wrapped with muslin cloth bag) | Flower with removed stamens (wrapped with muslin cloth bag) | Flower (wrapped with muslin cloth bag) | Flower (without muslin cloth bag) |
|---|---|---|---|---|---|
| Fruit formation (Yes/No) | Yes | No | No | Yes | Yes |
Fruits (pods) are formed in the flower bud wrapped without removing stamens, the flower wrapped with muslin cloth (stamens intact), and the uncovered flower. No fruits are formed in the flower bud from which stamens were removed (even though it was wrapped) and in the flower from which stamens were removed and wrapped. The only treatment that consistently prevents fruit formation is the removal of stamens.
Explanation:
Pollen grains from the anther must reach the stigma for fertilisation to occur - this process is called pollination. In pea plants, self-pollination normally occurs (pollen from the same flower reaches the stigma). When stamens are removed, no pollen is available within the flower. The muslin cloth bag prevents external pollen from reaching the stigma through insects or wind. Therefore, when stamens are removed AND the flower is bagged, no pollination can occur and no fruits form. When stamens are present (even if bagged), self-pollination occurs and fruits form. The uncovered flower is pollinated naturally. We can infer that the transfer of pollen grains from the anther to the stigma is necessary for fruit formation. This transfer is called pollination.
Conclusion: Pollination (transfer of pollen from anther to stigma) is essential for fruit and seed formation. Without pollen, the flower cannot be fertilised and no fruit develops. Pea plants are primarily self-pollinating.
Activity 11.7 : Let us find out - Pollination Strategies and Seed Formation
Studies of pollen production and seed formation by two different pollination strategies in different flowers show the following approximate trends (Table 11.3):

1. Compare and analyse the two strategies in terms of (Table 11.3):
- Pollen to seed ratio
- Efficiency of pollination and seed formation
2. Explain why producing a very large number of pollen grains can still be an effective pollination strategy.
Observation and Analysis:
Pollen to seed ratio comparison:
| Strategy | Pollen produced | Seeds formed | Pollen:Seed ratio (approx.) |
|---|---|---|---|
| Wind-pollinated (e.g., maize) | ~7,50,000 (average) | ~125 (average) | 6,000 : 1 |
| Insect-pollinated (e.g., sunflower) | ~30,000 (average) | ~900 (average) | 33 : 1 |
Explanation:
Wind-pollinated plants produce enormous quantities of pollen because wind dispersal is random and highly inefficient - most pollen grains never reach the stigma of the correct species. To compensate for this low probability of success, these plants release millions of pollen grains. The pollen grains are light, small, and produced in huge numbers, and the stigma is long and feathery to trap airborne pollen. Despite the very high pollen production, the number of seeds formed is relatively low, making the overall efficiency (pollen to seed ratio) very poor (approximately 6,000 pollen grains for every 1 seed).
Insect-pollinated plants are far more efficient. Their pollinators (bees, butterflies) visit flowers deliberately in search of nectar. Pollen grains attach to the insect's body and are directly transferred to the stigma of another flower of the same species. Because the transfer is targeted, fewer pollen grains are needed and many more seeds are produced per pollen grain released (ratio of about 33:1). These plants invest energy in bright coloured petals, nectar, and fragrance to attract pollinators rather than in producing enormous quantities of pollen.
Producing a very large number of pollen grains is still an effective strategy for wind-pollinated plants because: (a) the sheer volume increases the probability that at least some grains will land on the correct stigma; (b) these plants grow in large populations in open areas (grasslands, fields), increasing the chances of pollen reaching the right flower; and (c) they do not need to spend energy on attracting pollinators.
Conclusion: Insect pollination is more efficient (higher seeds per pollen grain) than wind pollination. However, wind-pollinated plants compensate by producing vastly larger quantities of pollen. Both strategies are successful adaptations for ensuring reproduction in different environments.
FAQs on NCERT Based Activity: How Life Continues
| 1. What is the process of budding in yeast? |  |
| 2. How do pollination strategies affect seed formation? | |
| 3. What are the main parts of a flower? | |
| 4. What is the significance of investigating yeast reproduction? | |
| 5. How does one conduct an experiment to observe budding in yeast? | |