Mechanical Engineering Exam  >  Mechanical Engineering Tests  >  Test: Fits & Tolerance - 2 - Mechanical Engineering MCQ

Test: Fits & Tolerance - 2 - Mechanical Engineering MCQ


Test Description

10 Questions MCQ Test - Test: Fits & Tolerance - 2

Test: Fits & Tolerance - 2 for Mechanical Engineering 2025 is part of Mechanical Engineering preparation. The Test: Fits & Tolerance - 2 questions and answers have been prepared according to the Mechanical Engineering exam syllabus.The Test: Fits & Tolerance - 2 MCQs are made for Mechanical Engineering 2025 Exam. Find important definitions, questions, notes, meanings, examples, exercises, MCQs and online tests for Test: Fits & Tolerance - 2 below.
Solutions of Test: Fits & Tolerance - 2 questions in English are available as part of our course for Mechanical Engineering & Test: Fits & Tolerance - 2 solutions in Hindi for Mechanical Engineering course. Download more important topics, notes, lectures and mock test series for Mechanical Engineering Exam by signing up for free. Attempt Test: Fits & Tolerance - 2 | 10 questions in 30 minutes | Mock test for Mechanical Engineering preparation | Free important questions MCQ to study for Mechanical Engineering Exam | Download free PDF with solutions
Test: Fits & Tolerance - 2 - Question 1

In the tolerance specification, 25 D6 the letter D represents

Detailed Solution for Test: Fits & Tolerance - 2 - Question 1

6 represents grade of tolerance and since D is used for hole it represents lower deviation (d used for shaft).

Test: Fits & Tolerance - 2 - Question 2

The difference between the higher limit and lower limit of size is known as

Test: Fits & Tolerance - 2 - Question 3

For sizes up to and including 500 mm, the tolerance unit i is determined from the equation  
Which one of the following does D stands for

Detailed Solution for Test: Fits & Tolerance - 2 - Question 3


i.e. It is geometric mean of the 2 diameter step.

Test: Fits & Tolerance - 2 - Question 4

Which one of the following is the value for the tolerance grade IT-8?

Test: Fits & Tolerance - 2 - Question 5

Tolerances are specified

Test: Fits & Tolerance - 2 - Question 6

According to Indian standard specifications, the total number of designated grades of fundamental tolerances are

Test: Fits & Tolerance - 2 - Question 7

Expressing a dimension as 25.3±0.05 mm is the case of

Test: Fits & Tolerance - 2 - Question 8

For the following hole and shaft sizes of mated parts according to basic hole system
Hole: 37.50 mm
37.52 mm
Shaft: 37.47 mm
37.45 mm
What is the value of allowance?

Detailed Solution for Test: Fits & Tolerance - 2 - Question 8

Allowances = 37.50-37.47 
= 0.03 mm

Test: Fits & Tolerance - 2 - Question 9

 A shaft has a dimension,   The respective values of fundamental deviation and tolerance are

Test: Fits & Tolerance - 2 - Question 10

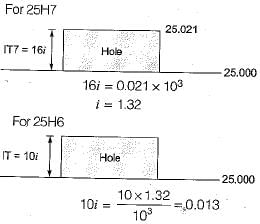
A small bore is designated as 25H7. The lower (minimum) and upper (maximum) limits of the bore are 25.000 mm and 25.021 mm, respectively. When the bore is designated as 25H8, then the upper (maximum) limit is 25.033 mm. When the bore is designated as 25H6, then the upper (maximum) limit of the bore (in mm) is

Detailed Solution for Test: Fits & Tolerance - 2 - Question 10


i.e. upper limit of bore = 25.013

Information about Test: Fits & Tolerance - 2 Page
In this test you can find the Exam questions for Test: Fits & Tolerance - 2 solved & explained in the simplest way possible. Besides giving Questions and answers for Test: Fits & Tolerance - 2, EduRev gives you an ample number of Online tests for practice
Download as PDF