Class 5 Exam  >  Class 5 Tests  >  Online MCQ Tests for Class 5  >  Test: MS Word 2010- 2 - Class 5 MCQ

Test: MS Word 2010- 2 - Class 5 MCQ


Test Description

15 Questions MCQ Test Online MCQ Tests for Class 5 - Test: MS Word 2010- 2

Test: MS Word 2010- 2 for Class 5 2024 is part of Online MCQ Tests for Class 5 preparation. The Test: MS Word 2010- 2 questions and answers have been prepared according to the Class 5 exam syllabus.The Test: MS Word 2010- 2 MCQs are made for Class 5 2024 Exam. Find important definitions, questions, notes, meanings, examples, exercises, MCQs and online tests for Test: MS Word 2010- 2 below.
Solutions of Test: MS Word 2010- 2 questions in English are available as part of our Online MCQ Tests for Class 5 for Class 5 & Test: MS Word 2010- 2 solutions in Hindi for Online MCQ Tests for Class 5 course. Download more important topics, notes, lectures and mock test series for Class 5 Exam by signing up for free. Attempt Test: MS Word 2010- 2 | 15 questions in 15 minutes | Mock test for Class 5 preparation | Free important questions MCQ to study Online MCQ Tests for Class 5 for Class 5 Exam | Download free PDF with solutions
Test: MS Word 2010- 2 - Question 1

 is used to __________.

Detailed Solution for Test: MS Word 2010- 2 - Question 1

The command button shown in the question is used for adding or changing the border around the page. So, option [D] is the answer.

Test: MS Word 2010- 2 - Question 2

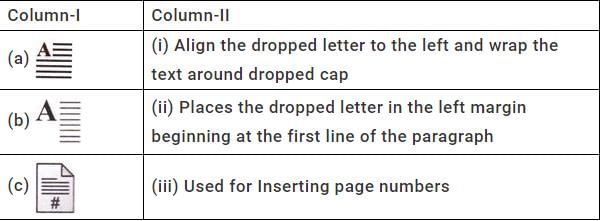
Match the icons in Column-I with the corresponding descriptions in Column-II.
1 Crore+ students have signed up on EduRev. Have you? Download the App
Test: MS Word 2010- 2 - Question 3

Observe the given snapshot and answer the questions that follow:

Which feature has been used here?

Test: MS Word 2010- 2 - Question 4

Observe the given snapshot and answer the questions that follow:

Which of the following positions of this feature has been represented in the given snapshot?

Test: MS Word 2010- 2 - Question 5

 What is the shortcut to set the line spacing to 1.5?

Detailed Solution for Test: MS Word 2010- 2 - Question 5
To set the line spacing to 1.5 in Microsoft Word, you can use the following shortcut:
Answer: D
Here is a detailed explanation of how to do it using the shortcut:
1. Open Microsoft Word and navigate to the document where you want to change the line spacing.
2. Select the text or paragraph that you want to apply the line spacing to. If you want to apply it to the entire document, press "Ctrl + A" to select all the text.
3. Press and hold the "Ctrl" key on your keyboard.
4. While holding the "Ctrl" key, press the number "1" on the top row of your keyboard to set the line spacing to 1.0.
5. Release the "Ctrl" key.
6. Now, press and hold the "Ctrl" key again.
7. While holding the "Ctrl" key, press the number "5" on the top row of your keyboard to set the line spacing to 1.5.
8. Release the "Ctrl" key.
9. The line spacing of the selected text or the entire document should now be set to 1.5.
Note: If you want to set the default line spacing to 1.5 for all new documents in Microsoft Word, you can go to the "Home" tab, click on the small arrow in the bottom right corner of the "Paragraph" section, go to the "Indents and Spacing" tab in the "Paragraph" dialog box, and change the "Line spacing" dropdown menu to "1.5". Then click on the "Set As Default" button and select the "All documents based on the Normal.dotm template" option to apply the change to all new documents.
Test: MS Word 2010- 2 - Question 6

 In Print Layout view, you can ________.

Detailed Solution for Test: MS Word 2010- 2 - Question 6
Print Layout view in Microsoft Word
Print Layout view is a viewing option available in Microsoft Word that allows you to see how your document will appear on the printed page. It is the default view in Word and offers several features to help you format and layout your document accurately.
Features of Print Layout view:
1. View the document as it will appear on the printed page:
- Print Layout view shows your document in a format that closely resembles how it will look when printed.
- It displays the page margins, headers, footers, and other elements exactly as they will appear in the printed document.
- This view helps you ensure that your document's formatting, alignment, and page breaks are correct.
2. View both textual content and graphics:
- Unlike the statement given in option B, Print Layout view allows you to view both the textual content and graphics in your document.
- You can see images, charts, tables, shapes, and other visual elements in their intended positions.
3. Maximize the area available for reading a document:
- Print Layout view maximizes the reading area by displaying the document in a single page or multiple pages, depending on your document's length and settings.
- It provides a comfortable reading experience, allowing you to scroll through the document smoothly.
4. View the outlining tools:
- Print Layout view also includes the outlining tools, which can be used to create and manage document outlines.
- Outlines help you organize and structure your document by creating headings, subheadings, and hierarchical levels.
In conclusion, Print Layout view in Microsoft Word allows you to view your document as it will appear on the printed page, including both textual content and graphics. It maximizes the reading area and provides access to outlining tools for document organization.
Test: MS Word 2010- 2 - Question 7

By pressing   you can _________.

Detailed Solution for Test: MS Word 2010- 2 - Question 7

Paragraph marks show symbols for tab, space, etc. Key combination  on or off.

Test: MS Word 2010- 2 - Question 8

You have inserted a bulleted list in a document and you want to change the size of bullet in the list. How can you do this?

Detailed Solution for Test: MS Word 2010- 2 - Question 8

To change the size of the bullet in a bulleted list in a document, you can follow these steps:
1. Select the bullet: Place your cursor on the bullet you want to change the size of.
2. Access the Font size box: Depending on the document editor you are using, locate the Font size box. This is usually found in the toolbar or formatting options.
3. Choose the desired size: Click on the Font size box and select the desired size for the bullet. This will change the size of the bullet in the list.
Alternatively, you can also use the following methods to change the size of the bullet:
- Keyboard shortcut: Select the bullet and press the "Ctrl" and "+" keys simultaneously to increase the size or press the "Ctrl" and "-" keys simultaneously to decrease the size.
- Formatting options: Select the bullet and access the formatting options by clicking on the "Format" or "Paragraph" tab in the toolbar. Look for the option to change the bullet size and adjust it accordingly.
Remember that these steps may vary slightly depending on the document editor you are using, but the general concept remains the same.
Test: MS Word 2010- 2 - Question 9

 Which of the following statements is INCORRECT about Header & Footer in MS-Word 2010?

Detailed Solution for Test: MS Word 2010- 2 - Question 9
Explanation:
The incorrect statement about Header & Footer in MS-Word 2010 is:
Statement A: You cannot insert a picture in header & footer area.
The correct statements about Header & Footer in MS-Word 2010 are:
Statement B: You cannot apply Drop Cap feature to header & footer text.
- This statement is correct. Drop Cap feature is not available for header and footer text in MS-Word 2010.
Statement C: You can specify a unique header and footer for the first page of the document.
- This statement is correct. MS-Word 2010 allows you to have a different header and footer for the first page of the document.
Statement D: You can specify different header and footer for the odd and even numbered pages.
- This statement is correct. MS-Word 2010 provides the option to have different headers and footers for odd and even numbered pages in a document.
In conclusion, statement A is incorrect while statements B, C, and D are correct about Header & Footer in MS-Word 2010.
Test: MS Word 2010- 2 - Question 10

Which of the following operations allow you to adjust the position of the picture on the page?

Test: MS Word 2010- 2 - Question 11

Which of the following tasks can be done with the given feature?  
(i) To show symbols to provide a visual representation of specific formatting in a document.
(ii) To apply shadow glow or reflection effects to the text in the document.

Detailed Solution for Test: MS Word 2010- 2 - Question 11

Paragraph mark is used for providing visual representation of specific formatting.

Test: MS Word 2010- 2 - Question 12

Consider the given snapshot, the cursor is after the word 'worm'. What would happen when you click on the    in the paragraph group?

- Files deleted by a virus, trojan or worm)
- A file with the same name exists in the folder

Detailed Solution for Test: MS Word 2010- 2 - Question 12

Bottom border adds a solid line below the current line of text.

Test: MS Word 2010- 2 - Question 13

Which of the following tasks can be done with the given feature?

(1) Insert a preformatted text box
(2) Draw a text box
(3) Add a caption to the text box

Test: MS Word 2010- 2 - Question 14

Select the INCORRECT match 

Detailed Solution for Test: MS Word 2010- 2 - Question 14

Command button shown in option [A] is used to increase the indent level of the paragraph, so it is incorrect.

Test: MS Word 2010- 2 - Question 15

How can you change a Page Number Style from 1,2, 3.... to a, b, c ... ?

Detailed Solution for Test: MS Word 2010- 2 - Question 15
How to change a Page Number Style from 1,2,3.... to a,b,c...?
To change the page number style from 1, 2, 3... to a, b, c..., follow these steps:
Step 1: Open your document in Microsoft Word.
Step 2: Go to the Insert tab.

  • Click on the Header & Footer option.

  • Select the Page Number drop-down menu.

  • Choose the Format Page Numbers option.


Step 3: In the Page Number Format dialog box, select the desired format for your page numbers.

  • Under Number format, select the option for lowercase letters (a, b, c...).

  • You can also customize the starting number and the style of the page numbers.


Step 4: Click OK to apply the changes.
By following these steps, you can easily change the page number style from 1, 2, 3... to a, b, c... in your Microsoft Word document.
243 tests
Information about Test: MS Word 2010- 2 Page
In this test you can find the Exam questions for Test: MS Word 2010- 2 solved & explained in the simplest way possible. Besides giving Questions and answers for Test: MS Word 2010- 2, EduRev gives you an ample number of Online tests for practice

Top Courses for Class 5

Download as PDF

Top Courses for Class 5