Class 7 Exam  >  Class 7 Tests  >  National Cyber Olympiad Class 7  >  Olympiad Test : MS Word 2010 - Class 7 MCQ

Olympiad Test : MS Word 2010 - Class 7 MCQ


Test Description

20 Questions MCQ Test National Cyber Olympiad Class 7 - Olympiad Test : MS Word 2010

Olympiad Test : MS Word 2010 for Class 7 2024 is part of National Cyber Olympiad Class 7 preparation. The Olympiad Test : MS Word 2010 questions and answers have been prepared according to the Class 7 exam syllabus.The Olympiad Test : MS Word 2010 MCQs are made for Class 7 2024 Exam. Find important definitions, questions, notes, meanings, examples, exercises, MCQs and online tests for Olympiad Test : MS Word 2010 below.
Solutions of Olympiad Test : MS Word 2010 questions in English are available as part of our National Cyber Olympiad Class 7 for Class 7 & Olympiad Test : MS Word 2010 solutions in Hindi for National Cyber Olympiad Class 7 course. Download more important topics, notes, lectures and mock test series for Class 7 Exam by signing up for free. Attempt Olympiad Test : MS Word 2010 | 20 questions in 40 minutes | Mock test for Class 7 preparation | Free important questions MCQ to study National Cyber Olympiad Class 7 for Class 7 Exam | Download free PDF with solutions
Olympiad Test : MS Word 2010 - Question 1

Split cell ______.

Detailed Solution for Olympiad Test : MS Word 2010 - Question 1
Splitting a cell in a table
To split a cell in a table, follow these steps:
Step 1: Select the cell you want to split. This can be done by clicking on the cell.
Step 2: Go to the "Table Tools" tab in the toolbar. This tab will appear when you have a table selected.
Step 3: Locate the "Merge Cells" button in the toolbar. This button may be under the "Layout" or "Design" section, depending on the version of the software you are using.
Step 4: Click on the "Split Cells" option. A dialog box will appear with options for splitting the cell.
Step 5: Specify the number of columns or rows you want to create in the cell. This will determine how the cell is split.
Step 6: Click on the "OK" button to split the cell. The cell will be divided into the specified number of columns or rows.
Step 7: If necessary, adjust the width or height of the split cells to fit your needs.
Step 8: Repeat these steps for any other cells you want to split in the table.
By following these steps, you can easily split a cell in a table according to your requirements. Remember that splitting a cell can help you organize and structure your table data more effectively.
Olympiad Test : MS Word 2010 - Question 2

The operation  is used for ______.

1 Crore+ students have signed up on EduRev. Have you? Download the App
Olympiad Test : MS Word 2010 - Question 3

______ is the maximum number of columns that can be inserted in a table in a MS Word document.

Detailed Solution for Olympiad Test : MS Word 2010 - Question 3

To determine the maximum number of columns that can be inserted in a table in a MS Word document, we need to consider the following:
Step 1: Understanding table structure in MS Word
- In MS Word, tables are made up of rows and columns.
- Each cell within a table represents a unit where data can be entered.
- The number of columns in a table determines the width of the table.
Step 2: Determining the maximum number of columns
- In MS Word, the maximum number of columns that can be inserted in a table is determined by the software's limitations.
- The maximum number of columns in MS Word is 63.
Therefore, the correct answer is C: 63.
Note: It is important to keep in mind that adding a large number of columns to a table can make it difficult to view and work with the table effectively. It is recommended to consider the readability and usability of the table when deciding on the number of columns to be inserted.
Olympiad Test : MS Word 2010 - Question 4

When you click Distribute Rows, it distributes the ______.

Detailed Solution for Olympiad Test : MS Word 2010 - Question 4
Answer:
When you click Distribute Rows, it distributes the height of the selected rows equally between them. Here is a detailed explanation:

  • Distribute Rows: This option is available in certain spreadsheet or table editing software, where you can select multiple rows and perform various operations on them.

  • Purpose: The Distribute Rows function is used to evenly distribute the height of the selected rows.

  • Selected Rows: The operation will only be applied to the rows that are selected.

  • Equal Distribution: The height of the selected rows will be adjusted in such a way that they become equal or as close to equal as possible.

  • Height Adjustment: The software will automatically calculate the required adjustment for each row based on the differences in their original heights.

  • Result: After applying the Distribute Rows function, the selected rows will have an equal height, which can improve the overall appearance and organization of the table or spreadsheet.


In summary, when you click Distribute Rows, it distributes the height of the selected rows equally between them, ensuring a consistent and visually appealing layout.
Olympiad Test : MS Word 2010 - Question 5

In Table Tools,under Design tab, by shading you can ______.

Detailed Solution for Olympiad Test : MS Word 2010 - Question 5
Shading in Table Tools Design Tab
Shading in Table Tools Design Tab allows you to specify a color for the background behind the selected text or paragraph. It helps in enhancing the visual appearance of the table and makes it easier to read and understand the content. Here are some key points about shading in Table Tools:
- Location: Shading option can be found under the Design tab in the Table Tools section of Microsoft Word.
- Selection: Shading can be applied to individual cells, rows, columns, or the entire table.
- Color Selection: You can choose from a variety of predefined colors or customize the shading color using the color picker tool.
- Effects: Shading can be used to create a contrasting background behind the selected text or paragraph, making it stand out from the rest of the content.
- Highlighting: Shading helps in highlighting specific sections of the table, making it easier to identify important information.
- Visual Appeal: By applying shading, you can improve the overall visual appeal of the table and make it more visually appealing and professional.
In conclusion, shading in Table Tools Design Tab under the Design tab allows you to specify a color for the background behind the selected text or paragraph in a table. It helps in enhancing the visual appearance and readability of the table.
Olympiad Test : MS Word 2010 - Question 6

You have been editing an existing letter in MS Word. You want to review the modifications to the letter since you last edited it, before you finally print it. Which feature of MS Word should you be using?

Detailed Solution for Olympiad Test : MS Word 2010 - Question 6
Reviewing Modifications in MS Word
To review the modifications made to an existing letter in MS Word before printing, you should use the "Track Changes" feature. Here's how it works:
1. Enable Track Changes:
- Open the document in MS Word.
- Go to the "Review" tab in the ribbon at the top.
- Click on the "Track Changes" button to enable tracking.
2. View and Review Modifications:
- Once track changes are enabled, any edits or modifications made to the document will be highlighted.
- Inserted text will appear underlined and in a different color, while deleted text will appear struck through or in a different color.
- You can navigate through the changes using the navigation buttons provided in the "Changes" group on the "Review" tab.
- Review each modification to ensure it meets your requirements.
3. Accept or Reject Changes:
- After reviewing the modifications, you can choose to accept or reject each change individually or collectively.
- Right-click on a specific change and select "Accept" or "Reject" to make a decision.
- Use the "Accept" or "Reject" buttons in the "Changes" group to apply the decision to all changes at once.
4. Finalize the Document:
- Once you have reviewed and made any necessary changes, you can finalize the document by accepting or rejecting all remaining changes.
- You can also turn off the "Track Changes" feature if you no longer need it.
By utilizing the "Track Changes" feature in MS Word, you can easily review the modifications made to a document, ensuring its accuracy before printing.
Olympiad Test : MS Word 2010 - Question 7

How do you increase the line spacing between two lines?

Detailed Solution for Olympiad Test : MS Word 2010 - Question 7

To increase the line spacing between two lines in a document, you can follow these steps:
Step 1: Open the document in the respective software (MS Word, Google Docs, etc.).
Step 2: Locate the "Home" or "Insert" tab in the toolbar at the top of the window.
Step 3: Click on the "Home" or "Insert" tab to open the available options.
Step 4: Look for the "Paragraph" or "Line and Paragraph Spacing" option.
Step 5: Click on the "Paragraph" or "Line and Paragraph Spacing" option to open the settings.
Step 6: In the settings, you will find an option to adjust the line spacing. It may be represented by a numeric value or preset options like "Single," "1.5 lines," or "Double."
Step 7: Increase the line spacing by selecting a higher value or a preset option like "1.5 lines" or "Double."
Step 8: After selecting the desired line spacing, the changes will be applied to the selected text or the entire document.
By following these steps, you can easily increase the line spacing between two lines in your document.
Remember, the exact location and terminology of the options may vary depending on the software you are using, but the general process remains the same.
Olympiad Test : MS Word 2010 - Question 8

In newspaper column format, what is the minimum width of a column?

Detailed Solution for Olympiad Test : MS Word 2010 - Question 8
Minimum Width of a Newspaper Column:

  • In newspaper column format, the minimum width of a column is 0.5”.


Explanation:

  • When designing a newspaper layout, columns are used to structure the content and make it easier to read.

  • The width of a column determines the amount of text that can fit within it.

  • In traditional newspaper design, the standard column width is typically 0.5”.

  • This width allows for a sufficient amount of text to be displayed in a single column without overwhelming the reader.

  • It also provides enough space for images, headlines, and other elements to be incorporated into the column layout.

  • A narrower column width, such as 0.25”, would restrict the amount of content that can be displayed, making it difficult to convey information effectively.

  • On the other hand, a wider column width, such as 1.0” or 1.5”, may result in longer lines of text, which can be harder to read and follow.

  • Therefore, the minimum width of a newspaper column is generally considered to be 0.5”.


Conclusion:

  • The minimum width of a newspaper column is 0.5”.

Olympiad Test : MS Word 2010 - Question 9

You can go to the Insert columns dialog box by ______.

Detailed Solution for Olympiad Test : MS Word 2010 - Question 9


To go to the Insert columns dialog box, you have two options:


A. Clicking Columns in the Insert card:


  • Locate and click on the Insert card in the toolbar.

  • Within the Insert card, look for the option "Columns" and click on it.

  • This will open the Insert columns dialog box.


B. Pressing Alt + O + C:


  • Press and hold the "Alt" key on your keyboard.

  • While holding the "Alt" key, press the "O" key followed by the "C" key.

  • This keyboard shortcut will directly open the Insert columns dialog box.


C. Clicking Columns in page Setup of page Layout tab:


  • Go to the "Page Layout" tab in the toolbar.

  • Within the "Page Layout" tab, locate and click on the "Page Setup" button.

  • In the "Page Setup" dialog box, navigate to the "Columns" section.

  • Click on the "Columns" button within the "Columns" section.

  • This will open the Insert columns dialog box.


D. Both b and c:


  • Option D is correct, as you can access the Insert columns dialog box by both pressing the keyboard shortcut (Alt + O + C) and clicking the "Columns" option in the "Page Setup" dialog box.


Therefore, the correct answer is d.

Olympiad Test : MS Word 2010 - Question 10

The maximum size that you can specify for a font is ______ points.

Detailed Solution for Olympiad Test : MS Word 2010 - Question 10

Answer:


Maximum Font Size Limit:


  • Option B: 1638 points is the correct answer.


Explanation:


When specifying the font size in CSS, the unit of measurement used is typically points (pt). The maximum size that can be specified for a font is determined by the browser and operating system limitations.


In general, the maximum font size limit is 1638 points. However, it is important to note that the actual limit may vary depending on the browser and operating system being used.


Therefore, the correct answer is option B: 1638 points.

Olympiad Test : MS Word 2010 - Question 11

Turabian sixth Edition and GB7714 2005 are types of ______ styles.

Detailed Solution for Olympiad Test : MS Word 2010 - Question 11
Types of citation styles:
- Turabian sixth Edition
- GB7714 2005
Detailed Explanation:
- Turabian sixth Edition and GB7714 2005 are both citation styles used in academic writing.
- These citation styles provide guidelines for citing sources and creating bibliographies or reference lists.
- Turabian sixth Edition is a variation of the Chicago Manual of Style and is commonly used in the humanities.
- GB7714 2005 is a Chinese standard for citation and is often used in Chinese scholarly articles.
- Both styles use different formatting and citation rules, but their purpose is the same: to provide accurate and consistent information about the sources used in a research paper or academic work.
- Turabian sixth Edition and GB7714 2005 are examples of citation styles, specifically used for providing citations and references in academic writing.
Olympiad Test : MS Word 2010 - Question 12

How can you change a page number style from 1, 2, 3 ______ to a, b, c ______?

Detailed Solution for Olympiad Test : MS Word 2010 - Question 12

To change the page number style from 1, 2, 3 ______ to a, b, c ______, follow the steps below:
Step 1: Open the document in Microsoft Word.
Step 2: Click on the "Insert" tab in the menu bar.
Step 3: In the "Header & Footer" section, click on the "Page Number" drop-down menu.
Step 4: Select the "Format Page Numbers" option.
Step 5: In the "Page Number Format" dialog box, choose the "Lowercase Letters (a, b, c, ...)" option.
Step 6: Click on the "OK" button to apply the changes.
Now, the page numbers in your document will be displayed as a, b, c, and so on.
Note: The correct option for this question is C: Click Insert -> Header & Footer -> Page Number -> Format Page Numbers.
Olympiad Test : MS Word 2010 - Question 13

This button  is used to ______.

Olympiad Test : MS Word 2010 - Question 14

Shortcut key to insert endnote text is ______.

Detailed Solution for Olympiad Test : MS Word 2010 - Question 14
The shortcut key to insert endnote text is Alt + Ctrl + D.
Here is a detailed solution explaining the shortcut key and its usage:
Shortcut Key:
- Alt + Ctrl + D
Explanation:
To insert endnote text in a document, you can use the Alt + Ctrl + D shortcut key combination. This shortcut allows you to quickly add endnotes to your content without having to navigate through multiple menus.
Steps to insert endnote text using the shortcut:
1. Open your document in a word processing software such as Microsoft Word.
2. Place the cursor at the location where you want to insert the endnote.
3. Press and hold the Alt key on your keyboard.
4. While holding the Alt key, press and hold the Ctrl key.
5. While holding both keys, press the D key.
6. Release all the keys.
Benefits of using the shortcut key:
- Saves time: Using the shortcut key eliminates the need to manually navigate through menus to insert endnotes, saving you time and effort.
- Easy access: The Alt + Ctrl + D combination is easy to remember and provides quick access to the endnote feature.
- Efficient workflow: By using shortcuts, you can streamline your workflow and focus on the content creation process rather than searching for specific menu options.
Using the Alt + Ctrl + D shortcut key combination, you can effortlessly insert endnote text in your documents, enhancing the readability and referencing of your content.
Olympiad Test : MS Word 2010 - Question 15

You can choose settings for features like dictionary, proofing and language when you ______. 

Detailed Solution for Olympiad Test : MS Word 2010 - Question 15

To choose settings for features like dictionary, proofing, and language in Microsoft Office, follow these steps:
1. Click on the File Tab, click Options:
- Open the Microsoft Office application (e.g., Word, Excel, PowerPoint).
- Click on the File tab located in the top left corner of the application window.
- From the dropdown menu, select Options. This will open the Options dialog box.
2. Navigate to the desired settings:
- In the Options dialog box, you will find various categories on the left-hand side.
- Choose the category related to the feature you want to customize. For example, "Proofing" for spell checking or "Language" for language settings.
- Click on the desired category to view and modify its settings.
3. Adjust the settings:
- Once you have selected a category, you will see a list of options and settings related to that category.
- Customize the settings according to your preferences. For example, you can choose the default dictionary language, enable or disable autocorrect, or add new languages for proofing.
4. Save the changes:
- After making the desired changes, click on the OK or Apply button to save the settings.
- The changes will take effect immediately or the next time you use the specific feature.
By following these steps, you can easily choose settings for features like the dictionary, proofing, and language in Microsoft Office applications. Remember, the exact steps may vary slightly depending on the version of Office you are using, but the general process remains the same.
Olympiad Test : MS Word 2010 - Question 16

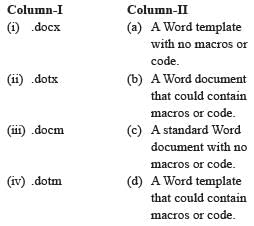
Match the following.

Olympiad Test : MS Word 2010 - Question 17

______ automatically adjusts the amount of space between certain characters of a word typed in a font like Times New Roman, so that the entire word looks more evenly spaced.

Detailed Solution for Olympiad Test : MS Word 2010 - Question 17
Kerning

  • Description: Kerning is a typographic term that refers to the adjustment of space between certain characters of a word in a font like Times New Roman.

  • Purpose: The purpose of kerning is to create visually appealing and evenly spaced words.

  • Adjustment: Kerning adjusts the space between specific pairs of characters, such as "AV" or "To", to ensure they are visually balanced.

  • Fonts: Kerning is commonly used in fonts where the spacing between characters may appear uneven without adjustment.

  • Visual Impact: Proper kerning enhances readability and improves the overall aesthetics of the text.

  • Manual vs Automatic: Kerning can be done manually by a designer, but many modern software applications and fonts have automatic kerning features.

  • Examples: Examples of kerning adjustments include reducing the space between "W" and "a" in the word "Water" or increasing the space between "T" and "o" in the word "To".


By automatically adjusting the spacing between certain characters, kerning helps to create visually balanced and evenly spaced words in fonts like Times New Roman. It is a typographic technique that enhances readability and improves the overall aesthetics of the text.
Olympiad Test : MS Word 2010 - Question 18

Which MS Word feature has been used here?

Olympiad Test : MS Word 2010 - Question 19

For mail merge in MS Word, ______ consists of names and addresses to be printed on labels and envelopes.

Detailed Solution for Olympiad Test : MS Word 2010 - Question 19
Answer:
The correct answer is Data source.
In mail merge in MS Word, the data source is a crucial component that contains the names and addresses to be printed on labels and envelopes. Here is a detailed explanation:
1. Data source: The data source is a file or database that stores the information to be merged into the main document. In the context of mail merge, it typically consists of names, addresses, and other relevant details.
2. Main document: The main document is the template in MS Word where you define the layout and format of the labels or envelopes. It contains placeholders, known as merge fields, that indicate where the data from the data source should be inserted.
3. New document: This option is not directly related to mail merge. It refers to creating a new document from scratch in MS Word.
4. Web site: This option is also unrelated to mail merge. It refers to a website accessed through a web browser.
To perform a mail merge in MS Word, you need to link the main document with the data source. This allows Word to automatically populate the merge fields with the corresponding data from the data source. This is particularly useful when you have a large number of labels or envelopes to print, as it eliminates the need to manually enter the information for each one.
By selecting the correct data source, you can efficiently print labels and envelopes with accurate recipient information, saving time and effort.
Olympiad Test : MS Word 2010 - Question 20

The ______ tab appears when we insert a picture in the word document.

Detailed Solution for Olympiad Test : MS Word 2010 - Question 20
Answer:
The Format tab appears when we insert a picture in a Word document.
Explanation:
When we insert a picture in a Word document, the Format tab appears on the ribbon. This tab provides various tools and options to format and customize the inserted picture.
Here is a detailed explanation of each tab mentioned in the options:
- Insert Picture: This option does not exist as a separate tab in the ribbon. It is a command within the Insert tab, where we can choose to insert a picture from our computer, from online sources, or from other locations.
- Format: This is the correct answer. The Format tab appears when a picture is selected or inserted in a Word document. It contains tools to adjust the picture's size, position, and appearance. We can apply various formatting options, such as adjusting brightness and contrast, adding borders, applying artistic effects, and more.
- Shapes: The Shapes tab appears when we want to insert or edit shapes in a Word document. It provides a variety of shapes, such as rectangles, circles, arrows, and lines, that can be customized and used for various purposes.
- Clip Art: The Clip Art feature is no longer available in newer versions of Microsoft Word. It was used to search and insert pre-made images and illustrations from a Microsoft database. Instead of Clip Art, users can now insert pictures directly from their computer or online sources using the Insert tab.
In summary:
- The Format tab is the correct answer.
- The Insert Picture option is a command within the Insert tab.
- The Shapes tab is used for inserting and editing shapes.
- The Clip Art feature has been replaced by direct picture insertion from various sources.
12 videos|25 docs|27 tests
Information about Olympiad Test : MS Word 2010 Page
In this test you can find the Exam questions for Olympiad Test : MS Word 2010 solved & explained in the simplest way possible. Besides giving Questions and answers for Olympiad Test : MS Word 2010, EduRev gives you an ample number of Online tests for practice

Top Courses for Class 7

12 videos|25 docs|27 tests
Download as PDF

Top Courses for Class 7