JEE Advanced (Single Correct MCQs): Units and Measurements - JEE MCQ
15 Questions MCQ Test - JEE Advanced (Single Correct MCQs): Units and Measurements
The dimension of  (ε0 : permittivity of free space, Eelectric field)
 (ε0 : permittivity of free space, Eelectric field)
A quantity X is given by  where ∈0 is the permittivity of the free space, L is a length, ΔV is a potential difference and Δt is a time interval. The dimensional formula for X is the same as that of
 where ∈0 is the permittivity of the free space, L is a length, ΔV is a potential difference and Δt is a time interval. The dimensional formula for X is the same as that of
A cube has a side of length 1.2 × 10⁻²m. Calculate its volume.
Pressure depends on distance as,  , where α, β are constants, z is distance, k is Boltzman’s constant and θ is temperature. The dimension of β are
A wire of length ℓ = 6 ± 0.06 cm and radius r = 0.5 ± 0.005 cm and mass m = 0.3 ± 0.003 gm. Maximum percentage error in density is
Which of the following set have different dimensions?
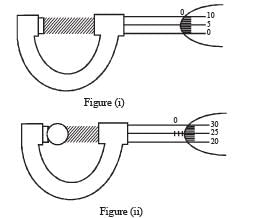
In a screw gauge, the zero of mainscale coincides with fifth division of circular scale in figure (i). The circular division of screw gauge are 50. It moves 0.5 mm on main scale in one rotation. The diameter of the ball in figure (ii) is
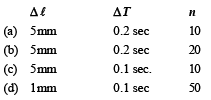
A student performs an exper iment for determination of  The error in length ℓ is Δℓ and in time T is ΔT and n is number of times the reading is taken. The measurement of g is most accurate for
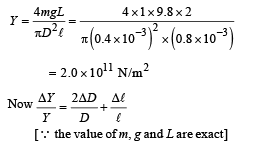
A student performs an experiment to determine the Young's modulus of a wire, exactly 2 m long, by Searle's method. In a particular reading, the student measures the extension in the length of the wire to be 0.8 mm with an uncertainty of ± 0.05 mm at a load of exactly 1.0 kg. The student also measures the diameter of the wire to be 0.4 mm with an uncertainty of ± 0.01 mm. Take g = 9.8 m/s2 (exact). The Young's modulus obtained from the reading is
Students I, II and III perform an experiment for measuring the acceleration due to gravity (g) using a simple pendulum.
They use different lengths of the pendulum and /or record time for different number of oscillations. The observations are shown in the table.
Least count for length = 0.1 cm
Least count for time = 0.1 s
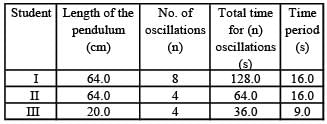
If EI, EII and EIII are the percentage errors in g, i.e.,  for students I, II and III, respectively, then
A vernier calipers has 1 mm marks on the main scale. It has 20 equal divisions on the Vernier scale which match with 16 main scale divisions. For this Vernier calipers, the least count is
Th e den sity of a solid ball is to be deter mined in an experiment. The diameter of the ball is measured with a screw gauge, whose pitch is 0.5 mm and there are 50 divisions on the circular scale. The reading on the main scale is 2.5 mm and that on the circular scale is 20 divisions. If the measured mass of the ball has a relative error of 2 %, the relative percentage error in the density is
In the determination of Young’s modulus  using Searle’s method, a wire of length L = 2 m and diameter d = 0.5 mm is used. For a load M = 2.5 kg, an extension l = 0.25 mm in the length of the wire is observed. Quantities d and l are measured using a screw gauge and a micrometer, respectively. They have the same pitch of 0.5 mm. The number of divisions on their circular scale is 100. The contributions to the maximum probable error of the Y measurement
The diameter of a cylinder is measured using a Vernier callipers with no zero error. It is found that the zero of the Vernier scale lies between 5.10 cm and 5.15 cm of the main scale. The Vernier scale has 50 divisions equivalent to 2.45 cm. The 24th division of the Vernier scale exactly coincides with one of the main scale divisions. The diameter of the cylinder is
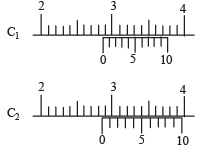
There are two Vernier calipers both of which have 1 cm divided into 10 equal divisions on the main scale. The Vernier scale of one of the calipers (C1) has 10 equal divisions that correspond to 9 main scale divisions. The Vernier scale of the other caliper (C2) has 10 equal divisions that correspond to 11 main scale divisions. The readings of the two calipers are shown in the figure. The measured values (in cm) by calipers C1 and C2, respectively, are
