Presentation Software: Special effects Chapter Notes | Computer Studies Class 5 ICSE PDF Download

Introduction
Microsoft PowerPoint is a tool that helps us make slideshows to show information in a fun and clear way. This chapter teaches us how to make our presentations look better using special effects. We will learn how to use ready-made designs called templates, change the look of slides with themes and colors, adjust text alignment and spacing, add objects like pictures and shapes, and create charts to show data. These skills will help us make our presentations more interesting and attractive for the audience.
Using Inbuilt Templates
- Templates are ready-made designs in PowerPoint that help us start a presentation quickly.
- They have sample slides with different themes and layouts to choose from.
- We can change the text, design, and add things like images and audio to the template.
- We can also remove parts of the template we don’t need.
Here are the steps to use a template in PowerPoint 2016:
- Step 1: Open PowerPoint 2016.
- Step 2: Double-click on a template thumbnail on the Start screen to see the list of templates, or click on it once to preview it and then click the Create button.
- Step 3: You can also create a presentation using online templates.
- Step 4: Type a word related to the template you want in the Search box.
- Step 5: Click the Search button, or you can click on one of the Suggested Searches below the Search box.
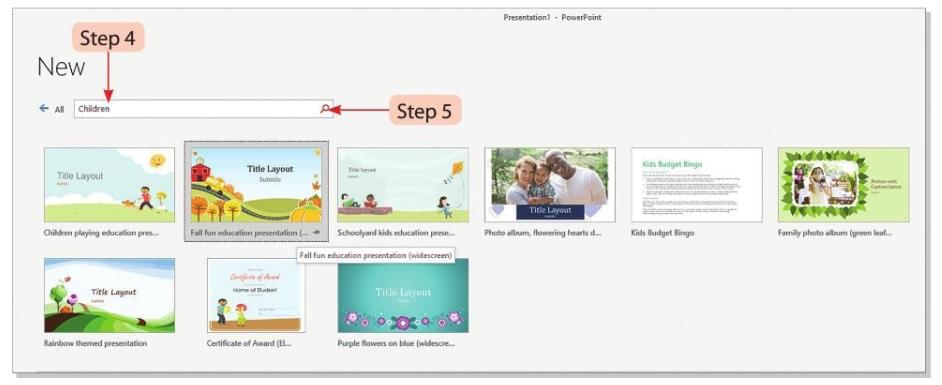
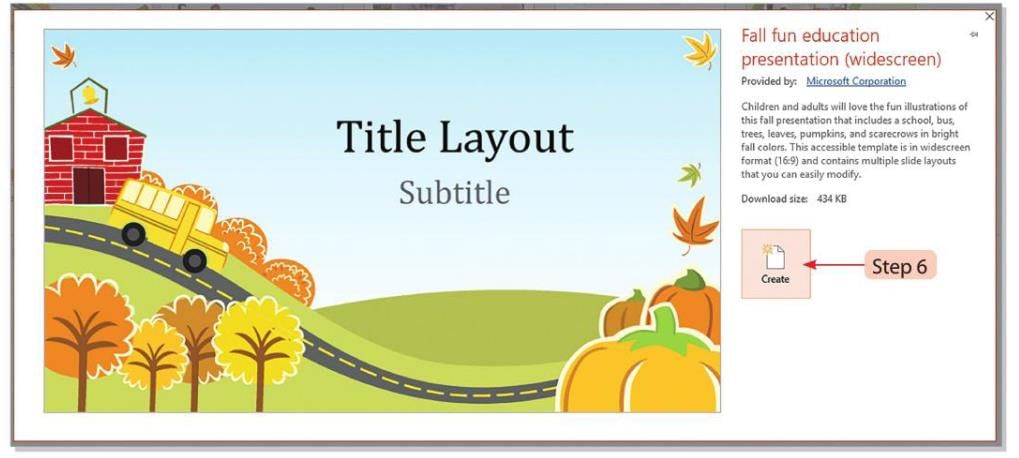
- Step 6: You will see a gallery of online templates. Choose the template you like and click the Create button.
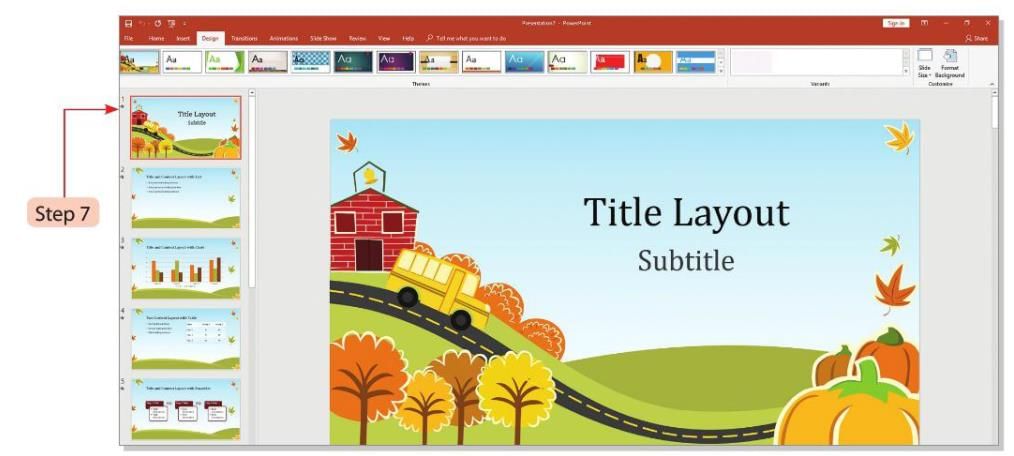
- Step 7: A new presentation will open with a group of slides having different backgrounds.
Enhancing the Presentation Display
We can make a presentation look better by changing its design and text style.
Here are the steps to enhance a presentation:
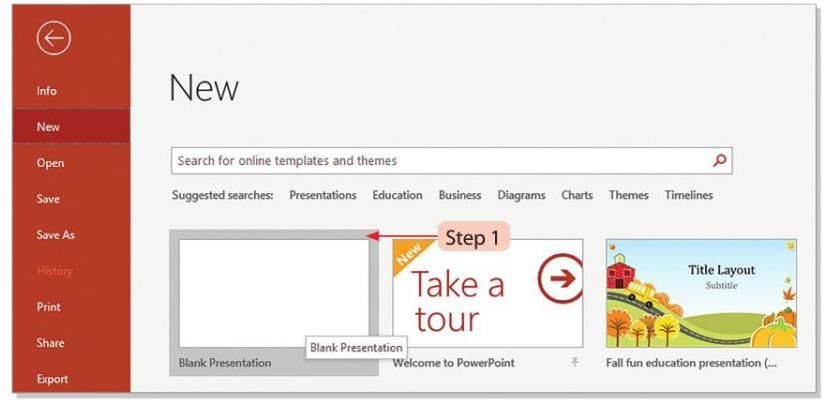
- Step 1: Create a new presentation using a blank presentation.
- Step 2: Type any text on the slide and select it.
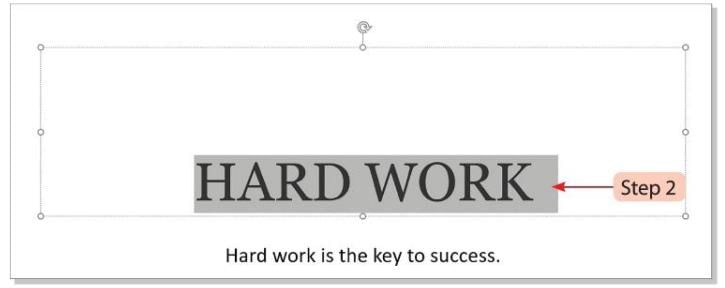
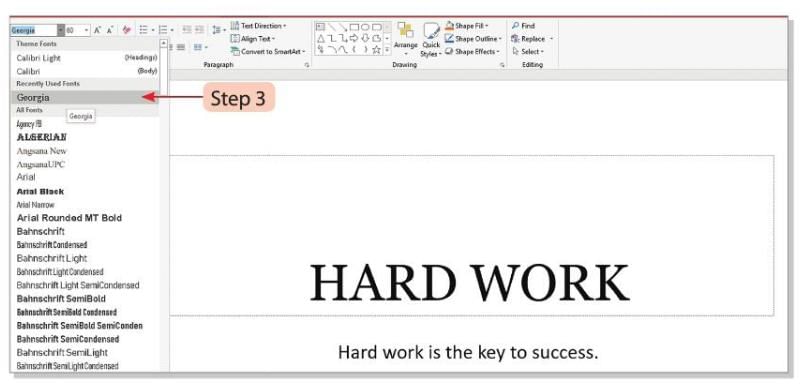
- Step 3: Click on the Font drop-down list in the Font group of the Home tab.
- Step 4: Select the font you want to apply to the text.
- Step 5: Click on the Font Size drop-down arrow in the Font group of the Home tab and select the size you want.
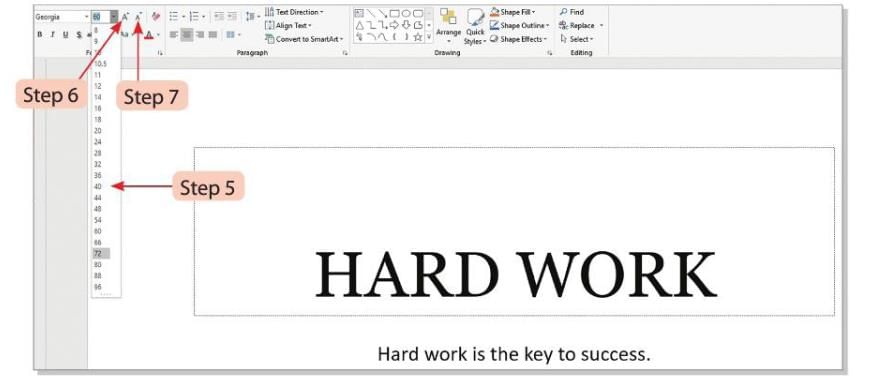
- Step 6: Click the Increase Font Size button
 to make the selected text bigger. Clicking it again will make it even bigger.
 - Step 7: Click the Decrease Font Size button
 to make the selected text smaller. Clicking it again will make it even smaller.
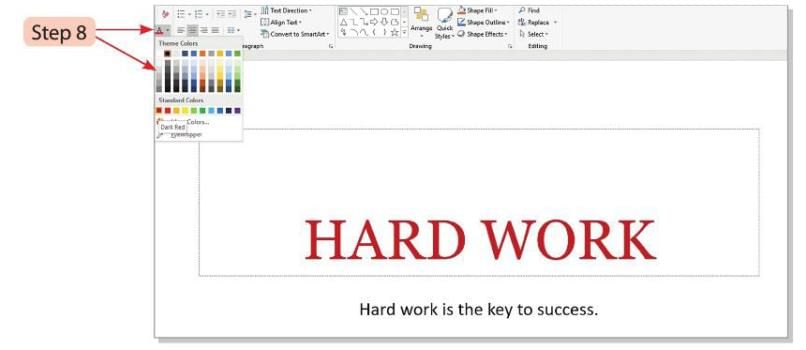
 - Step 8: Click on the drop-down arrow of the Font Color button in the Font group of the Home tab and select the color you want.
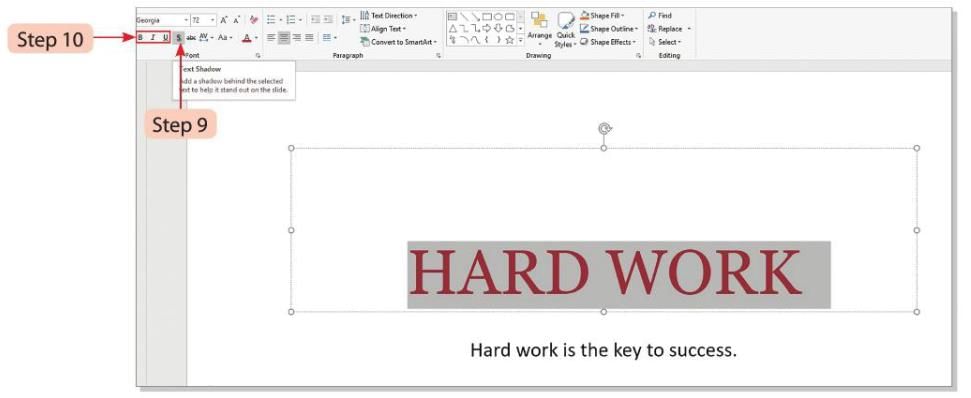
- Step 9: Click the Text Shadow button
 to add a shadow effect to the selected text. Clicking it again will remove the shadow.
- Step 10: Click the Bold
 Italic
 , or Underline button
 to apply that style to the selected text.
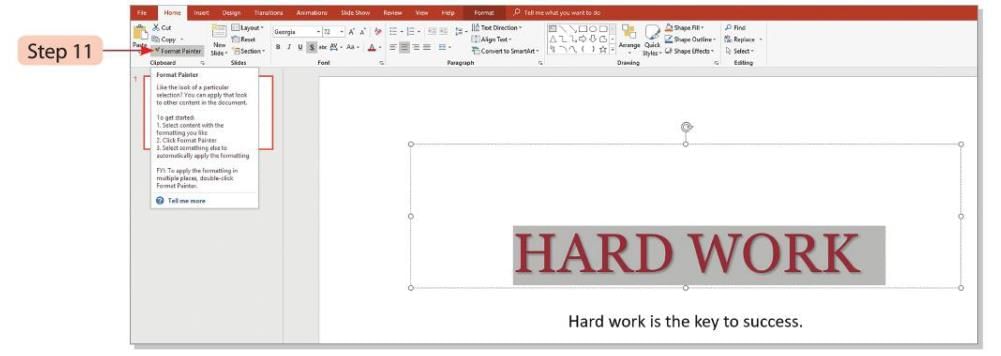
 - Step 11: Click the Format Painter button in the Clipboard group of the Home tab to copy the text effects to another section.
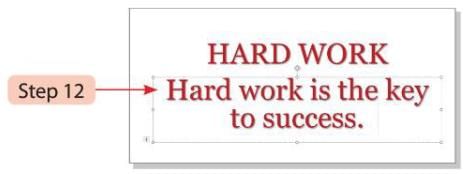
- Step 12: Hold down the mouse and drag it over the text where you want to apply the effects, then release the mouse button.
Specifying Alignments
- Alignment means placing the text on a slide in a proper position.
- We can adjust the text alignment either before or after typing the text.
- Text can be aligned in two ways: horizontally or vertically.
Vertical Alignment
Here are the steps to align text vertically:
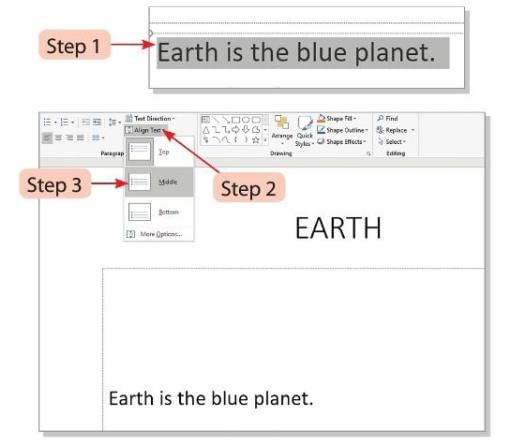
- Step 1: Select the text you want to align.
- Step 2: Click on the drop-down arrow of the Align Text button in the Paragraph group of the Home tab.
- Step 3: Select the option you want from the menu, such as Top, Middle, or Bottom.
Horizontal Alignment
Here are the steps to align text horizontally:
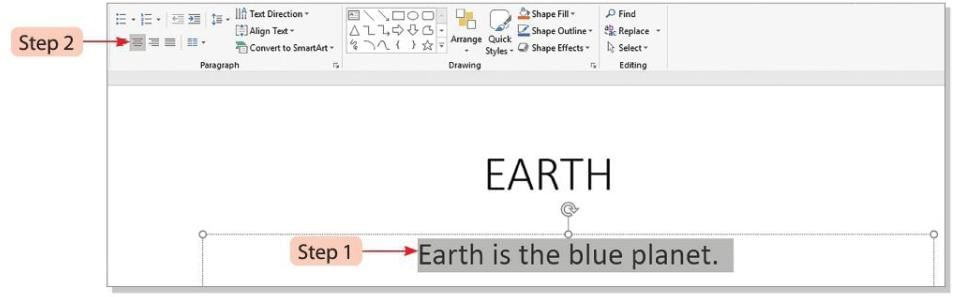
- Step 1: Select the text you want to align.
- Step 2: Select an option like Align Left, Center, Align Right, or Justify
 in the Paragraph group of the Home tab.
Specifying Line Spacing
Line spacing means adjusting the space between lines of text on a slide.
Here are the steps to change line spacing:
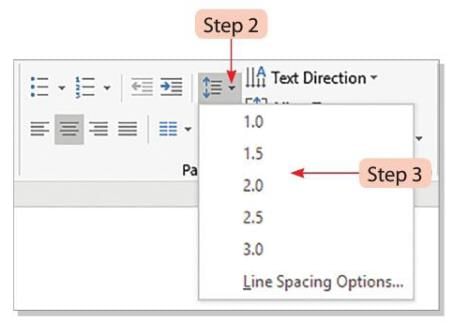
- Step 1: Select the text you want to adjust.
- Step 2: Click on the Line spacing button in the Paragraph group of the Home tab.
- Step 3: You will see a list of spacing options like 1.0, 1.15, 1.5, 2.0, 2.5, or 3.0.
- Step 4: Select the spacing you want to use.
Applying Themes
Themes are a mix of colors, fonts, effects, backgrounds, and layouts that can be applied to a presentation.
Here are the steps to apply a theme:
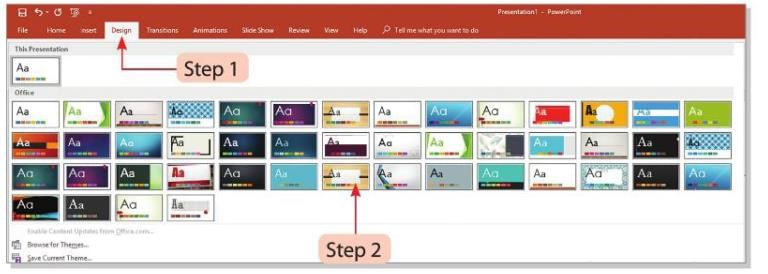
- Step 1: Click on the Design tab.
- Step 2: Scroll the mouse over the thumbnails in the Themes group.
- Step 3: Click on the More drop-down menu at the bottom right of the Themes group to see more themes.

- Step 4: You will see a gallery of themes.
- Step 5: The preview of the theme will show on the slide as you hover over it.
- Step 6: Select the theme you want, and the slide will display the selected theme.
Changing Colour Scheme
We can change the color scheme of a presentation to make it look different. The color scheme changes parts like the Title and Background of the slide.
Here are the steps to change the color scheme:
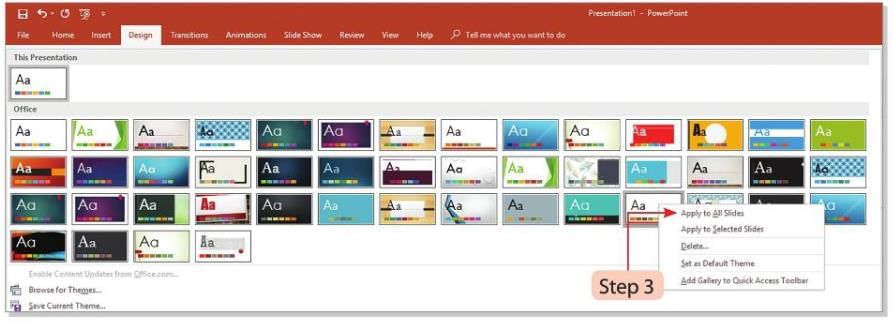
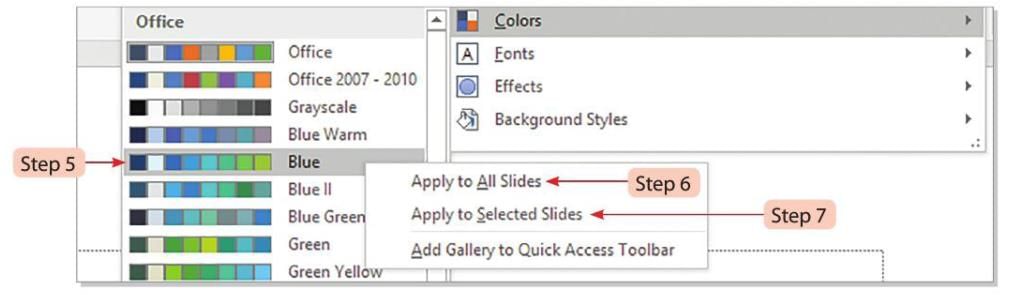
- Step 1: Go to the Design tab and click on a theme you want to apply.
- Step 2: Left-click on the theme to apply it.
- Step 3: You can also right-click on the selected theme to see a Shortcut menu. Choose the Apply to All Slides option to apply the theme to all slides in the presentation.
- Step 4: Click on the More drop-down arrow in the 'Variants' group. Select the Colors option.
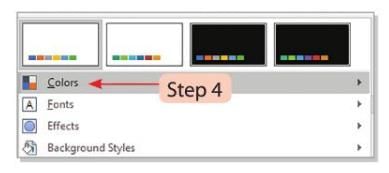
- Step 5: Select the desired colour scheme.
- Step 6: Right-click on the colour scheme and select the Apply to All Slides option. This will apply the colour scheme to all the slides.
- Step 7: Select the Apply to Selected Slides option to apply the colour scheme to the selected slide.
Changing Background Colour
We can change the background color, pattern, and texture of a slide to make it look better.
Here are the steps to change the background:
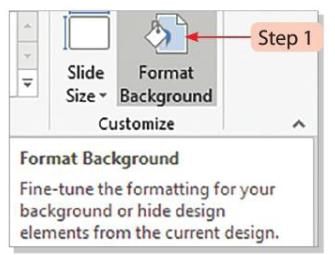
- Step 1: Click on the Format Background button in the Customize group of the Design tab.
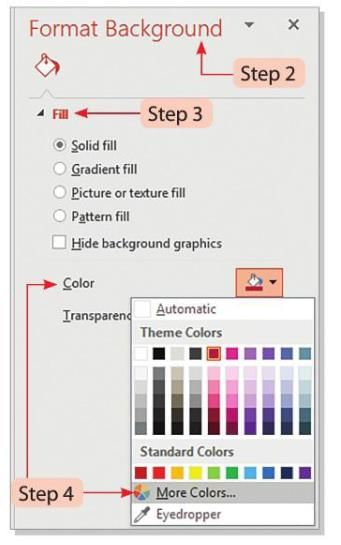
- Step 2: You will see the Format Background task pane on the right side.
- Step 3: Select the fill style option you want from the list in the Fill section, such as Solid fill, Gradient fill, Picture or texture fill, or Pattern fill.
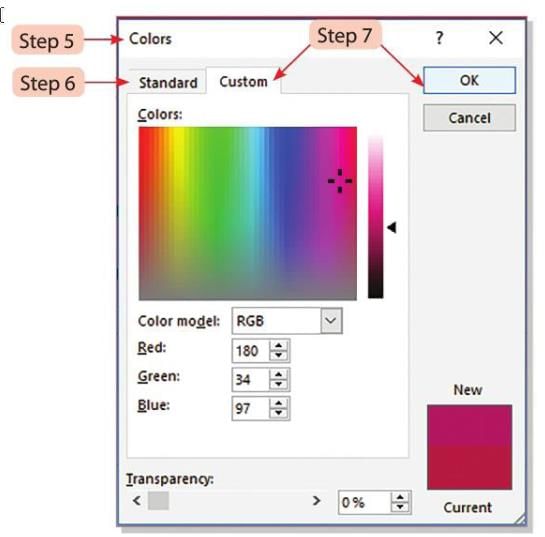
- Step 4: Click on the Color button and select the More Colors option to choose a different color from the displayed colors.
- Step 5: You will see the Colors dialog box.
- Step 6: Click on the Standard tab and select the color you want.
- Step 7: You can also select the Custom tab to create your own color scheme and click the OK button.
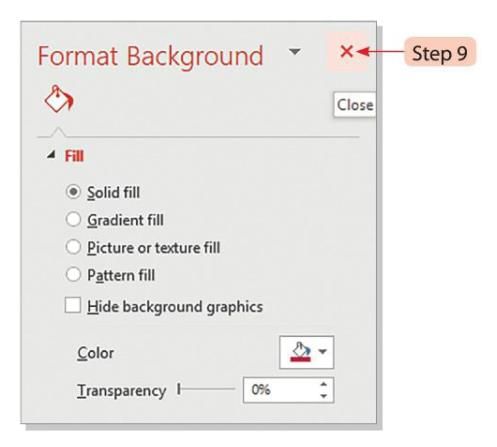
- Step 8: Click on the Apply to All button to apply the color scheme to all the slides.
- Step 9: Click on the Close button to close the Format Background task pane.
Inserting Objects in a Slide
We can add different objects like text boxes, WordArt, shapes, and pictures to a slide to make it more interesting.
Inserting Text Box
A text box lets us add extra text on a slide.
Here are the steps to insert a text box:
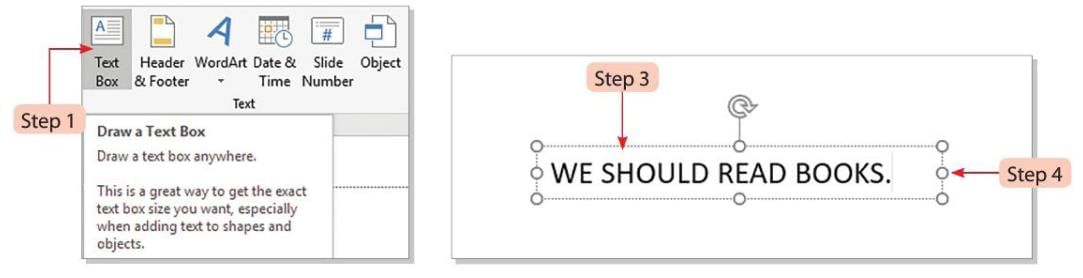
- Step 1: Click on the Text Box tool in the Text group of the Insert tab.
- Step 2: Hold down the left mouse button and drag the mouse diagonally to the right, then release the mouse button.
- Step 3: You will see a rectangular box with a cursor inside it.
- Step 4: Type the text you want inside the box.
Inserting WordArt
WordArt adds special effects like shadows or 3D styles to the text.
Here are the steps to insert WordArt:
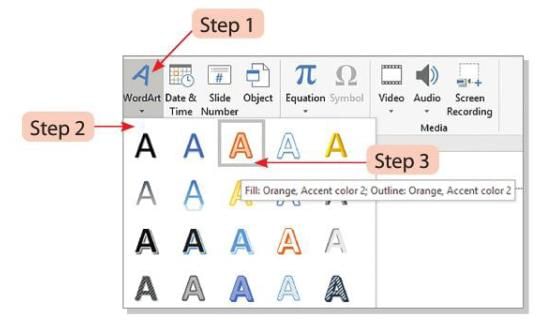
- Step 1: Click on the WordArt button in the Text group of the Insert tab.
- Step 2: You will see the WordArt gallery with different styles.
- Step 3: Select the WordArt style you want.
- Step 4: You will see a placeholder saying "Your text here." Type your text in the placeholder.
- Step 5: Select the typed text.

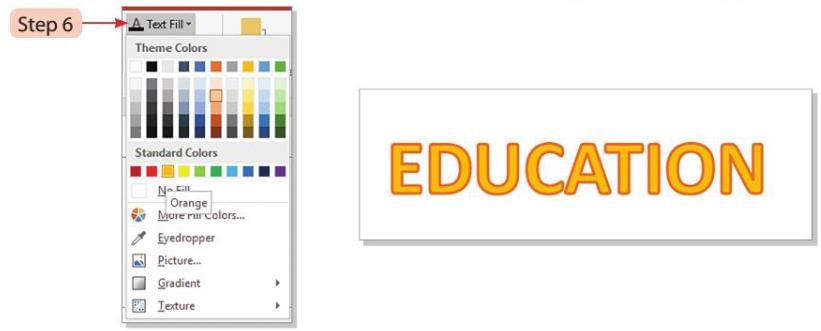
- Step 6: Click on the Text Fill drop-down menu arrow in the WordArt Styles group of the Format tab and select the color you want.
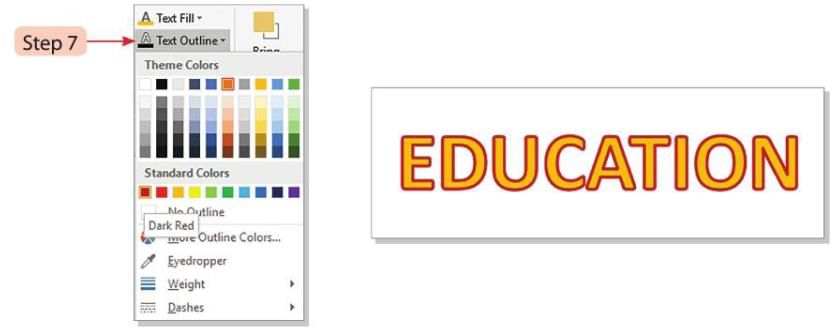
- Step 7: Click on the Text Outline drop-down menu arrow in the WordArt Styles group of the Format tab and select the color you want.
- Step 8: Click on the Text Effects drop-down menu arrow in the WordArt Styles group of the Format tab to apply effects like Shadow, Reflection, Glow, Bevel, 3-D Rotation, or Transform.

Inserting Pictures
- We can add pictures to a presentation to make it more attractive.
- We can insert pictures in two ways: from a file or from the web.
Inserting Pictures from a File
Here are the steps to insert a picture from a file:
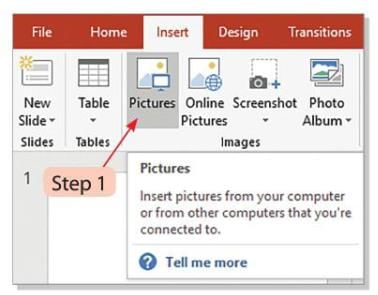
- Step 1: Click on the Pictures button in the Images group of the Insert tab.
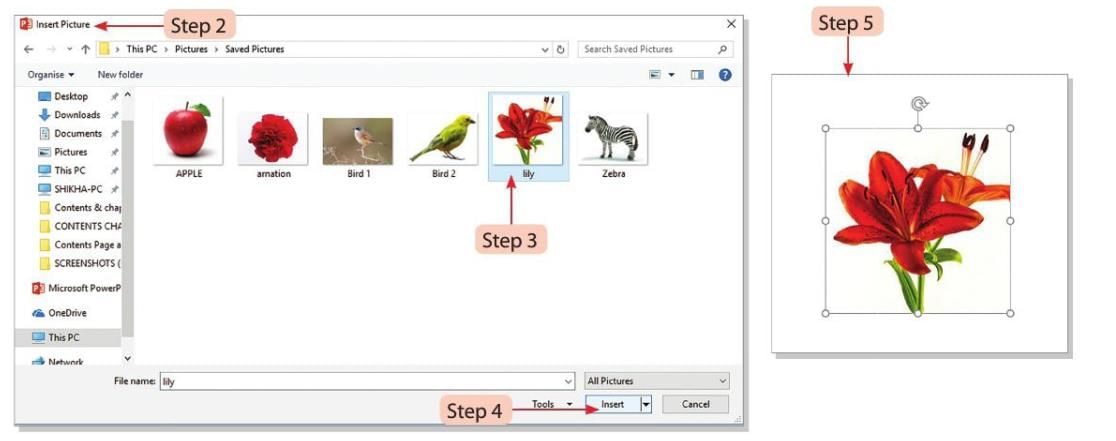
- Step 2: You will see the Insert Picture dialog box.
- Step 3: Select the picture you want to insert.
- Step 4: Click the Insert button.
- Step 5: The slide will display the selected picture.
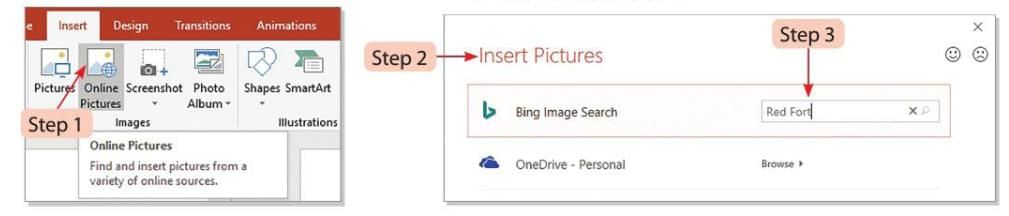
Inserting Pictures from Web
Here are the steps to insert a picture from the web:
- Step 1: Click on the Online Pictures button in the Images group of the Insert tab.
- Step 2: You will see the Insert Pictures dialog box.
- Step 3: Type a term in the Bing Image Search box to search for pictures online.
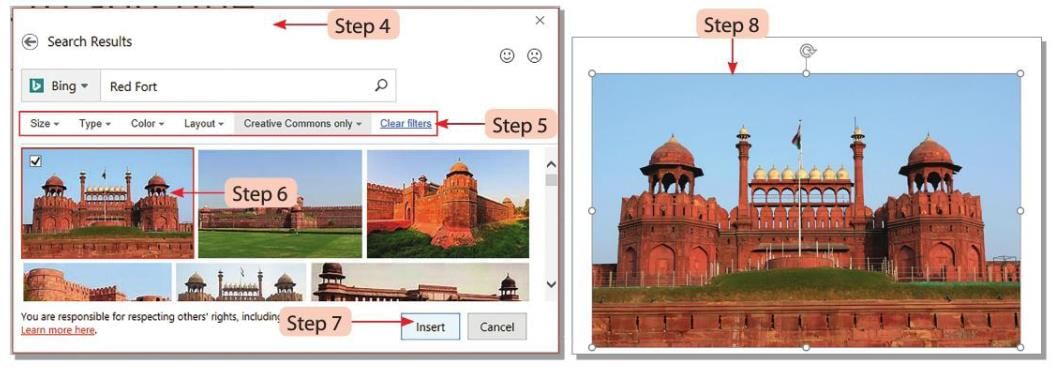
- Step 4: You will see a gallery of related pictures.
- Step 5: You can change the search results by adding details like Size, Type, and Color of the picture.
- Step 6: Select the picture you want.
- Step 7: Click the Insert button.
- Step 8: The slide will display the selected picture.
Inserting Shapes
- We can add shapes to a slide to create diagrams, web charts, and flowcharts.
- We can also resize, rotate, flip, and color the shapes.
Here are the steps to insert a shape:
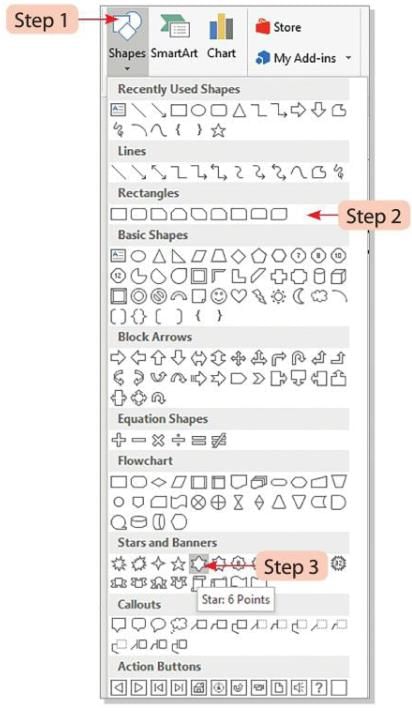
- Step 1: Click on the Shapes button in the Illustrations group of the Insert tab.
- Step 2: You will see a drop-down gallery with shapes in categories like Lines, Rectangles, Basic Shapes, Flowchart, and Callouts.
- Step 3: Click on the shape you want from any category.
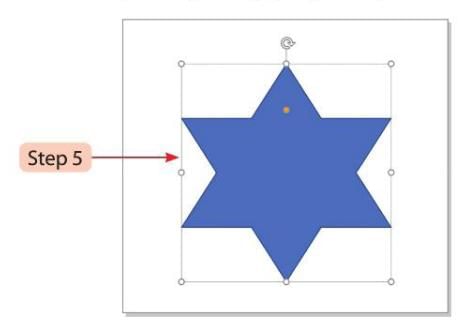
- Step 4: The mouse pointer will change to a "+" sign. Place the pointer on the slide where you want the shape.
- Step 5: Adjust the shape by dragging it to the size you want.
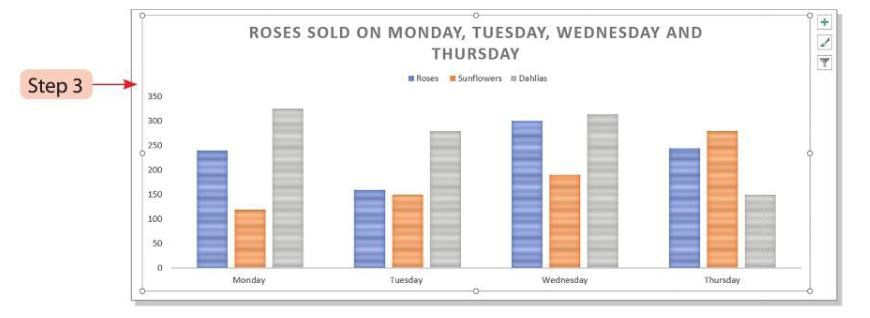
Inserting a Chart
- Charts help us show information from a worksheet in a graphic format.
- PowerPoint offers different types of charts like Column, Line, Pie, Bar, Area, and Scatter.
Here are the steps to insert a chart:
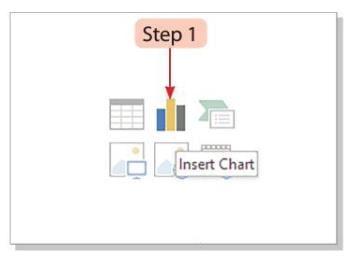
- Step 1: Click on the Insert Chart icon on the slide in the Title and Content layout.
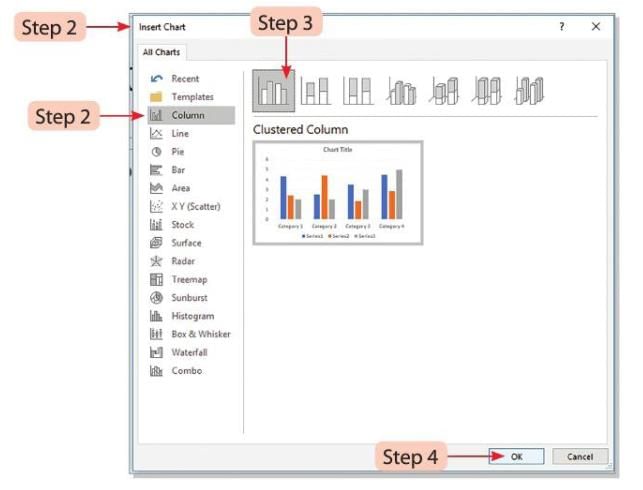
- Step 2: You will see the Insert Chart dialog box. Select the chart type in the left pane and the subtype in the right pane.
- Step 3: Select the chart, like a Column Chart.
- Step 4: Click the OK button.
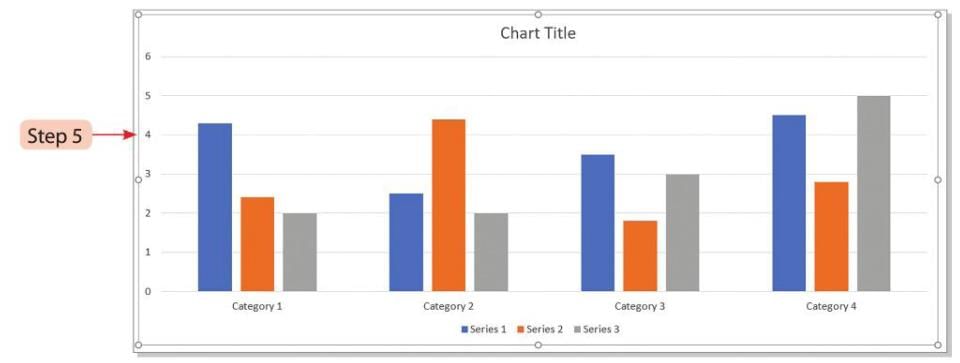
- Step 5: You will see the chart on the slide with default data.
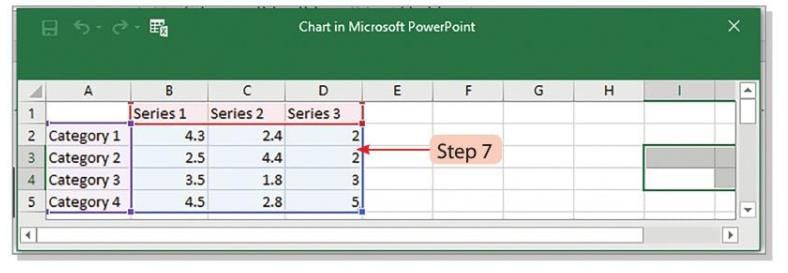
- Step 6: To change the default data, move the pointer to the Blank button at the top left corner of the column indicators.
- Step 7: The mouse pointer will change to a white plus sign.
- Step 8: Click on the button to select the datasheet and press the Delete key.
- Step 9: Click on a cell to type new data and press the Enter key.
- Step 10: Click on the Close button on the Chart in Microsoft PowerPoint – Title Bar to close the datasheet.

Formatting a Chart
We can format a chart to make it look better and show information more clearly.
Modifying the Chart Layout
Here are the steps to change the chart style:
- Step 1: Select the chart and click on the Design tab under Chart Tools.
- Step 2: Click on the More drop-down arrow and select the chart style you want.
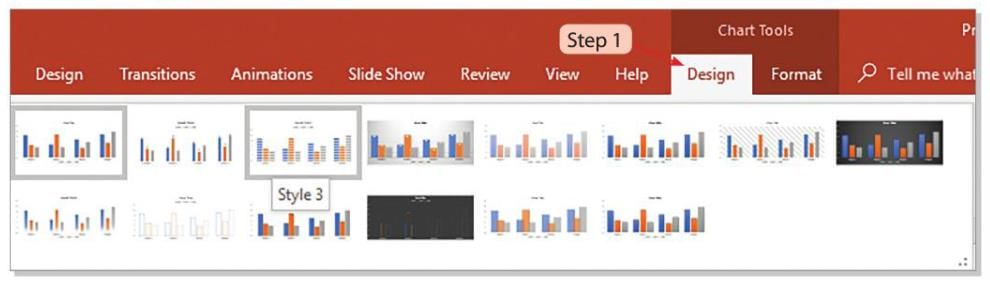
- Step 3: The selected chart will display the applied chart style.
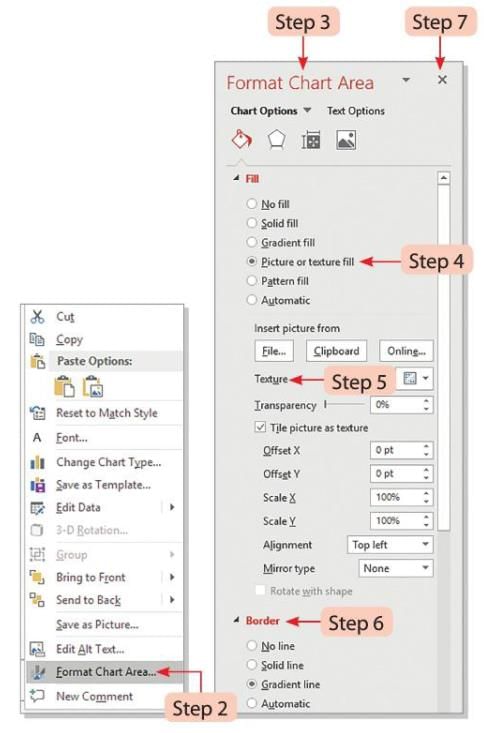
Changing Background, Colours and Patterns of a Chart
We can change the background, colors, and patterns of a chart to make it look better.
Here are the steps to change the chart area:
- Step 1: Right-click on the Chart Area of the chart.
- Step 2: Select the Format Chart Area option from the context menu.
- Step 3: You will see the Format Chart Area task pane on the right side of the PowerPoint window.
- Step 4: Click on the Picture or texture fill under the Fill tab.
- Step 5: Select the Texture button and choose the texture you want from the list.
- Step 6: Select the desired border style, color, and shadow effect.
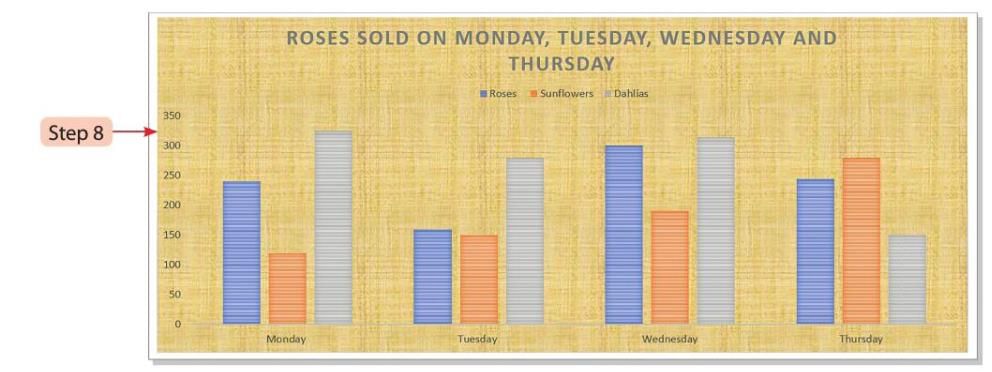
- Step 7: Click the Close button after selecting the features.
- Step 8: The chart will display the applied changes.
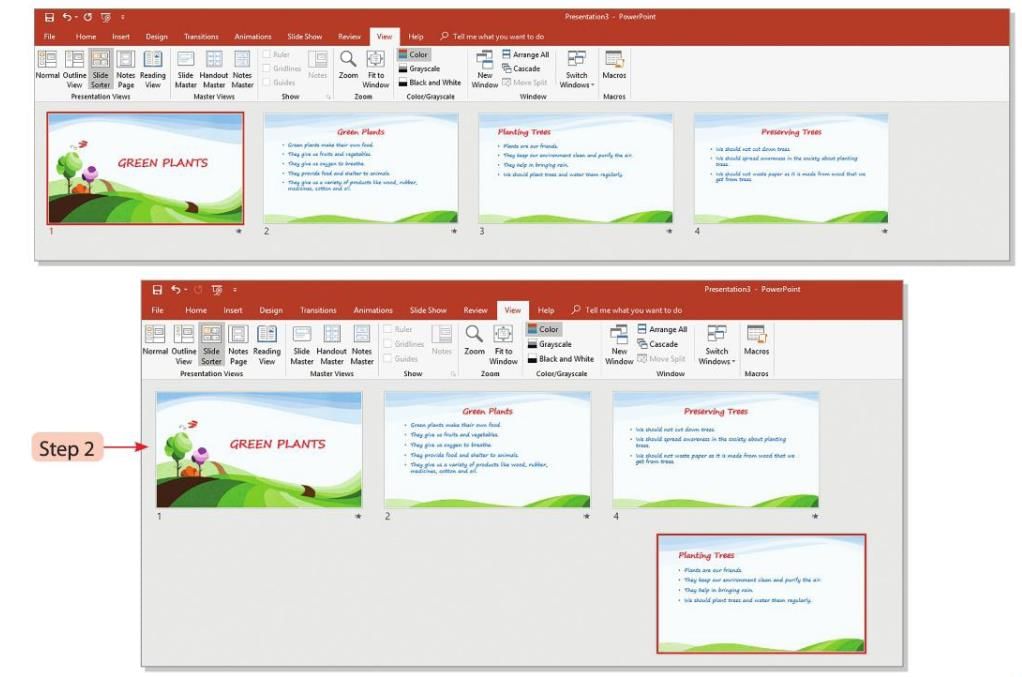
Rearranging Slides in Slide Sorter View
- Slide Sorter View shows all the slides in a presentation in a small form.
- It helps us rearrange, delete, or add slides to the presentation.
Here are the steps to rearrange slides:
- Step 1: Click on the Slide Sorter button on the View tab.

- Step 2: Rearrange the slides by dragging them to new locations as per your choice.
Learn the Shortcuts
- Ctrl + D: To create a copy of the duplicated slide.
- Ctrl + T: To open the Font dialog box.
- Ctrl + Shift + >: To increase the font size of text.
- Ctrl + Shift + <: To decrease the font size of text.
- Ctrl + P: To print slides of a presentation.
Points To Remember
- Microsoft PowerPoint allows us to place our content into a series of slides in a presentation format which can be projected using a projector for the audience.
- The user can create presentations in two ways: either by using a Blank Presentation or Sample Templates.
- The alignment of the text can be adjusted before or after typing the text. Text can be aligned horizontally or vertically.
- We can change the color schemes of a presentation. The color scheme of various elements like Title and Background can also be changed.
Glossary
- Alignment: Placement of the text on a slide.
- Themes: Combination of colors, fonts, effects, backgrounds, layouts, and more.
|
14 docs|7 tests
|
FAQs on Presentation Software: Special effects Chapter Notes - Computer Studies Class 5 ICSE
| 1. What are inbuilt templates in presentation software? |  |
| 2. How can I enhance the presentation display? | |
| 3. What is the importance of specifying alignments in a slide? | |
| 4. How do I change the background color of a slide? | |
| 5. What steps are involved in inserting a chart into a slide? | |


Summary
,shortcuts and tricks
,Viva Questions
,ppt
,Semester Notes
,Important questions
,practice quizzes
,video lectures
,mock tests for examination
,Objective type Questions
,Free
,MCQs
,Presentation Software: Special effects Chapter Notes | Computer Studies Class 5 ICSE
,Previous Year Questions with Solutions
,Extra Questions
,past year papers
,Presentation Software: Special effects Chapter Notes | Computer Studies Class 5 ICSE
,study material
,Sample Paper
,Exam
,Presentation Software: Special effects Chapter Notes | Computer Studies Class 5 ICSE
,


Chapter Notes: Presentation Software: Special effects Free PDF Download
Importance of Chapter Notes: Presentation Software: Special effects
Chapter Notes: Presentation Software: Special effects
Chapter Notes: Presentation Software: Special effects Class 5 Questions
Study Chapter Notes: Presentation Software: Special effects on the App
|
© EduRev
|
Education Revolution
|


|


