Olympiad Notes: Playing with Constructions | Maths Olympiad Class 6 PDF Download

Introduction
In the chapter – Playing with Constructions, we will explore the fascinating world of geometry by learning how to use tools like rulers and compasses to create precise and beautiful constructions.
Artwork
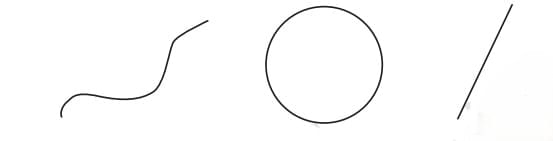
We start the chapter by Playing with constructions by observing some interesting figures and trying to draw them freehand. But to achieve perfect precision, we’ll need to arm ourselves with a ruler and a compass.
These simple tools will help us explore various shapes and curves, enhancing our understanding of geometry.
Exploring Curves and Circles
According to the chapter, Playing with Constructions, Curves are any shapes that can be drawn on paper with a pencil. They include straight lines, circles, and other figures.
To get started, mark a point ‘P’ in your notebook. Now, imagine marking points in different directions, all at a distance of 4 cm from point P.
What shape do you think they will form?
Using a compass, set the distance between the tip and the pencil to 4 cm. Place the tip on point P and draw a full circle by moving only the pencil. This circle will have all points exactly 4 cm away from P, which is known as the radius. The point P is the center of the circle.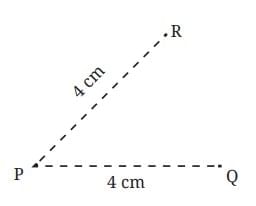
Squares and Rectangles
Within the chapter playing with constructions, when moving from circles to shapes with straight lines, we explore squares and rectangles—two of the most fundamental shapes in geometry.
Understanding Rectangles
Consider a rectangle named ABCD. The points A, B, C, and D are its corners, and the lines AB, BC, CD, and DA are its sides.
In a rectangle, the opposite sides are equal in length, and all angles are 90°. Lines AB, BC, CD, and DA are its sides. Its angles are ∠A, ∠B, ∠C, and ∠D. The blue sides AB and CD are called opposite sides, as they lie opposite to each other.
Likewise, AD and BC are the other pair of opposite sides.

Understanding Squares
A square is similar to a rectangle but with all sides equal in length. Like rectangles, all angles in a square are also 90°. When naming a square or rectangle, it’s essential to follow the order of the corners as you travel around the shape.
For ex Constructing Rectangle sample, in rectangle ABCD, you can also name it BCDA, CDAB, etc., but not ABDC or ACBD.
Rotated Squares and Rectangles
As stated in the chapter playing with constructions, even when rotated, a square remains a square, and a rectangle remains a rectangle, as the lengths of the sides and the angles do not change.

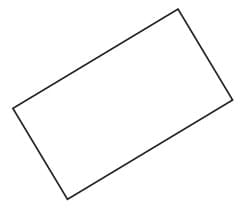
Let us check if the rotated square still satisfies the properties of a square.
• Are all the sides still equal? Yes.
• Are all the angles still 90°? Yes.
Rotating a square does not change its lengths and angles.
Therefore, this rotated figure satisfies both the properties of a square and so, it is a square.
By the same reasoning, a rotated rectangle is still a rectangle.
Constructing Squares and Rectangles
Going further in the chapter playing with constructions, now that we understand the properties of squares and rectangles, let’s construct them using a ruler and compass.
Constructing a Square
Steps to construct a square with a side of 6 cm:
- Draw a line segment PQ of 6 cm.
- Use a compass to draw a perpendicular line from point P.
- Mark point S on the perpendicular such that PS is also 6 cm.
- Repeat the process from point Q to complete the square.
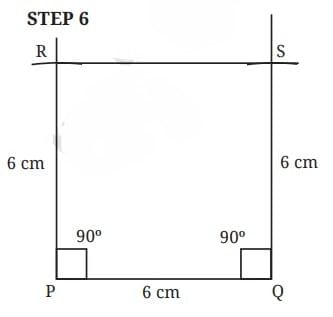
You can follow a similar method to construct rectangles.
For instance, to draw a rectangle with sides of 4 cm and 6 cm, start by drawing a line segment of 6 cm, and then use a compass to draw perpendiculars and complete the rectangle.
An Exploration in Rectangles
In this section of the chapter Playing with Constructions, we delve deeper into the properties of rectangles by exploring the distances between different points on the rectangle.
Understanding Positions and Distances
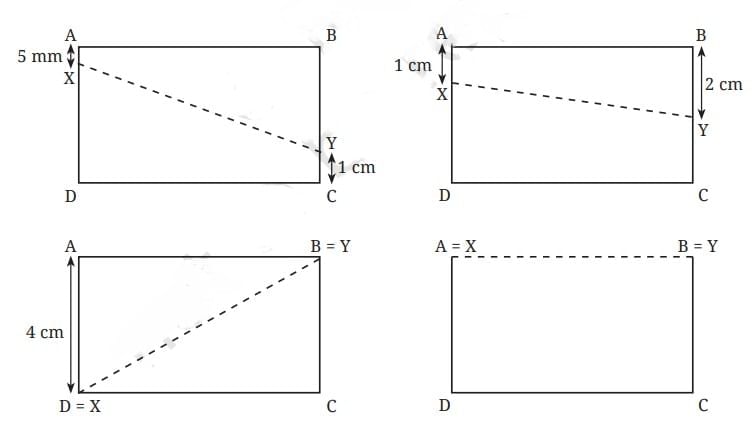
Imagine a rectangle ABCD with AB = 7 cm and BC = 4 cm. Points X and Y can move along sides AD and BC, respectively.
The distance between X and Y varies depending on their positions. You can experiment by placing X and Y at different distances from A and B and measuring the length of the line XY.

In each of these cases, observe
1. how the length of XY compares to that of AB and
2. the shape of the 4-sided figure ABYX.
The distance between X and Y can be obtained by measuring the length of the line XY.
Change the positions of X and Y to check if there are other positions where they are at their nearest or farthest. You could construct multiple copies of the rectangle and try out various positions of X and Y. Now let’s explore another topic of the chapter playing with constructions named Breaking Rectangles.
Breaking Rectangles
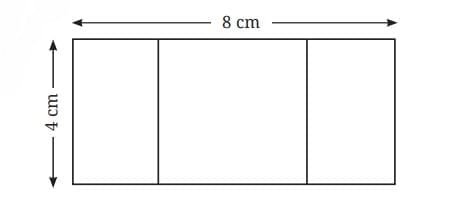
To add more fun, try breaking a rectangle into smaller squares.
For instance, can you divide a rectangle into two identical squares?
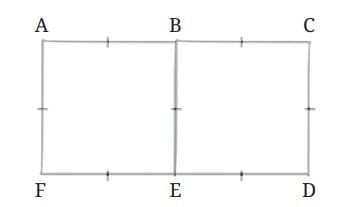
Since, the two squares are identical, AB = BC and FE = ED.
Since ABEF and BCDE are squares, all the sides in each of the squares are equal.
This is written as—
AF = AB = BE = FE
BE = BC = CD = ED
So, all the shorter lines are equal!
A convention is followed to represent equal sides. It is done by putting a ‘|’ on the line.
This exercise challenges your understanding of the relationship between the sides of squares and rectangles.
We can construct more figures like
A Square within a Rectangle
Falling Squares
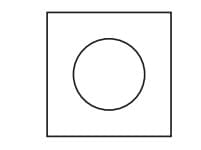
Square with a Hole
Now that we understand the concept of breaking rectangles, let’s go further in the chapter Playing with Constructions for Exploring Diagonals of Rectangles and Squares.
Exploring Diagonals of Rectangles and Squares
Consider a rectangle PQRS. Join PR and QS. These two lines are called the diagonals of the rectangle.
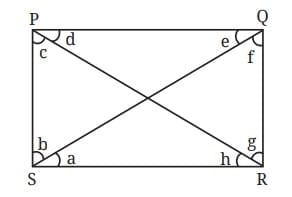
Compare the lengths of the diagonals.
In rectangle PQRS, the right angles at P and R are referred to as opposite angles. The other pair of opposite angles are the right angles at Q and S.
Observe that a diagonal divides each of the pair of opposite angles into two smaller angles.
In the figure, the diagonal PR divides angle R into two smaller angles which we simply call g and h. The diagonal also divides angle P into c and d.
Now, check that:
- Are g and h equal?
- Are c and d equal?
Measure them and identify pairs of angles that are equal.
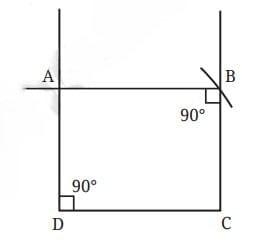
Example: Construct a rectangle where one of its sides is 5 cm and the length of a diagonal is 7 cm.
Solution: Let us start with a rough diagram
Steps of Construction:
- The base CD measuring length of 5 cm can be easily constructed.
- Draw a perpendicular to line DC at the point C. Let us call this line l
- This is easy as we know that this line is perpendicular to the base. The point B should be somewhere on this line l.
- To locate the point B, we can draw an arc on the line l.
- Construct perpendiculars to DC and BC passing through D and B, respectively. The point where these lines intersect is the fourth point A.
Check if ABCD is indeed a rectangle satisfying properties:
- The opposite sides are equal in length.
- All the angles are 90°.
Points Equidistant from Two Given Points
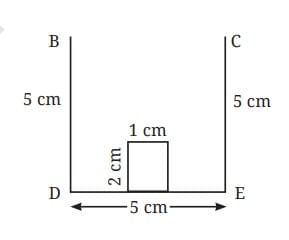
Construct House
All the lines forming the border of the house are of length 5 cm.
Solution: The first task is to identify in what sequence the lines and curve will have to be drawn.
Step 1: We need to locate point A which is of distance 5 cm from points B and C. Y
Step 2: Draw a curve that has all its points of 5 cm from point B; the circle centered at B should be with a 5 cm radius.
Point A can be located by finding the correct point on the circle that is a of distance 5 cm from point C.
Step 3: Point A could have been obtained just by drawing arcs of radius 5 cm from points B and C.
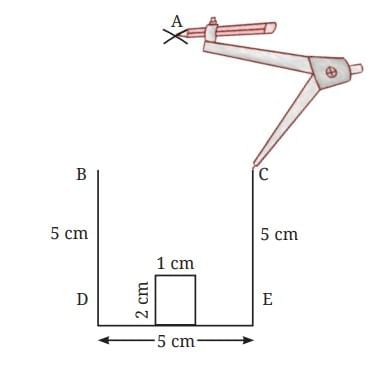
Join A to B and A to C in straight lines.
Having obtained point A, what remains is the construction of the remaining arc.
Step 4: Take a 5 cm radius in the compass and from A, draw the arc touching B and C as shown in the figure.
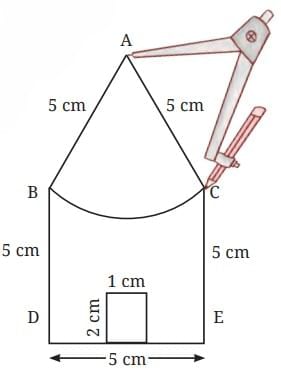
The house is ready!
|
30 videos|115 docs|59 tests
|
FAQs on Olympiad Notes: Playing with Constructions - Maths Olympiad Class 6
| 1. What are the basic shapes explored in this article related to geometry? |  |
| 2. How can one construct squares and rectangles using basic geometric tools? | |
| 3. What is the significance of exploring diagonals in rectangles and squares? | |
| 4. How does the concept of points equidistant from two given points apply in geometric constructions? | |
| 5. What are some common methods to break down rectangles into smaller shapes for problem-solving? | |


study material
,MCQs
,Olympiad Notes: Playing with Constructions | Maths Olympiad Class 6
,practice quizzes
,mock tests for examination
,shortcuts and tricks
,Exam
,Summary
,Important questions
,Previous Year Questions with Solutions
,past year papers
,Objective type Questions
,Sample Paper
,Free
,Viva Questions
,video lectures
,Extra Questions
,Semester Notes
,Olympiad Notes: Playing with Constructions | Maths Olympiad Class 6
,ppt
,Olympiad Notes: Playing with Constructions | Maths Olympiad Class 6
;


Olympiad Notes: Playing with Constructions Free PDF Download
Importance of Olympiad Notes: Playing with Constructions
Olympiad Notes: Playing with Constructions
Olympiad Notes: Playing with Constructions Class 6 Questions
Study Olympiad Notes: Playing with Constructions on the App
|
© EduRev
|
Education Revolution
|


|


