Textbook Solutions: Decomposing problems: Creating a smart solution | IGCSE Cambridge Computing for Year 7 - Class 7 PDF Download
All about software
Investigate how simulators are used in different industries:
Q1. Choose an industry that uses simulators, for example medical, military, transport, agricultural or gaming.
Ans: The aviation industry extensively uses simulators for pilot training and aircraft design.
Q2. Research:
what the simulator does and how it helps the industry the systems software (operating system) used the applications software used.
Ans:
What the Simulator Does and How It Helps the Industry:
- Flight simulators replicate the experience of flying an aircraft. They are used for training pilots in various scenarios, including emergency situations, without the risks associated with actual flying.
- Simulators help in reducing training costs, minimizing risks, and allowing for repeated practice sessions in a controlled environment.
- They are also used for designing and testing new aircraft, allowing engineers to model and simulate flight characteristics before the actual aircraft is built.
Systems Software (Operating System) Used:
- High-fidelity flight simulators often run on specialized or custom-developed operating systems that are designed for real-time performance and high reliability.
- Some simulators may also use standard operating systems like Linux or Windows, especially for lower-fidelity simulations or for certain components of the simulation system.
Applications Software Used:
- The core of a flight simulator is the simulation software, which includes the flight dynamics model, the environment model (weather, air traffic, etc.), and the cockpit instrumentation.
- Examples of applications software include Prepar3D by Lockheed Martin and X-Plane by Laminar Research.
- Additionally, there are various specialized software tools used for creating and editing the virtual environments, aircraft models, and scenarios.
Introducing the micro:bit
Q1. Plan a program to test the micro:bit simulator using a flowchart. The program needs to display an output of you r name followed by an image of your choice. Draw a flowchart to plan the program. Use the flowchart in the Learn box above to help you.
Ans:
- Start: Begin the flowchart.
- Input: Wait for button A to be pressed.
- Process: When button A is pressed, proceed to the next step.
- Output: Show string “Your Name” (replace “Your Name” with your actual name).
- Output: Show an icon of your choice (e.g., heart, smiley, etc.).
- End: End the flowchart.
Q2. Open the file called MicrobitSequenceOutput.hex provided by your teacher. Edit the code so that it follows your flowchart. Do this by:
- adding the show string block into the on button A pressed block
- editing the text to be displayed to your name
- adding the show icon block after the show string block
editing the image to be displayed.
Ans:
To edit the MicrobitSequenceOutput.hex file, you would use the micro:bit’s online editor or a similar tool that allows you to work with .hex files. Here’s what you would do in the editor:
- Drag and drop the “show string” block into the “on button A pressed” block.
- Change the text in the “show string” block to display your name.
- After the “show string” block, add a “show icon” block.
- Choose an icon to display from the options available in the “show icon” block.
Using Python with the micro:bit
Q1. Open the file MicrobitHodderSwitchSequence.hex provided by your teacher.
- Change the code view from MakeCode into Python.
- Edit the program code to display a different image and text by following these steps:
- Change the text: Locate the word Hello! inside the brackets, change it to your name and remember to keep the quotation marks " " around it. The quotation marks help tell the program that the text is to be kept as text.
- Locate the word HAPPY and change it to one of the options from the table below. Notice that they are all in capital letters and should be entered like this into the program.

Ans: 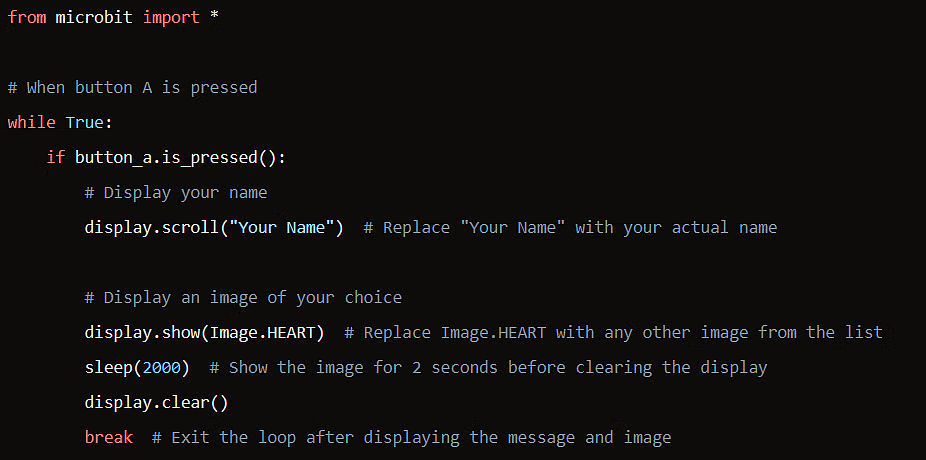
In this code:
- Replace
"Your Name"with your actual name. - Replace
Image.HEARTwith any other image from the list provided (e.g.,Image.SMILE,Image.DUCK, etc.), making sure to use the correct capitalization as shown in the list.
After making these changes, you would upload the updated .hex file to the micro:bit simulator to run the program and ensure the outcome is as expected
The micro:bit Python environment
1. Connect the micro:bit to the computer using the USB cable.
2. Select connect on the applications software to connect the micro:bit.
3. Open the file FirstMicroPythonProgram.py provided by your teacher, using the Load/Save button.
4. Flash the program to the micro:bit to view the output sequence.
5. Edit the text to be displayed and flash the program again to the micro:bit to view the updated program output.
6. Edit the image to be displayed and flash the program again to the micro:bit to view the updated program output.
Ans:
- Connect your micro:bit to your computer using the USB cable provided.
- Open the applications software for programming the micro:bit (such as the online Python editor or Mu editor).
- Click on the ‘Connect’ button or similar option to establish a connection with your micro:bit.
- In the applications software, use the ‘Load/Save’ button to navigate to the location of the
FirstMicroPythonProgram.pyfile. - Select the file and open it in the editor.
- Once the file is open, review the code to understand what it does.
- Use the ‘Flash’ button or similar option in the editor to transfer the program to the micro:bit and start its execution.
- In the program code, locate the line that displays text, which will likely use the
display.scroll()function. - Edit the text within the quotation marks to display a different message.
- Save your changes and flash the program to the micro:bit again to see the new text output.
- Find the line in the code that displays an image, which will likely use the
display.show()function with anImageobject. - Change the image to a different one by selecting from the predefined images in the micro:bit library (e.g.,
Image.HEART,Image.SMILE, etc.). - Save the changes and flash the program to the micro:bit once more to view the updated image output.
Correcting errors using a flowchart
Q1. Look at the following flowchart and follow the flow of the program:
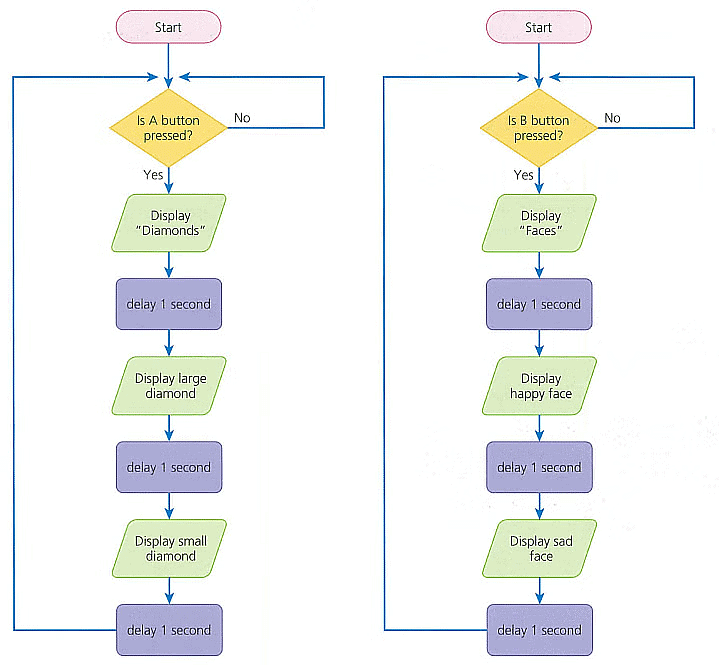
Discuss with a partner:
- What happens when the A button is pressed?
- What happens when the B button is pressed?
Ans: the program runs continuosly and displays: Diamonds large diamond small diamond
the program runs continuosly and displays: Faces happy face sad face
Q2. Look at the following MicroPython program code:
if button _ a.
display. show( Image. DIAMOND)
display. scroll ( "Hello")
display. Image. DIAYOND_SRALL)
sleep( 1000)
button_a. )
display. show( Image. SAD)
display. show( Image. SAD)
display. scroll(Faces)
sleep(1000)
Create flowcharts to match the MicroPython program code.
- Compare the original flowcharts above with your flowcharts (created from the MicroPython program code).
- The program code should follow the flowcharts above. Can you identify any errors in the program code by comparing the flow charts?
Ans:
To create a flowchart based on the provided MicroPython code, you would follow these steps:
- Start: Begin the flowchart.
- Decision: Check if button A is pressed.
- If Yes, proceed to step 3.
- If No, end or loop back to the decision step.
- Output: Show the diamond image.
- Output: Scroll the text “Hello”.
- Output: Show a small diamond image
- Wait: Pause for 1000 milliseconds (1 second).
- Decision: Check if button A is pressed again.
- If Yes, proceed to step 8.
- If No, end or loop back to the decision step.
- Output: Show the sad image.
- Output: Scroll the text “Faces”.
- Wait: Pause for 1000 milliseconds (1 second).
- End: End the flowchart.
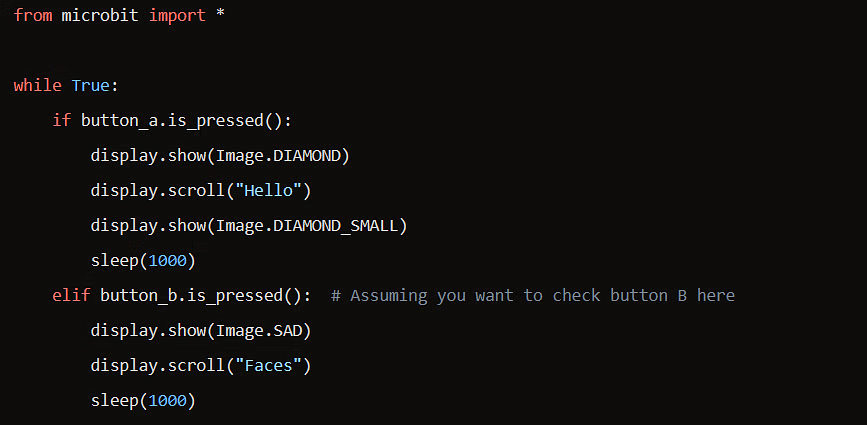
Based on the code snippet you provided, here are the errors and corrections:
- The
ifstatement syntax is incorrect; it should beif button_a.is_pressed():. - The second
button_a.line seems to be incomplete and should be part of anifstatement like the first. - The
display.scroll(Faces)line is missing quotation marks aroundFaces. - The code snippet does not include a loop or condition to check repeatedly if the button is pressed; it will only run once as written.
Here’s a corrected version of the code:
Using sensors in programming
Q1. Look at the flowchart and follow the flow.
In pairs, discuss what will happen if the light level is:
- 67
- 130
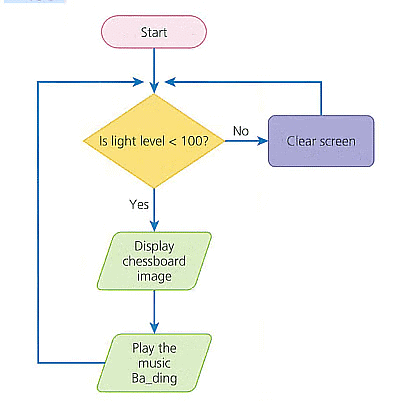
Ans: Chessboard image is displayed when it is 67, and music Ba_ding is played.
screen is cleared when it is 130
Q2. Look at the MicroPython program code below. To use the micro:bit light sensor in a
program, the code is
if display. read _ light _ level()
Compare the program code to the flowchart above and identify the error.
if display. > 100:
display. show( Image . CHESSBOARD)
music . play (music. BA_DING )
display. clear()
Ans: correct code :
if display < 100:
display.show( Image . CHESSBOARD)
music.play (music. BA_DING )
if display > 100:
display. clear()
Flowcharts for algorithm planning
Q1. Create a flowchart for the following program using selection IF statements:
A program that will turn the lights on and close the curtains if the light level is < 20, else the lights will be off and the curtains open.
Ans:
- Start: Begin the flowchart.
- Input: Measure the light level.
- Decision: Check if the light level is less than 20.
- If Yes (light level < 20), proceed to step 4.
- If No (light level >= 20), proceed to step 5.
- Output: Turn the lights on and close the curtains.
- Output: Turn the lights off and open the curtains.
- End: End the flowchart.
Q2. Look at the flowchart example and describe to a partner how the sensor is being used in the IF statement.
Predict what the output would be if the light level detected was:
- 10
- 50
- 51
- 45
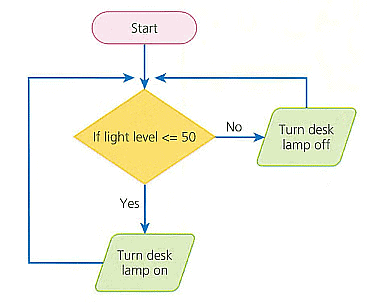
Ans: 10 - Desk lamp on
50 - desk lamp on
51 - desk lamp off
45 - desk lamp on
Algorithmic solutions and data types
Q1. What would the data type be for the following:
- 12
"Pass123"
'light'
- 3456?
Ans:
- 12: This is an integer. It’s a whole number without any decimal point.
- “Pass123”: This is a string because it’s enclosed in double quotes. Strings can contain letters, numbers, and symbols.
- ‘light’: This is also a string. Even though it’s enclosed in single quotes, it’s still a sequence of characters, which makes it a string.
- 3456: Like 12, this is also an integer since it’s a whole number.
Q2. Look at the flowchart below and describe to a partner what the program will do.
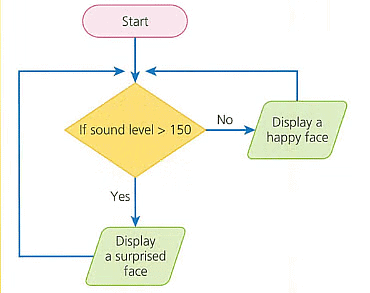
- What data type will the data from the sound sensor be stored as?
- What would the output be if the sound level detected was:
- 160
- 86
- 200
- 51?
Ans: int
160 - surprised face
86 - happy face
200 - surprised face
51 - happy face
Q3. Open the file SoundSensorProgram.py provided by your teacher.
Follow the flowchart above and the program flow to find and fix the error.
Flash the program (download the program) to the micro:bit to test.
Planning a smart solution
Q1. Create a flowchart to plan the program for another part of your smart home, the garage doors:
The garage doors need to open when the button is pressed on the key in the car.
- Plan the IF statement question that needs to be asked inthe selection.
What is the output if the outcome is true?
- What is the output if the outcome is false?
Check the flowchart in pairs to make sure the program works as expected.
Ans:
- Start
- Press Button on the car key.
- IF Statement: Is the button pressed?
- If YES (true): The output is Open Garage Door.
- If NO (false): The output is Do Nothing.
- End
Here’s how you can check the flowchart:
- Test the true outcome: Simulate pressing the button and see if the garage door opens.
- Test the false outcome: Do not press the button and ensure the garage door remains closed.
Q2. Discuss in pairs how the program will work to control the garage doors.
Ans:
- When I press the button on my car key, it sends a signal to the garage door’s receiver.
- The program in the garage door system checks if the signal received is the correct one (the IF statement).
- If the signal is correct, the program activates the mechanism to open the garage door (true outcome).
- If the signal is not correct or there is no signal, the program does nothing, and the garage door stays closed (false outcome).
Evaluating a program
Q1. Explain to a partner the purpose of a project plan using the stages outlined in the Learn box above.
Considering the impact specific images and sounds will have on users will help you to plan a new program. It is important to explore all the image and sound options available, to help you decide which is best to use. The micro:bit comes with a wide range of pre-set images and sounds that can be used.
- Create a table with the headings Positive images and Negative images.
Open the file Testlmages.py provided by your teacher.
- Edit the image displayed to a new image of your choice. Use the image table below to help you.
display. show(lmage. HAPPY)
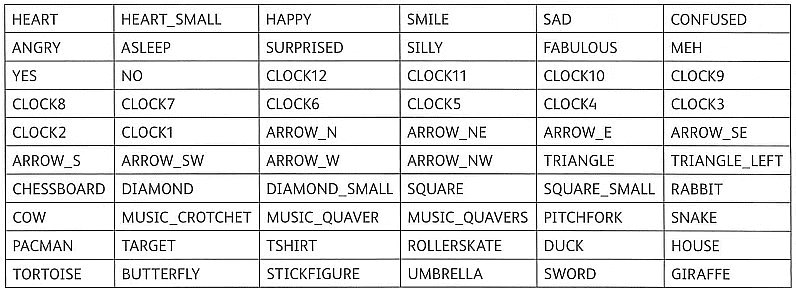
- Flash the program (download the program) to the micro:bit to view the image.
- Would this image be positive or negative to a user? Insert the image names that have a positive effect under the Positive heading in your table.
- Test some other images. Insert the image names that have a negative effect under the Negative heading in your table.
Q3. Create a table with the headings Positive sounds and Negative sounds.
- Open the file TestMusic.py provided by your teacher.
- Edit the sound displayed to play a different sound of your choice. use the table below to help you.
music. play(music. BIRTHDAY)

- Flash the program (download the program) to the micro:bit to hear the music.
- Would this music be positive or negative to a user?
- Test some other sounds. Insert the sound names that have a negative effect under the Negative heading in your table. Place the sound names that have a positive effect under the Positive heading.
Ans:
The purpose of a project plan is to outline the steps and stages necessary to complete a project successfully. It helps to organize tasks, manage time effectively, and allocate resources efficiently. In the context of programming, especially when considering user experience with images and sounds, a project plan ensures that the right choices are made to create a positive impact on the user.
- Conceptualization: Understand the goal of the program. For the micro:bit, it would be to display images or play sounds that trigger certain emotions or responses.
- Exploration: Look at all available pre-set images and sounds. Consider what emotions they might evoke.
- Selection: Choose images and sounds that align with the program’s goals. Positive images and sounds should enhance the user experience, while negative ones might be used for alerts or warnings.
- Implementation: Write the code to display images or play sounds based on user interaction or other triggers.
- Testing: Check if the images and sounds work as expected and make adjustments if necessary.
- Evaluation: Reflect on the impact of the images and sounds on the user and whether they meet the program’s objectives.
To edit the image displayed in TestImages.py, you can change the code like this
from microbit import *
display.show(Image.HEART)
Replace Image.HEART with any other image from the list to test different emotions. For example, Image.SAD might be considered a negative image because it represents sadness.
After testing various images on the micro:bit, you would insert the names of the images that have a positive effect under the “Positive Images” heading and those with a negative effect under the “Negative Images” heading in your table.
Challenge yourself
Apply what you have learned about sensors to this scenario:
A museum has asked for help to protect a priceless new crown that is on display. The crown needs to be protected against potential thieves.
Q1. Discuss with a partner:
What would you put in place to help protect the priceless crown from thieves?
How could you use sensors to protect the priceless crown?
What would the IF statement be for your protection method?
What would happen if the sensor detected the crown was stolen?
What else would happen when the sensor was not triggered?
How could you test your idea using the micro:bit?
Ans:
- Protection Measures: I would install a combination of motion sensors and pressure sensors around the display area. The motion sensors would detect any unauthorized movement, while the pressure sensors would alert if the crown is lifted from its pedestal.
- Using Sensors: The sensors would be connected to a central security system that monitors their status. If any sensor is triggered, the system would initiate a security protocol.
- IF Statement: The IF statement in the program could be:
IF motion_detected OR pressure_changed THEN trigger_alarm. - Sensor Triggered: If the sensor detected that the crown was stolen (motion detected or pressure changed), the system would trigger an alarm, lock down the area, and notify security personnel.
- Sensor Not Triggered: If the sensor was not triggered, the system would continue to monitor without taking any action.
- Testing with micro:bit: To test the idea, I could simulate the setup using a micro:bit by programming it to detect movement or changes in orientation as a proxy for the actual sensors.
Q2. Draw a flowchart to represent the IF statement you would need.
Ans:
Start
|
V
Check Sensors ---> Motion Detected? ---> Yes ---> Trigger Alarm
| |
| No V
| Lockdown Area
V |
Monitor Sensors <------------ Notify Security
|
V
End
Q3. Try coding your flowchart for the micro:bit.
Ans: 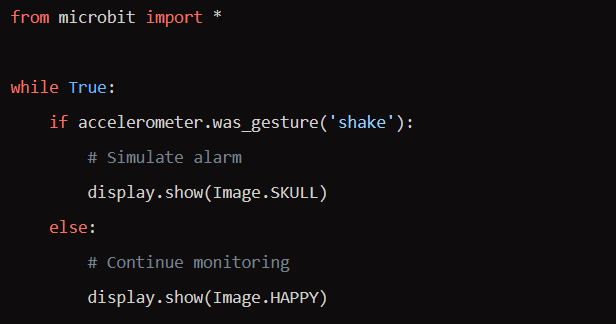
Final project
The skills you have learned in this unit are all about the different sensors that can be used on the micro:bit and how the data gathered by the sensor can be used to set selection, if statements in a program.
You are now going to develop a prototype using the micro:bit. It will use a sensor to detect whether someone is near a computer to help staff monitor the computers in the room, and act as a theft-detection system to signal to others when someone is near or is taking the device.
The software solution should:
use one of the sensors from the micro:bit: the light, touch or accelerometer sensor
use the data to decide the next instruction to execute in the program
be presented as a flowchart to show the flow of the program if the outcome to the question set is true or false
use more than one input and more than one output.
Q1. Discuss with a partner and write down your initial thoughts about:
- the benefits of using a simulator for this type of software-development project
whether this program will be application software or system software
- what sensor could be used and what the IF statement could be.
Ans:
- Benefits of Using a Simulator: A simulator allows us to test our software without the need for physical hardware. This can save time and resources, and it can also allow us to test scenarios that might be difficult or dangerous to create in real life.
- Application vs. System Software: This program would be considered application software because it’s designed to perform a specific task for the user, which is monitoring computers and detecting theft.
- Sensor and IF Statement: I could use the accelerometer sensor to detect movement. The IF statement could be:
IF movement_detected THEN alert_staff.
Q2. Before creating anything, you need to consider the project plan. Take time to plan and write the answers to the following questions:
What is it you are going to create?
What does the project outline require the software to have in it? (See the box above.)
- What hardware and software will you need to develop the software?
- When does the project need to be completed?
How will you know whether you have been successful?
Ans:
- Creation: I’m going to create a theft-detection system using the micro:bit.
- Project Requirements: The software must use a sensor to detect presence, decide the next instruction, and have multiple inputs and outputs.
- Hardware and Software: I’ll need a micro:bit, a computer with a USB port, and software to program the micro:bit (like the Python editor for micro:bit).
- Completion Date: This will depend on the project’s scope, but let’s say two weeks from now.
- Success Metrics: The project will be successful if it accurately detects presence and alerts staff without false positives or negatives.
Q3. Discuss with a partner how your software solution could work:
- Which sensor will you use to detect a potential theft?
What output will you have in your solution to alert others to a potential theft of a computer?
- How could you use selection to use the sensor's data?
Will the data generated by the sensor be a string or an integer?
- What will happen if the sensor is activated?
- What else will happen when the sensor is not detecting anything?
Ans:
- Sensor for Theft Detection: I’ll use the light sensor to detect if someone is near the computer.
- Output for Alert: The outputs could be a visual signal on the micro:bit’s LED display and a sound alarm.
- Using Selection: I could use an IF statement to check the sensor’s data and decide whether to trigger the alarm.
- Data Type: The data from the sensor will likely be an integer representing the light level.
- Sensor Activation: If the sensor is activated, the LED display will show a warning sign, and the alarm will sound.
- No Detection: If there’s no detection, the micro:bit will continue to monitor without any alert.
Q4. Once you have planned your software solution, create a flowchart to show how the sensor will be used and what the output will be.
- Discuss with a partner your flowchart and how it represents the solution.
Discuss with a partner the benefits of creating and testing a flowchart before starting to create a prototype.
Ans: Flowchart -
Start
|
V
Check Light Sensor ---> Light Level High? ---> Yes ---> Display Warning & Sound Alarm
| |
| No V
| Continue Monitoring
V |
End
Q5. Open the file FinalProject2.py provided by your teacher.
- Complete your software solution by adding more than one output in your solution to alert others to a potential theft of a computer through the use of a sensor.
Connect the micro:bit.
- Flash the program (download the program) to the micro:bit.
Test your program works by completing the test table above linked to the sensor you are using.
- Debug by finding and fixing any errors, if required.
Ans: Code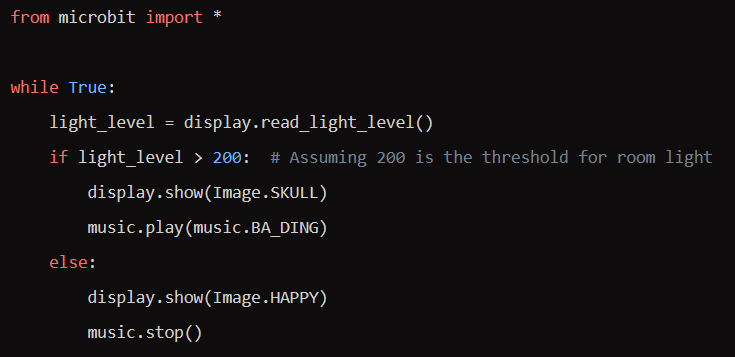
Testing and Debugging:
- Test 1: Simulate light - Expected outcome: Happy face shows, no sound.
- Test 2: Simulate darkness - Expected outcome: Skull shows, sound plays.
If the tests fail, I would adjust the light level threshold and ensure the outputs are correctly programmed.
|
28 videos|17 docs|5 tests
|
FAQs on Textbook Solutions: Decomposing problems: Creating a smart solution - IGCSE Cambridge Computing for Year 7 - Class 7
| 1. What is the micro:bit Python environment used for? |  |
| 2. How can flowcharts be used to correct errors in programming? |  |
| 3. How can sensors be utilized in programming with the micro:bit? |  |
| 4. How can algorithmic solutions and data types be used in programming with the micro:bit? |  |
| 5. What is the importance of planning a smart solution when programming with the micro:bit? |  |


