Practical Geometry Summary Class 6 Maths Del
Mathematical Instruments
- The ruler (or straight edge)

Description: A ruler ideally has no markings on it. However, the ruler in your instruments box is graduated into centimetres along one edge (and sometimes into inches along the other edge).
Use: To draw line segments and to measure their lengths.
- The Compasses
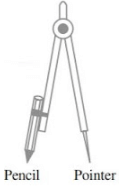
Description: A pair – a pointer on one end and a pencil on the other.
Use: To mark off equal lengths but not to measure them. To draw arcs and circles.
- The Divider

Description: A pair of pointers
Use: To compare lengths.
- Set Squares
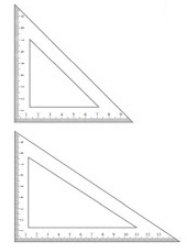
Description: Two triangular pieces – one of them has 45°, 45°, 90° angles at the vertices and the other has 30°, 60°, 90° angles at the vertices.
Use: To draw perpendicular and parallel lines.
- The Protractor
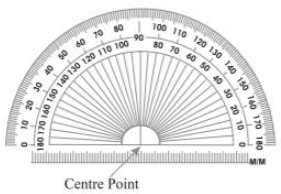
Description: A semi-circular device graduated into 180 degree-parts. The measure starts from 0° on the right hand side and ends with 180° on the left hand side and vice-versa.
Use: To draw and measure angles.
Circle
- Circle is closed plane figure consisting of all the points which are at a constant distance from a fixed point. This fixed point is called the centre and the distance of fixed point from the points on the circle is called radius of circle.
- A line segment joining the two points of a circle is called chord of the circle.
- The chord passing through the centre is called diameter of a circle.
Construction of a circle when its radius is known
- Draw a circle of radius 3 cm.
Step I: Open the compass for the required radius of 3 cm.
Step II: Mark a point with a sharp pencil.
Step III: Place the pointer of the compass on O.
Step IV: Turn the compass slowly to draw the circle. Be careful to complete the movement amount in one instant.
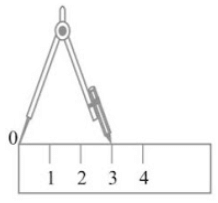
Line Segment
- Line segment is a part of line that is bounded by two distinct end points and contains every point on the line between its end points.
Step I : Draw a line l. Mark a point A on a line l.
Step II: Place the compass pointer on the zero mark of the ruler. Open it to place the pencil point upto the 4.7 cm mark.
Step III: Taking caution that the opening of the compasses has not changed, place the pointer on A and swing an arc to cut l at B.
Step IV: is a line segment of required length.

Constructing a copy of a given line segment using ruler and compass
Step I: Given, a line segment  whose length is not known.
Step II: Fix the compass pointer on A and the pencil end on B. The opening of the instrument now gives the length of line segment  .
.
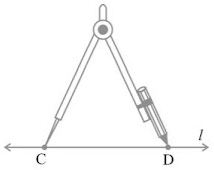
Step III: Draw any line l. Choose a point C on l. Without changing the compasses setting, place the pointer on C.
Step IV: Swing an arc that cuts l at a point, say D. Now, line segment  is a copy of line segment
  .
.
Perpendicular
The property of being perpendicular (perpendicularity) is the relationship between how lines which meet at right angle (90 degrees). The property extends to other related objects. A line is said to be perpendicular to another line if the two lines intersect at right angle.
Drawing perpendicular to a line through a point on it, using ruler and a set-square
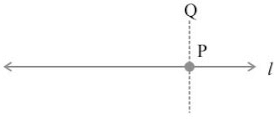
Step I: A line l and a point P are given as shown alongside.
Step II: Place a set-square with one of its edges along the already aligned edge of the ruler such that the right angled corner is in contact with the ruler.
Step III: Slide the set-square along the edge of ruler until its right angled corner coincides with P.
Step IV: Hold the set-square firmly in this position. Draw  along the edge of the set-square, where PQ is perpendicular to l.
Drawing perpendicular to a line through a point on it, using ruler and compass.
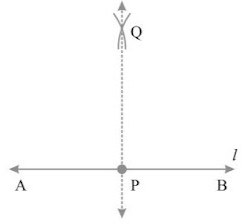
Step I: Let a point P on a line l.
Step II: With P as centre and a convenient radius, construct an arc intersecting the line l at two points A and B.
Step III: With A and B as centres and a radius greater than AP construct two arcs, which cut each other at Q.
Step VI: Join  . Then, is perpendicular to I. We write
  ⊥ l.
⊥ l.
Drawing a perpendicular to a line through a point not on it, using ruler and set-square.
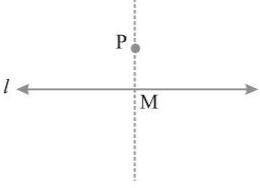
Step I: Let l be the given line and P be a point outside l.
Step II: Place a set-square on l such that one arm of its right angle aligns along l.
Step III: Place a ruler along the edge opposite to the right angle of the set-square.
Step IV: Hold the ruler fixed. Slide the set-square along the ruler till the point P touches the other arm of the set-square.
Step V: Join PM along the edge through P meeting l at M. Now, PM I.
Drawing a perpendicular to a line through a point not on it, using ruler and compass.
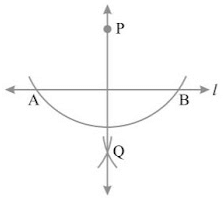
Step I: Given a line l and a point P not on it.
Step II: With P as centre, draw an arc, which intersects line l at two points A and B.
Step III: Using the same radius and with A and B as centres, construct two arcs that intersect at a point, (say Q) on the other side.
Step IV: Join PQ. Thus, PQ is perpendicular to l.
Perpendicular bisector of a line segment
- A perpendicular bisector of a line segment is a line segment perpendicular to line segment and passing through the mid point. The perpendicular bisector of a line segment can be constructed using a compass by drawing circles centred at and with radius and connecting their two intersections.
Constructing perpendicular bisector by using ruler and compasses
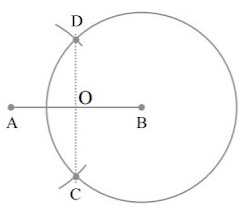
Step I: Draw a line segment  of any length.
Step II: With A as centre, using compasses, draw a circle. The radius of your circle should be more than half the length of  .
.
Step III: With the same radius and with B as centre, draw another circle using compasses. Let it cut the previous circle at C and D.
Step IV: Join  which cuts
  at O, use the divider to verify that O is the mid-point of
  . Also, Verify that ∠COA and ∠COB are right angles. Therefore, CD is the perpendicular bisector of
  .
.
Angle
- An angle is a figure formed by two rays, called the sides of the angle, sharing a common end point, called the vertex of the angle.
Constructing an angle of a given measure
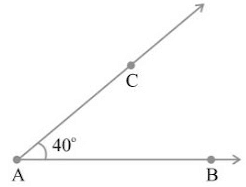
Make an angle of measure 40°.
Step I: Draw of any length.
Step II: Place the centre of the protractor at A and the zero edge along .
Step III: Start with zero near B. Mark point C at 40°.
Step IV: Join AC. ∠ BAC is the required angle.
Constructing a copy of an angle of unknown measure
Let ∠ A be an angle whose measure is not known.
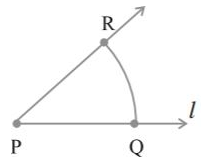
Step I: Draw a line l and choose a point P on it.
Step II: Place the compasses at A and draw an arc to cut the rays of ∠ A at B and C.
Step III: Use the same compasses setting to draw an arc with P as centre, cutting l at Q.
Step IV: Set your compasses to the length BC with the same radius.
Step V: Place the compasses pointer at Q and draw the arc, to cut the arc drawn earlier in R.
Step VI: Join PR. This gives us ∠ P. It has the same measure as ∠ A.
Bisector of an angle
- The bisector of an angle is a ray whose end point is a vertex of the angle and which divides the angle into two equal angles.
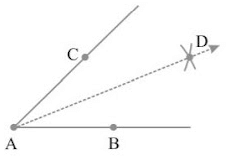
Construction of bisector of an angle using ruler and compasses
Step I: With A as centre and using compasses, draw an arc that cuts both rays of ∠ A. Label the points of intersection as B and C.
Step II: With B as centre, draw (in the interior angle of ∠ A) an arc, whose radius is more than half the length of BC.
Step III: With the same radius and with C as centre, draw another arc in the interior angle of ∠ A.
Angles of special measures
- There are some elegant and accurate methods to construct some angles of special measures, which do not require the use of the protractor.
FAQs on Practical Geometry Summary Class 6 Maths Del
| 1. What are the different types of mathematical instruments used in practical geometry? |  |
| 2. How is a ruler used in practical geometry? |  |
| 3. What is the purpose of a compass in practical geometry? |  |
| 4. How is a protractor used in practical geometry? |  |
| 5. What is the function of a divider in practical geometry? |  |

 is a line segment of required length.


