Measurement of Finish | Manufacturing Engineering - Mechanical Engineering PDF Download
What is Surface Finish/Surface Texture/Surface Topography?
Surface finish is also known as surface texture or surface topography, is the nature of a surface. It comprises the small local deviations of a surface from the perfectly flat ideal (a true plane).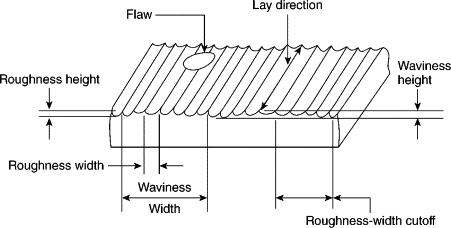
The surface of every component has some form of texture which varies according to its structure and the way it has been manufactured.
In order to control the manufacturing process or predict a component’s behaviour during use, it is necessary to quantify surface characteristics by using surface texture parameters.
Surface texture parameters or surface finish parameters can be separated into three basic types:
- Roughness
- Waviness
- Form
What are the Types of Surface Finish Parameters (Surface Texture Parameters)
Surface texture or surface finish parameters can be separated into three basic types:
- Amplitude parameters
- Spacing parameters
- Hybrid parameters
- Amplitude Parameters
Amplitude Parameters are measures of the vertical characteristics of the surface deviations.
(i) Ra, Rq, Wa, Wq, Pa, Pq
(ii) Rv, Rp, Rt, Wv, Wp, Wt, Pv, Pp, Pt
(iii) Rsk, Rku, Wsk, Wku, Psk, Pku
(iv) Rz (JIS), Pz (JIS)
(v) Rz, Wz, Pz, Rz1max
(vi) R3z, R3y (R3z1max)
(i) Ra, Rq, Wa, Wq, Pa, Pq
l1 - l5 are consecutive and equal sampling lengths (l the sampling length corresponds to filter cut-off length λc). The evaluation length 'L' is defined as the length of profile used for assessing surface roughness parameters.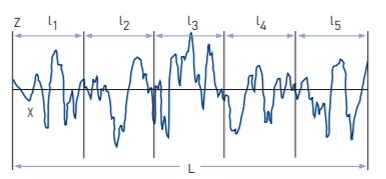
(a) Ra: Ra is the universally recognised, and most used, international parameter of roughness. It is the arithmetic mean of the absolute departures of the roughness profile from the mean line.
(b) Rq: Rq is the rms root-mean-square (rms) value of the departures of the profile from the mean line. Rq is sometimes referred to as RMS.
(c) Wa, Wq, Pa and Pq are the corresponding parameters from the waviness and primary profiles, respectively.
(ii) Rv, Rp, Rt, Wv, Wp, Wt, Pv, Pp, Pt
Rv is the maximum depth of the profile below the mean line within the sampling length. Rp is the maximum height of the profile above the mean line within the sampling length. Rt is the maximum peak to valley height of the profile in the evaluation length. Rp1max is the largest of the individual peak to mean from each sample length. Rv1max is the largest of the individual mean to valley from each sample length. Wv, Wp, Wt, Pv, Pp and Pt are the corresponding parameters from the waviness and primary profiles, respectively.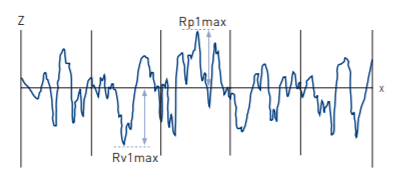
(iii) Rsk, Rku, Wsk, Wku, Psk, Pku
Rsk: Skewness – is the measure of the symmetry of the profile about the mean line. It will distinguish between asymmetrical profiles of the same Ra or Rq.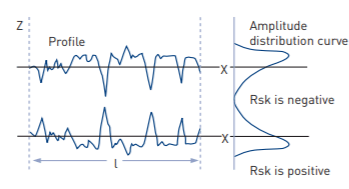

Rku: Kurtosis – is a measure of the sharpness of the surface profile. Rsk and Rku are calculated within the sampling length.
Wsk, Wku, Psk and Pku are the corresponding parameters from the waviness and primary profiles, respectively.
(iv) Rz (JIS), Pz (JIS)
Rz (JIS) also known as the ISO 10 point height parameter in ISO 4287/1-1984, is measured on the roughness and primary profiles only and is numerically the average height difference between the five highest peaks and the five lowest valleys within the sampling length.
Pz (JIS) is the corresponding parameter from the primary profile.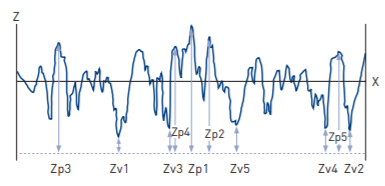 (v) Rz, Wz, Pz, Rz1max
Rz = Rp + Rv and is the maximum peak to valley height of the profile within a sampling length. Rz1max is the largest peak to valley in any sampling length within the evaluation length. Wz, Pz, are the corresponding parameters from the waviness and primary profiles respectively.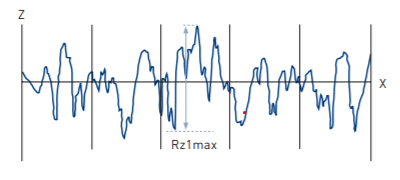 (vi) R3z, R3y (R3z1max)
R3z is the vertical mean from the third highest peak to the third lowest valley in a sampling length averaged over the assessment length. DB N31007 (1983). Where N = number of sampling lengths then. R3y (R3z1max) is the largest of the R3zi, i = 1...N values.
- Spacing Parameters
(i) RSm, WSm, PSm
(ii) RHSC
(iii) RPc
(i) RSm, WSm, PSm
(i) RSm is the mean spacing between profile elements at the mean line, measured within the sampling length.
Where n = number of peak spacings. WSm and PSm are the corresponding parameters from the waviness and primary profiles, respectively.
(ii) RHSCS
RHSC The high spot count is the number of complete profile peaks (within a sampling length) projecting above the mean line, or a line parallel with the mean line.
(iii) RPc
RPc (peak count) and is the number of peaks per unit distance that project through a selectable band centred about the mean line.
In accordance with Amd 1, RPc is now calculated as
Rpc = L/RSm
where L is the reference length (e.g. 1 cm or 1 inch). - Hybrid Parameters
Hybrid Parameters are combinations of spacing and amplitude parameters.
(i) R∆q, W∆q, P∆q, Rλq, Wλq, Pλq
(ii) Material Ratio Rmr(c), Rmr, RSc
(iii) Rpk, Rk, Rvk, Mr1, Mr2
(i) R∆q, W∆q, P∆q, Rλq, Wλq, Pλq Download the notesMeasurement of Finish
Download as PDF Download as PDF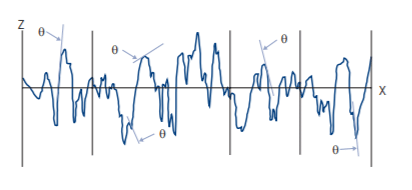

where θ (x) is the slope of the profile at any given point, x.
Rλq is the root-mean-square (rms) wavelength of the roughness profile and is a measure of the spacings between local peaks and valleys, considering their relative amplitudes and individual spatial frequencies.
Rλq = 2πRq/RΔq
W∆q, Wλq, P∆q, and Pλq are the corresponding parameters from the waviness and primary profiles, respectively.
Material Ratio Rmr(c), Rmr, RSc
Material Ratio Rmr(c) is the length of bearing surface at a level c. The level may be defined in different ways. The figure above shows the level defined as a depth below the highest peak.
Rmr is defined as the material ratio determined at an offset relative to a previously defined reference level. Rδc – the height difference between two section levels of given material ratio.
Material Ratio
The material ratio (or Abbott-Firestone) curve below, shows how the material ratio varies with level.
Rpk, Rk, Rvk, Mr1, Mr2
These parameters were specifically designed for the control of the potential wear in cylinder bores in the automotive manufacturing industry.
Rpk is the Reduced Peak Height – the top portion of the surface which will quickly be worn away when the engine begins to run. Rk is the Kernel Roughness Depth – the long term running surface which will influence the performance and life of the cylinder. (The depth of the Roughness Core Profile).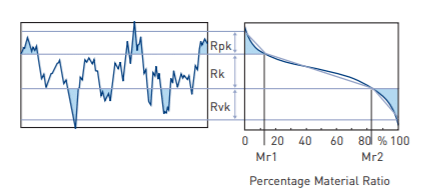
Rvk is the Trough Depth – the oil retaining capability of the deep troughs which have been machined into the surface. Mr1 is the material ratio corresponding to the upper limit of the roughness core. Mr2 is the matrix ratio corresponding to the lower limit of the roughness core.
|
52 videos|54 docs|29 tests
|
FAQs on Measurement of Finish - Manufacturing Engineering - Mechanical Engineering
| 1. What is the importance of measurement in finish mechanical engineering? |  |
| 2. What are some common measurement techniques used in finish mechanical engineering? |  |
| 3. How does measurement contribute to quality control in finish mechanical engineering? |  |
| 4. What are the challenges faced in measurement for finish mechanical engineering? |  |
| 5. How can measurement technology advancements benefit finish mechanical engineering? |  |


