Link Data & Spreadsheets | Information Technology for Class 10 PDF Download
| Table of contents |

|
| Set up multiple sheets |

|
| Rename worksheet – Set up multiple sheets |

|
| Link data and spreadsheets – Creating references |

|
| Hyperlinks in Spreadsheet |

|
Set up multiple sheets
The file of MS Excel is known as a workbook. A workbook contains different worksheets. Observe the following screen shots:
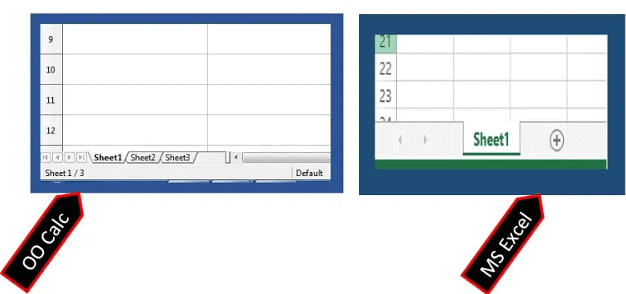
Sheet Tab in MS Excel and OO Calc – Set up multiple sheets
Identify sheets
The file of the spreadsheet software is known as a workbook. A workbook contains different worksheets. These spreadsheets are identified by their names.
OO Calc
OO Calc provides 3 worksheets by default in sheet tabs named Sheet1, Sheet2, and Sheet3. The blank space can be used to insert a new worksheet.
MS Excel
In the above screenshot, the bottom part of the worksheet with the title “Sheet1” is known as the sheet tab. This tab is displayed with a transparent sheet tab color. You can change this sheet tab options as and when you want to do so.
Inserting new sheets
Inserting sheet is the first learning objective in the topic Set up multiple sheets.
MS Excel
MS Excel provides two ways to insert new sheet in the workbook.
- Click on + (New Sheet) icon available next to Sheet1 word.
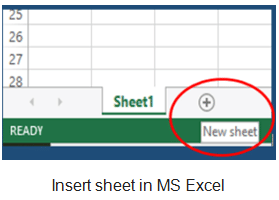
- Click on Home –> Insert Sheet from Cells group.

The new sheet will be inserted to the left of the current sheet with Sheet2 name. Look at the following screen:
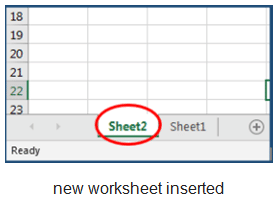
OO Calc
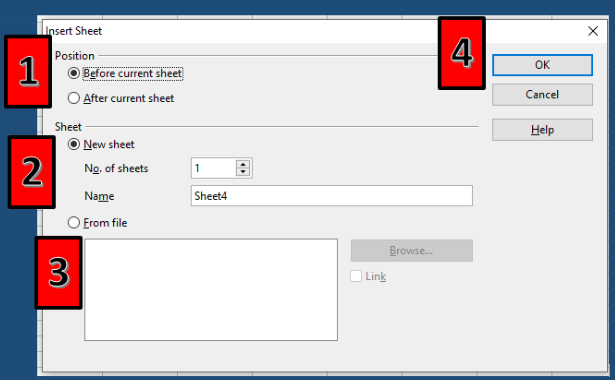
Inserting new worksheet in OO Calc is quite easy stuff. Follow the given steps:
- Click on Insert –> Sheet option. The Insert Sheet dialog box will appear.
- Select the place where you want to insert the worksheet either before the current sheet or after the current sheet. or Click on empty space available in the sheet tab after last worksheet.
- Select the sheet options like New Sheet, No. of Sheets, Name of the sheet, or Chose from file option as per your need.
- Click on the OK button. Observe the following screenshot.
Rename worksheet – Set up multiple sheets
Rename worksheet option allows changing the name of worksheets as per user’s need in place of sheet1, sheet2, etc. It adds more customization flexibility to handle data easily.
MS Excel
To rename the worksheet follow these steps:
Step 1: Select the worksheet to rename with double click on sheet name.
Step 2: Right click on it and choose Rename worksheet option.
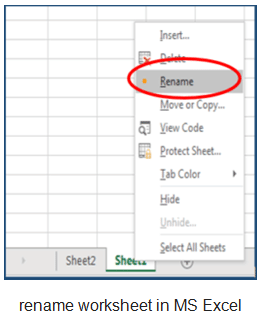
Or Click Home –> Format –> Rename sheet from cells group.
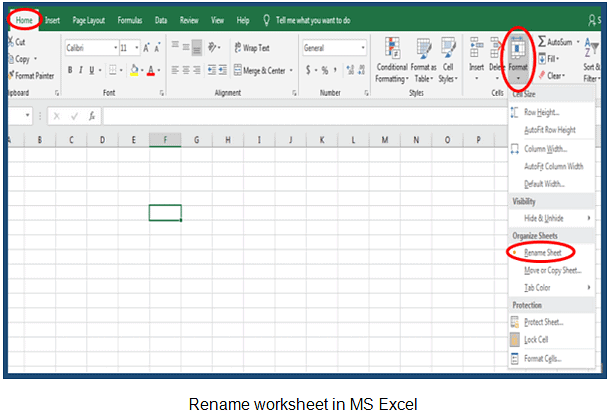
Step 3: Now type the desired new name for your sheet and press enter.
OO Calc
You can rename worksheet by double click and with right click like MS Excel. and another way is given below:
Click on Format –> Sheet –> Rename. and Type the new desired name for the spreadsheet.
Changing the sheet tab color – Set up multiple sheets
Sheet tab color is used to make the sheet tabs colorful and more attractive. To do this follow these steps in MS Excel:
Step 1: Select the sheet from sheet tab to change the sheet tab.
Step 2: Right click on Sheet tab and Choose Tab Color à Desired Color. Observe the following screen shot:

Or click on Home –> Format –> Tab Color –> Desired Color from cells group. Observe this screenshot.
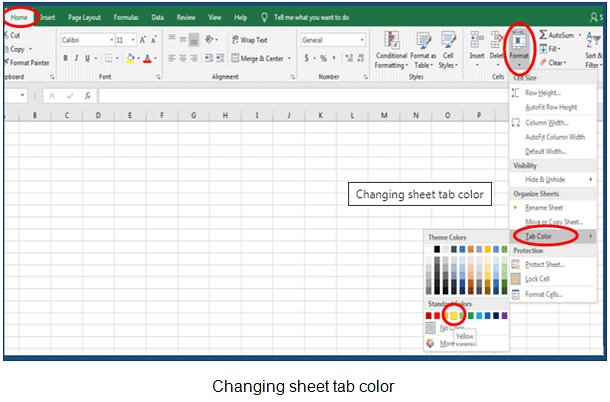
Steps to change sheet tab color in OO Calc:
Right-click on a particular sheet and choose the Tab color option and pick a desired color from the dialog box.
Click on Format –> Sheet –> Tab color and pick a desired color from the dialog box.
Delete the worksheet
Whenever a worksheet(s) is/are not required for the work, you can delete it/them.
MS Excel
Follow these steps to delete the worksheet:
Step 1: Select the worksheet you want to delete.
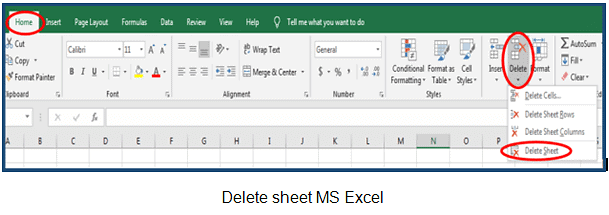
Step 2: Right click on sheet tab and choose delete option.
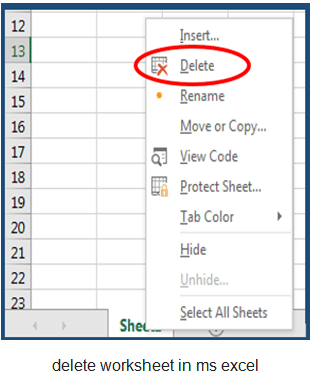
Or click on Home –> Delete –> Delete Sheets option from cells group.
OO Calc:
Right click on a particular sheet to delete. Select delete option.
Click on Edit –> Sheet –> Delete option.
If you want to delete multiple sheets, select multiple sheets.
Move or Copy worksheet
Sometimes we need to move the worksheet data from one sheet to another sheet. If the same date is required in multiple sheets, you can copy the worksheet. You can copy or move worksheet in similar workbook or another workbook as well.
MS Excel
To move/copy a worksheet follow these steps:
Step 1: Select the sheet to move or copy.
Step 2: Right click on sheet name and choose Move or copy option.
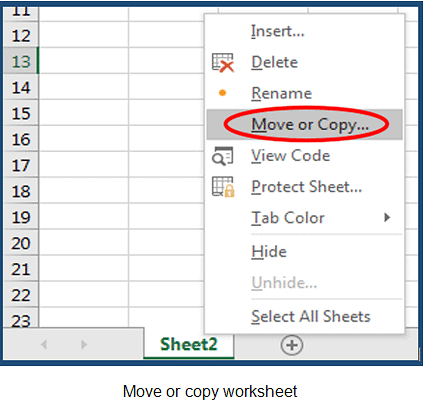
Or click on click on Home → Format → Move or Copy sheet from cells group.
Step 3: Move or copy dialog box opens as displayed in the following screen shot.
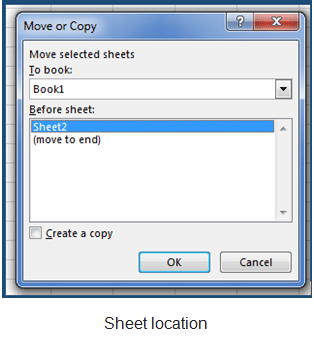
Select desired option as given in below:
OO Calc
Step 4: Click on the OK button finally to place your worksheet at the selected destination.
OO Calc
Right-click on a sheet in the sheet tab and choose the location for the selected worksheet. The selected sheet will be shifted or moved to the particular location.
Link data and spreadsheets – Creating references
For linking data between spreadsheets you need to understand the concept of references.
What is a cell reference ?
A cell reference refers to the particular address of a cell of a worksheet in spreadsheet software. This cell contains data or value in the worksheet. Sometimes it can be a range of cells.
This cell reference can be used for the following:
- In different formulas or function to take the values for computation or calculation
- To display the value of particular cells
- To carry forward data from one worksheet to another
Link data and spreadsheets
Sometimes when you are working with spreadsheet software you need to repeat or use same data values frequently in worksheet. So you can insert value in worksheet and then use that value by a reference in other worksheets.
There are two ways to creating references:
- Using keyboard
- Using mouse
Using keyboard
You can do this by following these simple steps:
- Enter the data into the worksheet for the master sheet.
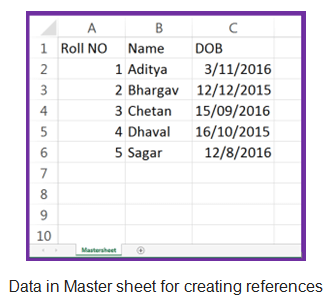
- Insert new worksheet by pressing sheet + F11. Move your worksheet to next to the mastersheet rename the worksheet as Data Entry. In this worksheet we will carry forward Roll No and Names from the mastersheet.
- Now point the cursor in the cell where you need the cell value. Type = in the cell.
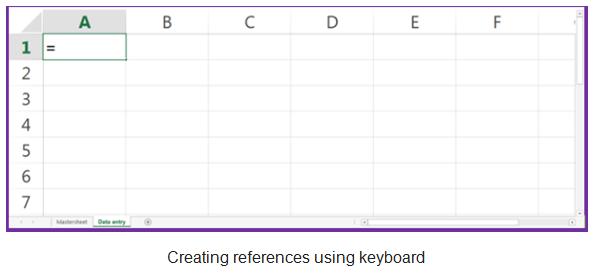
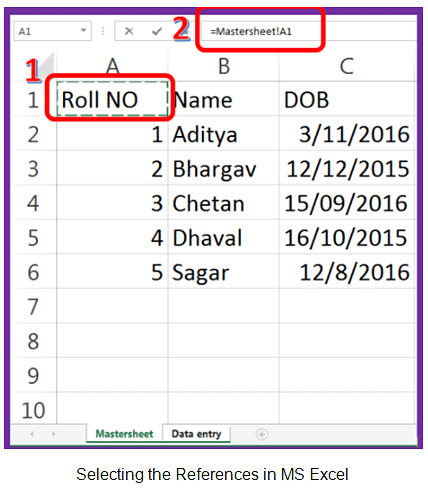
- Now switch to the master sheet to take the reference. (Press Ctrl + Page Up key) and select the cell for the Roll No column. Observe the following screenshot.
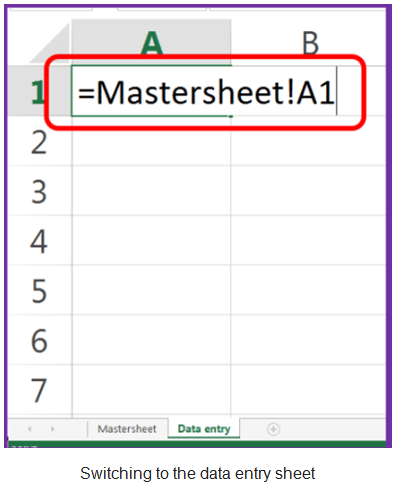
- Now switch to the data entry worksheet by pressing the Ctrl + Page Down Key. Place the cursor where you want to display the referenced value. You will get something like this:
- Press enter when you finished. Repeat the similar steps for the names. Observe the following screen shot.

Using mouse
When you want to create reference using mouse follow these steps:
- Prepare your mastersheet by entering the data.
- Click on + symbol in the sheet tab to insert new worksheet.
- Place the cursor where you want to create a reference.
- Type = and click on mastersheet to switch the worksheet.
- Place the cursor which reference you want to take.
- Switch back to data entry worksheet.
- Click and drag the data as per the requirement.
Hyperlinks in Spreadsheet
As you are aware with links generated from google meet or other web applications to connect different online text based web pages.
Hyperlinks are text based links that allows to redirect or open another file or website in MS Excel.
Create Hyperlink in Spreadsheet
To create a hyperlink follow the given steps:
- Place the cursor where you wan to display the link text.
- Click on Insert –> hyperlink option from Links group. Look at this screenshot.

- Insert hyperlink dialog box will appear. Select appropriate option from dialog box and click on OK button.
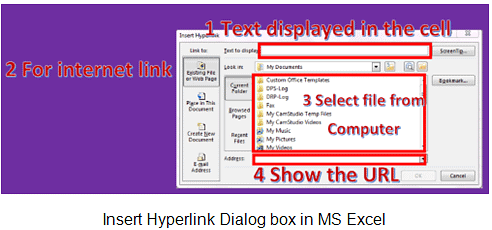
Options
- Existing File or web page: You can select a file from your computer or web page from internet.
- Place in this document: This option allows to select a place like cell references or defined names or ranges.
Edit Hyperlink in Spreadsheet
- To edit hyperlink follow the similar steps as insert hyperlink and do the changes.
Remove the hyperlink from Spreadsheet
Follow these steps to remove link from the excel worksheet.
- Click on the cell where the link is created.
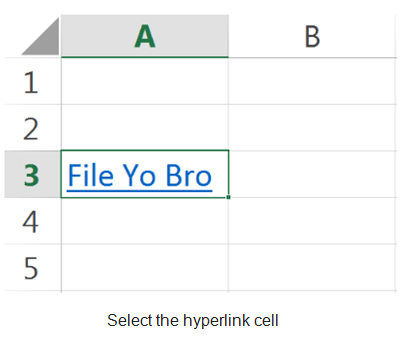
- Click on Insert –> Hyperlink option from Links group.
- The Edit Hyperlink dialog box will appear.
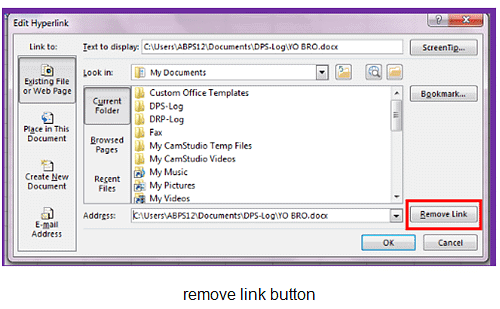
- Find the Remove Link button in the dialog box.
- Click on Remove Link button.
|
4 videos|28 docs|8 tests
|


