Perform operations on the table - Class 10 PDF Download
Insert records in the table
Lets start this article with insert data into a table. You can insert data into table for database table operations in two ways:
- Datasheet View: This option is very simple and easy to insert a record.
- SQL View: This option provides a command to insert a record.
Datasheet View
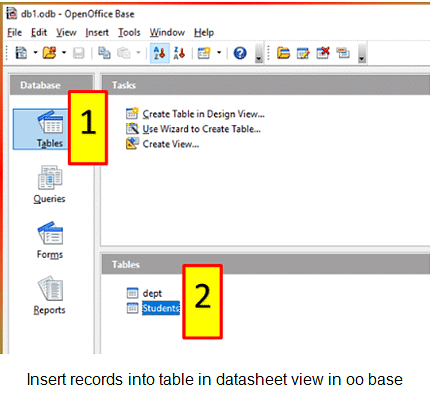
To insert data using datasheet view follow these steps:
Step 1: Open the database and select the table to insert a record.
Step 2: Now double click on the table name.

Step 3: A new screen appears with the title of table and database.

Step 4: Now insert records in the last row. Observe the above screenshot.
Step 5: Save the table when you finished.
SQL Mode
To insert data using SQL mode follow these steps:
Step 1 > Open database.
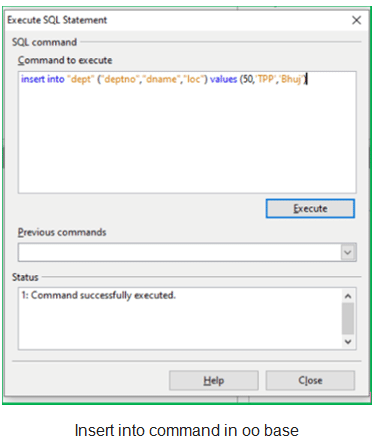
Step 2 > Click on Tools > SQL. A new window appears with the title Execute SQL Statement.
Step 3 > Now type following command to insert record.
insert into "dept" ("dno","dname","loc") values (50,'TPP','Bhuj')
Step 4 >Now click on execute button and click on close button when you get the message “Command executed successfully. “
Step 5 > Click on close button.
Step 6 > Click View > Refresh Table option to see the updated table.
Observe the following screen shot:

You can avoid the column names if you are going to insert all records. Observe this command:
insert into "dept" values (60,'Hospital','Township')
The next operation is edit record operation for database table operations.
Edit records in table
You can edit any records in similar two ways like datasheet view and SQL command.
Edit records in Datasheet view
Follow the below given steps:
Step 1 > Open your database to edit table.
Step 2 > Select your table and double click on it to open it.
Step 3 > Now place your cursor on the record which you want to edit.
Step 4 > Click on Edit > Edit Data or click on edit icon available on the standard toolbar or double click on data you want to edit.
Step 5 > Type the new data as you per requirement.
Step 6 > Save your records.
Edit records through SQL
Open Execute SQL statement window. and type following command:
update "dept" set "deptno"=100 where "deptno"=10
The update command is used to edit records through SQL command. As you have seen in the above command –
- update – is a command to edit records
- tablename – it is a table in which the record needs to be updated
- set – This is a keyword used to set a new value
- columnname = new value – it is a columnname with new value
- where – it specifies the unique record of the table which is going to be deleted
- columnname = value – here the columnname is the column which is having a unique record and the value is a unique value
Delete records from the table
You can delete records from the table using datasheet view and execute SQL statement window. Open the database and table in datasheet view and open the table from you want to delete the record.
Delete record in datasheet view
Place your cursor on the record in the table and do one of the following:
- Click on Edit > Delete Record option. It will ask your confirmation to delete selected data with “Yes”/“No” button.
- Do Right-click and select delete option.
- Select the entire row, do right-click and choose the option Delete Rows and click on “Yes” button to confirm deletion.
Delete record using SQL view
Open Execute SQL statement window and write the following command:
delete from "dept" where "deptno"=100
It is almost similar like update with one difference that is, use delete from tablename command.
Common field Properties
Field properties are useful to restrict or enable data validation in the table.
To change the properties follow these steps:
- Open your database and select the table to change the properties.
- Right-click on a table and select edit option or Click on Edit > Edit option. That opens the table in design view.
- Now select the particular field to change the properties.
The common properties are as following:
- AutoValue – It provides Yes/No type option to accept the value automatically at the time of insertion.
- Entry Required – It is also Yes/No type option to make the field value mandatory at the time of insertion.
- Length – This option is used to specify the total length of the selected field.
- Default Value – This option provides a default value to your field if value is not inserted.
- Format Example – It allows to set your own format for the field values like email format, zip code format etc.
Sorting Data
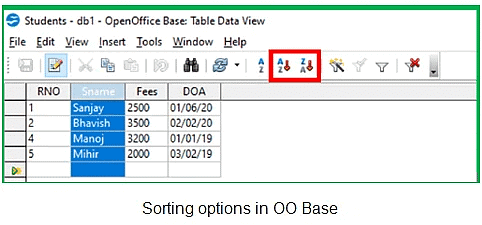
As you know that sorting rearranges the data in an ascending or descending order. To sort data in OO Base, follow these steps:
Step 1 > Select the column which you want to sort.

Step 2 > Now click on appropriate button from the toolbar as highlighted in above screen shot. Your datasheet displays the result accordingly.
What is referential integrity IT?
As now you are familiar with the terms primary key and foreign key which is used for referential integrity. These keys link more than one table with each other. The referential integrity help to maintain the accuracy and consistency of data in the relational database. Let’s start an article referential integrity with advantages.
Advantages of referential integrity in database
- Add records into the referenced table even there are no matching records in the parent table (Primary Key table)
- Update records automatically when changes made to the parent table
- Delete records from automatically from the parent table
- Allows to retrieve linked data as and when required
- Save the time of database developer
- No need to enter the same data in separate tables
- reduce data entry errors
- Summarize data from related tables
Types of relationship
There are three types of relationships:
- One to One: Each record of one table is related to one record of another table.
- One to Many or Many to one: Each record of the table is related to one or more than one records in another table.
- Many to Many: This type of relationship links or more records with one table to another table’s one or more records.
Creating and Editing relationships between table
Now we will see how to create a relationship using OO base for referential integrity. By using relationship we are going to provide a connection or link or association between two tables. Hence it avoids data redundancy, in simple words, data duplicity can be avoided.
Steps to Create a relationship in OO Base
Create table to create relationship with primary key and foreign key. You can create relationship in two ways:
- Through Menu: Insert > New Relation
- Drag and Drop > Drag Primary Key column to related column into the another table
Follow the below given steps to create relationship in OO base.
- Click on Tool > Relationships. A new window appears to add tables in the relationship.
- If tables are not available, click on Insert > Add Tables option or click on Add Tables icon on the taskbar.
- Click on Insert > New Relations. A new window appears to select the Tables, fields, update options, and delete options. Select appropriate fields and options then click on the OK button. If you want to create a relationship using drag and drop click on the field of the primary key of one table and link them with the foreign key of the child table.


Similarly, you can set the relationship of other types as well. When you add a relationship, the relation design window show one line that connects your tables.
Remove Relationship
Removing relationship is quite simple. You can remove this relationship using one of the following:
- Click on connecting line and press delete key.
- Click on connecting line and do right click, then select Delete option.
Edit relationship is quite similar to delete relationship, click on connecting lines and do right click on table and select edit option.


