Office Tools Chapter Notes | Computer Science for Grade 9 PDF Download

Introduction to Word Processor
- Word Processing Packages are the set of programs written specifically for text manipulation. Word processing mainly involves operations like creating, editing, viewing, searching and replacing, formatting, saving and printing text. Various Word Processing Packages also allow us to design and include various pictures, graphs and charts in the text. With personal computers becoming quite affordable, their quality of being versatile and with the use of e-mail, office correspondance has improved a lot. Desktop Publishing has been revolutionized and the quality of results is astonishing.
- Many softwares have been developed till now for Word Processing, e.g., Wordstar, Word Perfect, Page Maker, MS Word etc. Out of these, the most popular is MS Word (Microsoft Office) alongwith PowerPoint and Excel packages. This software needs a windows platform to work in. In this book MS Office 2010 has been used.
Ms Word
In this section, we will study about MS Word. We will learn how to start MS Word, create documents, save and print them and how to use various features of MS Word to improve the presentation of our document like
- Editing using Cut, Copy, Paste, Find and Replace
- Formatting by changing font, size, colour and alignment
- Using spelling and grammar check
- Inserting Word Art, Clip Art and Pictures and Tables
Getting Started
Method (1): Start → All Programs → MS Office 2010 → MS Word 2010
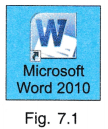
Method (2): If you find MS Word icon shown in Fig. 7.1 anywhere on your screen, just double click.
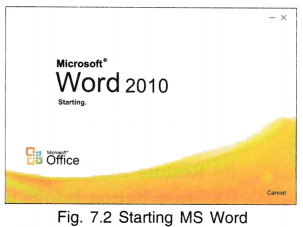
You will get a screen introducing you to MS Word (Fig. 7.2) and then the workscreen shown in Fig. 7.3 will appear.
MS Word Window
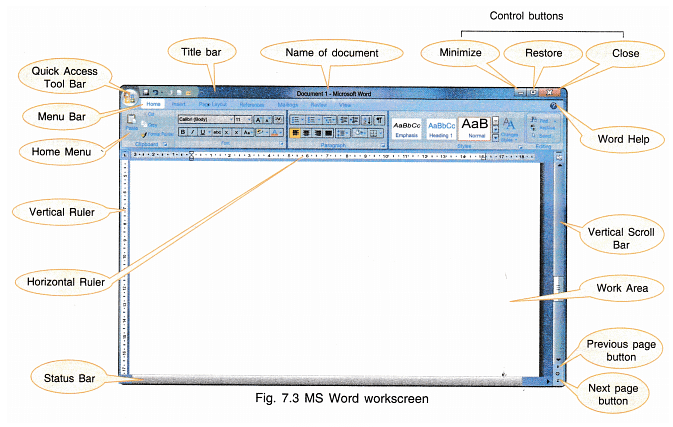
The MS Word workscreen (Fig. 7.3) has the following items displayed on it:
1. Title Bar: The various components of title bar are:
- Control Menu Button: On the extreme left upper corner of the window, there is a small icon same as that for MS Word. This is actually a button which is called control menu button. If you click on this button, you will get another menu showing a list of options — Restore, Minimize, Maximize, Close etc.
- Restore reduce the maximize window size to minimize window and when clicked again restores the minimize window to maximize window size.
- Minimize option reduces the window size to a button on the lowermost portion of screen i.e., on the task bar. The application still remains active.
- Maximize option restores the application window to its original size.
- Close option makes us exit the application.
- Name of Application: Control menu button is immediately followed by the name of the application and the file name.
- Control Buttons: On the extreme right upper corner of the window, there are three buttons — Minimize, Restore and Close Buttons.
- Minimize button reduces the window to an icon on task bar but Word still remains active.
- Restore button again brings Word window to the maximum original size.
- Close button brings us out of Word.
2. Menu Bar: It displays the Word Menu —File, Home, View, Insert etc.
- You can select any of the options by either clicking the mouse on it or by using shortcut which you get when you press Alt + Ctrl key which is next to the space bar.
- Select any option and you will see a submenu. This menu tells you about the additional functions provided under the selected option.
3. Rulers: There are two rulers for each application window — horizontal ruler and vertical ruler. The horizontal and vertical rulers align text, graphics, tables and other elements in the documents. The length of tab can also be adjusted.
4. Workspace: It is the area where the text can be entered.
5. Vertical Scroll Bar: It is used to move backwards or forwards in the document.
6. Previous Page Button: It displays the previous page of the document.
7. Next Page Button: It displays the next page of the document.
Creating a New Document
From the menu bar of Word window, click File option. You will get a pull-down menu.
It has a number of options:
- Click New and you will have a new window showing the type of documents you want to create.
- You can also open a new document by clicking option from standard tool bar.
- Click on Blank Document.
- Click Create on right bottom corner to get a blank document.
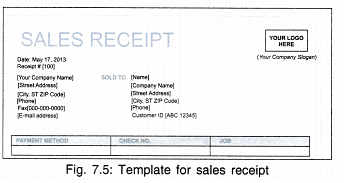
Templates
Templates are the formats for documents which are already available in MS-Word or if your computer is connected to the Internet many more can be accessed from office.com Templates.
- Click File → New.
Templates are for office documents like Budgets, Business cards, Contracts, Plans and Proposals, Personal like invitations, letters, resumes. For most of the templates there are further options for different styles of templates e.g., resume itself will have 3-5 templates for different styles of writing the resume.
You can choose the template you want and replace the text by your own data.
If you want to create any such type of document just choose the related template. Fig. 7.5 shows the template for sales receipt.
Save the Document
Select the File option from menu bar. You will find two options: Save and Save As (Fig. 7.6). Save will save the document with the default name (name given by Word), e.g., Document 2. If you want to save your document with any other name, click Save As.
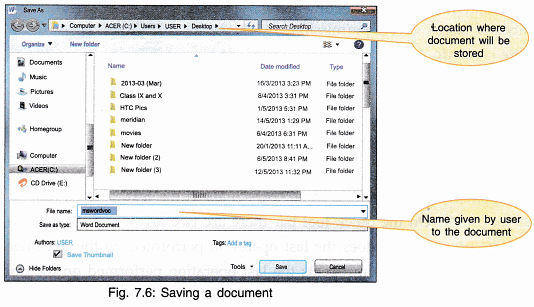
The window in Fig. 7.6 shows the folders in which you can save the file. Choose the desired location.
- Enter a file name at the bottom of the window and click the option Save.
- The document will be saved with a name given by you in the folder displayed in the address line.
Opening a File
If you want to open an already created file, choose File option from menu bar.
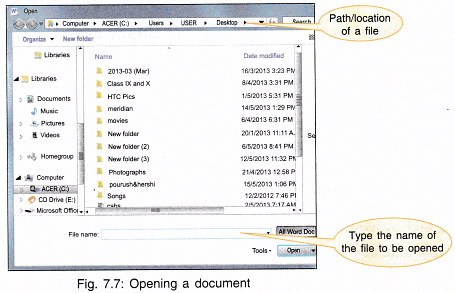
- Choose Open.
- Choose the correct folder and then type the file name.
- You can also display the open window from the standard tool bar by choosing option.
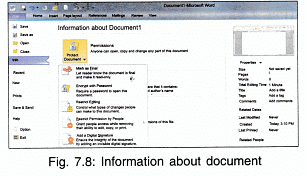
Information about the Document
To get information about the document e.g., size, number of pages, access permission etc.
- Click File → Info.
Editing and Advanced Formatting Options
Editing a Document
Editing a document means making some corrections in the text.
1. Undo and Redo: On the quick tool bar there are two arrows for redo/undo.
- Undo (Ctrl + Z): It undoes the last operation performed on the document.
- Redo (Ctrl + Y): It again repeats the last operation performed on the document.
2. Selecting a Section of a Document: Click mouse at the start of the section. Keeping the mouse button pressed, drag the mouse to the last word of the section and release the mouse button. Selected section will appear in reverse screen mode, i.e., if the document is displayed as black text on white background, the selected text will appear as white on black background.
3. Cut (Ctrl + X): This option is used to remove the selected text or graphic from a document.
- Select some Text using drag and drop method.
- Select Home from menu bar.
- Click Cut.
The selected portion will disappear from the document and will go to the clipboard.
Another Method: Choose X from standard tool bar to cut the selected text.
Suppose you want the disappeared section of the document to appear again, then
- Click Undo.
The disappeared section again appears in the document.
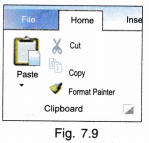
4. Copy (Ctrl + C): It is used to copy the selected text or graphic from the word document to the windows’ clipboard. The selected object does not disappear from the document.
- Select some text.
- Choose Home from menu bar.
- Click Copy.
5. Paste (Ctrl + V): It copies the contents of the clipboard on to the document where the cursor is positioned.
- Place the cursor in the document at the required position.
- Select Home.
- Click on Paste.
If we choose Cut and then Paste the object, the object is removed from its original position and pasted at the position of the cursor. But if we choose Copy and then Paste the object, it remains at its original position and also gets copied at the new insertion position.
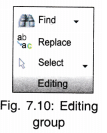
6. Find (Ctrl + F): This is a very useful option which helps us in searching a particular word, set of words, characters, fonts etc. It also allows us to find words which sound like the selected word and can also find all the forms of the word. You can search in a particular portion of a document or in the whole document. To get Find dialogue box
- Select the part of document in which search is to be performed.
- Click Find from Editing group on Home Ribbon.
- Advanced Find and the box shown in Fig. 7.11 appears.
7. Replace (Ctrl + H): This option is used to first find the word and then replace it with the given word.
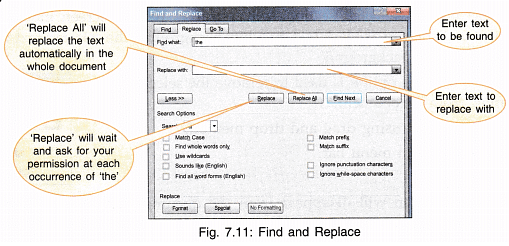
- Click on Replace.
If you only want to find, click Find tab. Click Replace tab if you have to replace the word after finding it.
There are several search options to choose from such as:
- Match Case: Finds the word only if the case matches, i.e., matches lower case with lower case and upper case with upper case.
‘the’ does not match with ‘The’. - Find Whole Words Only: Finds the word only at places where it appears as an independent word and not as a part of another word e.g., another —will not be matched with ‘the’.
- Use Wildcards: Searches for wildcards, special characters. Click Special button at the bottom of the dialog box for this option.
- Sounds Like: Finds and matches homophones also, e.g., ‘see’ will match with ‘sea’.
- Find all Word Forms: Finds and matches all forms of the Find what text.
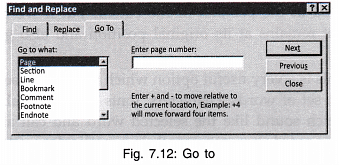
8. Go To (Ctrl + G): It helps us in reaching a particular position in our document quickly. We can go to a page, section, line, footnote, table, heading etc:
9. Select: Text and objects in the documents can be either selected by drag and drop method or
- Click Select from editing group.
- Click Select All.
Formatting a Document
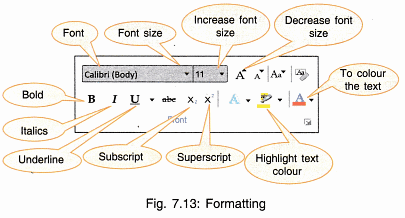
Formatting basically refers to how the text is written, arranged and its appearance in the document. There are various options for formatting which can be viewed on the Formatting Bar.
1.Font: It refers to the style or the script of writing the characters.
- Click on ▼ arrow head and a number of fonts will appear. Select any font from the font selection bar. Whatever you type now will be typed in the selected font.
- If text is already typed and the font has to be changed then
- Select the text.
- Choose the font.
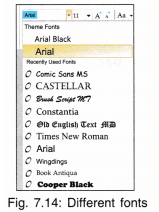
- The font of selected text changes to the new font.
2.Font Style: There are four types of font styles: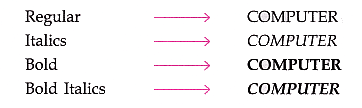
- Select any style from the font style bar B I U on font tool bat as shown in Fig. 7.13.
- Before doing any formatting, select the text that has to be formatted.
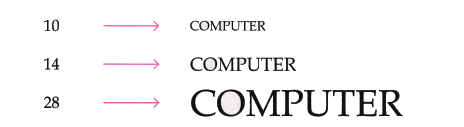
3. Font Size: You can change the font size also by clicking the required size from the font size bar. Font size is measured in points where 1 pt = 1/72 inches i.e., 1 inch is equal to 72 points.
4. Underline: The selected text can be underlined using the options shown below:
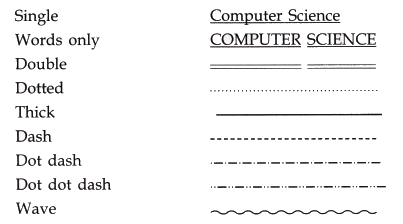
Font tool box also has an option for single underline B I U
5. Colour: The font colour can also be changed by selecting the required colour from Color Bar.
Colour options can be Black, Green, Yellow, Blue, Red, White etc. Use
6. Effects: Special effects like the following can be put to the text abc

- Select OK to apply the effect.
7. Superscript/Subscript: Text can also be superscripted or subscripted by selecting the text and then using the required tool X2 , X2
- Superscript is generally used when we have to write exponents x2 or temperature °C or °F.
- Subscript is used when we write chemical formula e.g., H2O or CO2.
Type CO2, select 2 and then select the subscript checkbox. It will appear as CO2.
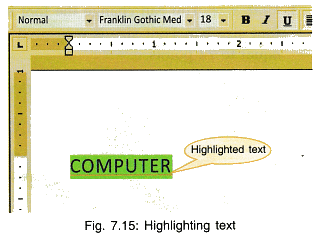
8. Highlight: On the font tool bar, there is an option . This is for highlighting the selected text (Fig. 7.15). The colour can be chosen by using the down arrowhead.
9. Change Case: The next option in Font box is the Change Case which can be used to change the case of the selected text i.e., capital letters to small letters and vice versa.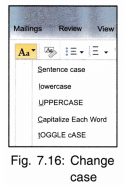
It has following options:
- Sentence Case: First character of sentence is m upper case and
- the rest of the text is in lower case.
- Lower Case: Every character is changed to lower case. lowercase
- Upper Case: Every character is changed to upper case.
- Capitalize Each Word: First character of each word is in Upper Case
- Toggle Case: Upper case characters change to lower case and lower case characters appear as upper case.
10.Paragraph: This option is present on Home Tab. It contains the tabs for adjusting the text in document with different spacing and borders.
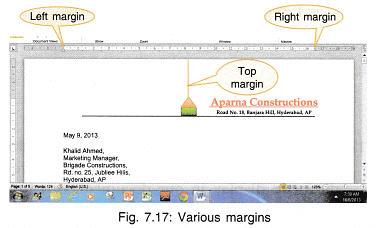
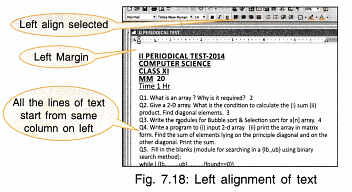
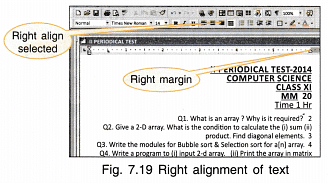
11. Text Alignment: In Fig. 7.17 you can see left and right margins on the horizontal ruler. These margins can be adjusted by dragging the indent left or right. Once the margins are set, the typed text gets adjusted between these margins
- The text can be adjusted such that all the lines start from the same left margin (left aligned).
- All the lines end at the same margin (right aligned).
- The text is adjusted in the centre (centre aligned).

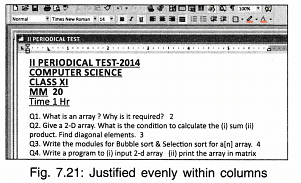
- All the lines start at the same column and end at the same column (justified).
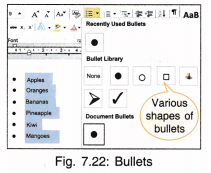
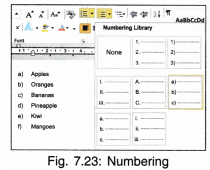
12. Bullets and Numbering: This option is used when we have various points in our text which we want to distinctly display in our document as a list. The list can either be numbered 1, 2, 3 or a, b, c Instead of numbers and alphabets we can put bold dots called bullets.
- Click Bullets and then start typing the text.
- A bullet appears as soon as enter key is hit.
- Bullets can be discontinued by again clicking on the Bullet tab.
The shape of a bullet can also be changed. Multi level lists can also be formed.
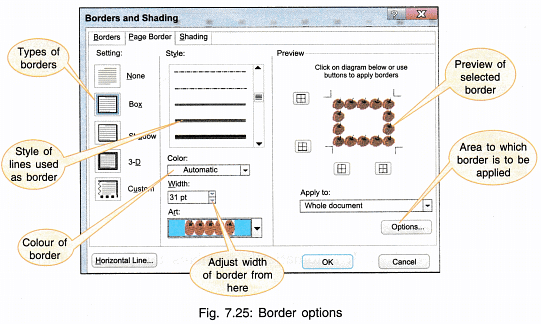
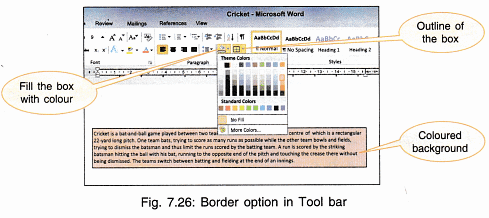
13. Borders and Shading: To have a border around the text and also background colour,
- Click on the Border arrow head and a dropdown menu will appear (Fig. 7.24).
- Select Borders and Shading.
- Choose the required border (line or art) and thickness (for line border).
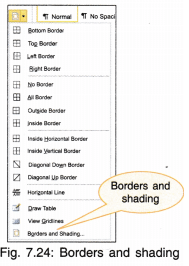
- The same effect can be achieved from the tool bar also (Fig. 7.26).
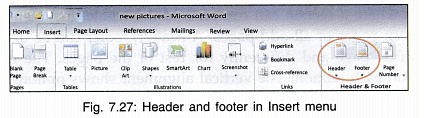
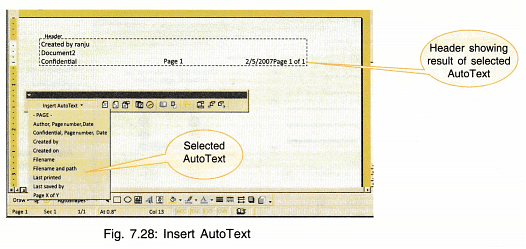
14. Header and Footer: Header and Footer are separate sections on a page reserved for specific text. A header appears at the top of the page and a footer appears at the bottom of the page. Header and footer can be same or different for each page. These may include information (textual or graphical) about the document e.g., date of creation, author, page number, file name etc.
- Click on Insert on menu bar to get a pull-down menu.
- Choose Header and Footer to get a screen as shown in Fig. 7.27.
The header and footer tool bar shows the following tools:
- Insert AutoText: It has various options which can be seen by clicking on the arrow head. Some of them are page number, author, date, file name etc.
- Insert Page Number: It automatically numbers the pages and inserts a page number on each page.
- Insert Number of Pages: It displays the total number of pages in the document.

- Format Page Number: It shows different ways in which you can write page numbers.
For example, 1, 2, 3,
or a, b, c
or i, ii, iii etc.
You can include chapter number also. If the document has various sections then you can either continue numbering from previous section or can start independently in the current section. - Insert Date: The current date is inserted in the header.
- Insert Time: Current system time gets inserted.
- Page Setup: The margins of header and footer from edge are 0.5″ by default but can be changed by the user. The layout button in Page Setup dialog box helps us to decide where to start the section from. The document can be divided into sections where a section can comprise of the whole document or a single page or all even pages or all odd pages. A header/footer can be designed separately for the first page and differently for rest of the pages. The header and footer appear on each section. The vertical alignment shows options like top, bottom, justified etc. for the user’s choice to align the text vertically between the top and bottom margins. Partial pages are aligned with the top margins. The justified setting affects only full pages.
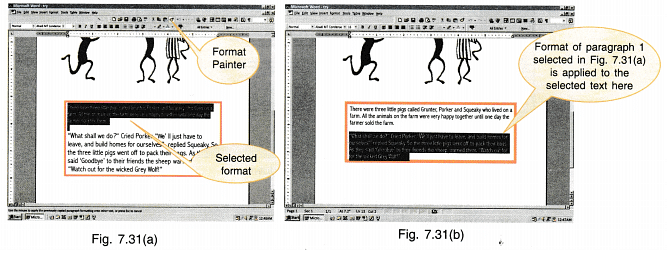
15. Format Painter: This tool copies the format from a selected text or object and copies it to the object or text you click on. When we select format painter, the mouse takes the shape of its icon, i.e., a brush. You can apply the format to one or to more than one items.
To apply format painter to one item:
- Select the formatted text.
- Click on Format Painter icon once.
Select the text to be formatted.

To apply Format Painter to more than one items:
- Select the formatted text.
- Double click on Format Painter.
- Keep on selecting the text to be formatted
- Click on Format Painter to deactivate it.
Format Painter cannot be applied to WordArt Text for font and font size.
Working on Multiple Documents
View
Another very useful option on menu bar is View. Some of the tools are discussed here.
- Zoom: To magnify the view of the document.
- One Page/Tivo Pages: To view one page or two pages arranged side by side together.
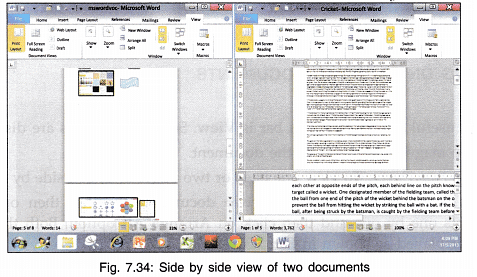
- Arrange All: If you want to view two documents together then open both the documents one by one and then click on Arrange All option. Both the documents will be displayed as shown in Fig. 7.32.

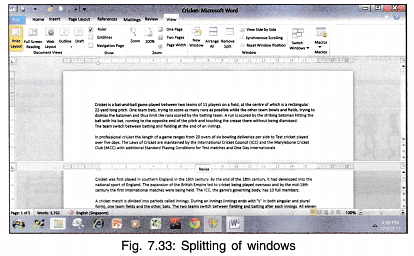
- Split/Remove Split: The current window can be split into two parts so that different sections of the document can be viewed at the same time.
- View Side by Side: This tool helps to view two different documents side by side which makes comparing the document easier.
Review
This option on menu bar has several tools for making correction in the document as shown in Fig. 7.5. A few are discussed below.
1. Spelling and Grammar
This tool helps in checking the spelling and grammar in the document. Any misspelt word gets a red underline. Click right button on mouse to find the correct spelling.
Similarly, all grammatical mistakes get a green underline. Fig. 7.35
 Again click right button on mouse to view the correct version. Click to make the changes or choose Ignore if you want no corrections.
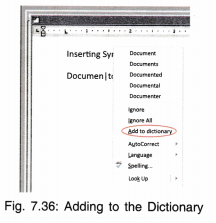
(i) Adding Word to Dictionary:
If spell check is active and document is typed as documents, then a red wavy line will appear under it indicating spelling mistake.
- Right click on mouse and a menu will appear.
- This menu shows all the related spellings from which you can choose the correct spelling.
- It also has options for Ignore if you want to let the spelling be like that.
- Add to Dictionary option will add this new spelling to the dictionary of MS Word and in future, will not consider it to be a spelling mistake.
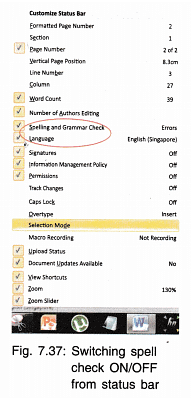
(ii) Turning Check: By default spell check is ON. To turn it off:
- Right click on Status Bar.
- Click on the check box against Spelling and Grammar check.
- The / sign will vanish. This means that Spell and Grammar check is not activated.
(iii) Using AutoCorrect: MS Word automatically corrects the error it finds in the document like spelling mistake or an extra blank or extra special character. Auto correct has many options which can be set by
- Click File from menu bar.
- Click Options under Help.
- Click Proofing and the following dialog box appears:
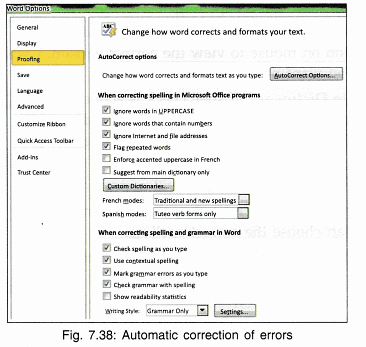
- Check the boxes for the option you want to implement.
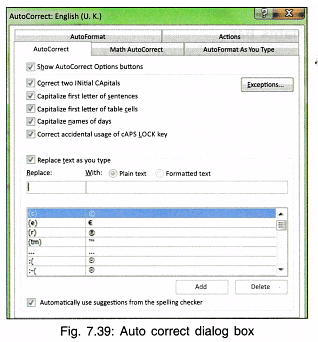
- Further for the Auto Correct dialog box, click AutoCorrect Options.
- Check the options from the dialog box (Fig. 7.39).
Thesaurus
It has synonyms (words with same meaning) and antonyms (words with opposite meaning) for almost every word. Just right click on the word and from shortcut menu choose synonyms and you will get a whole list of similar meaning words.
Creating and Working With Tables
Insert Table
Many a times data has to be entered in rows and columns which form a table. To insert a table:
- Choose Table from Insert box.
- Drag mouse over number of columns and rows you want.
- As soon as a table is inserted in the document a Table Tools menu appear.

It has two options:
1. Design Option: It provides tools for choosing different Table Styles, adding Borders and Shading to the table as a whole or to individual cells.
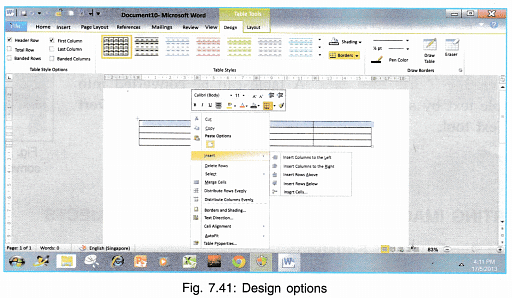
2. Layout Tool Bar: It allows us to insert/delete rows and columns, adjust height and width of cells, align text in cells etc.
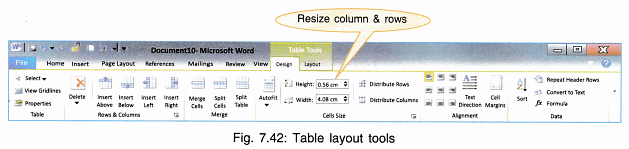
Other options available under layout Tool bar are:
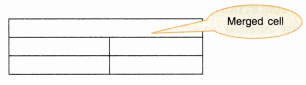
- Merging and Splitting
- Merging of cells means joining to cells to make a single cell.
- Splitting a cell means making two or more cells in a single cell.
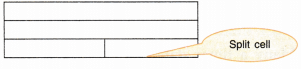 Options for Merging and Splitting and many others are available on Layout Tool bar and also on the shortcut menu (right click).
- Merging of cells means joining to cells to make a single cell.
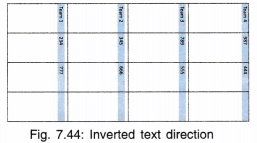
- Changing Text Direction: Text direction can also be changed in the table by clicking on Text Direction Tool (Fig. 7.43 and 7.44).

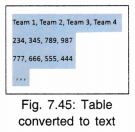
- Converting Table into Text: A table can be converted into simple text by selecting the table and then selecting Convert to Text tool.
Inserting Images, Drawings and Gallery Objects
Insert Symbols and Equations
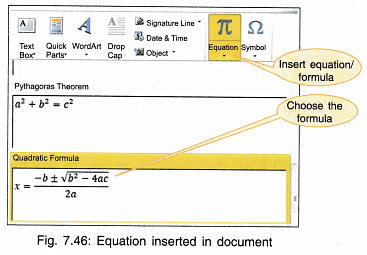
Some of the equations very frequently used in Mathematics are time-consuming to type in a document. So Word gives us the facility of readymade available equations which can be directly used by the user with his own user-defined value e.g., if the standard form is
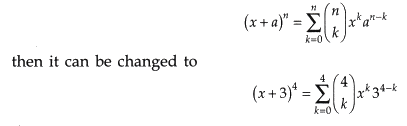
To Insert an Equation:
- Click Insert on menu bar.
- Click Equation.
- Choose the readymade equations or for a new equation click ‘Insert new equation’.
- Change the variables by clicking on them and retyping the new values.
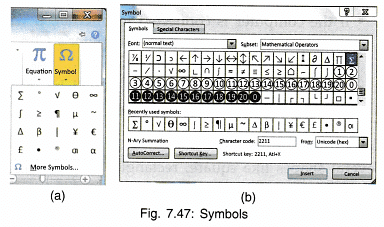
To Insert a Symbol:
- Click Insert on menu bar.
- Click Symbol from Symbols group.
- Choose the required symbol or click ‘More Symbols’ for a list of other symbols and special characters.
- Select the symbol and click Insert to insert the symbol at the cursor position in the document.
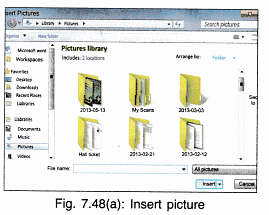
Insert Picture
Any picture present in a file or on web can be inserted in the document by
- Insert → Picture.
From the screen which appears, choose the location and then the file which contains the picture to be inserted. Click Insert [Fig. 7.48(a)]. The picture will be inserted at the cursor position in the word document.

Formatting the Picture
- When you click on the picture, resizing handles appear around the picture which can be dragged in and out to change the picture size.
- Also a picture tool bar appears which can be used to format the picture.
- Cropping means cutting the portion of the picture from any/all the sides.
- Click Crop and take the cursor to resizing handles.
- The shapes of the cursor changes to /— . Pushing the cursor inside the picture will delete the portion of the picture between the border and the cursor.
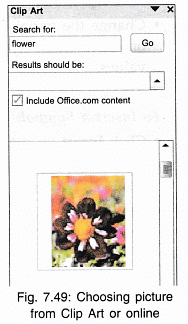
Insert Clip Art
If you don’t have the required picture in any file then you can use pictures from Clip Art gallery. MS Word comes with a library of picture files.
- Click Insert → Clip Art.
- Type the names of picture (flower) [Fig. 7.49],
- If the computer is connected to Internet, it will show all the pictures of flowers from computer’s Clip Art Gallery as well as from Online Office Gallery.
- Click on the required picture. It will be inserted at the cursor position in the document.
Insert Shapes
Several shapes like square, rectangle, star, arrows etc. can be selected from the shapes menu and inserted in the document by a click of mouse. When a picture or shape is inserted, its size can be increased or decreased by dragging the handles. Shape can also be rotated by rotating the green dot.
- Click Insert → Shapes → Choose the required shape.

Formatting the Drawing
- Click on the shape to select it.
- A menu for Drawing Tools appears.
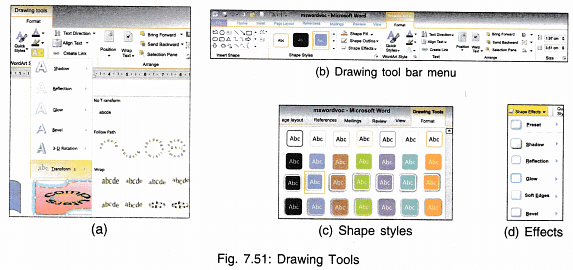
- Shape can be filled with different colours using Shape Fill option.
- You can also choose a colour for outline of the shape using Shape Outline option.
- Shape can be given 3D or shadow effect also by Shape Effects.
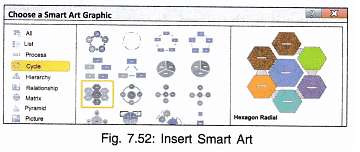
Insert Smart Art
- Click on Insert → Smart Art.
- From the menu (Fig. 7.52), choose a smart graph of your choice and it will appear in your document.
- The text in shapes can be changed by selecting and then retyping.
Insert Page Number
Page number can be inserted using page number option from Header and Footer box. Page number can either be on the top/bottom/bottom left/middle/right etc.

Header and Footer
A heading having the title of document, date, name of author etc. can be inserted either on the top of each page of the document (called header) or at the bottom of each page (called footer).

Inserting Text box
Sometimes we have to write text on a picture or any other object so we use a text box.
- Click Text Box.
- Bring the cursor in work area.
- Drag the cursor diagonally. A box will appear.
- Drop the mouse at the required size.
- Now you can enter data in the box.
- This text can be selected and formatted as normal text.
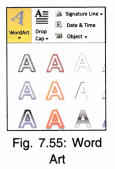
Inserting WordArt
When the text has to made decorative e.g., for headings, type the text, select it and then choose the required WordArt from the Text menu of Insert.
Inserting Date and Time
- Click on Date & Time in Text Group of Insert ribbon.
- From the available formats choose the required format.
- Click OK. The current date and time of the computer system will get inserted at the cursor position in the document.
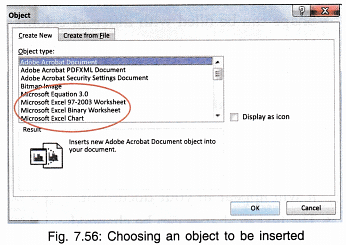
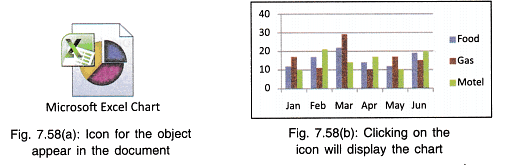
Inserting Objects
Objects may be a pdf file, a bitmap image, Excel sheet, Excel chart, a PowerPoint slide etc.
To create a new object and inserting it in the word document:
- Click Objects from Text Group on Insert ribbon.
- Select Object.
- Select object from the list to Create
- Click OK. The object will get inserted in the document with the related menu bar and tool bar displayed.
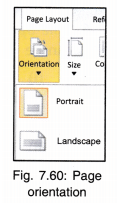
Page Layout
Page layout refers to how the setting of text is done on the page. The parameters displayed in Page Layout menu are shown in Fig. 7.59. A few are discussed below.

1. Orientation: Page can be placed horizontally (Landscape) or vertically (Portrait). Default orientation is Portrait
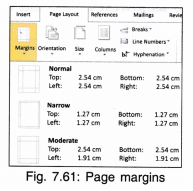
2. Margins: The spaces left on the top, left, right and bottom of the page around the text are called margins. There are some built-in margin settings but you can set own margins using CustomMargins option.
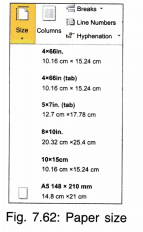
3. Paper Size: In offices, papers of different sizes are used for different purposes like A4, B5, A3, envelop etc. You can choose the paper size from the page setup group and the work area will be set according to the paper size.
4. Indents and Spacing: Indentation sets the position of text in relation to the left and right margins. Following indents are available in MS word:
- Left: Indents a paragraph from the left margin by the amount you enter in the box.
If you want text to appear in left margin, enter a negative number. - Right: Indents a paragraph from the right margin by the amount you enter in the box.
A negative number will print text in right margin.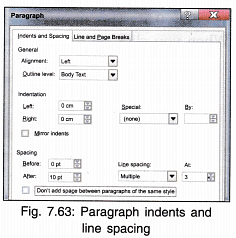
- Special: It has two options:
- First line—which is to indent only the first line of the paragraph;
- Hanging—which is to indent all but the first line of a paragraph.
- By: The amount entered here decides the indentation for first line or hanging indent.
5. Spacing: Sets the amount of space between lines and between paragraphs.
- Before Sets the space above each selected paragraph.
- After Sets the amount of space below each selected paragraph.
6. Line Spacing: Sets the amount of vertical space between lines of text. Line spacing can be
- Single: Sets a single spacing between the lines and the preview of paragraph can be seen in the dialog box.
- 1.5 Lines: Sets spacing to one and a half of normal spacing.
- Double: Sets double spacing.
- At Least: Sets a minimum line spacing if different fonts are used in the text.
- Exactly: Sets exact spacing.
- Multiple: Sets line spacing starting from 0.5 as lowest range and can be set to any point.
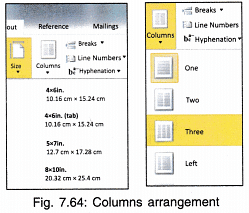
7. Columns: You must have seen how data is arranged in several columns on a newspaper. You can do the same in your document by using Columns tool.
- Select the text.
- Click on Columns.
- Choose the number of columns.
- Text will get arranged in columns.
Using Tabs Option
Tabs are used to arrange the spacing of characters in a line. By default, the tab stops are at every 0.5″. This means when tab key is pressed once, the cursor moves 0.5″ forward. When you click on the extreme left of the ruler bar you will see the symbols changing.

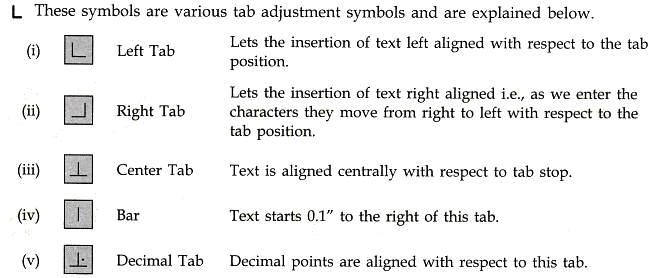
- Tabs can be set by making measurement entries in the tabs dialog box.
- Tabs can also be set by clicking on the extreme left tab button of ruler for selecting the required tab, then clicking at the required tab position on the ruler.
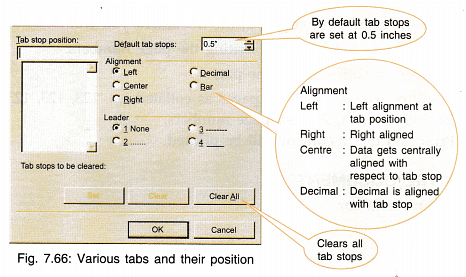
- Tab can be removed by dragging the tab marker out of the ruler.
- To change the position of the tab, it can be moved on the ruler with the help of mouse.
Printing a Document
After the document has been typed and formatted, to print it click Print on File Tab.
- You can enter the number of copies of the document you want.
- Print all pages or selected pages by writing the page numbers.
- Print on one side or both sides of the page.
- In case of multiple copies print the pages as collated i.e., 123, 123, 123 or mediated i.e. 111, 222, 333 where 1, 2, 3 are page numbers.
- Click on Print and the document will be printed.
Closing the Document
- Choose File from menu bar.
- Click Close.
Another way of closing the document is to click [x] close button from the extreme top right corner of the document.
|
51 videos|44 docs|9 tests
|


shortcuts and tricks
,Free
,Important questions
,Semester Notes
,Sample Paper
,study material
,video lectures
,Viva Questions
,Office Tools Chapter Notes | Computer Science for Grade 9
,Office Tools Chapter Notes | Computer Science for Grade 9
,mock tests for examination
,Objective type Questions
,practice quizzes
,Extra Questions
,Previous Year Questions with Solutions
,Summary
,MCQs
,past year papers
,Exam
,Office Tools Chapter Notes | Computer Science for Grade 9
,ppt
;


Chapter Notes: Office Tools Free PDF Download
Importance of Chapter Notes: Office Tools
Chapter Notes: Office Tools
Chapter Notes: Office Tools Grade 9 Questions
Study Chapter Notes: Office Tools on the App
|
© EduRev
|
Education Revolution
|


|


within 7 days!