How to Convert Java Code to Kotlin Code in Android Studio? - Software Development PDF Download

How to Convert Java Code to Kotlin Code in Android Studio?
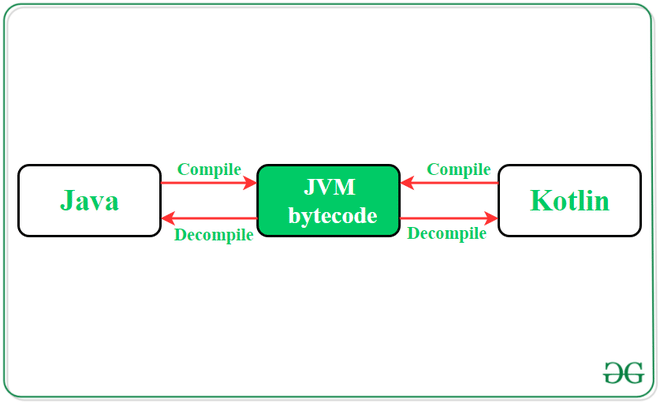
Last Updated : 31 Jan, 2021In 2017 at Google I/O, Kotlin was announced as an official language for Android app development. Its rapid acceptance among developers stems from its compatibility and interoperability with Java. Kotlin allows for seamless integration of Java and Kotlin code within an Android project, addressing challenges such as null pointer exceptions effectively. Consequently, learning Kotlin has become indispensable, and Android Studio facilitates this by enabling developers to convert Java code to Kotlin effortlessly. The primary scenarios developers encounter are:
- Converting an entire Java File/Class into a Kotlin File/Class
- Adding a new Kotlin file/class in the project and converting a segment of Java code
This article delineates the step-by-step process involved in converting code for both scenarios.
Converting a complete Java File/Class into Kotlin File/Class
When converting a full Java File/Class into a Kotlin File/Class, developers can seamlessly migrate their entire codebase from Java to Kotlin, ensuring compatibility and functionality in the new language.
Steps to follow:
- Open Android Studio
- Locate the Java File/Class to be converted
- Right-click on the file
- Select 'Convert Java File to Kotlin File'
- Review and adjust the converted code as needed
Add a new Kotlin file/class in the project and convert a piece of Java code
For this method, developers can integrate Kotlin code within an existing Java project, promoting a gradual transition from Java to Kotlin.
Steps to follow:
- Create a new Kotlin file/class in the project
- Copy the Java code segment to be converted
- Paste the code into the new Kotlin file
- Adjust any necessary syntax changes or compatibility issues
Code Conversion
Method 1: Converting a Complete Class/File into Kotlin
- Open the Java source code file that needs to be converted into Kotlin. For instance, consider the provided code snippet of the MainActivity file.
- Declare variables and set up the initial structure:
- Declare a variable for the TextView component.
- Declare a variable to keep track of the number of button clicks.
- Implement the necessary functions:
- Create a function to handle button clicks and update the TextView accordingly.
- Translate Java code into Kotlin syntax following the necessary conversion rules.
Step 2: Select the appropriate conversion option based on the specific requirements of the project.
Converting Java Files to Kotlin Files in Android Studio
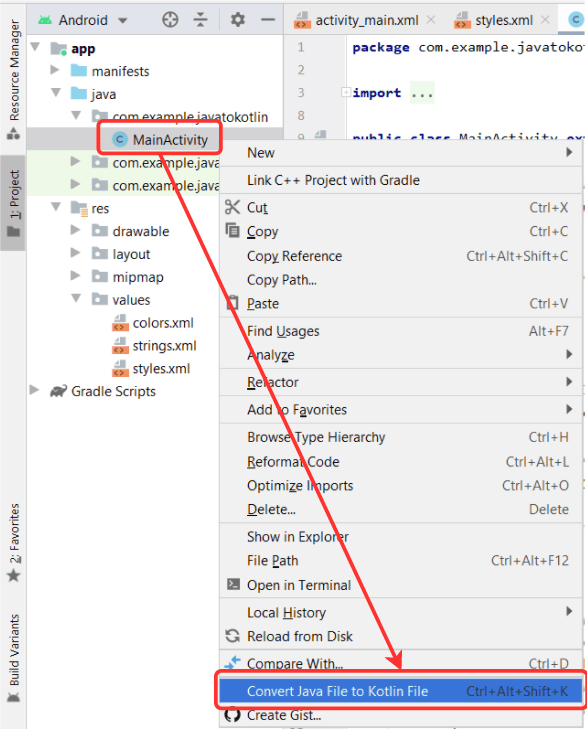
- Using Android Studio Menu:
Begin by selecting "Android Project" from the left-hand side Option menu. Then, right-click on the source code file. Choose the option "Convert Java File to Kotlin File." Alternatively, use the shortcut command "Ctrl Alt Shift K" while the file is open in Android Studio.
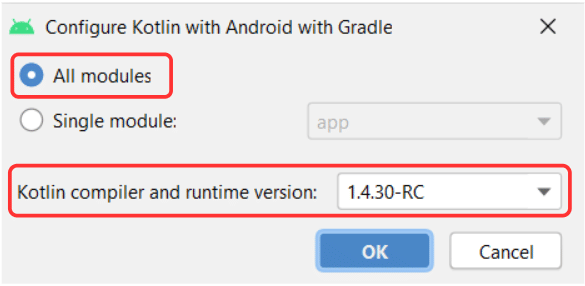
- Configuring Kotlin in Project:
A dialog box will appear seeking permission to configure Kotlin in the Project. Grant the permission to proceed with the code conversion. Select the "All modules" option and pick the latest Kotlin compiler installed on your system. Click "OK." Android Studio will make necessary changes in the app module build.gradle file for successful code conversion.

Producing Kotlin Files
Once again, right-click on the java class/file and select the "Convert Java File to Kotlin File" option. This action will convert the file, changing the extension from .java to .kt. Below is an example of Kotlin code resulting from converting a MainActivity.java file.
import android.os.Bundle import android.view.View import android.widget.TextView import androidx.appcompat.app.AppCompatActivity class MainActivity : AppCompatActivity() { // declaring variable for TextView component private var textView: TextView? = null // declaring variable to store // the number of button click private var count = 0 override fun onCreate(savedInstanceState: Bundle?) { super.onCreate(savedInstanceState) setContentView(R.layout.activity_main) // assigning ID of textView2 to the variable textView = findViewById(R.id.textView2) // initializing the value of count with 0 count = 0 } // function to perform operations // when button is clicked fun buttonOnClick(view: View?) { // increasing count by one on // each tap on the button count // changing the value of the // textView with the current // value of count variable textView!!.text = Integer.toString(count) } }
- Using Android Studio Menu:
Method 2: Adding a Separate Kotlin File into the Project
When working on an Android Studio project, it is possible to blend Java and Kotlin code seamlessly. If there's a need to recycle a segment of Java code by transcribing it into Kotlin, follow these steps:
- Create a Kotlin Class/File
- Configure Kotlin into the Project
- Copy and Paste
Advantages of Kotlin Over Java
- Kotlin code is more succinct compared to Java.
- It seamlessly interoperates with Java.
- Kotlin addresses nullability concerns by incorporating "Null" into its type system.
- It promotes cleaner and more secure code practices.
To begin, generate a new Kotlin Class/File within the java folder of your application's project file. Provide it with a suitable name. Upon creation, Android Studio will signal an alert stating "Kotlin is not configured."

Click on the "configure" option within the alert message. A dialogue box will emerge; opt for "All modules" and select the most recent Kotlin compiler installed on your system. Click "OK" to implement the changes in the build.gradle files.

After Android Studio completes the project file build, access the created Kotlin Class/File. Transfer the Java code intended for conversion. Paste this code into the newly created file/class with a Kotlin extension. Android Studio will automatically convert the Java code into Kotlin.
Are you eager to delve into the realm of Android Development with Kotlin? Take the leap and engage in an enriching learning journey with our Mastering Android Development with Kotlin From Beginner to Pro - Self Paced course!
Please Login to comment...
LoginLike
Free
,Exam
,How to Convert Java Code to Kotlin Code in Android Studio? - Software Development
,video lectures
,Previous Year Questions with Solutions
,MCQs
,Summary
,shortcuts and tricks
,ppt
,Extra Questions
,Sample Paper
,How to Convert Java Code to Kotlin Code in Android Studio? - Software Development
,practice quizzes
,Semester Notes
,Objective type Questions
,mock tests for examination
,past year papers
,How to Convert Java Code to Kotlin Code in Android Studio? - Software Development
,Viva Questions
,Important questions
,study material
;


How to Convert Java Code to Kotlin Code in Android Studio? Free PDF Download
Importance of How to Convert Java Code to Kotlin Code in Android Studio?
How to Convert Java Code to Kotlin Code in Android Studio? Notes
How to Convert Java Code to Kotlin Code in Android Studio? Software Development Questions
Study How to Convert Java Code to Kotlin Code in Android Studio? on the App
|
© EduRev
|
Education Revolution
|


|


