How to Access any Component Outside RecyclerView from RecyclerView in Android? - Software Development PDF Download

How to Access any Component Outside RecyclerView from RecyclerView in Android?
Last Updated : 09 Dec, 2020The concept here revolves around controlling a component outside a RecyclerView from within the RecyclerView itself in an Android application. Imagine having a RecyclerView in your app with a list of clickable components like Buttons, and alongside, a TextView outside the RecyclerView. The objective is to update the text in this TextView based on different button clicks within the RecyclerView.

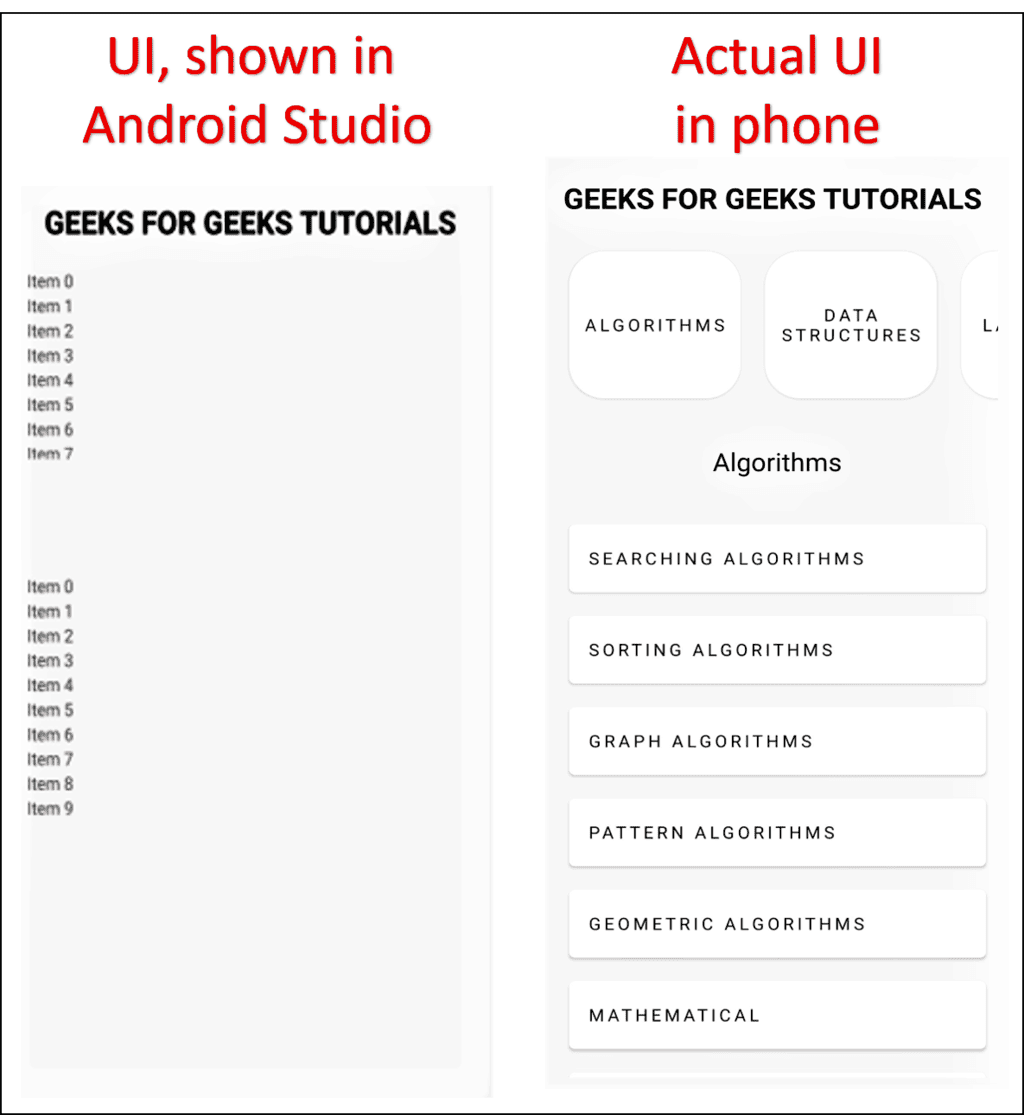
In the illustration, there's a RecyclerView containing various Buttons and a TextView. The TextView's content changes based on the specific Button clicked within the RecyclerView. This walkthrough aims to implement a similar functionality with a practical touch. The resulting app will display a list and a sub-list of tutorials provided by GEEKS FOR GEEKS. Here's a preview GIF of the final app:
So the final app will show a list and a sub-list of the Tutorials offered by GEEKS FOR GEEKS
Let's start with the prerequisites:
- How to install Android Studio
- Setting up a new project in Android Studio
- What is RecyclerView
Now, let's dive into the implementation steps:
- Step 1: Working with the activity_main.xml file
Begin by navigating to the res -> layout -> activity_main.xml file. Below is the XML code snippet for reference:
- Go to the res -> layout -> activity_main.xml file. res -> layout -> activity_main.xml
- Here is the code of that XML file:
- XML
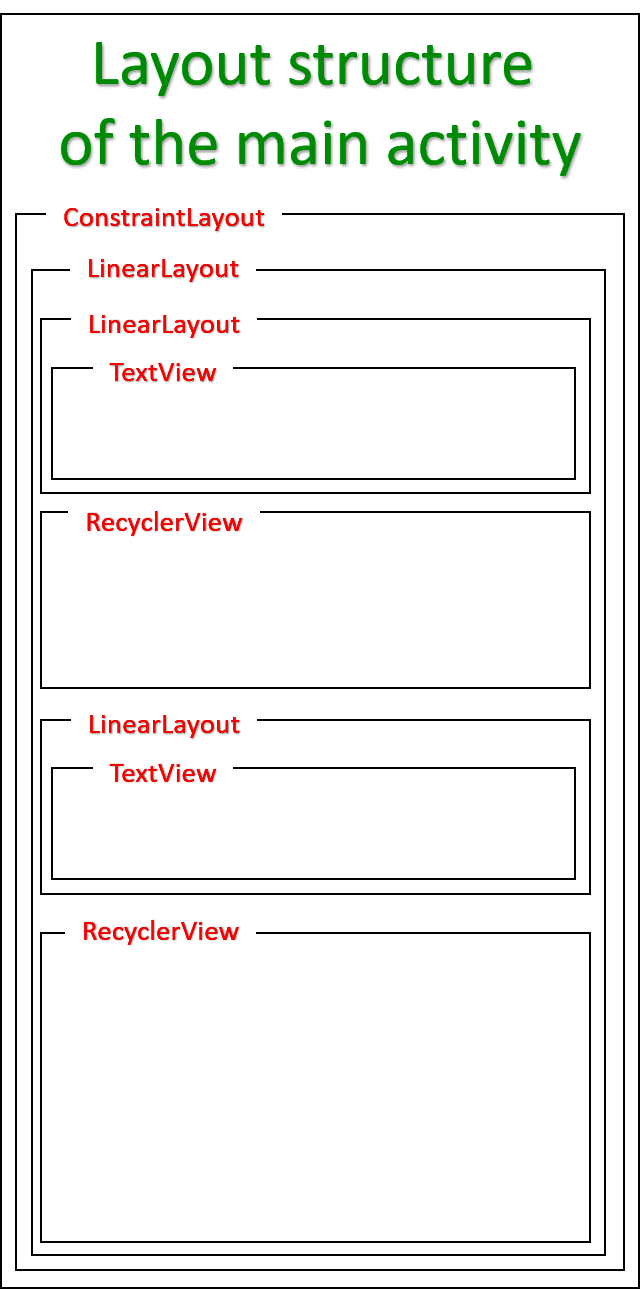
Main Components of Android Layout
- ConstraintLayout in Android
- LinearLayout in Android
- RecyclerView in Android
ConstraintLayout in Android
- Utilized for flexible layout management
- Allows creating complex layouts with a flat view hierarchy
- Enables positioning and aligning widgets using constraints
LinearLayout in Android
- Organizes elements linearly either horizontally or vertically
- Used for simple layout structures
- Supports weighting to distribute space proportionally
RecyclerView in Android
- Efficient for displaying large datasets
- Supports dynamic data updates with smooth scrolling
- Consists of a flexible adapter to connect data to views
Details of the Android Layout Structure
- Two RecyclerViews are employed: one horizontal (recyclerViewOne) and one vertical (recyclerViewTwo)
- recyclerViewOne showcases the main list items
- recyclerViewTwo displays the sub-list items related to the main list
- A TextView is utilized to exhibit the text of the main list item
Main List and Sub-list Implementation
- Two RecyclerViews are utilized: one horizontal (recyclerViewOne) and one vertical (recyclerViewTwo). The former displays the main list while the latter exhibits the sub-list related to each main list item.
- A TextView is employed to exhibit the text of each main list item.
Adding Layout for Main List Items
- Access the 'res -> layout' directory.
- Right-click on the layout folder.
- Navigate to 'New -> Layout Resource File'.
- Name the file as 'single_card_layout.xml'.
- Modify the root element to RelativeLayout and confirm.
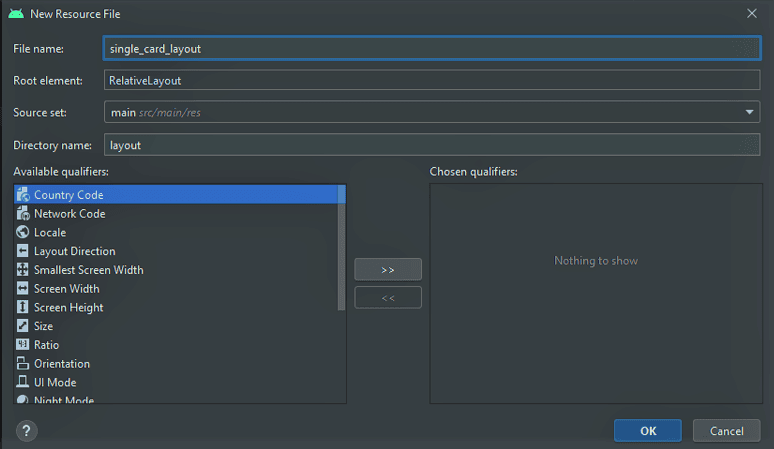
Below is the XML code snippet for the 'single_card_layout.xml' file:
- This layout represents the structure of items displayed in recyclerViewOne, which is the main list or the horizontal RecyclerView.
Layout Overview
- This section describes the layout of items displayed in recyclerViewOne, which represents the main list or the horizontal RecyclerView.
Adding Sub-List Items
- To include sub-list items, the file single_card_layout_vertical.xml needs to be added:
- Go to res -> layout and right-click on the layout folder.
- Select New -> Layout Resource File and name the file single_card_layout_vertical.xml.
- Set the root element to RelativeLayout and click OK.
XML Code for single_card_layout_vertical.xml
Layout Details
- This section illustrates the layout of items displayed in recyclerViewTwo, representing the sub list or the vertical RecyclerView.
RecyclerViewTwo Layout
- This layout represents the items displayed in the RecyclerViewTwo, which can be considered as a sublist or a vertical RecyclerView.
Working on the Horizontal RecyclerView or Main List
- Proceed to the java -> com.wheic.recyclergetsout directory (Paths may vary).
- Create a new directory under com.wheic.recyclergetsout, naming it RV1. In Android Studio, creating a directory might seem complex due to potential bugs in the process.
Steps to Follow:
- Access java -> com.wheic.recyclergetsout directory (Your path may differ).
- Establish a new directory under com.wheic.recyclergetsout, naming it RV1. If faced with issues in Android Studio, follow these steps:
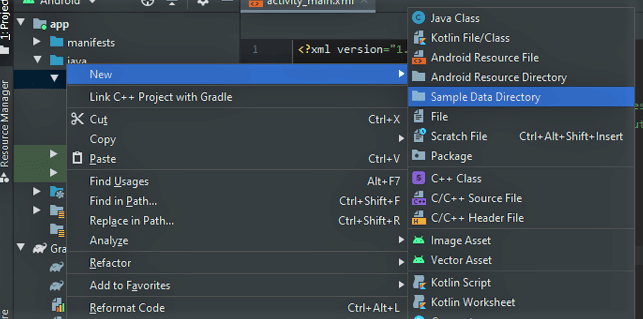
- Right-click on com.wheic.recyclergetsout, then navigate to New -> Sample Data Directory.
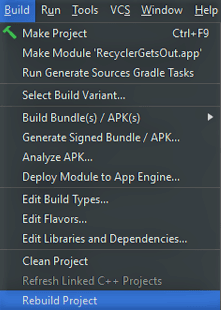
- Proceed to Build -> Rebuild Project.
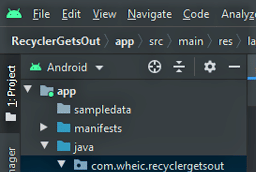
- You will observe a sampledata folder under the app directory.
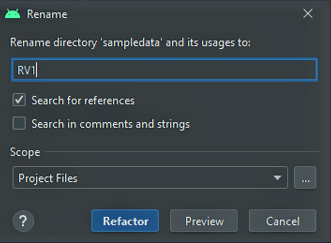
- Right-click on the sampledata folder and select Refactor -> Rename.
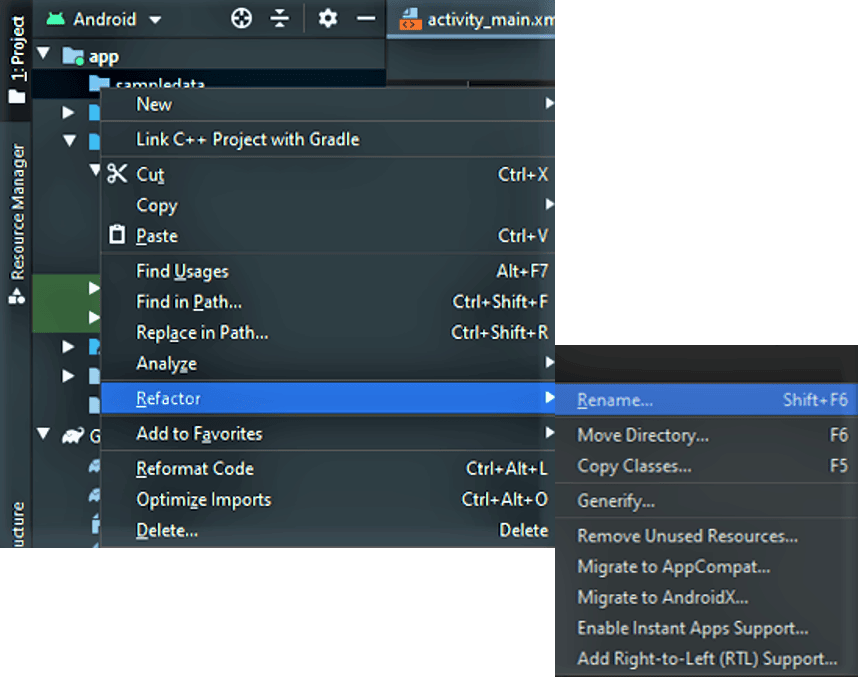
- Provide a name for the folder (e.g., RV1) and click on Refactor.
Instructions for Refactoring and Building Project in Android Studio
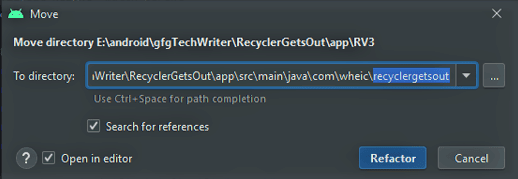
- Drag the folder onto com.wheic.recyclergetsout.
- Click Refactor in the pop-up window.
Rebuilding the Project
- Go to Build -> Rebuild Project.
- Alternatively, if you prefer a manual approach:
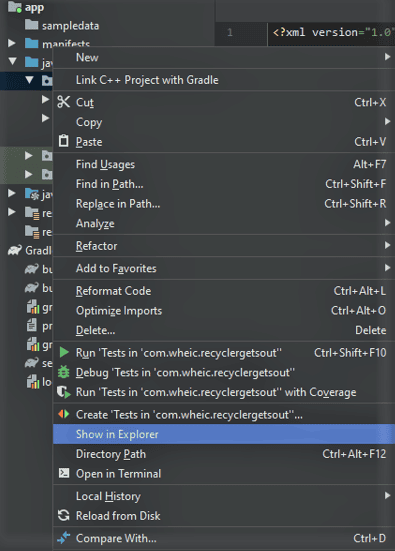
- Right-click on com.wheic.recyclergetsout -> Show in Explorer.
- Create a folder there manually.
Begin by working on the corresponding model class:
- Java
RVOneModel Class
- The
RVOneModelclass contains: - A
Stringvariablenameto store the main-list item title. - An
intvariablenumto differentiate between main-list items. - It has a parameterized constructor that initializes
nameandnum. - Getter functions
getName()andgetNum()retrieve the values stored in the variables.
Adapter Class for Horizontal RecyclerView
- To create the Adapter class:
- Right-click on the folder (RV1) and select New -> Java Class. Name the class (e.g., RVOneAdapter).
- An Adapter requires a ViewHolder class.
- Functionality and methods are detailed in a specific GFG link.
- Below is the Java code for the Adapter class along with the ViewHolder class:
| import android.view.LayoutInflater; | import android.view.View; | import android.view.ViewGroup; | import android.widget.TextView; | import androidx.annotation.NonNull; | import androidx.cardview.widget.CardView; | import androidx.recyclerview.widget.RecyclerView; | import com.wheic.recyclergetsout.R; | import java.util.List; |
RVOneAdapter extends RecyclerView.Adapter | ||||||||
private List | ||||||||
public RVOneAdapter(List | ||||||||
| ... |
Working on MainActivity.java for First RecyclerView
Start working on the MainActivity.java file to add the first RecyclerView.
Main List Item Title Setup
- The list of tutorial items is stored using string variables, and then the adapter is set to the horizontal RecyclerView.
- Here is the code snippet in MainActivity.java for adding the initial RecyclerView:
Code Snippet - MainActivity.java
import androidx.appcompat.app.AppCompatActivity;import androidx.recyclerview.widget.LinearLayoutManager;import androidx.recyclerview.widget.RecyclerView;import android.os.Bundle;import android.widget.LinearLayout;import android.widget.TextView;import com.wheic.recyclergetsout.RV1.RVOneAdapter;import com.wheic.recyclergetsout.RV1.RVOneModel;import java.util.ArrayList;import java.util.List;public class MainActivity extends AppCompatActivity { private RecyclerView RVOne; private List
Import Statements in MainActivity.java
- androidx.appcompat.app.AppCompatActivity;
- androidx.recyclerview.widget.LinearLayoutManager;
- android.os.Bundle;
- android.widget.LinearLayout;
- com.wheic.recyclergetsout.RV1.RVOneAdapter;
- com.wheic.recyclergetsout.RV1.RVOneModel;
- java.util.ArrayList;
- MainActivity
Main List Item Initialization
- The Main List RecyclerView is set up horizontally.
- Static data items are stored one by one in the tutorialList ArrayList.
- An RVOneAdapter is created and set to the RecyclerView.
Step 5: Setting up the Click Listener
- An interface is established in RVOneAdapater.java to handle each item click event by defining an
onItemClickabstract method.
RVOneAdapater.java
- An interface called
OnItemsClickListeneris created to manage events related to Main-List item clicks.
// Interface to perform events on Main-List item click
interface OnItemsClickListener{ void onItemClick(RVOneModel rvOneModel); }- A reference variable of the interface is initialized to manage the interactions.
// Need this for the Main-list item onClick events
OnItemsClickListener listener;- A function named setWhenClickListener is developed to be invoked from the MainActivity.
// Main-list item clickListener is initialized// This will be used in MainActivity
setWhenClickListener(OnItemsClickListener listener){ this.listener = listener; }- Within the
onBindViewHoldermethod, asetOnClickListeneris implemented to trigger theonItemClickmethod upon clicking an item in the horizontal RecyclerView.
Explaining onBindViewHolder in RecyclerView
- Inside the onBindViewHolder method, a setOnClickListener is implemented to trigger the onItemClick function upon clicking an item in the horizontal RecyclerView.
Example Code Snippet:
holder.singleItemCardView.setOnClickListener(View.OnClickListener() { onClick(View v) { if(listener != null){ listener.onItemClick(modelItems); });Setting up TextView in MainActivity
- In the MainActivity.java file, a TextView reference variable is created and linked to the corresponding id in the XML layout.
Example Code:
algorithmTitleText = findViewById(R.id.algorithmTitleText);Implementing onClickListener for Adapter
- The adapter's setOnClickListener is invoked to handle text changes in the TextView upon clicking a list item.
Example Code Snippet:
rvOneAdapter.setWhenClickListener(RVOneAdapter.OnItemsClickListener() { onItemClick(RVOneModel rvOneModel) { algorithmTitleText.setText(rvOneModel.getName()); setRVTwoList(rvOneModel.getNum()); Working with Vertical RecyclerView
Step 6: Proceed with managing the vertical RecyclerView or the sub-list.
Setting up Model and Adapter Classes for RecyclerView in Android
- Go to the directory
java -> com.wheic.recyclergetsoutand create a new folder named RV2. - Within the RV2 folder, create a Java class named RVTwoModel by right-clicking on the folder, selecting New, then Java Class.
- The RVTwoModel class should contain a single String variable to store the title text of the sub-list item, along with a constructor and a getter function.
Here is the Java code for the RVTwoModel class:
public class RVTwoModel { private String name; public RVTwoModel(String name) { this.name = name; } public String getName() { return name; }}Next, proceed to create the Adapter class for the vertical RecyclerView:
- Create a new Java class named RVTwoAdapter within the RV2 folder, following a similar process as before.
- The RVTwoAdapter class is responsible for managing the RecyclerView and is similar to other RecyclerView adapters.
Below is the Java code for the RVTwoAdapter class and the ViewHolder class:
import android.view.LayoutInflater;import android.view.View;import android.view.ViewGroup;import android.widget.TextView;import androidx.annotation.NonNull;import androidx.recyclerview.widget.RecyclerView;import com.wheic.recyclergetsout.R;import java.util.List;public class RVTwoAdapter extends RecyclerView.Adapter { private List tutorialSubList; public RVTwoAdapter(List tutorialSubList) { this.tutorialSubList = tutorialSubList; } @NonNull @Override public RVTwoAdapter.ViewHolder onCreateViewHolder(@NonNull ViewGroup parent, int viewType) { View view = LayoutInflater.from(parent.getContext()).inflate(R.layout.single_card_layout_vertical, parent, false); return new ViewHolder(view); } @Override public void onBindViewHolder(@NonNull RVTwoAdapter.ViewHolder holder, int position) { holder.setData(tutorialSubList.get(position).getName()); } @Override public int getItemCount() { return tutorialSubList.size(); } public class ViewHolder extends RecyclerView.ViewHolder { public TextView rvTwoText; public ViewHolder(@NonNull View itemView) { super(itemView); rvTwoText = itemView.findViewById(R.id.singleItemTextViewRVTwo); } public void setData(String name) { this.rvTwoText.setText(name); } }} Completing the Code in MainActivity.java
Ensure to finalize the necessary code implementations in the MainActivity.java file to integrate the RecyclerView functionalities effectively.
Main List
- A second ArrayList tutorialSubList for the sub-list is required. Create a reference variable of a second ArrayList.
- Create a function specifically for the vertical recyclerView, which accepts an integer parameter.
- Add static data to the ArrayList for each main-list item.
- Call the
setRVTwoList(num)function insideonCreate()to display the sub-list when the activity is created.
Code for the Function
Here is an example of the function:
private void setRVTwoList(int num) { RVTwo.setLayoutManager(new LinearLayoutManager(getApplicationContext(), LinearLayoutManager.VERTICAL, false)); tutorialSubList = new ArrayList< />(); // Add static data based on the provided number if (num == 1) { tutorialSubList.add(new RVTwoModel("Searching Algorithms")); // Add more items as needed } else if (num == 2) { tutorialSubList.add(new RVTwoModel("Arrays")); // Add more items as needed } // Continue adding items for other conditions rvTwoAdapter = new RVTwoAdapter(tutorialSubList); RVTwo.setAdapter(rvTwoAdapter); }
Sub-List Item Titles
- Searching Algorithms
- Sorting Algorithms
- Graph Algorithms
- Pattern Algorithms
- Geometric Algorithms
Main-List Item Categories
- Algorithms
- Data Structures
- Programming Languages
- Interview Preparation
Exam Preparation Resources
- GATE CS Notes 2021
- ISRO CS Solved Papers
- UGC NET CS Notes
| Inside onCreate(), the setRVTwo() function is called in the main-list item clickListener. Also, it is called outside because we need to see the sub-list just when the activity gets created. |
Explanation of MainActivity.java Code
- Inside the onCreate() method, the setRVTwo() function is called both within the main-list item clickListener and outside of it to ensure that the sub-list is visible when the activity is created.
Code Snippet: Setting up RecyclerViews
- The code sets up two RecyclerViews: RVOne for the Main-List and RVTwo for the Sub-List.
- The Main-List is displayed horizontally, while the Sub-List is displayed vertically.
MainActivity.java: Initialization and Data Population
- The MainActivity class extends AppCompatActivity and initializes various components like RecyclerViews, adapters, and TextViews.
- The Main-List items are stored in the tutorialList, and the Sub-List items are stored in the tutorialSubList.
- Data for the Main-List and Sub-List is statically populated based on the category number.
Main-List Item Click Functionality
- When a Main-List item is clicked, the title is displayed in the TextView, and the corresponding Sub-List is shown by calling setRVTwoList() with the item's number.
setRVTwoList() Method: Handling Sub-List Data
- The setRVTwoList() method populates the Sub-List based on the category number passed to it.
- It clears the previous Sub-List data, allocates new memory, and adds new items to the list based on the selected category.
Final Java Codes of the Project
- The MainActivity.java file contains the complete Java code for the project, including RecyclerView setup, data population, and item click functionality.
Main Features of RVOneAdapter.java
- The RVOneAdapter.java file is crucial for handling RecyclerView operations in Android applications.
- It facilitates the display of a list of items in a RecyclerView efficiently.
RVOneAdapter Class Overview
- The RVOneAdapter class extends RecyclerView.Adapter and is responsible for binding data to the RecyclerView.
- It contains a ViewHolder class that holds references to the layout views of individual items.
Key Components and Functions
- tutorialList: Stores the main-list item titles for the RecyclerView.
- listener: Manages onClick events for main-list items.
- RVOneAdapter Constructor: Initializes the tutorialList.
ViewHolder Class Details
- The ViewHolder class binds layout components to their respective IDs.
- It sets the text for main-list item titles.
Event Handling
- The RVOneAdapter class utilizes an interface, OnItemsClickListener, to handle item click events.
- Click events trigger actions related to the clicked item within the RecyclerView.
Example Usage in Android Development
- RVOneAdapter.java streamlines the process of populating RecyclerViews with data in Android apps.
- By implementing this adapter, developers can efficiently manage item click events and data binding.
RVOneModel.java
- Main-List Item Title: This variable, 'name', stores the title of the main-list item.
- Differentiation: The variable 'num' helps differentiate between the main-list items.
- Parameterized Constructor: The constructor initializes 'name' and 'num'.
- Getter Functions: Functions like getName() and getNum() retrieve the respective values.
RVTwoAdapter.java
- Sub-List Item Titles: Titles are stored in 'tutorialSubList'.
- Parameterized Constructor: Initializes 'tutorialSubList'.
- onCreateViewHolder: Attaches item layout using proper XML file.
- onBindViewHolder: Sets data and methods for different views.
- getItemCount: Returns the length of the RecyclerView.
ViewHolder Class
- Initialization: Stores references to item layout views.
- setData Method: Sets text in Sub-List title.
| import android.view.LayoutInflater; | import android.view.View; | import android.view.ViewGroup; |
| import android.widget.TextView; | import androidx.annotation.NonNull; | import androidx.recyclerview.widget.RecyclerView; |
| import com.wheic.recyclergetsout.R; | import java.util.List; |
RVTwoModel.java
- This Java file contains a class named RVTwoModel.
- RVTwoModel class has a member variable called 'name' which stores the title of a sub-list item.
- It includes a constructor that initializes the 'name' variable.
- There is a getter method to retrieve the value of the 'name' variable.
Output:
- The output pertains to a Video Player.
- The timestamps 00:00 and 00:19 are likely related to the video duration.
- Instructions are provided to adjust volume using the Up/Down Arrow keys.
You can access the project on GitHub by following this link.
GitHubIf you are interested in delving into the realm of Android Development with Kotlin, consider enrolling in our course "Mastering Android Development with Kotlin From Beginner to Pro - Self Paced" for a rewarding learning experience.
Please Login to comment...
- You are required to log in to leave a comment.
- There is an option to 'Like' a post or comment.

Extra Questions
,How to Access any Component Outside RecyclerView from RecyclerView in Android? - Software Development
,Semester Notes
,Previous Year Questions with Solutions
,study material
,shortcuts and tricks
,Sample Paper
,practice quizzes
,Important questions
,past year papers
,ppt
,Exam
,Viva Questions
,video lectures
,Objective type Questions
,Free
,How to Access any Component Outside RecyclerView from RecyclerView in Android? - Software Development
,How to Access any Component Outside RecyclerView from RecyclerView in Android? - Software Development
,Summary
,MCQs
,mock tests for examination
;


How to Access any Component Outside RecyclerView from RecyclerView in Android? Free PDF Download
Importance of How to Access any Component Outside RecyclerView from RecyclerView in Android?
How to Access any Component Outside RecyclerView from RecyclerView in Android? Notes
How to Access any Component Outside RecyclerView from RecyclerView in Android? Software Development Questions
Study How to Access any Component Outside RecyclerView from RecyclerView in Android? on the App
|
© EduRev
|
Education Revolution
|


|


within 7 days!