Snackbar Material Design Components in Android - Software Development PDF Download

Snackbar Material Design Components in Android
Last Updated : 27 Jul, 2022The Material design Snackbar in Android is a key component that stands out for its design, ease of implementation, and customization options. Unlike various other Material design components, implementing the Material design Snackbar does not require special attributes. Let's delve into the steps for implementing this in an Android project using Java.
Java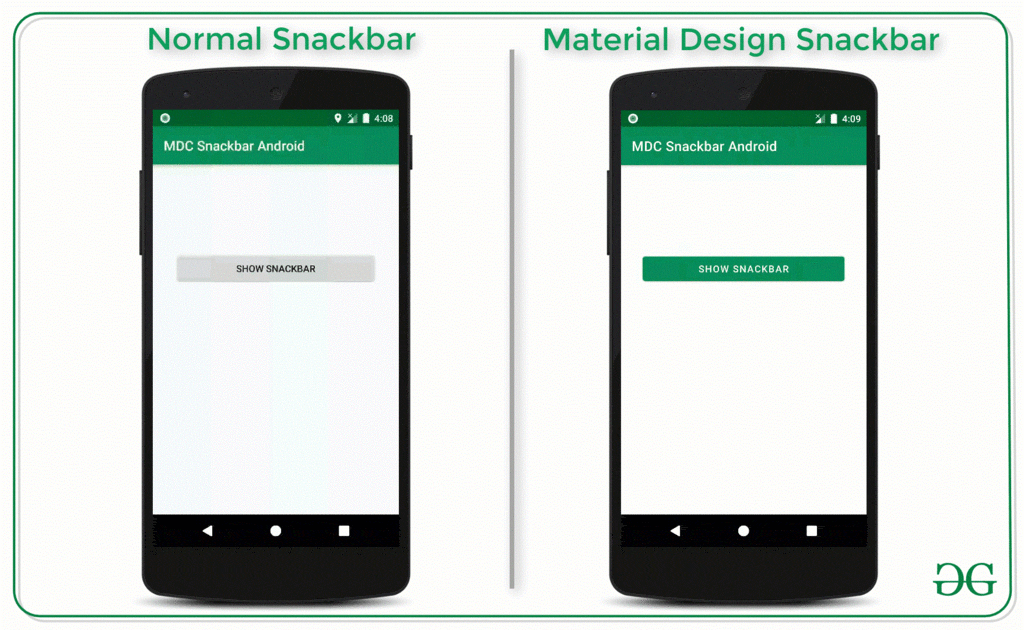
Steps to Implement the Material Design Snackbar
- Step 1: Create an empty activity Android Studio project
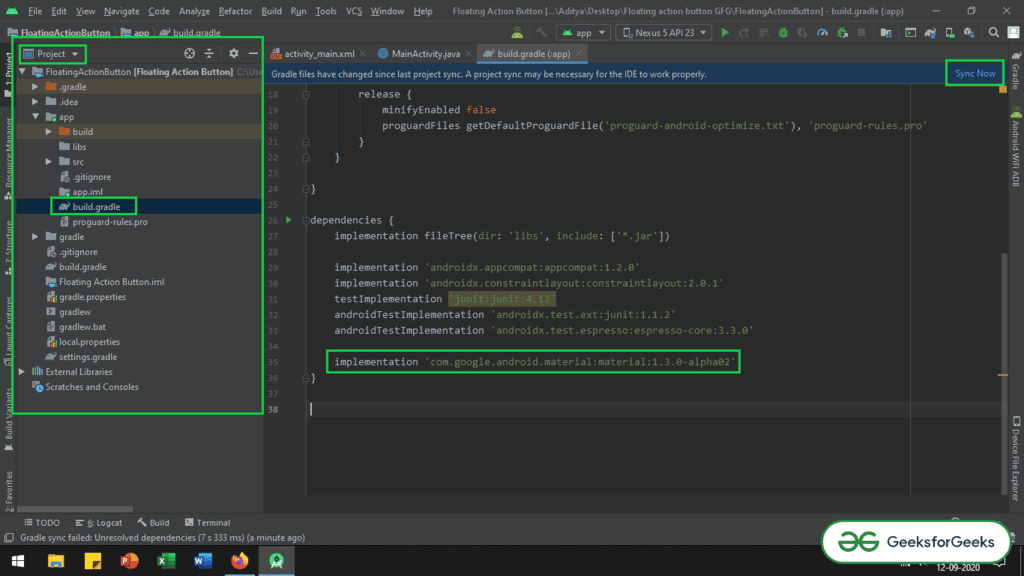
- Step 2: Add the required dependency
- Add the Material design dependency library to the app-level gradle file.
- To locate the app level gradle file, navigate to Project > app > build.gradle.
- Include the following dependency:
- implementation ‘com.google.android.material:material:1.3.0-alpha03’
- If you encounter any difficulty finding the app level gradle file, refer to the accompanying image for assistance.
- After adding the dependency, click on the "Sync Now" button at the top right corner of Android Studio.
- Ensure that your system is connected to the network to download the necessary files.
To start, create an empty activity Android Studio project. You can refer to "Android | How to Create/Start a New Project in Android Studio" for guidance on this. Ensure that you are using Java for this project.
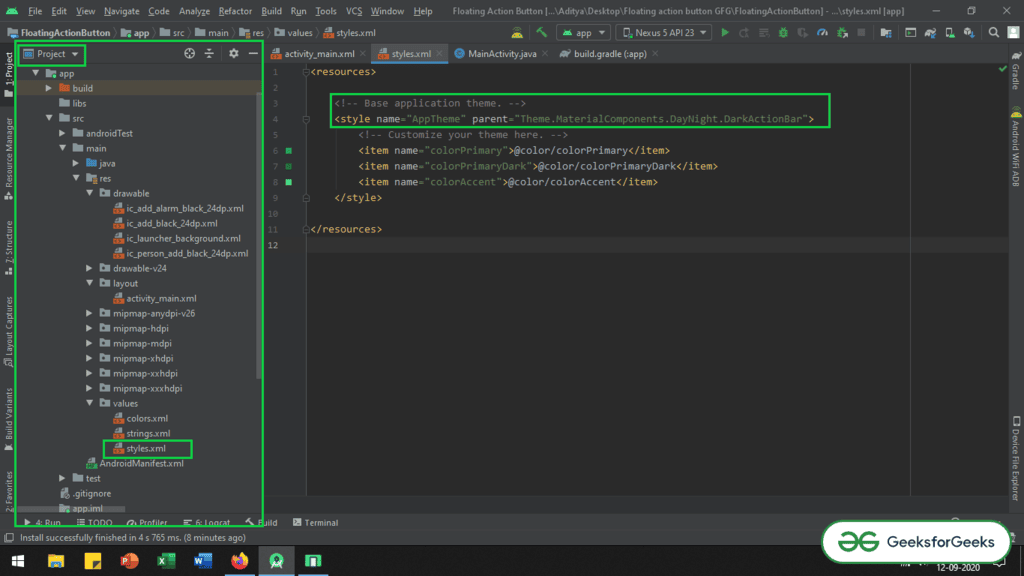
Setting Up Material Components Theme
- Refer to the image below if you're having trouble finding the app level Gradle file and adding the dependency. Once you've added the dependency, click on the "Sync Now" button at the top right. Ensure that your system is connected to the network for file downloads.
- Change the base application theme to the Material Components theme in the styles.xml file located at app > src > res > styles.xml.
- Within the
<resources>tag, modify the theme toAppThemewithTheme.MaterialComponents.Light.DarkActionBaras the parent theme. Customize the theme by specifying colors likecolorPrimary,colorPrimaryDark, andcolorAccent.
- Within the
- If you're unable to locate or implement the Material Components theme, refer to the image below:
- Proceed to work with the
activity_main.xmlfile. Insert the following XML code within the file or design it according to your requirements. - For the UI output, run the application on an emulator.
Output UI:

MainActivity.java Overview:
- MainActivity.java is a crucial file in Android development.
- It typically contains the main code logic and structure for an Android application.
- This file often handles user interactions and various app functionalities.
Key Components of MainActivity.java:
- AppCompatActivity: This class provides compatibility for using newer Android features on older versions of Android.
- Button: Represents a push-button widget in the user interface that can trigger actions when clicked.
- Toast: A small pop-up message that provides simple feedback to the user.
- Snackbar: A lightweight feedback component that shows a brief message at the bottom of the screen.
Functionality in MainActivity.java:
- The
onCreatemethod is a crucial part of MainActivity.java where the initialization of the activity occurs. - Listeners like
OnClickListenerare set to handle user interactions such as button clicks. - Snackbar is used to display messages that can also have actions like 'UNDO.'
- Toast messages provide simple feedback, like notifying the user that an action has been completed.
| Code Snippet: |
|---|
import androidx.appcompat.app.AppCompatActivity;import android.os.Bundle;import android.view.View;import android.widget.Button;import android.widget.Toast;import com.google.android.material.snackbar.Snackbar;public class MainActivity extends AppCompatActivity {// Button to show the snackbarButton bShowSnackbar;@Overrideprotected void onCreate(Bundle savedInstanceState) {super.onCreate(savedInstanceState);setContentView(R.layout.activity_main);bShowSnackbar = findViewById(R.id.show_snackbar_button);bShowSnackbar.setOnClickListener(new View.OnClickListener() {@Overridepublic void onClick(View v) {Snackbar snackbar = Snackbar.make(v, "You have deleted an item", Snackbar.LENGTH_LONG);snackbar.setAction("UNDO", new View.OnClickListener() {@Overridepublic void onClick(View v) {Toast.makeText(MainActivity.this, "The item has been restored", Toast.LENGTH_SHORT).show();}});snackbar.show();}});}} |
MainActivity : AppCompatActivity()
- Declare a class MainActivity that extends AppCompatActivity.
Variables
- Declare a variable
bShowSnackbarof type Button and initialize it tonull.
onCreate() Method
- Override the
onCreatemethod with thesavedInstanceStateparameter. - Call the superclass's
onCreatemethod with thesavedInstanceStateparameter. - Set the content view of the activity to
R.layout.activity_main. - Find and assign the button with the ID
show_snackbar_buttontobShowSnackbar. - Set a click listener on
bShowSnackbarto show a Snackbar when clicked.
Snackbar Implementation
- Create a Snackbar with a message "You have deleted an item" and length
Snackbar.LENGTH_LONG. - Add an action to the Snackbar labeled "UNDO".
- Define the action to be taken when the "UNDO" action is clicked, which in this case shows a Toast message "The item has been restored".
- Show the Snackbar.
Output
Following output is produced:
| Output |
More Functionalities of the Material design Snackbar
- Functionality 1: Set the duration of the Snackbar manually
- Inside the MainActivity.java, you can set the Snackbar dismiss duration for a specific time, like 3 seconds.
When working with Snackbar functionality in Android development, you have the ability to customize various aspects of the Snackbar's behavior. Let's delve deeper into the process of setting the duration of the Snackbar manually, with a focus on the MainActivity.java file.
Within the MainActivity.java file, developers can manipulate the Snackbar dismiss duration to control how long the Snackbar remains visible on the screen before disappearing. This is particularly useful in providing users with adequate time to view important messages or alerts.
For instance, imagine a scenario where you want to display a Snackbar message notifying the user that an item has been deleted. By setting the dismiss duration to 3 seconds, you ensure that the message is displayed for a brief period before automatically disappearing.
Here is a simplified example of how you can achieve this in your Android application:
import androidx.appcompat.app.AppCompatActivity;import android.os.Bundle;import android.view.View;import android.widget.Button;import android.widget.Toast;import com.google.android.material.snackbar.Snackbar;public class MainActivity extends AppCompatActivity { // Button to show the snackbar Button bShowSnackbar; @Override protected void onCreate(Bundle savedInstanceState) { super.onCreate(savedInstanceState); setContentView(R.layout.activity_main); // Register the show snackbar button with the appropriate ID bShowSnackbar = findViewById(R.id.show_snackbar_button); // Button click listener to show the snackbar bShowSnackbar.setOnClickListener(new View.OnClickListener() { @Override public void onClick(View v) { Snackbar snackbar = Snackbar.make(v, "You have deleted an item", Snackbar.LENGTH_LONG); snackbar.setAction("UNDO", new View.OnClickListener() { @Override public void onClick(View v) { // Perform any action when the button on the snackbar is clicked // In this case, it shows a simple toast Toast.makeText(MainActivity.this, "The item has been restored", Toast.LENGTH_SHORT).show(); } }); // Set the duration of the snackbar in milliseconds (e.g., 3000 milliseconds for 3 seconds) snackbar.setDuration(3000); snackbar.show(); } }); }}
Main Activity Code Explanation
- Explanation of MainActivity class in Android
- Implementation of Snackbar functionality
- Handling button click events
MainActivity Class
- The MainActivity class is a part of the Android app development environment.
- It extends the AppCompatActivity class, which provides compatibility support for older versions of Android.
Snackbar Functionality
- The Snackbar class displays lightweight feedback about an operation in progress.
- It can contain an action button for the user to interact with.
- The Snackbar.LENGTH_LONG parameter sets the duration of the Snackbar to be displayed.
Button Click Event Handling
- Registering a button click listener to show the Snackbar when the button is clicked.
- Performing an action when the Snackbar action button is clicked, in this case, displaying a Toast message.
Example:
- In this code snippet, the MainActivity class is responsible for setting up the user interface of an Android app.
- When the "show_snackbar_button" is clicked, a Snackbar is displayed with a message "You have deleted an item" and an "UNDO" action button.
- If the "UNDO" button is clicked, a Toast message "The item has been restored" is shown.
- The Snackbar remains visible for 3 seconds (3000 milliseconds) before disappearing.
| Output: | 00:07 |
Functionality 2: Preventing Snackbar overlap, over the FAB (Floating Action Button)
- To prevent the simple overlapping of the Snackbar, it's essential to ensure that the Snackbar does not cover the Floating Action Button (FAB) completely. This issue can be addressed by adjusting the anchor point of the Snackbar concerning the FAB.
- One method to avoid this overlap is by setting the anchor point of the Snackbar to the Floating Action Button. By doing this, you can control where the Snackbar appears in relation to the FAB.
- Let's consider an illustration to understand this better: Imagine you have a messaging app where the FAB is used to compose a new message. When a Snackbar needs to be displayed, setting the anchor point correctly ensures that the message notification does not obstruct the new message button.
acnhorPoint
- The 'anchorPoint' is a crucial property that defines the reference point for the position of the Snackbar in coordination with other elements on the screen.
- When implementing this in your code, you will need to specify the anchor point to ensure that the Snackbar appears just above or below the FAB, without causing any visual interference.
activity_main.xml
Working with the MainActivity.java file
- When dealing with the MainActivity.java file, it becomes necessary to manage the behavior of the Snackbar to avoid unwanted overlap with the Floating Action Button.
MainActivity.java File Handling Snackbar Overlapping
- Working with the MainActivity.java file to manage the overlapping of the Snackbar.
- Utilizing the MainActivity.java file to resolve Snackbar overlap issues.
Code Snippet Overview
- Import necessary packages and classes for functionality.
- Initialize button and coordinator layout variables.
- Set up a listener for button click events to display the Snackbar.
- Define actions for Snackbar button and set its duration.
Code Explanation
- Include required libraries and classes for Snackbar functionality.
- Instantiate button and coordinator layout objects for interaction.
- Attach a listener to the button for displaying the Snackbar upon click.
- Specify actions to be taken when the Snackbar button is pressed and set its display duration.
Snackbar Handling in MainActivity.java
- Implementing Snackbar management within the MainActivity.java file.
Snackbar Display Mechanism
- Illustrating the process of showing a Snackbar upon a specific event.
Main Activity Class Overview
- The MainActivity class extends AppCompatActivity and is a crucial component in Android development.
- It contains the necessary logic for displaying a Snackbar message when a specific button is clicked.
- The class demonstrates the use of CoordinatorLayout and Snackbar functionalities.
Initialization and Setup
- Within the onCreate method, the layout for MainActivity is set using setContentView(R.layout.activity_main).
- The show_snackbar_button and snackbar_layout elements are initialized using findViewById.
Snackbar Implementation
- A click listener is attached to the bShowSnackbar button to trigger the Snackbar display.
- Snackbar.make() is used to create a new Snackbar with a specific message and duration.
- An action is added to the Snackbar to allow users to undo the action.
- The Snackbar is displayed using the show() method and remains visible for 3 seconds.
Example Usage
- When the user clicks on a button, a Snackbar appears, informing them that an item has been deleted.
- If the user clicks on "UNDO" within 3 seconds, a toast message shows that the item has been restored.
This code is written by Ujjwal Kumar Bhardwaj |
|
|
|
|
|
Output: Run on Emulator
Functionality 3: Swipe feature for Snackbar to dismiss it
- Implement the provided code inside the activity_main.xml.
The activity_main.xml file contains the layout structure for your Android app's main activity. It defines how elements are arranged on the screen.
Inside activity_main.xml, you'll find a ConstraintLayout that specifies the positioning of UI elements. This layout includes a Button for triggering the Snackbar.
The CoordinatorLayout is used to manage the visual structure of your app's UI components. It ensures that the Snackbar appears correctly on the screen without overlapping other elements.
In your MainActivity.java file, when creating the Snackbar, remember to provide the CoordinatorLayout as an argument to the make function. This ensures the Snackbar is displayed properly within your app's layout.
Main Activity in Android Development
- When working with the MainActivity.java file, ensure that the Snackbar utilizes the CoordinatorLayout for the "make" function.
- Import necessary classes like AppCompatActivity, CoordinatorLayout, and others for proper functionality.
- Define the necessary UI elements within the MainActivity class.
- Set an onClickListener for a button to trigger the Snackbar.
Snackbar Implementation Details
- Register the show Snackbar button and the CoordinatorLayout with their respective IDs for referencing.
- Utilize the CoordinatorLayout as the view parameter in the Snackbar's make function to associate it with the Snackbar.
- Define actions for the Snackbar, such as displaying a message and providing an 'UNDO' option.
- Set the duration of the Snackbar display, typically in milliseconds, to control how long it appears on the screen.
- Show the Snackbar to display the notification to the user.
Explaining Android Snackbar Implementation in Kotlin
In this section, we will break down the Android Snackbar implementation in Kotlin as demonstrated in the provided code snippet.
Initializing Views and Listeners
The code initializes the necessary views and listeners for the Snackbar implementation.
- The
ButtonandCoordinatorLayoutare initialized to interact with the Snackbar.
- The
Snackbar Creation and Display
Snackbar creation and display logic are defined in this part of the code.
- When the designated button is clicked, a Snackbar with a message "You have deleted an item" is displayed.
- An action labeled "UNDO" is also provided within the Snackbar.
- If the "UNDO" action is clicked, a toast message appears stating "The item has been restored".
- The Snackbar is displayed for 3 seconds (3000 milliseconds).
Author Information
The code snippet is attributed to Ujjwal Kumar Bhardwaj.
Please Login to comment...
LoginLike| import androidx.appcompat.app.AppCompatActivity; | import androidx.coordinatorlayout.widget.CoordinatorLayout; | import android.os.Bundle; | import android.view.View; |
| import android.widget.Button; | import android.widget.Toast; | import com.google.android.material.snackbar.Snackbar; |

Exam
,Snackbar Material Design Components in Android - Software Development
,Summary
,Sample Paper
,shortcuts and tricks
,Previous Year Questions with Solutions
,Semester Notes
,practice quizzes
,Free
,Important questions
,study material
,Snackbar Material Design Components in Android - Software Development
,MCQs
,Viva Questions
,ppt
,Objective type Questions
,mock tests for examination
,Extra Questions
,video lectures
,Snackbar Material Design Components in Android - Software Development
,past year papers
;


Snackbar Material Design Components in Android Free PDF Download
Importance of Snackbar Material Design Components in Android
Snackbar Material Design Components in Android Notes
Snackbar Material Design Components in Android Software Development Questions
Study Snackbar Material Design Components in Android on the App
|
© EduRev
|
Education Revolution
|


|


