How to Create Dynamic Intro Slider in Android using Firebase Firestore? - Software Development PDF Download

How to Create Dynamic Intro Slider in Android using Firebase Firestore?
Last Updated: 23 Dec, 2022We have previously explored creating a fundamental Intro Slider in Android, which serves to acquaint our users with our app's features. This article delves into crafting a dynamic Intro Slider utilizing Firebase. Leveraging Firebase Firestore empowers us to dynamically modify all data from the Firebase Console. Let's delve into the implementation.
Dynamic Intro Slider in our app with the help of Firebase FirestoreWhat we are going to build in this project?
In this project, we are set to construct a straightforward Intro Slider that fetches data from the Firebase Console for display. Firebase enables us to seamlessly update our data to suit our needs dynamically. Below is a sample GIF to provide a glimpse of what this article entails. It's important to note that this project will be developed using the Java language.
A sample GIF is given below to provide an overview of what we are aiming to achieve in this article. Please note the utilization of the Java language for this project.Java
Step by Step Implementation
Step by Step Implementation- Step 1: Create a New Project
To initiate a new project in Android Studio, refer to the guide on How to Create/Start a New Project in Android Studio. Ensure that Java is selected as the programming language.
- Step 2: Connect your app to Firebase
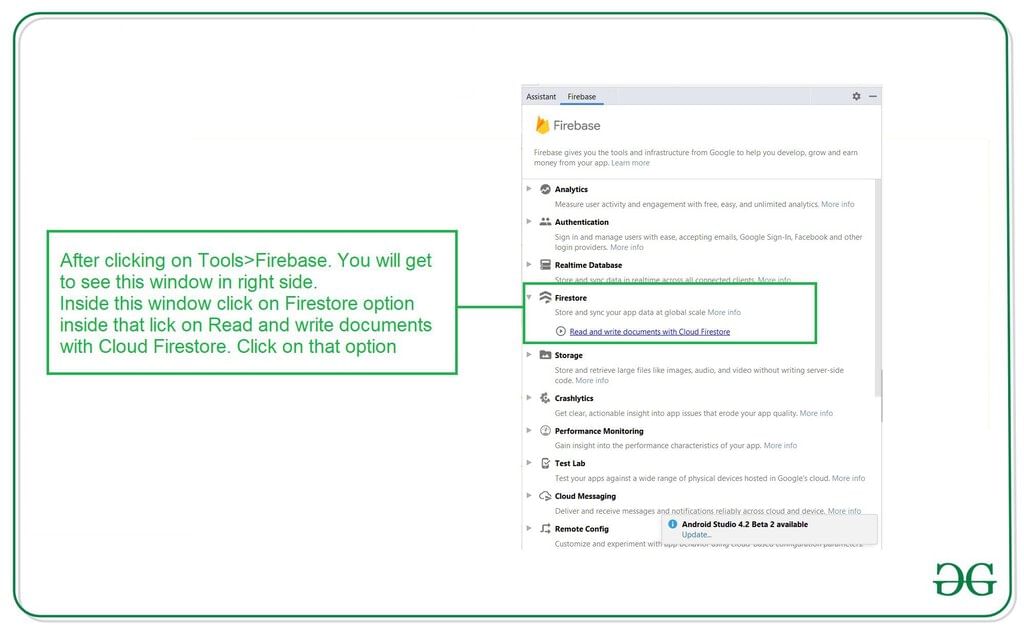
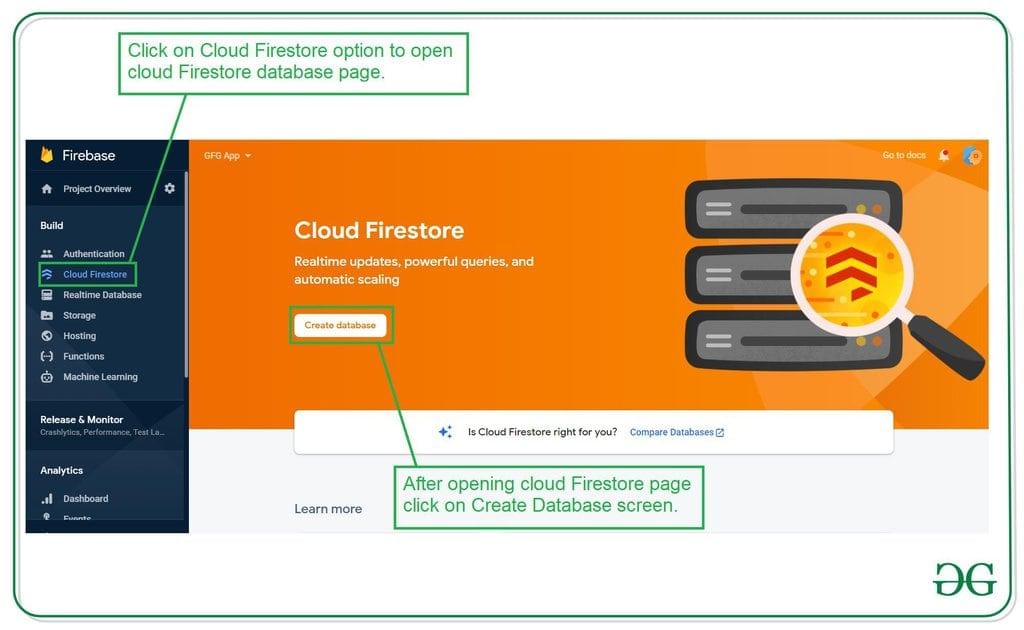
After creating a new project, navigate to the Tools option on the top bar. Click on Firebase. In the ensuing column, choose Firebase Cloud Firestore. Proceed by clicking on Connect app to Firebase, then Add Cloud Firestore to your app. Select 'Connect now' to establish the connection. Following this, click on the second option to finalize the Firebase connection. Upon successful connection, you will encounter the screen below.
Adding Dependencies and Permissions for Android App Development
- Verify and add Firebase Firestore dependency to the Gradle file:
- Implementation: com.google.firebase:firebase-firestore:22.0.1
- Implementation: com.squareup.picasso:picasso:2.71828
- Sync the project after adding the dependency
Adding Permissions for Internet
- Add necessary permissions in the AndroidManifest.xml file:
- android.permission.INTERNET
- android.permission.ACCESS_NETWORK_STATE
Working with the activity_main.xml file
- Edit the activity_main.xml layout:
- Include a ViewPager for displaying slides
- Add a LinearLayout for creating dots view
- Integrate a button for skipping the intro slider
Creating a Layout File for Slider Item
- Develop a layout file for the slider item
Step 5: Creating a layout file for our slider item
- Now we will create an item that we will be displaying in our slider. To create a new layout, navigate to the following path: app > res > layout. Right-click on it, click on New, select layout resource file, and name it as slider_layout. Add the provided code snippet to this file.
- Below is the code snippet for the slider layout:
Step 6: Creating a Modal class for storing all the data for Slider items
- In this step, we will create a Modal class to store all the necessary data for the Slider items.
Step 6: Creating a Modal class for storing all the data for Slider items
- Creating a new Modal class involves navigating to the specified directory in your app structure.
- Right-click on the package name and select "New" followed by "Java class."
- Name the class as SliderModal.
- Add the provided code snippet to the SliderModal class.
|
Step 7: Create an Adapter class for setting data to each view
In this step, you need to create an Adapter class that will be responsible for populating data into each view within the app.
Step 7: Creating an Adapter Class for Setting Data
- Create a new Adapter class named SliderAdapter in your app's package.
- Define variables for layout inflater, context, and an ArrayList.
- Implement methods like getCount and isViewFromObject.
- Initialize layout items and inflate the layout file.
- Set data to views like ImageView, TextView, etc., by loading images using Picasso.
- Add the view to the container and return the view.
- Implement a method to remove a view when necessary.
Step 8: Working with the MainActivity.java file
After creating the Adapter class, continue working on your project:
- Implement necessary functionalities in the MainActivity.java file.
- Ensure proper communication between the Adapter and the MainActivity.
- Handle user interactions and events in the MainActivity.
- Update UI elements based on user actions or data changes.
Step 8: Working with the MainActivity.java file
- Go to the MainActivity.java file and refer to the following code. Below is the code for the MainActivity.java file. Comments are added inside the code to understand the code in more detail.
MainActivity.java
- Import necessary packages and classes like android.os.Bundle, android.text.Html, android.widget.LinearLayout, android.widget.TextView, android.widget.Toast, androidx.annotation.NonNull, androidx.appcompat.app.AppCompatActivity, androidx.viewpager.widget.ViewPager, com.google.android.gms.tasks.OnFailureListener, com.google.android.gms.tasks.OnSuccessListener, com.google.firebase.firestore.DocumentSnapshot, com.google.firebase.firestore.FirebaseFirestore, com.google.firebase.firestore.QuerySnapshot, and java.util.List.
- Create variables for the ViewPager, LinearLayout, adapter, and an ArrayList.
Explanation:
- The MainActivity.java file contains the main code logic for an Android application. It initializes views, fetches data from Firebase Firestore, and sets up a ViewPager with slider indicators.
- Inside the MainActivity.java file, there are methods like onCreate(), loadDataFromFirebase(), addDots(), and ViewPager.OnPageChangeListener viewListener, each serving a specific purpose in the app's functionality.
Example:
- In the onCreate() method, the setContentView(R.layout.activity_main) function sets the layout for the main activity. It initializes views like ViewPager and LinearLayout necessary for the app's UI.
- The loadDataFromFirebase() method retrieves data from a Firestore collection named "SliderData" and populates the sliderModalArrayList with retrieved data.
Adding Data to Firebase Firestore
- After adding the provided code to the MainActivity.java file, data needs to be added to Firebase Firestore in an Android application.
Steps to Add Data to Firebase Firestore in Android
Step 1: Accessing Firebase on the Web
Begin by navigating to the Firebase website and log in to your account to reach the main dashboard.
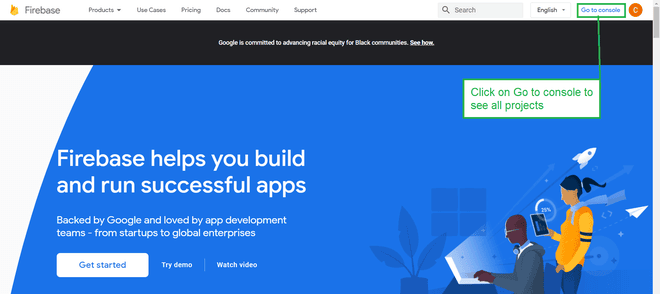
Step 2: Selecting Your Project
Click on the "Go to Console" option, followed by selecting your specific project from the displayed list.
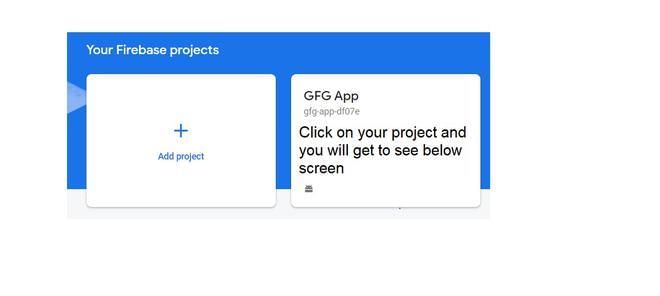
Step 3: Initiating Database Creation
After selecting your project, proceed to create a new database by clicking on the "Create Database" option.
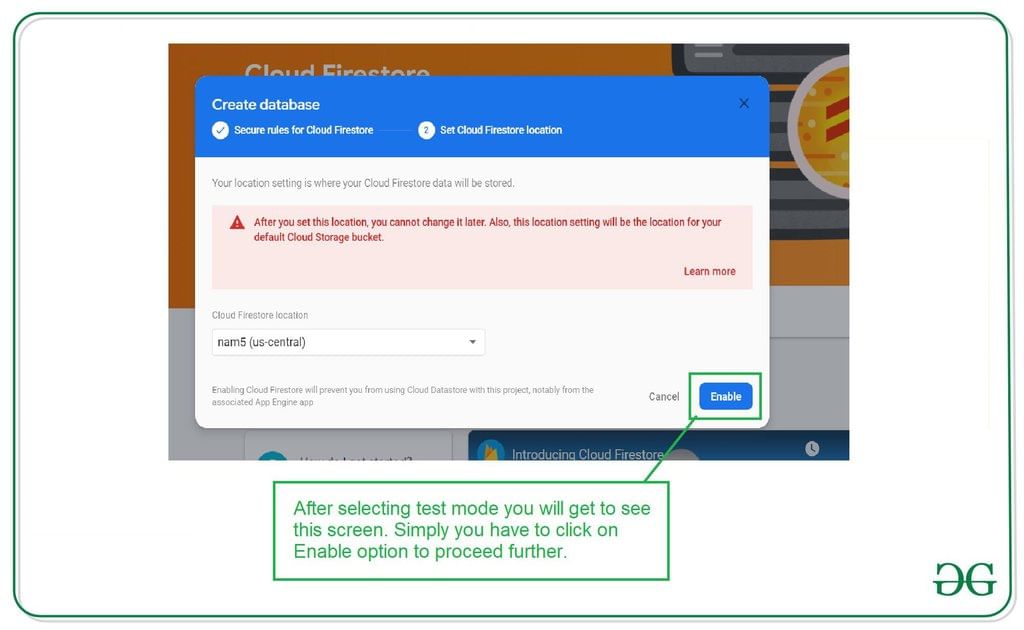
Step 4: Configuring Test Mode
Within the database setup, opt for the "Start in test mode" for authentication-free usage. Follow the prompts until database activation.

Step 5: Enabling Firebase Firestore
Simply click on the "Enable" button to activate your Firebase Firestore database for use.
Step 6: Adding Data to Firebase Console
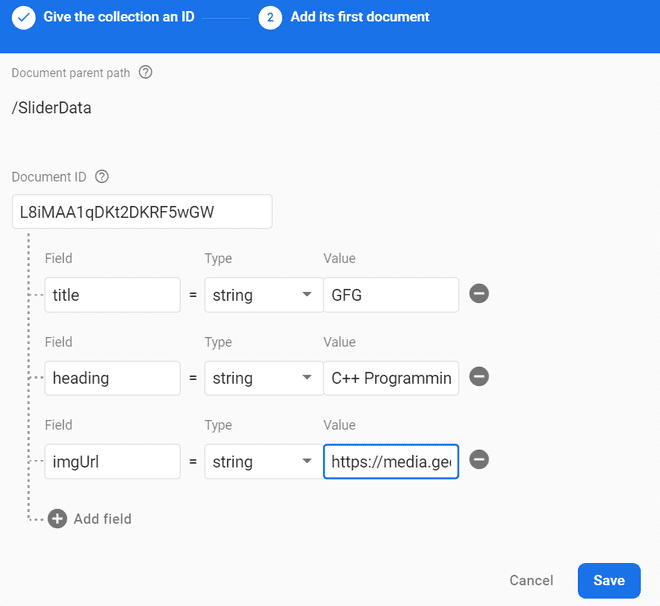
Proceed by creating a new collection named "SliderData" and generating the initial document with fields like title, heading, and imgUrl. Populate these fields with relevant data.
Step 7: Testing Your Application
After inputting the necessary data, run your application to observe the displayed output.
Output:
- Video Player
- 00:00
- 00:12
- Use Up/Down Arrow keys to increase or decrease volume.
Ready to embark on an exciting journey into the world of Android Development with Kotlin? It's time to make a change and dive into a fantastic learning experience with our Mastering Android Development with Kotlin From Beginner to Pro - Self Paced!
Please Login to comment...
- Login
- Like

Viva Questions
,How to Create Dynamic Intro Slider in Android using Firebase Firestore? - Software Development
,video lectures
,practice quizzes
,How to Create Dynamic Intro Slider in Android using Firebase Firestore? - Software Development
,shortcuts and tricks
,mock tests for examination
,Summary
,ppt
,Extra Questions
,MCQs
,How to Create Dynamic Intro Slider in Android using Firebase Firestore? - Software Development
,Free
,Important questions
,Exam
,Semester Notes
,study material
,Sample Paper
,Objective type Questions
,Previous Year Questions with Solutions
,past year papers
;


How to Create Dynamic Intro Slider in Android using Firebase Firestore? Free PDF Download
Importance of How to Create Dynamic Intro Slider in Android using Firebase Firestore?
How to Create Dynamic Intro Slider in Android using Firebase Firestore? Notes
How to Create Dynamic Intro Slider in Android using Firebase Firestore? Software Development Questions
Study How to Create Dynamic Intro Slider in Android using Firebase Firestore? on the App
|
© EduRev
|
Education Revolution
|


|


