How to Create Dynamic Horizontal RecyclerView in Android using Firebase Firestore? - Software Development PDF Download

How to Create Dynamic Horizontal RecyclerView in Android using Firebase Firestore?
Last Updated : 17 Jan, 2021- Horizontal RecyclerView is commonly used in apps to display categories.
- It offers a dynamic display allowing admins to add or remove items.
- This article focuses on creating a dynamic Horizontal RecyclerView in Android using Firebase Firestore.
Firebase Firestore
What we are going to build in this article?
We will develop an application featuring a horizontal RecyclerView showcasing various computer science technologies.
- We will use Java as the programming language for this project.
- A sample GIF is provided to visualize the project.
Step by Step Implementation
- Step 1: Create a new Project
To start, create a new project in Android Studio using Java as the programming language.
- Step 2: Connect your app to Firebase
After creating a new project, follow these steps:
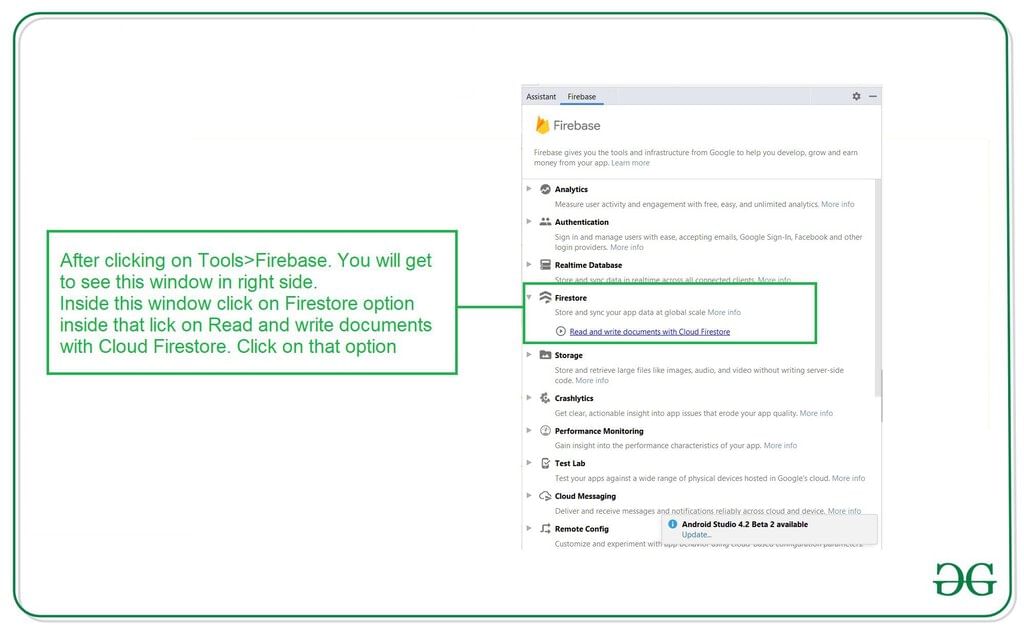
- Navigate to the Tools option and click on Firebase.
- In Firebase, go to Firebase Cloud Firestore.
- Click on "Connect app to Firebase" and then "Add Cloud Firestore to your app."
- Finally, your app will be connected to Firebase.
Connecting Firebase to Android App
- Verify Firebase Firestore Dependency:
Check if the Firebase Firestore dependency is added to your Gradle file. If not, include the following line:
implementation 'com.google.firebase:firebase-firestore:22.0.1'After adding the dependency, sync your project to proceed.
- Working with AndroidManifest.xml File:
To enable data transfer with Firebase, grant necessary permissions by adding these lines to your AndroidManifest.xml file:
<uses-permission android:name="android.permission.INTERNET" /><uses-permission android:name="android.permission.ACCESS_NETWORK_STATE" /> - Working with activity_main.xml File:
In the activity_main.xml file, utilize the following code snippet:
<LinearLayout xmlns:android="http://schemas.android.com/apk/res/android" xmlns:tools="http://schemas.android.com/tools" android:layout_width="match_parent" android:layout_height="match_parent" android:orientation="vertical" tools:context=".MainActivity">...</LinearLayout> - Creating a Java Class:
Develop a new Java class dedicated to data storage and management.
Step 5: Creating a Java Class for Data Storage
When we work with Firebase Firestore to retrieve data, we need to develop a Java class to encapsulate this data. Follow these steps:
- Create a new Java class in your app's package. To do this, navigate to app > java > your app’s package name and right-click. Choose New > Java Class and name your class (e.g., DataModal).
- In the DataModal class, define variables to store the image and name data.
- Include an empty constructor required for Firebase functionality.
- Implement a constructor that initializes the name and image URL for the object.
- Add getter and setter methods for accessing and modifying the name and image URL.
Java Class Example: DataModal
public class DataModal {private String name;private String imgUrl;public DataModal() { }public DataModal(String name, String imgUrl) {this.name = name;this.imgUrl = imgUrl;}public String getName() { return name; }public void setName(String name) { this.name = name; }public String getImgUrl() { return imgUrl; }public void setImgUrl(String imgUrl) { this.imgUrl = imgUrl; }}
Step 6: Creating a Layout File for RecyclerView Items
Now, let's proceed to create a layout file for each item that will be displayed in the RecyclerView.
Step 6: Creating a Layout File for RecyclerView Item
- Navigate to the app > res > layout.
- Right-click and select New > Layout Resource File to create a new file (e.g., image_rv_item).
Adding Code to the Layout File:
- Add the following XML code to the file:
| <?xml version="1.0" encoding="utf-8"?> |
| <LinearLayout xmlns:android="http://schemas.android.com/apk/res/android" android:layout_width="wrap_content" android:layout_height="wrap_content" android:layout_gravity="center" android:gravity="center" android:orientation="vertical"> |
| <!-- Image view for displaying our image --> |
| <ImageView android:id="@id/idIVimage" android:layout_width="100dp" android:layout_height="100dp" android:layout_margin="4dp" android:background="@color/white" android:backgroundTint="@color/white" android:padding="3dp" /> |
| <!-- Text view for displaying our text --> |
| <TextView android:id="@id/idTVtext" android:layout_width="wrap_content" android:layout_height="wrap_content" android:layout_margin="2dp" android:padding="3dp" android:text="Category Text" android:textAlignment="center" android:textColor="@color/white" /> |
| </LinearLayout> |
Step 7: Creating an Adapter Class
- Proceed to create an Adapter class for further implementation.
Creating a new Adapter class
For creating a new Adapter class, follow these steps:
- Navigate to app > java > your app's package name
- Right-click and Click on New > Java class
- Name your java class as DataRVAdapter
Code for DataRVAdapter Class
Below is the code for the DataRVAdapter class along with detailed explanations:
- Import necessary packages like android.content.Context, android.view.LayoutInflater, android.view.View, and more.
- Create a class named DataRVAdapter that extends RecyclerView.Adapter
. - Define variables like dataModalArrayList and context within the DataRVAdapter class.
- Create a constructor for the DataRVAdapter class that initializes dataModalArrayList and context.
- Override the onCreateViewHolder method to inflate the layout file for displaying card items.
- Override the onBindViewHolder method to set data to views in RecyclerView items.
- Set an onClickListener for items in the RecyclerView.
- Override the getItemCount method to return the size of the array list.
- Create a ViewHolder class that holds views of RecyclerView items.
- Initialize views like courseNameTV and courseIV inside the ViewHolder class.
Working with the MainActivity.java file
After creating the DataRVAdapter class, you can proceed to work with the MainActivity.java file to further implement and utilize the adapter.
Understanding MainActivity.java Code
Go to the MainActivity.java file and refer to the following code. Below is the code for the MainActivity.java file. Comments are added inside the code to understand the code in more detail.
- Import necessary packages like android.os.Bundle, androidx.appcompat.app.AppCompatActivity, and more.
- Initialize variables like RecyclerView, DataRVAdapter, and FirebaseFirestore in the MainActivity class.
- In the onCreate method, set the content view, initialize variables, set layout manager for RecyclerView, and load data into the RecyclerView.
- Define a method loadRecyclerViewData to fetch data from Firestore and populate the RecyclerView accordingly.
- Handle success and failure scenarios when fetching data from Firestore using listeners.
Step 9: Adding Data to Firebase Console
After setting up the code and ensuring proper data retrieval, the final step involves adding the data to your Firebase Console for storage and retrieval purposes.
Setting Up Firebase
- Access the Firebase website in your browser and navigate to the following screen:
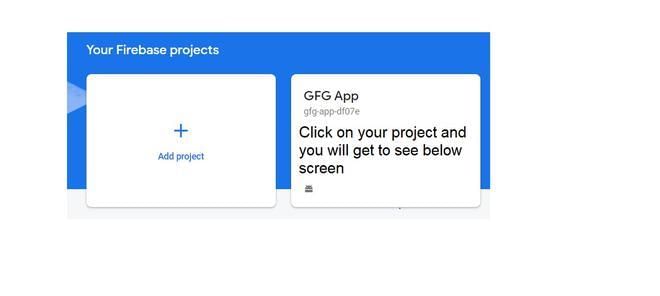
- Click on the "Go to Console" option and select your project as displayed below:
- Upon selecting your project, you'll encounter the following screen:
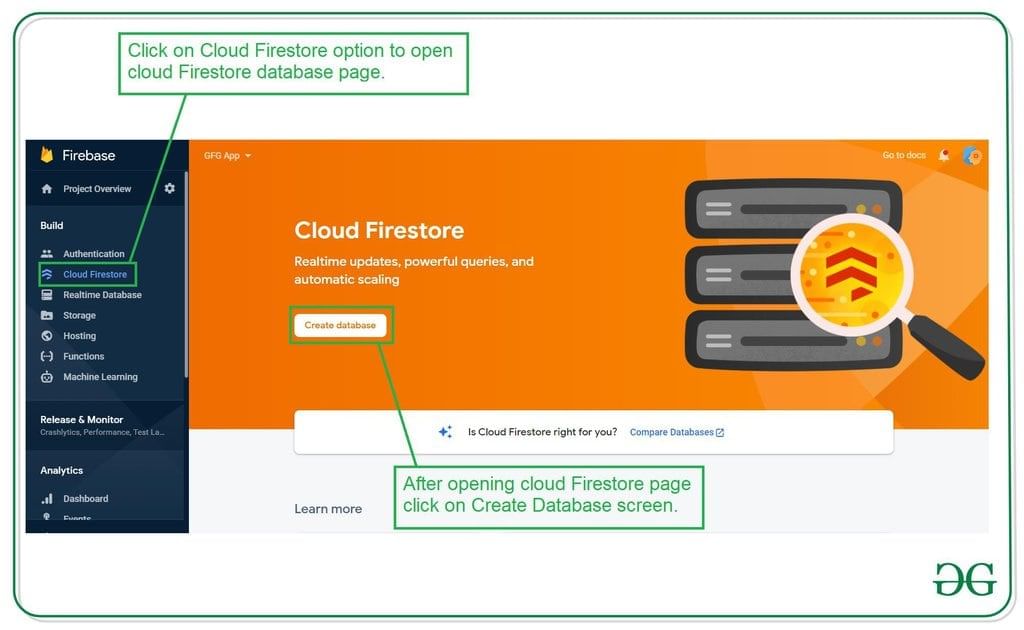
- Proceed by clicking on the "Create Database" option to access the subsequent screen:
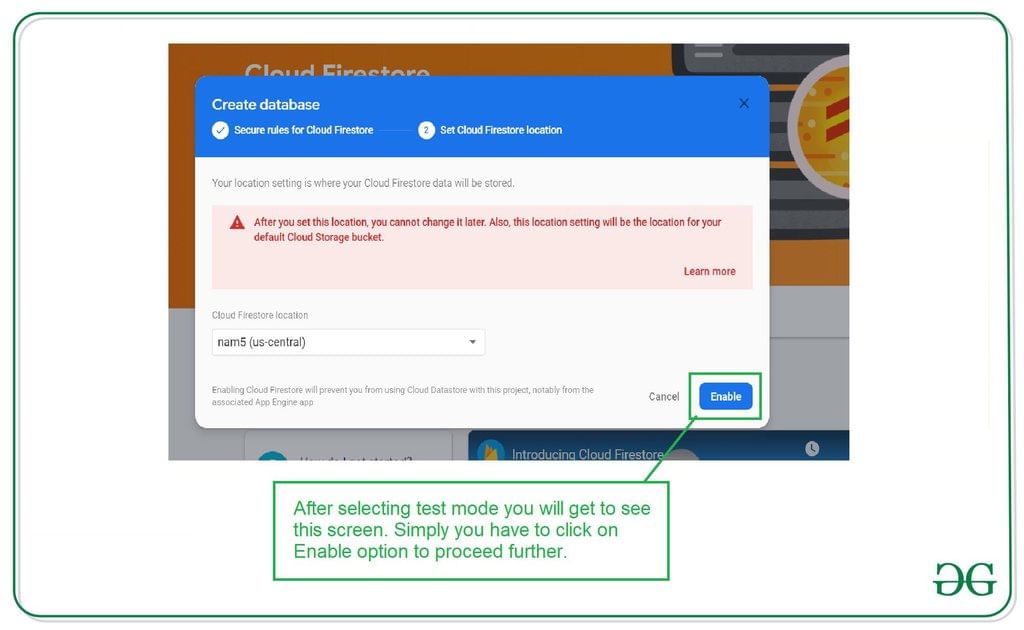
- Within this interface, opt for "Start in test mode" since we're not configuring authentication currently. After selecting test mode, click "Next" to proceed:
- Simply click on "Enable" to activate your Firebase Firestore database. Following this, you can start adding data to your Firebase Console:
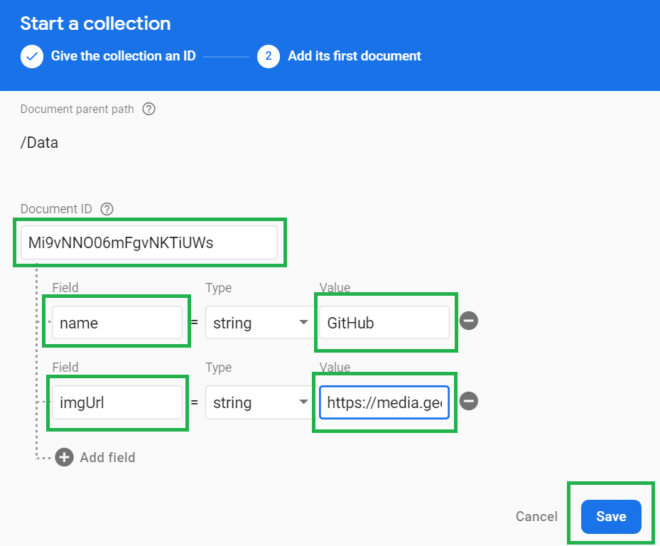
- To begin, click on "Start Collection" and name the collection as "Data." Subsequently, select "Autoid" to create the initial document. Include fields for "name" and "imgUrl," entering relevant values. Ensure the imgUrl field contains the appropriate image URL link, then save your entry: Start CollectionDataAutoidnameimgUrlimage URL linkSaveYour first image in the Data collection has been successfully added.
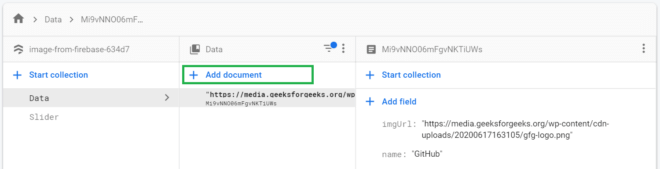
- Continue adding more images by selecting "Add document": Add document
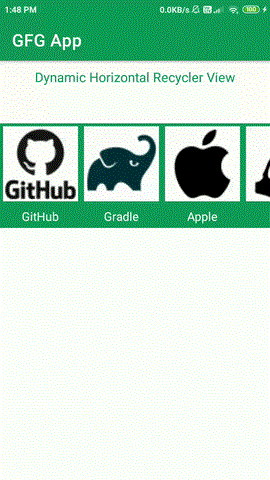
- After incorporating these images, run your application to view the output on the subsequent screen.


Output:
- Introduction to Android Development with Kotlin:
- Embark on an exciting journey into the world of Android Development with Kotlin.
- Opportunity to learn and grow with the Mastering Android Development with Kotlin From Beginner to Pro - Self Paced course.
- Course Details:
- Self-paced course structure for flexible learning.
- Comprehensive content covering beginner to advanced topics in Android Development.
- Interactivity Features:
- Login option available for commenting.
- Engage with the content through 'Like' functionality.
Please Login to comment...
- Login
- Like
| Video Player |
| 00:00 |
| 00:08 |
| Use Up/Down Arrow keys to increase or decrease volume. |

past year papers
,mock tests for examination
,Previous Year Questions with Solutions
,MCQs
,Extra Questions
,Sample Paper
,How to Create Dynamic Horizontal RecyclerView in Android using Firebase Firestore? - Software Development
,Exam
,Free
,Important questions
,ppt
,How to Create Dynamic Horizontal RecyclerView in Android using Firebase Firestore? - Software Development
,shortcuts and tricks
,practice quizzes
,video lectures
,study material
,Viva Questions
,Summary
,Semester Notes
,Objective type Questions
,How to Create Dynamic Horizontal RecyclerView in Android using Firebase Firestore? - Software Development
;


How to Create Dynamic Horizontal RecyclerView in Android using Firebase Firestore? Free PDF Download
Importance of How to Create Dynamic Horizontal RecyclerView in Android using Firebase Firestore?
How to Create Dynamic Horizontal RecyclerView in Android using Firebase Firestore? Notes
How to Create Dynamic Horizontal RecyclerView in Android using Firebase Firestore? Software Development Questions
Study How to Create Dynamic Horizontal RecyclerView in Android using Firebase Firestore? on the App
|
© EduRev
|
Education Revolution
|


|


