How to Create Dynamic GridView in Android using Firebase Firestore? - Software Development PDF Download

How to Create Dynamic GridView in Android using Firebase Firestore?
Last Updated : 17 Jan, 2021- GridView is a commonly used UI component to display items in a grid format within mobile apps.
- In this tutorial, we will explore how to implement GridView using Firebase Firestore in an Android app.
What we are going to build in this article?
- We will create a simple application that displays data in a grid format fetched from Firebase Firestore.
- The project will be implemented using the Java programming language.
Step by Step Implementation
Step 1: Create a new Project
- Create a new project in Android Studio, selecting Java as the programming language.
Step 2: Connect your app to Firebase
- Navigate to the Tools option in Android Studio and click on Firebase.
- In the Firebase panel, go to Firebase Cloud Firestore and connect your app to Firebase.
- Ensure that the necessary dependency for Firebase Firestore database is added to your Gradle file.
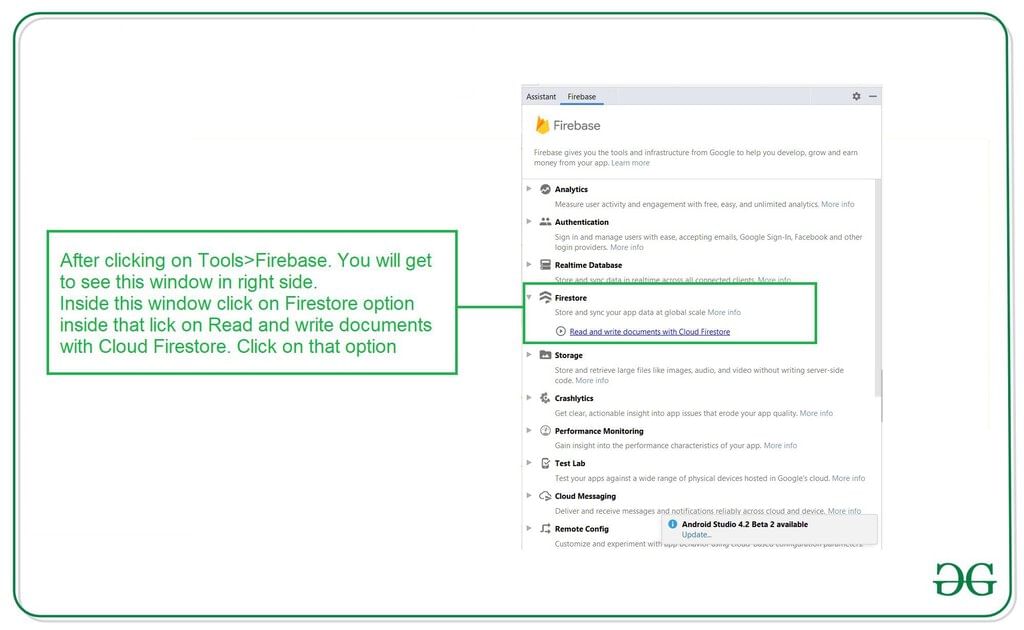
After that, click on the second option and now your App is connected to Firebase. After connecting your app to Firebase, you will get to see the below screen.
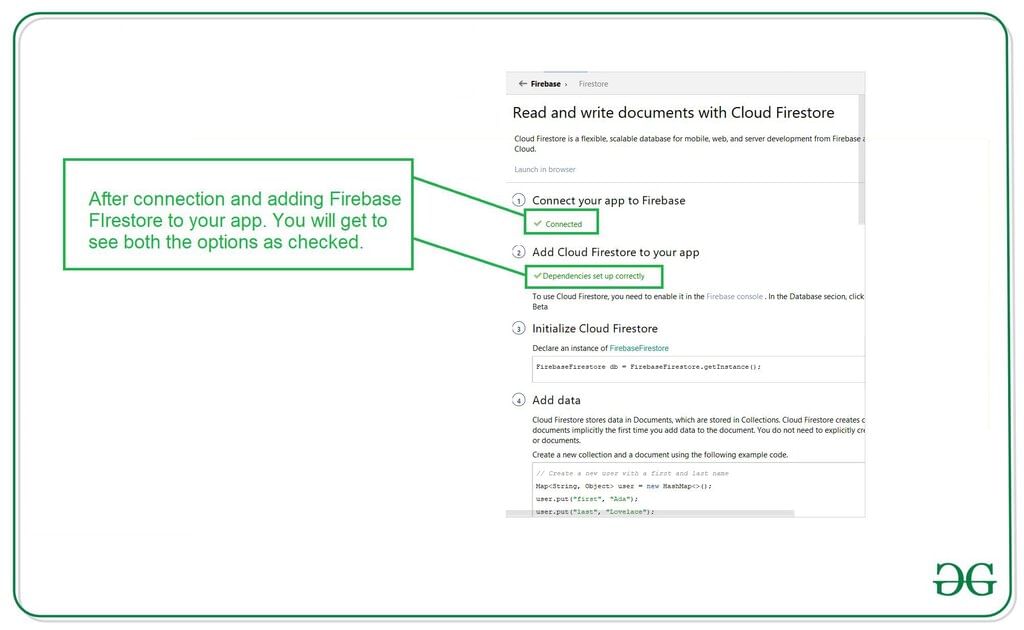
Verify that the dependency for the Firebase Firestore database has been added to your Gradle file. Navigate to the app > Gradle Scripts and check whether the necessary dependency is present in the dependencies section. If not, add it to your build.gradle file.
Adding Firebase to Android App
- Ensure you have the necessary Firebase dependencies in your Gradle Scripts.
- Grant internet permissions in your AndroidManifest.xml file.
- Set up the layout in your activity_main.xml file to display data from Firebase.
- Create a Java class to manage the data from Firebase.
Gradle Scripts
Include the Firebase Firestore dependency in your Gradle Scripts to enable Firebase functionality in your app.
AndroidManifest.xml
Update your AndroidManifest.xml file to include permissions for internet access:
<uses-permission android:name="android.permission.INTERNET" /><uses-permission android:name="android.permission.ACCESS_NETWORK_STATE" />
activity_main.xml
Configure your activity_main.xml layout to incorporate a GridView for displaying data fetched from Firebase.
Example code snippet for activity_main.xml:
<GridView android:id="@id/idGVCourses" android:layout_width="match_parent" android:layout_height="match_parent" android:numColumns="2" />
Storing Data in Java Class
Create a new Java class to handle and manage the data retrieved from Firebase in your Android app.
Reading Data from Firebase Firestore Database
- Creation of Object Class for Reading Data:
- To read data from the Firebase Firestore database, an Object class needs to be created.
- Navigate to app > java > your app's package name.
- Right-click and choose New > Java Class to create a new class.
- Name the class (e.g., DataModal) and insert the provided code.
- DataModal Object Class Code:
- Below is the code snippet for the DataModal class:
public class DataModal { private String name; private String imgUrl; public DataModal() { } public DataModal(String name, String imgUrl) { this.name = name; this.imgUrl = imgUrl; } public String getName() { return name; } public void setName(String name) { this.name = name; } public String getImgUrl() { return imgUrl; } public void setImgUrl(String imgUrl) { this.imgUrl = imgUrl; } } - Create Layout File for GridView Item:
- To display items in a GridView, a layout file needs to be created for each item.
Creating Layout Resource File for GridView Item
- Navigate to the app > res > layout.
- Right-click on it and click on New > Layout Resource File and provide a name, e.g., image_gv_item.
- Add the following XML code to the file:
| <?xml version="1.0" encoding="utf-8"?> | |||||||
| <LinearLayout xmlns:android="http://schemas.android.com/apk/res/android" | android:layout_width="match_parent" | android:layout_height="wrap_content" | android:layout_gravity="center" | android:gravity="center" | android:orientation="vertical" | android:padding="4dp"> | |
| <!-- Image view for displaying our image --> | |||||||
| <ImageView android:id="@id/idIVimage" | android:layout_width="100dp" | android:layout_height="100dp" | android:layout_margin="4dp" | android:background="@color/white" | android:backgroundTint="@color/white" | android:padding="3dp" /> | |
| <!-- Text view for displaying our text --> | |||||||
| <TextView android:id="@id/idTVtext" | android:layout_width="wrap_content" | android:layout_height="wrap_content" | android:layout_margin="2dp" | android:padding="3dp" | android:text="Category Text" | android:textAlignment="center" | android:textColor="@color/black" /> |
| </LinearLayout> |
Creating Adapter Class for GridView
- Now, proceed to create an Adapter class for the GridView.
Creating a New Adapter Class
- Go to the following path in your project: app > java > your app's package name.
- Right-click on the package name, then click on "New" and select "Java Class".
- Name your Java class as "CoursesGVAdapter".
- Add the provided code snippet to the class. Comments within the code offer detailed explanations.
Code Snippet Walkthrough
- The
CoursesGVAdapterclass extendsArrayAdapter<DataModal>to manage a list view. - A constructor initializes the adapter with a context and an ArrayList of
DataModalobjects.
View Inflation and Data Binding
- The
getViewmethod inflates the layout for each list item. - Data from the
DataModalat a specific position is retrieved. - UI components like TextView and ImageView are initialized for the list item.
- Data is set to the views, such as setting text to a TextView and loading an image with Picasso.
Item Click Handling
- A click listener is set on the list item to display a toast message with the clicked item's name.
Working with the MainActivity.java File
Step 8: Implementing functionalities in the MainActivity.java file.
MainActivity.java File Overview
Go to the MainActivity.java file and refer to the following code. Below is a summarized explanation of the code present in the MainActivity.java file:
- MainActivity.java Structure:
- The MainActivity.java file contains code for an Android application.
- It includes the initialization of variables for a grid view, an array list, and the Firebase Firestore.
- There are methods for loading data into the grid view from Firebase Firestore and handling success and failure scenarios.
- Initialization Steps:
- Variables like coursesGV, dataModalArrayList, and db are initialized.
- The onCreate method sets the content view and initializes variables.
- The loadDatainGridView method is called to load data into the grid view.
- Loading Data from Firebase:
- Data is fetched from Firebase Firestore using a collection in Android.
- On successful data retrieval, it is added to the array list and displayed in the grid view using an adapter.
- If no data is found, a corresponding message is displayed.
- Error Handling:
- If there is a failure in loading data from Firebase, an appropriate error message is shown.
Adding Data to Firebase Firestore in Android
After understanding the code, the next step involves adding data to Firebase Firestore in an Android application.
- Adding Data to Firebase Firestore in Android:
- Search for Firebase on your browser and navigate to the website.
- Click on "Go to Console" and select your project.
- Create a Firestore database by clicking on "Create Database."
- Select "Start in test mode" to proceed without setting up authentication.
- Click "Next" to confirm the selection.
- Enable your Firebase Firestore database by clicking on the "Enable" button.
- Adding Data to Firebase Console:
- Click on "Start Collection" and name the collection as "Data."
- Use the "Autoid" option to create the first document.
- Create fields for "name" and "imgUrl" and input the respective values.
- Specify the image URL link in the "imgUrl" field.
- Click on "Save" to add your first image to the Data collection.
- Adding More Images:
- Add more images by clicking on the "Add document" button.
- Viewing Output:
- Run your app to view the output on the screen.
Output:
- Video Player
- 00:00
- 00:10
- Use Up/Down Arrow keys to increase or decrease volume.
Please Login to comment...
- Login
- Like

Extra Questions
,How to Create Dynamic GridView in Android using Firebase Firestore? - Software Development
,past year papers
,How to Create Dynamic GridView in Android using Firebase Firestore? - Software Development
,ppt
,MCQs
,Summary
,Viva Questions
,Sample Paper
,How to Create Dynamic GridView in Android using Firebase Firestore? - Software Development
,Previous Year Questions with Solutions
,video lectures
,Important questions
,study material
,shortcuts and tricks
,Exam
,practice quizzes
,mock tests for examination
,Semester Notes
,Free
,Objective type Questions
;


How to Create Dynamic GridView in Android using Firebase Firestore? Free PDF Download
Importance of How to Create Dynamic GridView in Android using Firebase Firestore?
How to Create Dynamic GridView in Android using Firebase Firestore? Notes
How to Create Dynamic GridView in Android using Firebase Firestore? Software Development Questions
Study How to Create Dynamic GridView in Android using Firebase Firestore? on the App
|
© EduRev
|
Education Revolution
|


|


