Drawing and measuring angles - Year 7 PDF Download

Key points
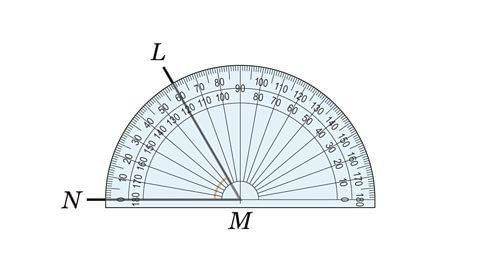 Image caption
- An angle represents the rotation between two intersecting lines and is measured in degrees (°).
- Angles can be categorized based on their size:
- Acute angle: Less than 90°.
- Right angle: Exactly 90°.
- Obtuse angle: Between 90° and 180°.
- Straight angle: Exactly 180°, forming a straight line.
- Reflex angle: Between 180° and 360°.
- Angles are often labeled using three letters (e.g., DEF) to specify the angle's location, with the middle letter indicating the angle's vertex.
- When measuring or drawing angles using a protractor, it's essential to start counting from zero, either on the inside or outside row, based on the angle's position.
Types of Angles
- Acute Angle: An angle that is less than 90 degrees.
- Right Angle: An angle that measures exactly 90 degrees.
- Obtuse Angle: An angle that falls between 90 and 180 degrees.
- Straight Angle: An angle that forms a straight line and measures 180 degrees.
- Reflex Angle: An angle that is greater than 180 degrees but less than 360 degrees.
Labeling Angles
- Definition: Angles can be denoted using three letters, such as DEF, to specify the angle's location, where the middle letter represents the angle, and the other two letters indicate the lines that enclose the angle.
Measuring and Drawing Angles with a Protractor
- When measuring or drawing angles with a protractor, start counting from zero. A protractor is a semi-circular or circular tool used to measure angles. Depending on the angle's position, you may follow either the inside or outside row of numbers.
- It's crucial to align the protractor correctly to get an accurate measurement. Ensure that the center of the protractor is aligned with the vertex of the angle.
- For example, if you are measuring an acute angle like angle LMN shown in the image, place the protractor such that one arm aligns with line LM and the other arm aligns with line MN.
Image Reference
 |
Types of Angles and Estimating Angles
Angles are defined based on divisions of a full rotation, which encompasses 360 degrees.
Full Turn:A quarter turn corresponds to 90 degrees and is termed a right angle.
Quarter Turn:A half turn equals 180 degrees and is referred to as a straight angle (or an angle along a straight line).
Half Turn:A three-quarter turn measures 270 degrees.
Three-quarter Turn:- An acute angle is less than 90 degrees.
- An obtuse angle falls between 90 and 180 degrees.
- A reflex angle ranges from 180 to 360 degrees.
The magnitude of an angle can be approximated without utilizing a protractor. This estimation involves considering the type of angle.
Estimate: To roughly approximate or provide an estimated value.Example
Image GallerySkip Image Gallery- Image Caption: The four most commonly employed angles are based on quarter turns.
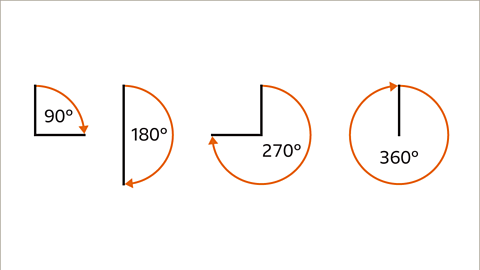 Image Caption: The four most commonly employed angles are based on quarter turns.
Types of Angles
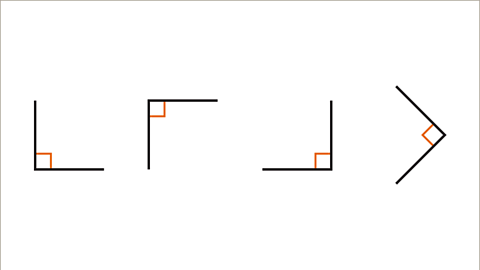
- Right Angles
- Acute Angles
- Obtuse Angles
Right Angles
- Right angles are angles that measure 90 degrees.
- They look like the corner of a square, with a box symbol at the vertex.
- For example, a quarter turn represents a right angle.
Acute Angles
- Acute angles are less than 90 degrees.
- These angles are smaller than a right angle.
- For instance, angles in a triangle are often acute.
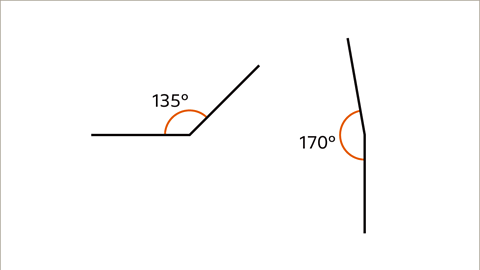
Obtuse Angles
- An obtuse angle is between 90 and 180 degrees.
- It is wider than a right angle but not a straight line.
- For example, an angle measuring 135 degrees is obtuse.
Visual Representations
 |  |
 |  |
Reflex Angles
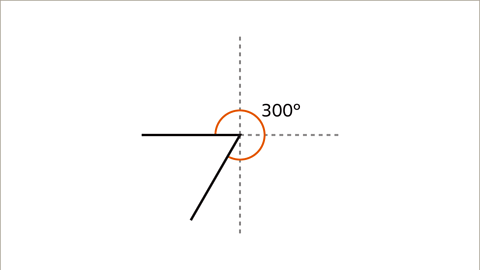
- Reflex angles are angles greater than 180 degrees as they extend beyond a half turn. For instance, an angle exceeding 270 degrees but less than 360 degrees can be termed as a reflex angle, with a good estimate typically around 300 degrees.
Slide 1 of 6
- An image displays four angles:
- 1. A right angle of 90 degrees formed by two line segments.
- 2. A straight line representing 180 degrees.
- 3. An angle of 270 degrees created by two line segments.
- 4. A full turn of 360 degrees represented by a straight line.
- The images help visualize angles based on quarter turns and demonstrate angles commonly encountered.

Question
Back to topNaming and Measuring Angles
When a diagram contains multiple lines, it's useful to assign letters to angles for clarity. For example, angle CAB is formed when moving from point C to point A and then to point B.
To measure angles, a protractor is employed. Here are the steps for measuring acute or obtuse angles:
- Place the protractor's cross on the angle's vertex (corner).
- Align the protractor's baseline with one of the angle's lines, ensuring the zero mark aligns with the line.
- Determine if the zero mark is on the inner or outer row of the protractor.
- Read the angle measurement by following the numbers around the protractor. The direction of measurement (clockwise or counterclockwise) depends on the row followed.
Understanding Angle Measurement
Clockwise: Moving in the same direction as the hands on a clock.
Anti-clockwise: Moving in the opposite direction to the hands on a clock.
Reflex Angles
To measure a reflex angle, find the acute or obtuse angle and subtract it from 360 degrees.
Examples
Image Gallery:
Skip the image gallery.
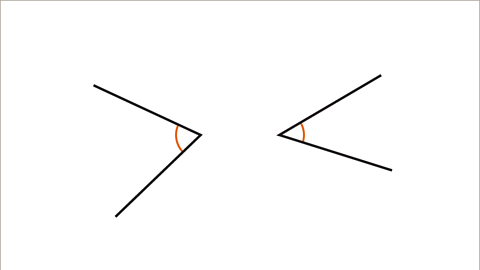
- When you need a reflex angle instead of an acute angle, it will be specifically labeled as 'reflex angle LMN'.

Image caption:
Angle LMN is shown on the left. If the reflex angle LMN is needed instead, it will be labeled specifically as 'reflex angle LMN', like the picture on the right-hand side.
How to Measure Angles Using a Protractor
Angle LMN: To measure the angle LMN, place the protractor's cross at the angle's vertex and align one side of the angle with the protractor's base. The angle measurement is where the other side intersects the protractor scale.
Angle PQR: When measuring the angle PQR, ensure the protractor's zero aligns with one side of the angle and read the measurement where the other side crosses the protractor scale. Remember to follow the correct direction based on the protractor scale.
Measuring Angle LMN
- When measuring angle LMN, remember to place the protractor's cross at the vertex M and align one side of the angle with the protractor's base. The angle measurement is where the other side intersects the scale, indicating a 60-degree angle.
Measuring Angle PQR
- For angle PQR, ensure the protractor's zero aligns with one side of the angle, and carefully follow the scale in the counterclockwise direction. In this case, the angle measures 132 degrees.
| Angle | Measurement |
|---|---|
| LMN | 60° |
| PQR | 132° |
Reflex Angles
When dealing with reflex angles, it's often more straightforward to work with the corresponding obtuse angle and then calculate the reflex angle from that.
- Definition: The reflex angle SUV is the angle that exceeds 180 degrees, often measured as the obtuse angle and then subtracted from 360 degrees to find the reflex angle.
- Calculation: To find the reflex angle SUV, first measure the obtuse angle SUV. For instance, if the obtuse angle SUV measures 120 degrees, the reflex angle can be calculated as 360 degrees - 120 degrees = 240 degrees.
Visual Representation
Visual aids are essential for understanding reflex angles:
 | 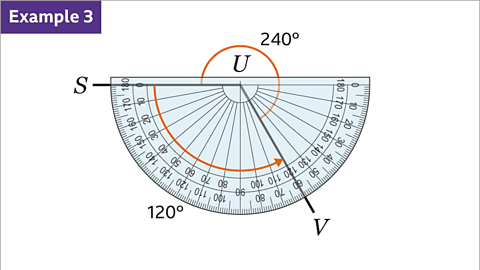 |
| Image caption: A protractor overlays the angle. The protractor is aligned to measure the remaining angle SUV, such that U is on the cross of the protractor and line SU corresponds to the zero on the protractor's scale. An arc has been drawn with an anti-clockwise arrow from SU, corresponding to zero on the protractor scale, to UV, measuring 120 degrees. The reflex angle is labeled 240 degrees. | Image caption: A protractor overlays the angle. The protractor is aligned to measure the remaining angle SUV, such that U is on the cross of the protractor and line SU corresponds to the zero on the protractor's scale. An arc has been drawn with an anti-clockwise arrow from SU, corresponding to zero on the protractor scale, to UV, measuring 120 degrees. The reflex angle is labeled 240 degrees. |
Angles Overview
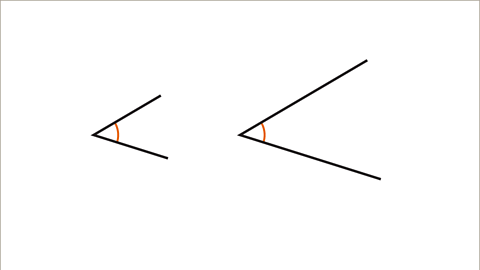
Understanding the relationship between acute and reflex angles:
- Acute Angle LMN: This angle is formed by line segments LM and MN, typically measuring less than 90 degrees.
- Reflex Angle LMN: In contrast, the reflex angle LMN exceeds 180 degrees, often shown with an orange arc to differentiate it from the acute angle.
On a visual representation, if Angle LMN is displayed, the reflex angle LMN can be specifically labeled as 'reflex angle LMN' to distinguish it clearly.
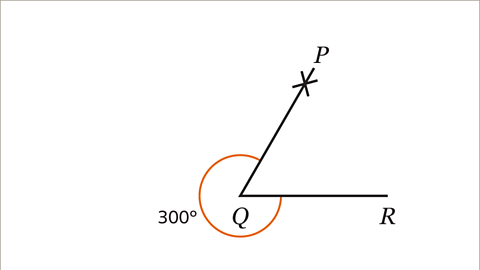
Drawing angles
- When drawing an acute or obtuse angle, like in the case of angle PQR = 60 degrees, follow these steps:
- Begin by drawing the line QR.
- Position the cross on the protractor at point Q, aligning the bottom line with QR.
- Using the protractor, mark 60 degrees from the zero line, denoting point P.
- Connect the mark to point Q to form the angle.
- For reflex angles exceeding 180 degrees, such as PQR = 300 degrees:
- Calculate the complementary acute angle, which in this case is 60 degrees.
- Proceed with the same steps as earlier, drawing the 60-degree angle and labeling the reflex angle as 300 degrees.
Example
- To draw a reflex angle like PQR = 300 degrees, it's simpler to first draw the complementary angle, which is found by subtracting 300 from 360 degrees, resulting in 60 degrees.
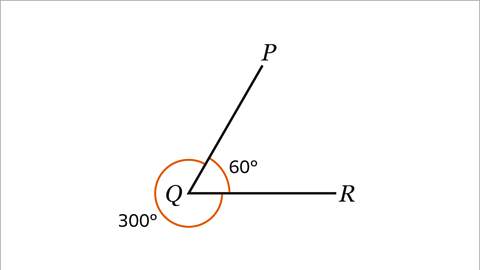 | To draw a reflex angle such as PQR = 300 degrees, it is easier to draw the complementary angle of 60 degrees first, then represent the reflex angle as required. |
How to Measure and Draw Angles
Here are the steps to measure and draw angles accurately:
- Draw the Line QR:Use a ruler to draw a horizontal line segment QR.
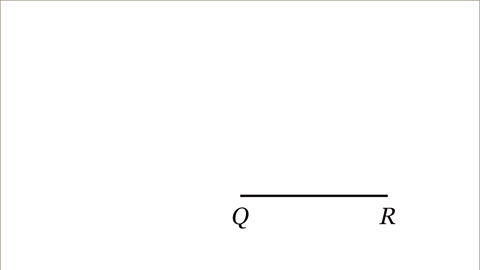
- Place the Protractor and Measure an Angle of 60°:Position the protractor on line QR with the cross at point Q. Measure a 60° angle by marking and labeling point P.
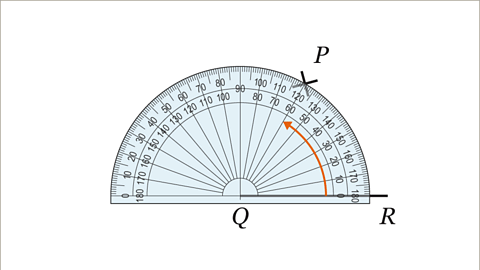
- Connect Points Q and P:Remove the protractor and draw a line from point Q to point P using a ruler.
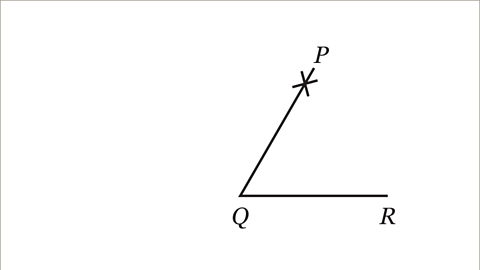
- Illustrating a 300° Angle:Mark the reflex angle corresponding to 300°.
Understanding Angles:
When drawing angles, it's important to follow these steps precisely to achieve accurate results. Remember, practice makes perfect!
| Angle | Measurement |
|---|---|
| Angle PQR | 60° |
| Reflex Angle PQR | 300° |
Remember, to draw a reflex angle like PQR = 300°, it's easier to draw the complementary angle first and then determine the reflex angle as the required angle. The complementary angle is calculated by subtracting 300° from 360°, resulting in 60°.
1 of 5
Slide 1 of 5, An image of acute angle PQR labeled sixty degrees. The reflex angle PQR is also labeled three hundred degrees. The arcs indicating the angles are colored orange. To draw a reflex angle like PQR = 300°, it's easier to draw the 'other' angle, then show the reflex angle as the required angle. The 'other' angle is found by subtracting 300° from 360°, resulting in 60°.Back to topPractise drawing and measuring angles
Quiz
Practise drawing and measuring angles with this quiz. You may need a pen, paper, ruler and protractor to help you with your answers.
Real-life maths
When installing solar panels, it's crucial to tilt them at specific angles to maximize energy absorption from the sun's rays.

An angle of 0° would be parallel to the ground, while a 90° angle would be perpendicular. The optimal tilt angle varies based on the location of the solar panels:
- London, UK - 35°
- Madrid, Spain - 30°
- Mexico City, Mexico - 20°

Game - Divided Islands
| Topic | Explanation |
|---|---|
| Importance of Tilted Solar Panels | When setting up solar panels, their angles significantly impact energy absorption efficiency from sunlight. For instance, in London, UK, the optimal tilt angle is 35°. |
| Varying Tilt Angles | The appropriate tilt angles for solar panels differ based on location. In Madrid, Spain, the recommended angle is 30°, while in Mexico City, Mexico, it is 20°. |

Exam
,Drawing and measuring angles - Year 7
,Extra Questions
,practice quizzes
,study material
,Previous Year Questions with Solutions
,Viva Questions
,mock tests for examination
,Drawing and measuring angles - Year 7
,video lectures
,ppt
,Objective type Questions
,Free
,Summary
,past year papers
,MCQs
,shortcuts and tricks
,Semester Notes
,Sample Paper
,Drawing and measuring angles - Year 7
,Important questions
,


Drawing and measuring angles Free PDF Download
Importance of Drawing and measuring angles
Drawing and measuring angles Notes
Drawing and measuring angles Year 7 Questions
Study Drawing and measuring angles on the App
|
© EduRev
|
Education Revolution
|


|


within 7 days!