3D Shapes and Nets - Year 7 PDF Download

Key points
 Image caption
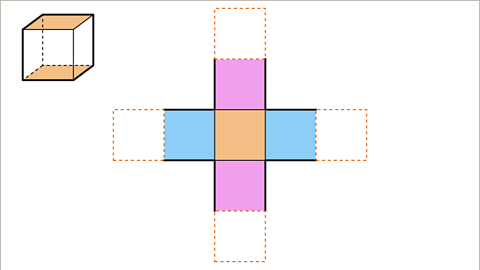
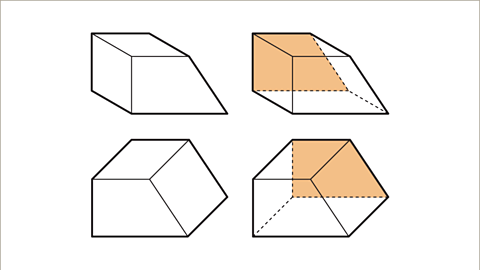
- A three-dimensional (3D) shape can be created from a two-dimensional (2D) shape known as a net, which is a group of connected 2D shapes that fold to form a 3D shape.
- The two-dimensional shapes forming a net can be arranged in various ways for a specific 3D shape, ensuring consistency in faces, vertices, and edges. There exist eleven distinct nets that can form a cube.
- An isometric grid, a pattern of lines or dots arranged at regular intervals and 60-degree angles, serves as a helpful guide for drawing 3D shapes on paper.
 Back to top
Explanation:
- A three-dimensional shape is built by folding a net, a connected group of 2D shapes, into a 3D form. For instance, a cube can be constructed by folding the net of interconnected squares.
- When arranging the 2D shapes to form a 3D shape, it's crucial to maintain the consistency of faces, vertices (corner points where edges meet), and edges. This ensures the resulting 3D shape is accurate and complete.
- There are specific nets that, when folded, create a cube. These nets vary in shape but ultimately fold to form the familiar cube structure we recognize.
- An isometric grid, featuring lines or dots at specific intervals and angles, aids in accurately sketching 3D objects on a 2D surface. It provides a guide for maintaining proportions and angles in the drawing.
Video
Watch the video to understand how 3D shapes like cubes can be formed from nets, which are arrangements of 2D shapes.
Back to topHow to Draw the Net of a Cube and a Cuboid
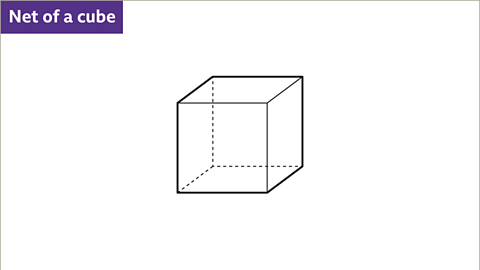
- To create a net of a cube or a cuboid, envision the 3D shape being unfolded. Each face is either a rectangle or a square. Start by drawing the base face, which matches the dimensions of the top face. Proceed by sketching the faces connected to the base face. The top face should be drawn attached to an edge of the front, back, left, or right face without touching the base face. This separation between the top and base faces is crucial both in the 3D shape and on the net. The net of a cube, termed a hexomino, comprises six identical squares linked along their edges. There exist eleven distinct ways to arrange these squares correctly to form a cube's net.
- When visualizing the unfolding of a 3D shape to create its net, remember that a cube has six square faces, while a cuboid possesses six rectangular faces with congruent opposite faces.
- While creating the net, ensure that the top face of the cube or cuboid does not touch the base face either at an edge or vertex. This principle applies both to the 3D shape and its corresponding net.
- It's important to note that a cube's net, known as a hexomino, consists of six equal squares joined together along their edges. The net's correct formation requires arranging these squares in one of the eleven possible configurations.
- Visualize the unfolding process of the 3D shape to construct the net accurately, distinguishing between the cube's six square faces and the cuboid's six rectangular faces.
The Basics of Geometric Shapes
- A cube is a 3D shape with six square faces.
- A cuboid is a 3D shape with six rectangular faces. The opposite faces are congruent.
- 3D refers to three dimensions: length, width, and height.
- A rectangle is a quadrilateral with opposite pairs of sides that are equal in length and parallel. Additionally, all four angles are right angles.
Explanation of Geometric Shapes
- Cube: A cube is a three-dimensional shape with six square faces. Imagine a Rubik's Cube as an example of a cube. Each face is a perfect square, and all edges are equal in length.
- Cuboid: A cuboid is also a three-dimensional shape, but it has six rectangular faces. Think of a rectangular prism, like a shoebox. The opposite faces of a cuboid have the same size and shape.
- 3D: Three-dimensional space includes length, width, and height. When we look at objects in the real world, we can perceive them in three dimensions. For instance, think about a room with its length, width, and height measurements.
- Rectangle: A rectangle is a four-sided shape where opposite sides are equal in length and parallel. Visualize a piece of paper or a book cover. Its four angles are all right angles, forming perfect corners.
Visual Representation of Geometric Shapes
 |  |  |  |
Steps to Draw a Cube Net
- Draw the base face: This is the face on which the shape rests, with dimensions identical to the top face.
- Draw the faces attached to the base face.
- Draw the top face attached to an edge of the front, back, left, or right face.
- The top face should not touch the base face at any point, whether at an edge or vertex. This rule applies to both the 3D shape and its net representation.
- The net of a cube, known as a hexomino, consists of six congruent squares connected along their edges. The term "hex" originates from Greek, denoting 'six'. There exist eleven distinct ways to arrange these squares to form a correct cube net.
Examples
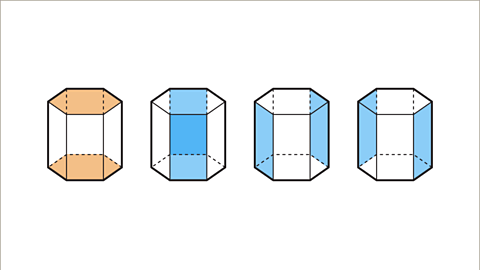
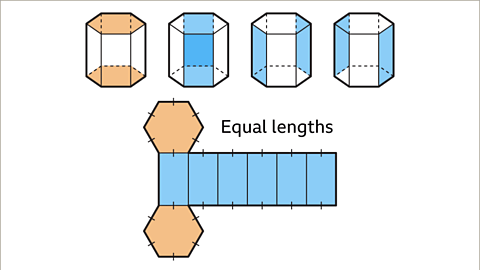
Image gallery Skip image gallery- Image caption: A net represents a 2D shape that can be folded to form a 3D shape. For instance, the net of a dodecahedron, a solid figure with twelve pentagonal faces, consists of 12 regular pentagons.
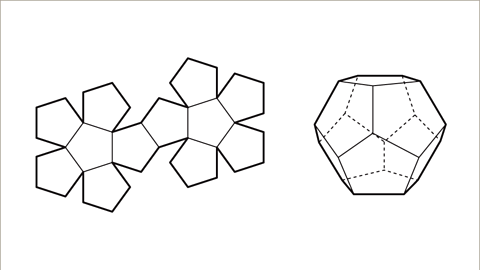 Image caption: A net is a 2D shape that folds to make up a 3D shape. The net of a dodecahedron (a platonic solid with twelve pentagonal faces) is made up of 12 regular pentagons.
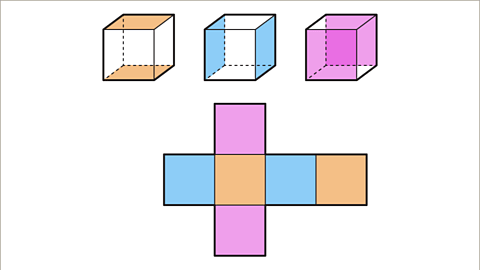
- Image caption: To create the net of a cube, you draw its two-dimensional representation.
- Image caption: A cube comprises six faces, and its net consists of six squares. The process involves drawing the square base face and then the attached faces - front, back, left, and right.
- Image caption: The top face, the sixth square in the net of a cube, can be positioned in various ways without touching the base face's edges or vertices.
Net of Shapes
- The net of a shape represents its 2D unfolded form before it's folded into a 3D object.
- Each shape has a unique net that corresponds to its 3D structure.
Creating Nets
- To create a net, visualize how the 3D shape can be unfolded into a flat 2D shape.
- Nets help in understanding the surface areas and structures of 3D shapes.
Cube Net Configurations
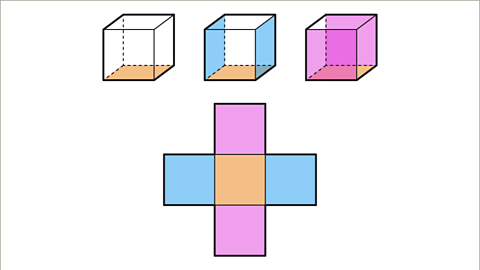
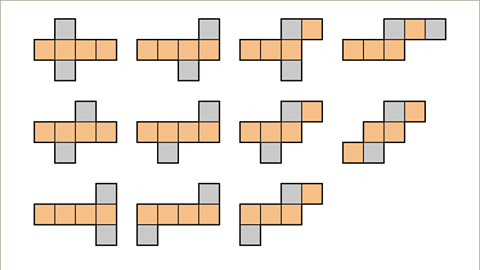
- Image caption: This net represents a cross-shaped structure. The cube's opposite faces are not adjacent on the net.
- Image caption: There exist eleven potential nets that can form a cube, each presenting a distinct configuration.
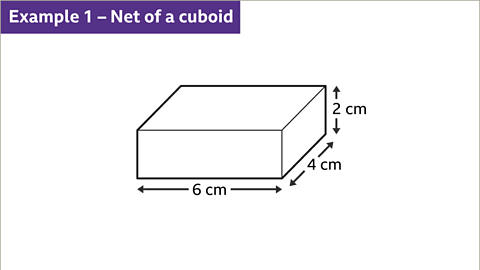
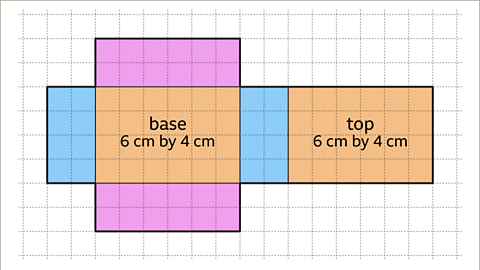
- Image caption: Tasked with drawing the net of a cuboid measuring 6 cm by 2 cm by 4 cm.
- Image caption: Initially, outline a rectangle denoting the cuboid's base, measuring 6 cm by 4 cm. Proceed by illustrating the attached faces' dimensions.
- Image caption: The final step involves adding the top face to the net, ensuring it doesn't touch any edges or vertices of the base. The top face mirrors the base, measuring 6 cm by 4 cm.
Visual Representation
 |  |
 |  |
How to draw the nets of a prism and a pyramid
Net is a 2D shape that folds to form a 3D shape. Let's delve into creating the nets of a prism and a pyramid.
Nets of a Prism
- A prism is a polyhedron with two parallel and congruent faces called bases and rectangular faces called lateral faces.
- To draw the net of a prism, start by sketching the shape of its bases (usually polygons) and connect the corresponding vertices with rectangles representing the lateral faces.
- For example, consider a rectangular prism. Its net will consist of two rectangles (bases) connected by four rectangles (lateral faces).
Nets of a Pyramid
- A pyramid is a polyhedron with a polygonal base and triangular faces that meet at a common vertex called the apex.
- To create the net of a pyramid, you need to unfold the faces of the pyramid onto a 2D plane.
- For instance, visualizing a square pyramid, its net will show a square base and four triangular faces joining at the apex.
Remember, mastering the art of drawing nets enhances your spatial visualization skills and aids in understanding the 3D structures better.
| Image 1 | Image 2 |
|---|---|
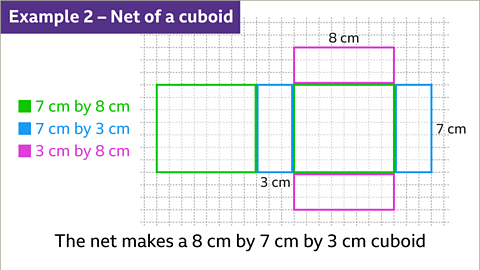 |  |
Image caption: The three rectangles used to make the cuboid net give the dimensions of the cuboid. The rectangles are 7 cm by 8 cm, 7 cm by 3 cm, and 3 cm by 8 cm. The dimensions of the cuboid for this net are 7 cm, 8 cm, and 3 cm. The length, width, and height can be any combination of these measurements.
Net of 3D Shapes
- To draw the net of a triangular prism:
- The net consists of three rectangles and two triangles.
- For an equilateral triangle cross-section, the rectangles are congruent.
- For an isosceles triangle cross-section, two rectangles are congruent.
- For a scalene triangle cross-section, all rectangles are different.
- Rectangles are placed next to each other, with triangles at each end.
Net of Prism with Regular Polygon Cross-Section
- To draw the net of a prism with a regular polygon cross-section:
- The net comprises congruent rectangles and polygon ends.
- Number of rectangles equals the sides of the polygon.
- Rectangles are joined along the prism's length dimension.
- Polygon is placed at each end of a rectangle.
Net of Pyramid
- To draw the net of a pyramid:
- The net includes the base polygon and isosceles triangles attached to each side.
- Measurements include side-length of the polygon and triangle height.
- Height of the triangle is the slant height of the pyramid.
- Base shape is drawn with isosceles triangles on each side.
Net of a Prism with Different Cross-Sections
- The net of a prism comprises three rectangles and two triangles.
- When the cross-section is an equilateral triangle, the rectangles are identical.
- When the cross-section is an isosceles triangle, two of the rectangles are congruent.
- When the cross-section is a scalene triangle, all rectangles are distinct.
- The rectangles are placed adjacent, connected along the prism's length dimension.
- A triangle adjoins each end of one rectangle, ensuring perfect edge alignment upon folding.
Net of a Prism with a Regular Polygon Cross-Section
- To depict the net of a prism with a regular polygon cross-section:
- The net comprises congruent rectangles and two polygon ends.
- The number of rectangles matches the sides of the polygon.
- One rectangle dimension aligns with the prism's length, while the other mirrors the polygon's side length.
- The rectangles are placed side-by-side, connected along the prism's length dimension.
- The polygon is positioned at each end of a rectangle.
Polygon and Pyramid Nets
A polygon is a 2D shape with three or more edges and vertices. It consists of straight lines that form a closed shape.
- The net of a polygon is made up of congruent rectangles and two polygon ends.
- The number of rectangles in the net equals the number of sides of the polygon.
- One dimension of a rectangle represents the length of the prism, while the other is the side-length of the polygon cross-section.
- Rectangles are positioned adjacent to each other, connected along the prism's length dimension.
- A polygon is placed at each end of one of the rectangles.
Net of Pyramid
A pyramid is a 3D shape with a polygon-shaped base and a pointed apex.
- To draw the net of a pyramid, start with the base polygon and attach congruent isosceles triangles to each side of the base.
- The given measurements typically include the side-length of the polygon and the height of each triangle.
- The height of the triangle is the slant height of the pyramid, extending from the apex to the midpoint of the base.
- Begin by drawing the base shape, then add an isosceles triangle to each side of the base.
Understanding Pyramids
- A pyramid is a 3D shape with a polygon-shaped base and a pointed apex. It is named according to the shape of its base, such as square-based or hexagon-based.
Key Characteristics of Pyramids
- The net of a pyramid consists of the base polygon and congruent isosceles triangles attached to each side of the base.
- The measurements provided include the side-length of the polygon and the height of each triangle. The height of the triangle is known as the slant height, which is the height of an isosceles triangle face from the apex to the midpoint of the base.
- To visualize a pyramid, draw the base shape and add an isosceles triangle to each side of the base.
Net of a Triangular Prism
In geometry, a triangular prism is a three-sided polyhedron with two triangular bases and three rectangular faces. Understanding its net, or unfolded form, is crucial for visualizing its structure.
Examples
Image gallerySkip image gallery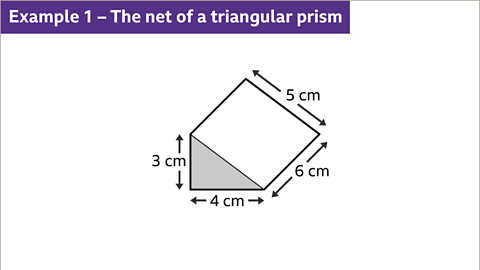 Image caption, Draw the net of a triangular prism.
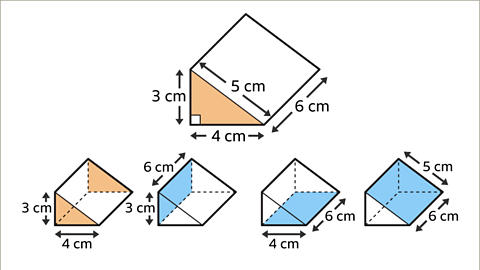 Image caption, The cross-section of the prism is a right-angled triangle with side-lengths 3 cm, 4 cm, and 5 cm. The prism is 6 cm long. The net is made up of two right-angled triangles and three rectangles. The dimensions of the rectangles are 3 cm by 6 cm, 4 cm by 6 cm, and 5 cm by 6 cm.
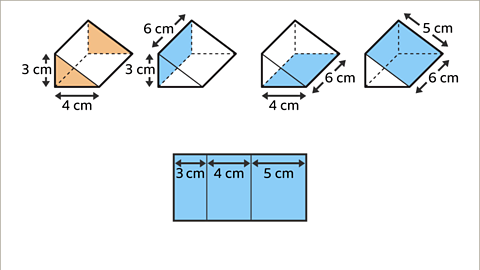 Image caption, Draw the three rectangles next to each other joined along the dimension that is the length of the prism (6 cm).
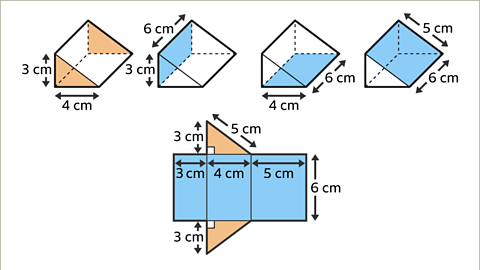 Image caption, Draw a right-angled triangle at opposite ends of a rectangle. The net is complete.
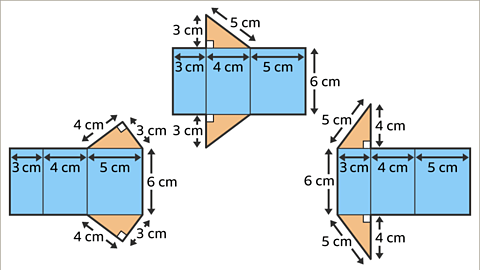
 Image caption, The net may be drawn in more than one way.
Synopsis of Geometric Shapes
Net of a Hexagonal Prism
In this section, we explore the concept of the net of a hexagonal prism.
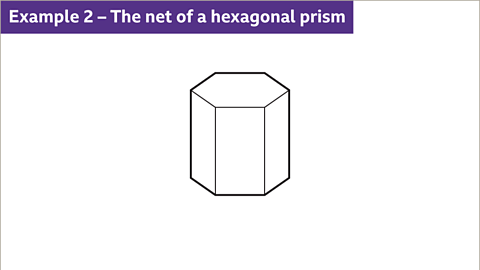
Sketch the net of a hexagonal prism.
Components of the Hexagonal Prism Net
There are no measurements on the 3D shape. The sketch will show the shapes used to form the net of the hexagonal prism. The cross-section of the prism is a regular hexagon. The net is made up of two hexagons and six rectangles.
Completing the Hexagonal Prism Net
Draw the six rectangles next to each other joined along the dimension that is the length of the prism (5 cm) and draw a hexagon at opposite ends of one of the rectangles. The net is complete.
Net of a Square-Based Pyramid
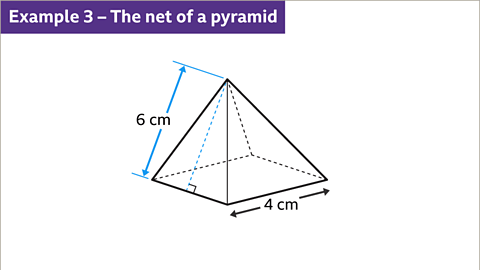
Draw the net of a square-based pyramid. The square has sides-lengths of 4 cm, and the slant height of the pyramid is 6 cm.
Net of Shapes
- Image caption: The net is made up of a square and four congruent isosceles triangles. Draw the square 4 cm by 4 cm base and attach the four congruent isosceles triangles with base 4 cm and height 6 cm on each side of the square. The net is complete.
- The net is made up of a square and four congruent isosceles triangles. Draw the square 4 cm by 4 cm base and attach the four congruent isosceles triangles with base 4 cm and height 6 cm on each side of the square. The net is complete.
- 1 of 10 Slide 1 of 10, Example one. The net of a triangular prism. The image shows a three-dimensional triangular prism. The triangle is right-angled, with the right angle in the lower left corner of the shape. It has a base labeled as four centimeters and height labeled as three centimeters. The length of the diagonal, or hypotenuse, is five centimeters. The prism has a length labeled as six centimeters. Draw the net of a triangular prism.Slide 1 of 10, Example one. The net of a triangular prism. The image shows a three-dimensional triangular prism. The triangle is right-angled, with the right angle in the lower left corner of the shape. It has a base labeled as four centimeters and height labeled as three centimeters. The length of the diagonal, or hypotenuse, is five centimeters. The prism has a length labeled as six centimeters. Draw the net of a triangular prism.
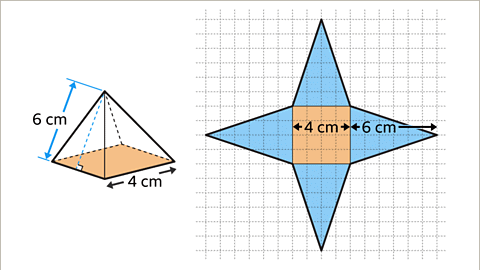
 Image caption:
Paraphrased Content
- A net comprises a square and four identical isosceles triangles. Construct the square with a 4 cm by 4 cm base and affix the four isosceles triangles, each with a base of 4 cm and a height of 6 cm, to the square's sides to complete the net.
- Consider the net consisting of a square and four congruent isosceles triangles, where the square measures 4 cm by 4 cm at its base, and each triangle has a base of 4 cm and a height of 6 cm on all sides of the square.
- Observing the net with a square and four identical isosceles triangles, the square is 4 cm by 4 cm in base dimension, while the triangles have a base of 4 cm and a perpendicular height of 6 cm on each side of the square.
- Regarding the net composed of a square and four congruent isosceles triangles, ensure the square has a base of 4 cm by 4 cm, and attach the isosceles triangles, each with a base of 4 cm and a height of 6 cm, to the square's sides to finalize the net.
- Examine the net featuring a square and four isosceles triangles, where the square is 4 cm by 4 cm in base size and the triangles have a base of 4 cm and a height of 6 cm on each side of the square.
Question
Back to topHow to draw a 2D representation of a 3D shape
A 3D shape can be represented on plain paper as a sketch or on an isometric grid. An isometric grid consists of lines or dots arranged at regular intervals and angles of 60 degrees, providing a useful background for drawing three-dimensional objects.
Isometric grid: A pattern of lines or dots arranged at regular intervals and angles of 60 degrees. It serves as a useful background for drawing three-dimensional objects.- Utilize an isometric grid for drawing 3D shapes:
- An isometric grid comprises lines or dots positioned regularly at 60-degree angles.
- It facilitates the creation of three-dimensional representations on a two-dimensional surface.
- Sketch 3D shapes on plain paper:
- Represent the depth and dimensions of the 3D shape through shading and perspective.
- Use techniques like isometric projection to accurately depict the object.
- Understanding isometric drawing:
- Isometric drawings show three sides of an object in a 2D space.
- These drawings maintain equal angles between the axes, providing a realistic portrayal of the object.
How to Draw 3D Shapes
- To draw any three-dimensional shape with a uniform cross-section:
- Begin by sketching the shape of the cross-section.
- Reproduce the same shape, positioning it slightly higher and to the right of the original.
- Connect the corresponding vertices of both shapes.
- For a solid 3D shape, erase the edges that would be obscured from view.
- For a skeletal 3D shape, represent hidden edges with dotted lines.
- To draw a cuboid, which is a three-dimensional shape with six rectangular faces:
- On an isometric grid, ensure the paper is oriented correctly with the longest line vertical.
- Select a point, draw a vertical line for the height of the cuboid, and sketch oblique lines to the left and upward, and to the right and upward for the base dimensions.
- Outline the vertical lines at the ends of the oblique lines.
- Depict the top face of the cuboid with two sets of parallel lines.
Understanding 3D Shapes
- When drawing any three-dimensional shape, it's crucial to envision how a cross-section would look.
- Using faint lines initially allows for adjustments before finalizing the drawing.
- For a cuboid, ensuring correct orientation on an isometric grid is essential for accurate depiction.
Steps to Draw 3D Shapes on an Isometric Grid
- Use faint lines when drawing, so they can be adjusted later.
- Sketch the cross-section shape.
- Draw an identical shape higher and to the right of the original.
- Connect the corresponding vertices.
- For a solid 3D form, erase hidden edges.
- For a skeletal 3D form, depict hidden edges as dotted lines.
Drawing a Cuboid on an Isometric Grid
- Ensure the paper is correctly oriented.
- Choose a point and draw the cuboid's height vertically.
- Sketch oblique lines to represent the base dimensions.
- Add vertical lines at the endpoints of the oblique lines.
- Create the top face with parallel lines.
How to Sketch a Cuboid on Paper
- Begin by ensuring the paper is oriented correctly with the longest line vertical.
- Mark a dot, draw a vertical line for the height of the cuboid, and sketch oblique lines for the base dimensions.
- Add vertical lines at the ends of the oblique lines.
- Create the top face of the cuboid using two sets of parallel lines.
Examples
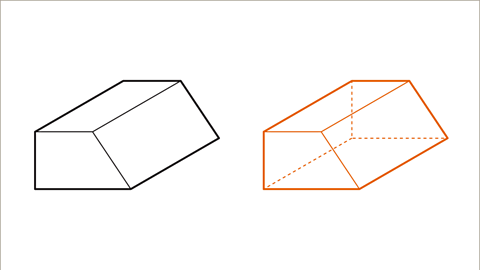
- Sketch a prism on plain paper.
- Illustrate the cross-section shape, like a trapezium, with faint lines initially.
| Image | Description |
|---|---|
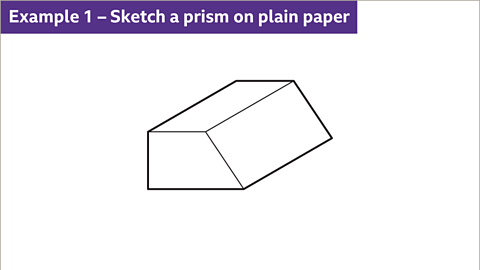 | Sketch a prism on plain paper. |
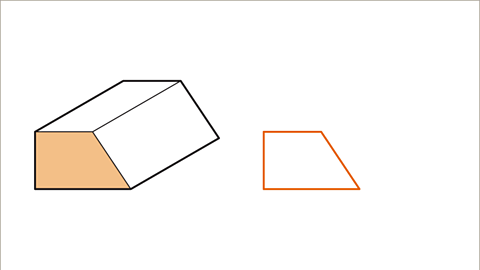 | Draw the shape of the cross-section, which is a trapezium, using faint lines initially. |
Complex Shapes Transformation
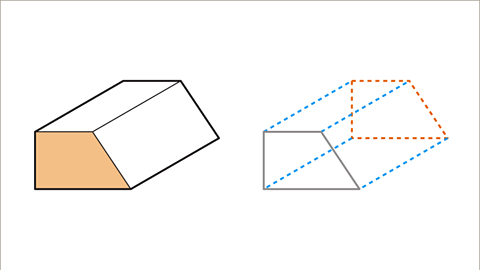
- Image Transformation: Drawing a trapezium at a different position can yield varied results. By relocating the trapezium, you can observe changes in its orientation and appearance.
- Visualizing 3D Shapes: When dealing with solid 3D shapes, altering hidden edges based on visibility is crucial. For visible edges, utilize solid lines; for concealed edges, represent them using dotted lines.
Isometric Drawing
Creating a Cuboid
- Isometric Paper Guidelines: Before drawing a cuboid on isometric paper, ensure the correct orientation of the grid. Connect a chosen dot to its six nearest dots, with the longest line in a vertical position for accuracy.
- Dimension Representation: When depicting a 3 cm by 4 cm by 5 cm cuboid, adhere to the isometric paper's guidelines. Each centimeter on the grid should be treated as the shortest distance between the dots.
| Image 1 | Image 2 |
|---|---|
 |  |
| Image 3 | Image 4 |
|---|---|
 |  |
| Image 5 | Image 6 |
|---|---|
 |  |
| Image 7 | Image 8 |
|---|---|
 |  |
Cuboid Construction Steps
- Image caption: Pick a dot and draw a vertical line to represent a height of 5 cm for the cuboid. Draw oblique lines for the base dimensions.
- Image caption: Draw vertical lines at the ends of the oblique lines to show the 5 cm edges of the cuboid.
- Image caption: Complete the cuboid by drawing the top face with parallel 3 cm and 4 cm lines.
Sketching a Prism
- Slide 1 of 10, Example one: Sketch a prism on plain paper. The cross-section is a trapezium with parallel horizontal sides.
| Slide Number | Details |
|---|---|
| 1 of 10 | Sketch a prism on plain paper. The cross-section is a trapezium with parallel horizontal sides. |
Practise your understanding of 3D shapes and nets
- Engage in activities to enhance your comprehension of 3D shapes and nets.
Real-life maths
 Image caption
Nets play a vital role in packaging industries, facilitating efficient packing processes. They consist of flat cardboard with flaps for securing or folding into boxes.
Specialized machinery is employed to cut out the net and fold it into the desired box or container for packaging.
The design of the net aims to minimize cardboard wastage while ensuring easy assembly. Various machines may staple, tape, or fold the boxes securely.
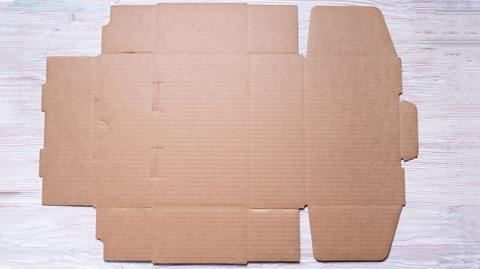 Image caption
Game - Divided Islands
- Explore the intriguing game of Divided Islands that challenges your strategic thinking and problem-solving skills.

study material
,Sample Paper
,ppt
,3D Shapes and Nets - Year 7
,3D Shapes and Nets - Year 7
,Free
,3D Shapes and Nets - Year 7
,Previous Year Questions with Solutions
,Exam
,Viva Questions
,video lectures
,practice quizzes
,Objective type Questions
,mock tests for examination
,Extra Questions
,MCQs
,past year papers
,Semester Notes
,Important questions
,Summary
,shortcuts and tricks
;


3D Shapes and Nets Free PDF Download
Importance of 3D Shapes and Nets
3D Shapes and Nets Notes
3D Shapes and Nets Year 7 Questions
Study 3D Shapes and Nets on the App
|
© EduRev
|
Education Revolution
|


|


