Advance features of Word Processor (Part -1) Chapter Notes | Computer Studies Class 5 ICSE PDF Download

Introduction
MS Word is a powerful software used for creating and editing documents. It helps us make different types of text documents and present them in an attractive way. In this chapter, we will learn about advanced tools in MS Word that make our work easier and better. These tools include formatting text, adding superscripts and subscripts, applying shadow effects, inserting headers and footers, managing columns, setting margins, and more. Let's explore how to use these features step by step.
Format Painter
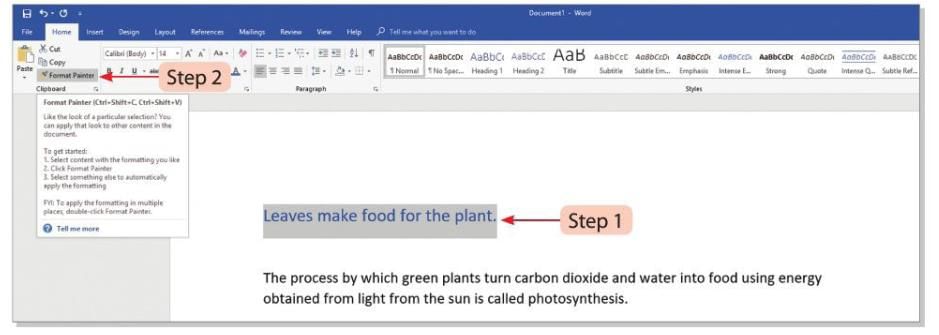
Format Painter is a tool on the Home tab in MS Word. It helps copy formatting like color, font style, size, and border style from one text or graphic to another.
Steps to use Format Painter:
- Step 1: Select the text or graphic with the formatting you want to copy.
- Step 2: Click on the Format Painter button in the Clipboard group on the Home tab.
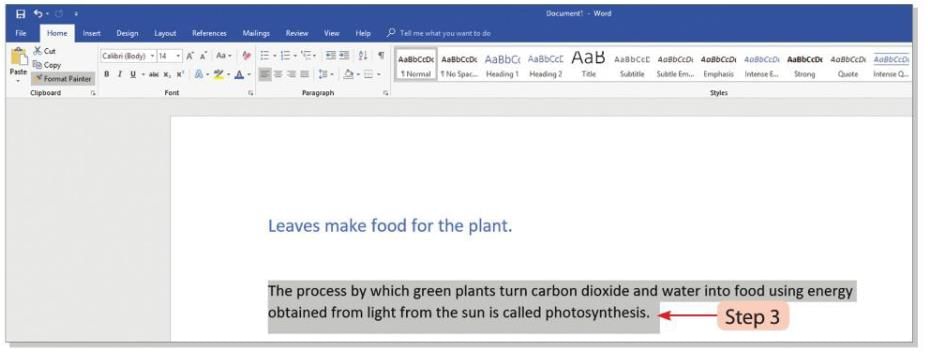
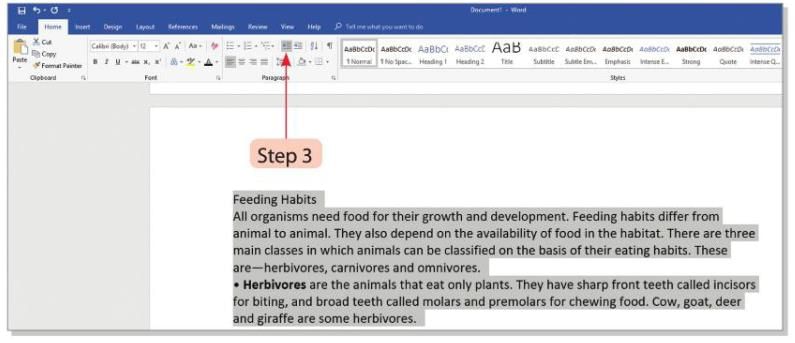
- Step 3: The pointer will change into a brush shape. Drag the brush over the text you want to apply the copied formatting to.
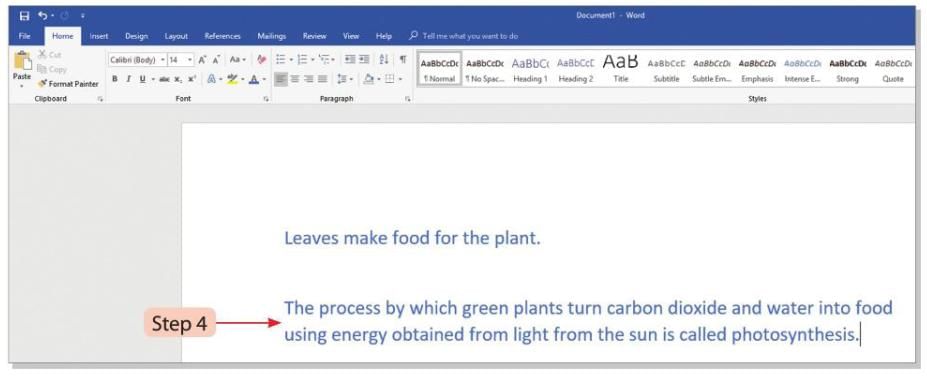
- Step 4: The selected text will get the same formatting as the copied text.
Applying Superscripts and Subscripts
Superscript means letters or digits shown a little above the normal line (e.g., x²). Subscript means letters or digits shown a little below the normal line (e.g., O₂).
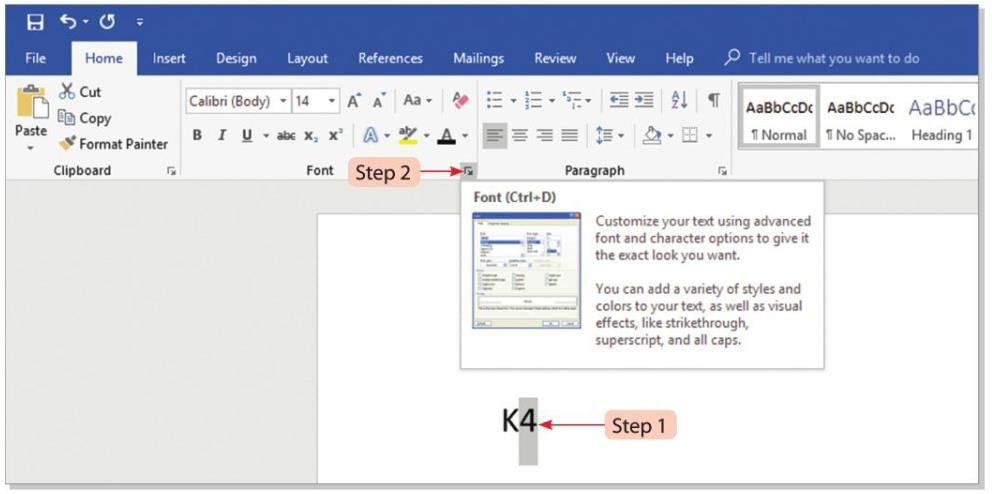
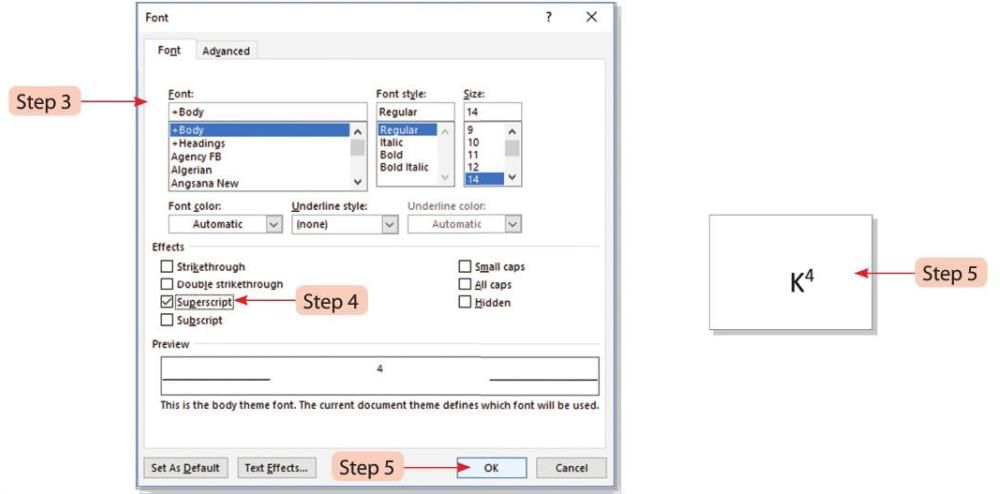
Steps to add a superscript (e.g., K4 to K⁴):
- Step 1: Type K4 and select the 4.
- Step 2: Click on the Font dialog box launcher on the Home tab.
- Step 3: The Font dialog box will open.
- Step 4: In the Effects section, select the Superscript option.
- Step 5: Click the OK button. K4 will change to K⁴, where 4 is placed above the base line.
You can also add a superscript by clicking the Superscript button (X²) in the Font group on the Home tab.
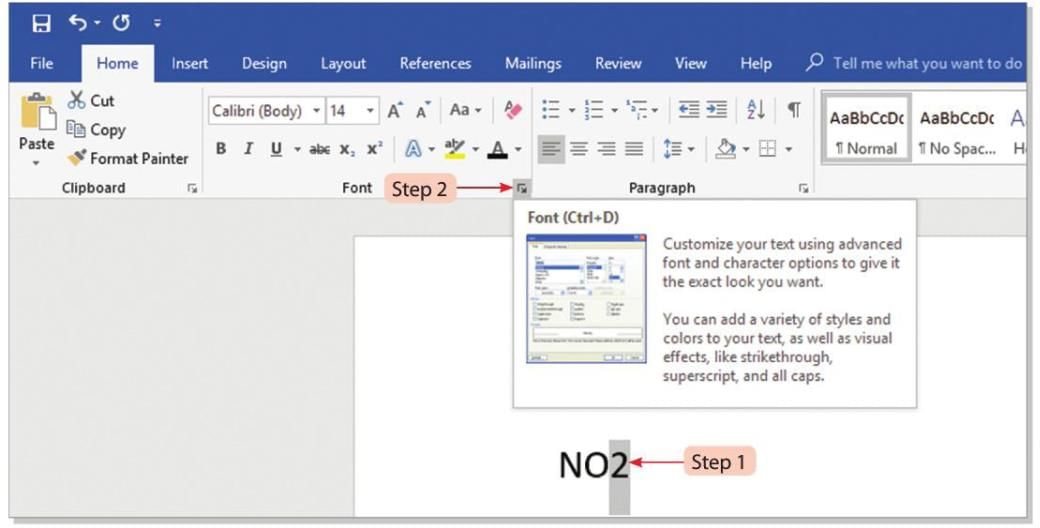
Steps to add a subscript (e.g., NO2 to NO₂):
- Step 1: Type NO2 and select 2.
- Step 2: Click on the Font dialog box launcher on the Home tab.
- Step 3: The Font dialog box will open.
- Step 4: In the Effects section, select the Subscript option.
- Step 5: Click the OK button. NO2 will change to NO₂, where 2 is placed below the base line.

You can also add a subscript by clicking the Subscript button (X₂) in the Font group on the Home tab.
Did You Know?
- Change lowercase letters to uppercase by pressing Shift + F3 keys together.
- Change uppercase letters back to lowercase by pressing Shift + F3 keys again.
Applying Shadow Effect
Shadow Effect gives a 3D look to the text.
Steps to apply Shadow Effect:
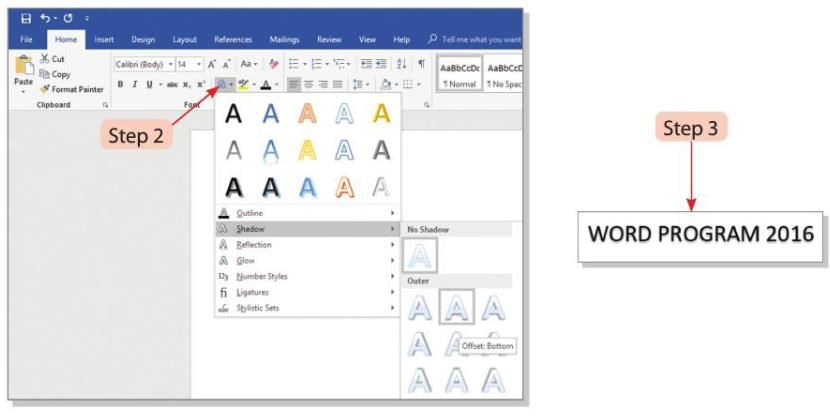
- Step 1: Select the text where you want to add the shadow effect.
- Step 2: Click on the Shadow button in the Font group on the Home tab. A list of shadow styles will appear.
- Step 3: Choose the shadow style you like. The selected text will show the shadow effect in the chosen style.
Applying Headers and Footers
- Headers and Footers are important parts of a Word document.
- A Header appears at the top margin of each page.
- A Footer appears at the bottom margin of each page.
- Headers and Footers can include text, page numbers, dates, or logos.
Steps to add a Header and Footer:
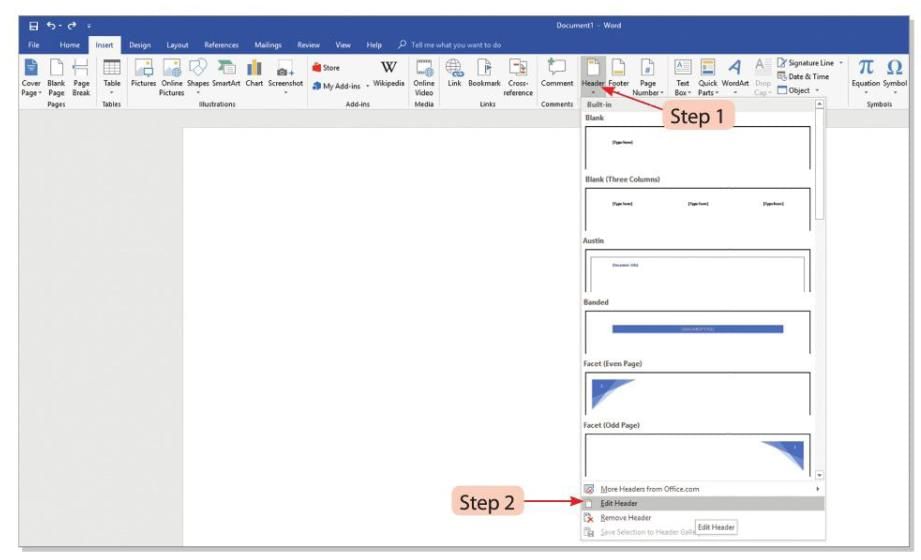
- Step 1: Click on the Header button in the Header & Footer group on the Insert tab.
- Step 2: Choose the Edit Header option from the drop-down menu.
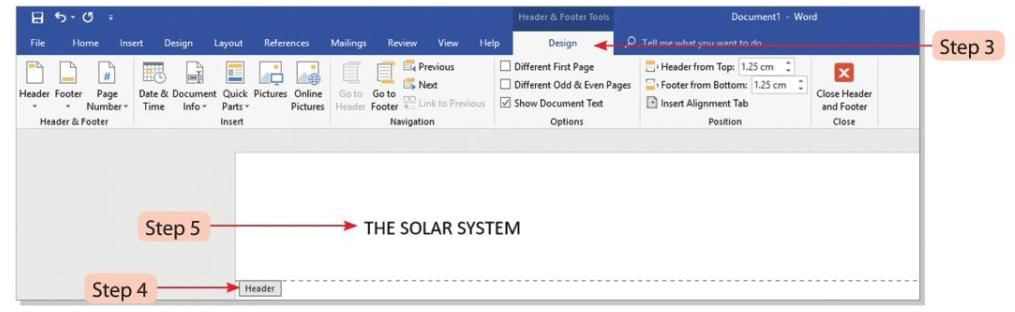
- Step 3: A new tab named Design will appear under Header & Footer Tools.
- Step 4: Header boxes with dotted lines will appear at the top of each page.
- Step 5: Click on the Header box and type the text you want to add.
- Step 6: Press the Tab key twice to move the cursor to the right side of the Header.
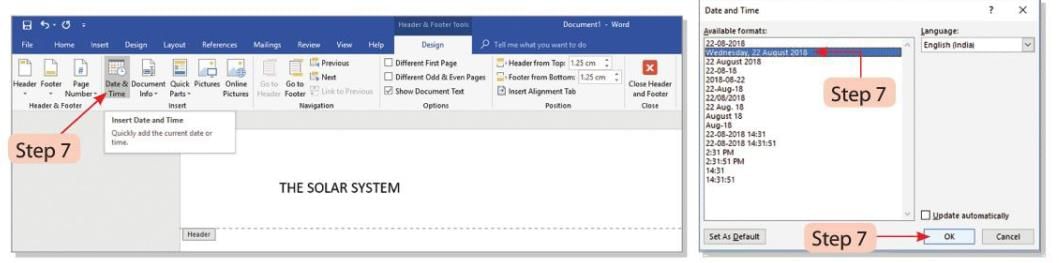
- Step 7: Click on the Date & Time button in the Insert group on the Design tab. The Date and Time dialog box will open. Select the desired date and time format, then click the OK button.

- Step 8: Click on the Footer button on the Insert tab and select the Edit Footer option. The cursor will move to the left side of the Footer section.
- Step 9: Press the Tab key to move the cursor to the center of the Footer. Press the Tab key again to move the cursor to the right side of the Footer.
- Step 10: Click on the Page Number button in the Header & Footer group on the Design tab.

- Step 11: Select the Format Page Numbers option from the drop-down menu.
- Step 12: The Page Number Format dialog box will open.
- Step 13: Adjust the settings for the page number as needed and click the OK button.
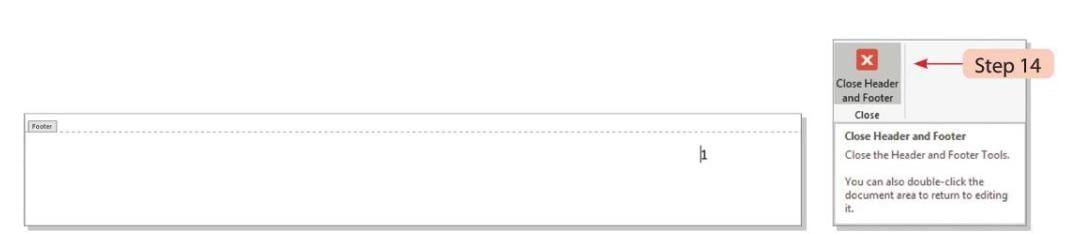
- Step 14: Click on the Close Header and Footer button on the Design tab to finish.
Inserting Column and Column Break
By default, text in MS Word is typed in a single column. You can split text into two or more columns for better presentation.
Using Column Button
Steps to insert columns using the Column button:
- Step 1: Select the text you want to split into columns. Click on the Columns button in the Page Setup group on the Layout tab.
- Step 2: Choose the number of columns you want from the drop-down menu.
- Step 3: Click on the More Columns option to customize the columns further.
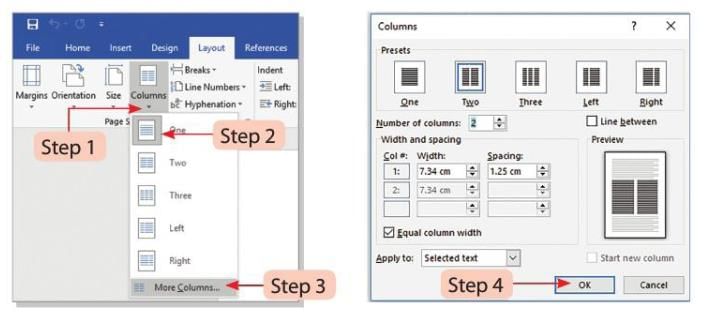
- Step 4: The Columns dialog box will open. Select the desired settings for the columns and click the OK button.
Inserting Column Break
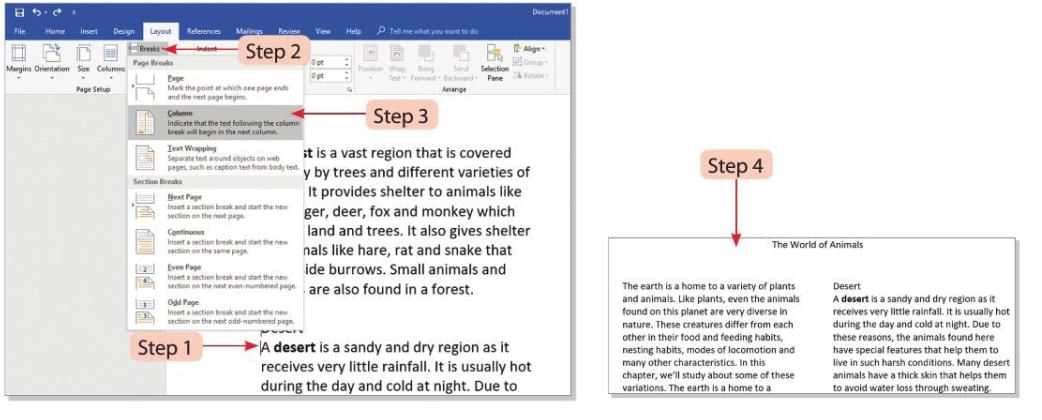
Sometimes, columns may not be balanced (text not evenly distributed). A Column Break can be added to shift text to the start of the next column.
Steps to insert a Column Break:
- Step 1: Place the cursor before the text where you want the column break.
- Step 2: Click on the Breaks button on the Layout tab.
- Step 3: Select the Column option from the drop-down menu.
- Step 4: The text after the cursor will move to the beginning of the next column.
Inserting Page Break
A Page Break starts the text on a new page.
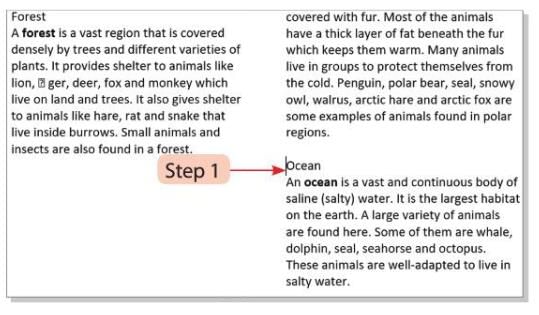
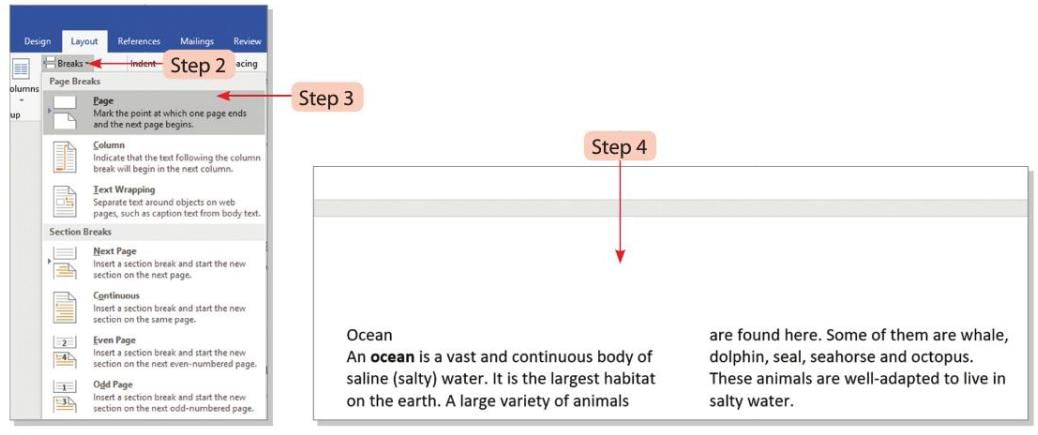
Steps to insert a Page Break:
- Step 1: Select the text where you want to insert the page break.
- Step 2: Click on the Breaks button in the Page Setup group on the Layout tab.
- Step 3: Choose the Page option from the drop-down menu.
- Step 4: The page will change, and the text after the cursor will move to the next page.
Inserting Line Break
A Line Break moves the text to the next line without starting a new paragraph.
Steps to insert a Line Break:
- Step 1: Place the cursor where you want the line break.
- Step 2: Press the Enter key while holding the Shift key (Shift + Enter).
- Step 3: The text after the cursor will move to the next line.
You can click on the Show/Hide option in the Paragraph group on the Home tab to see line breaks in a Word document.
Setting Margins
- Margins are the spaces between the text and the edges of the page (top, bottom, left, and right).
- In a new Word document, the default margins are 1 inch on all sides.
- You can change margins using ruler bars or the Layout tab.
Using Ruler Bars
Steps to change left or right margins using ruler bars:
- Step 1: Point to the margin boundary on the horizontal ruler to adjust the left or right margin.
- Step 2: The pointer will change to a double-headed arrow pointing left and right.
- Step 3: Drag the margin boundary to the desired position.
Steps to change top or bottom margins using ruler bars:
- Step 1: Point to the margin boundary on the vertical ruler to adjust the top or bottom margin.
- Step 2: The pointer will change to a double-headed arrow pointing up and down.
- Step 3: Drag the margin boundary to the desired position.
Using Layout Tab
Steps to change margins using the Layout tab:
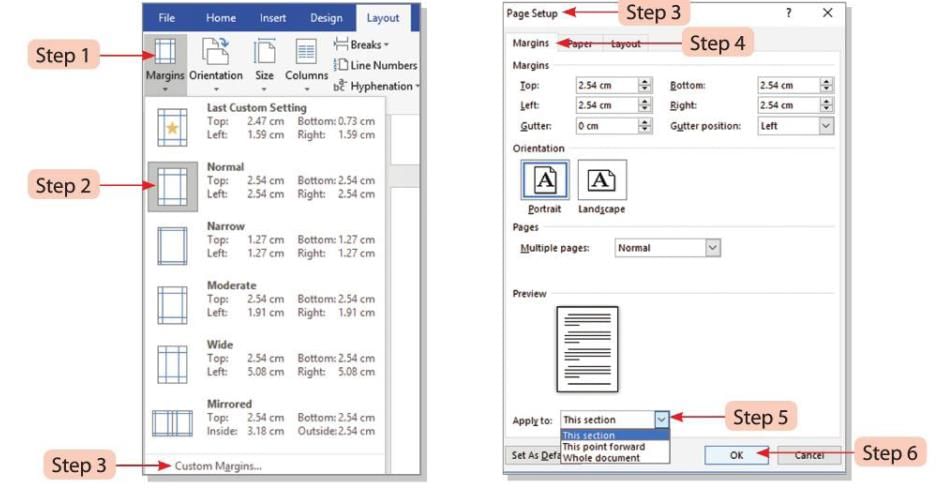
- Step 1: Click on the Margins option in the Page Setup group on the Layout tab.
- Step 2: The Normal option (1-inch margins) is selected by default in the drop-down menu.
- Step 3: Select a predefined margin setting, or choose the Custom Margins option. Choosing Custom Margins will open the Page Setup dialog box.
- Step 4: In the Page Setup dialog box, the Margins tab will be selected by default. Type the values for Top, Bottom, Left, and Right margins in the boxes. You can also select margin values by clicking the spin boxes.
- Step 5: In the Apply to drop-down list, select options like Whole document or This point forward.
- Step 6: Click the OK button to apply the changes.
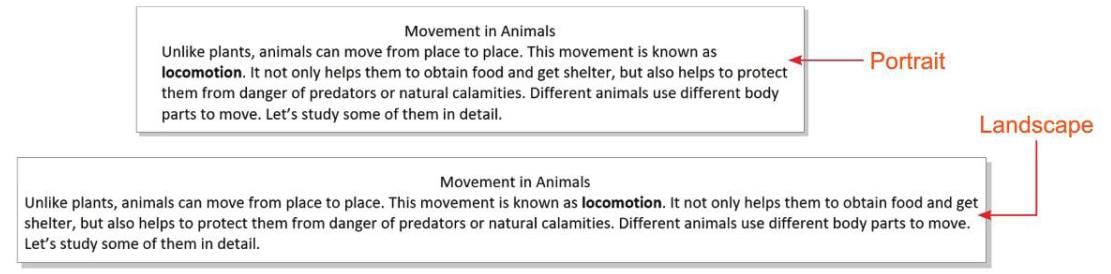
Setting Page Orientation
- Page Orientation refers to the direction of the page when displayed or printed.
- There are two types of page orientation: Portrait (vertical) and Landscape (horizontal).
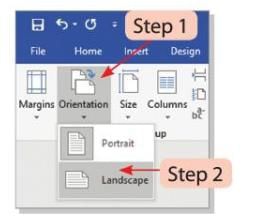
Steps to change the page orientation:
- Step 1: Click on the Orientation button in the Page Setup group on the Layout tab.
- Step 2: Select the Landscape option from the drop-down menu to change from Portrait to Landscape.
Setting Paper Size
- Paper size refers to the size of the paper used for printing a document.
- The available paper sizes depend on the printer being used.
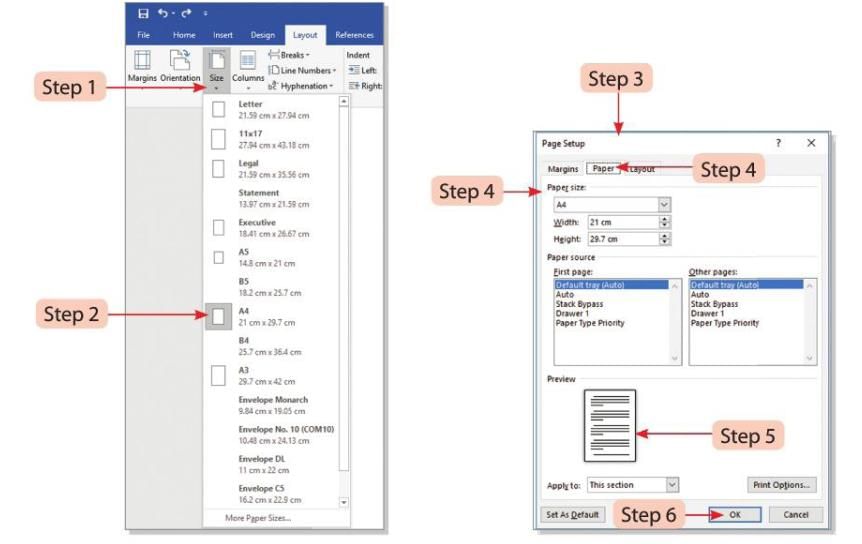
Steps to set the paper size:
- Step 1: Click on the Size button in the Page Setup group on the Layout tab.
- Step 2: The current paper size will be highlighted in the drop-down menu. Select the desired paper size from the drop-down list.
- Step 3: You can also click on the Paper tab in the Page Setup dialog box launcher to open the Page Setup dialog box.
- Step 4: In the Page Setup dialog box, go to the Paper tab. Select the desired paper size from the Paper size drop-down list.
- Step 5: The changes will be shown in the Preview section of the dialog box.
- Step 6: Click the OK button to apply the changes.
Indenting Text
- An indent is the space between the text and the page margin.
- You can adjust indents for a single paragraph, a group of paragraphs, or the entire document.
- MS Word 2016 allows you to increase or decrease the indent.
Steps to use the indentation feature:
- Step 1: Select the text you want to indent.
- Step 2: Click on the Increase Indent button in the Paragraph group on the Home tab. The selected text will move ½ inch away from the left margin.

- Step 3: Click on the Decrease Indent button in the Paragraph group on the Home tab. The selected text will move ½ inch closer to the left margin.
Working with Tabs
- The Tab key on the keyboard helps indent text or move the cursor to specific positions.
- By default, the Tab stop is set at every 0.5 inch in the document.
- You can change the Tab stop position using the ruler or dialog box.
Steps to set a Tab stop:
- Step 1: Click on the Dialog Box Launcher button in the Paragraph group on the Layout tab.
- Step 2: The Paragraph dialog box will open. Click on the Tabs button at the bottom left of the dialog box to open the Tabs dialog box.
- Step 3: Type the desired Tab stop position in the Tab stop position text box.
- Step 4: Click the OK button to set the new Tab stop.
- Step 5: Press the Tab key to move the cursor to the new Tab stop position.
Did You Know?
Leader lines are used to create Tab stops with dots or dashes leading up to the Tab stop position.
Points To Remember
- The Format Painter tool on the Home tab copies formatting like color, font style, size, and border style to other text or graphics.
- Applying the Shadow effect gives a 3D look to the text.
- A Header is placed at the top margin of the document, while a Footer appears at the bottom margin.
Glossary
- Superscript: Letters or digits shown above the normal line (e.g., x²).
- Subscript: Letters or digits shown below the normal line (e.g., O₂).
- Margin: The space between the text and the edges of the document on all four sides.
- Page Orientation: The direction in which a document is displayed or printed (Portrait or Landscape).
- Indent: The amount of space between the text and the page margin.
|
21 docs|7 tests
|
FAQs on Advance features of Word Processor (Part -1) Chapter Notes - Computer Studies Class 5 ICSE
| 1. What are some advanced features of word processors that can help me with my school projects? |  |
| 2. How can I use templates in a word processor? | |
| 3. What is the purpose of spell check in a word processor? | |
| 4. Can I insert images into my document, and how do I do it? | |
| 5. What are formatting tools, and how do they help in document creation? | |


MCQs
,shortcuts and tricks
,Advance features of Word Processor (Part -1) Chapter Notes | Computer Studies Class 5 ICSE
,Extra Questions
,study material
,Exam
,Advance features of Word Processor (Part -1) Chapter Notes | Computer Studies Class 5 ICSE
,Summary
,ppt
,Important questions
,Objective type Questions
,Free
,Advance features of Word Processor (Part -1) Chapter Notes | Computer Studies Class 5 ICSE
,mock tests for examination
,video lectures
,Viva Questions
,past year papers
,Previous Year Questions with Solutions
,practice quizzes
,Semester Notes
,Sample Paper
;


Chapter Notes: Advance features of Word Processor (Part -1) Free PDF Download
Importance of Chapter Notes: Advance features of Word Processor (Part -1)
Chapter Notes: Advance features of Word Processor (Part -1)
Chapter Notes: Advance features of Word Processor (Part -1) Class 5 Questions
Study Chapter Notes: Advance features of Word Processor (Part -1) on the App
|
© EduRev
|
Education Revolution
|


|


