Diagram Based Questions: Exploring Magnets | Science for Class 6 PDF Download

Q.1: Answer the following questions based on the diagram given below (Fig. 4.4: Iron filings sticking to a bar magnet):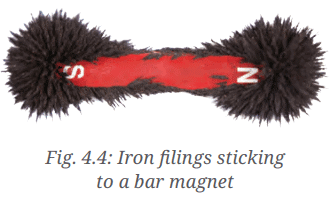
(i) What does the diagram show about the distribution of iron filings on the bar magnet?
(ii) Why do the iron filings stick more at certain parts of the magnet?
(iii) What are the two ends of the magnet called, as indicated in the diagram?
(iv) Why is it important to use iron filings to observe the magnetic effect in this experiment?
Ans:
(i) The diagram shows that iron filings stick mostly near the ends of the bar magnet, with fewer filings sticking to the middle.
(ii) Iron filings stick more at the ends because these are the poles of the magnet, where the magnetic force is strongest.
(iii) The two ends of the magnet are called the North pole and the South pole.
(iv) Iron filings are magnetic materials that align with the magnetic field, making the magnetic effect visible without damaging the magnet.
Q.2: Answer the following questions based on the diagram given below (Fig. 4.5: A freely suspended bar magnet): (i) What direction does the freely suspended bar magnet align with, as shown in the diagram?
(ii) Why does the magnet always come to rest in a specific direction?
(iii) What is the name of the pole of the magnet that points towards the north direction?
(iv) How does the setup in the diagram help in finding directions?
(v) Why is it necessary to balance the magnet horizontally in this experiment?
Ans:
(i) The bar magnet aligns along the north-south direction.
(ii) The magnet aligns in this direction because Earth acts like a giant magnet, influencing the magnet to rest along its magnetic field.
(iii) The pole pointing towards the north direction is called the North-seeking pole or North pole.
(iv) The setup helps find directions by showing the north-south alignment, which can be used to determine other directions relative to it.
(v) Balancing the magnet horizontally ensures it can rotate freely without external forces affecting its alignment, providing accurate results.
Q.3: Answer the following questions based on the diagram given below (Fig. 4.6: A magnetic compass):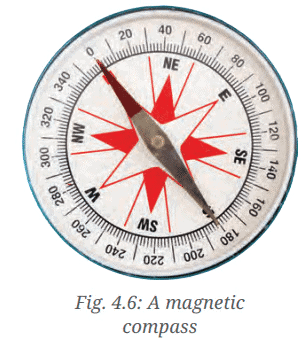 (i) What is the main component of the magnetic compass shown in the diagram?
(ii) How does the needle of the magnetic compass indicate direction?
(iii) Why is the needle of the compass painted red at one end?
(iv) How does rotating the compass box help in using the compass effectively?
(v) Why is the compass needle mounted on a pin to allow free rotation?
Ans:
(i) The main component is a magnetized needle that can rotate freely.
(ii) The needle indicates direction by aligning itself along the north-south direction due to Earth’s magnetic field.
(iii) The red-painted end usually points to the North pole, making it easier to identify the north direction.
(iv) Rotating the compass box aligns the marked directions on the dial with the needle, allowing accurate identification of all directions.
(v) The needle is mounted on a pin to allow free rotation, ensuring it aligns with Earth’s magnetic field without friction or obstruction.
Q.4: Answer the following questions based on the diagram given below (Fig. 4.8: Interaction between two bar magnets):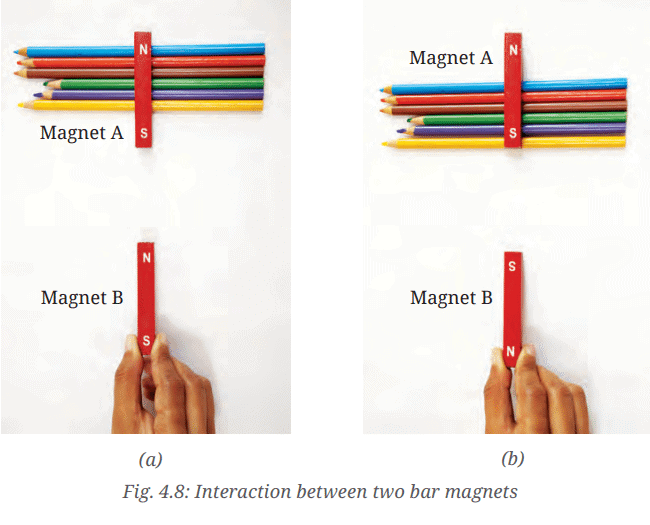 (i) What happens when the North pole of one magnet is brought near the South pole of another magnet, as shown in the diagram?
(ii) What happens when like poles of two magnets are brought close to each other?
(iii) Why does magnet A move when placed on pencils in the experiment?
(iv) How does the interaction shown in the diagram help distinguish a magnet from a non-magnetic material?
(v) Why is it important to ensure the magnets do not touch each other during this experiment?
Ans:
(i) The North pole of one magnet attracts the South pole of the other magnet, causing them to move closer.
(ii) Like poles (North-North or South-South) repel each other, causing the magnets to move apart.
(iii) Magnet A moves because the pencils reduce friction, allowing it to respond freely to the magnetic attraction or repulsion.
(iv) A magnet shows repulsion with like poles, while a non-magnetic material like an iron bar is attracted to both poles, helping distinguish them.
(v) Keeping the magnets from touching ensures the observation of attraction or repulsion is due to magnetic forces, not physical contact.
Q.5: Answer the following questions based on the diagram given below (Fig. 4.10: Compass needle and a magnet with a piece of wood in between):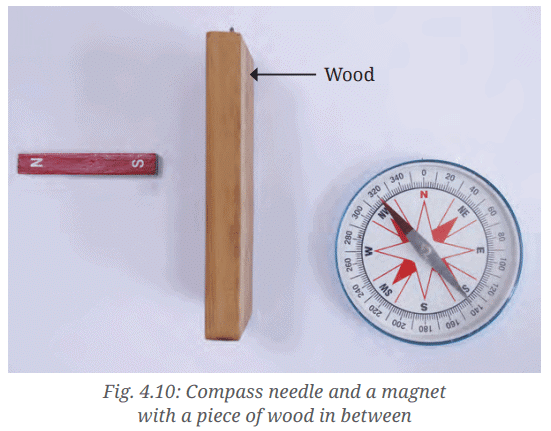
(i) What does the diagram show about the effect of a wooden piece placed between the magnet and the compass needle?
(ii) What happens to the compass needle’s deflection when non-magnetic materials are placed between it and the magnet?
(iii) Why do non-magnetic materials like wood, cardboard, plastic, and glass not affect the magnetic force?
(iv) How does this experiment demonstrate the nature of magnetic fields?
(v) Why is it important to test multiple non-magnetic materials in this experiment?
Ans:
(i) The diagram shows that the wooden piece does not affect the deflection of the compass needle.
(ii) The compass needle’s deflection remains unchanged when non-magnetic materials are placed between it and the magnet.
(iii) Non-magnetic materials do not interfere with magnetic fields, allowing the magnetic force to pass through them unaffected.
(iv) The experiment demonstrates that magnetic fields can act through non-magnetic materials, showing their penetrating nature.
(v) Testing multiple materials confirms that the magnetic effect consistently passes through non-magnetic substances, validating the conclusion.
|
67 videos|349 docs|27 tests
|
FAQs on Diagram Based Questions: Exploring Magnets - Science for Class 6
| 1. What are magnets and how do they work? |  |
| 2. What are the different types of magnets? | |
| 3. How can you identify the poles of a magnet? | |
| 4. What materials are attracted to magnets? | |
| 5. How do magnets play a role in everyday life? | |


Diagram Based Questions: Exploring Magnets | Science for Class 6
,ppt
,Free
,Summary
,video lectures
,practice quizzes
,Diagram Based Questions: Exploring Magnets | Science for Class 6
,study material
,mock tests for examination
,Objective type Questions
,Sample Paper
,shortcuts and tricks
,MCQs
,Previous Year Questions with Solutions
,Important questions
,Diagram Based Questions: Exploring Magnets | Science for Class 6
,Viva Questions
,Semester Notes
,past year papers
,Exam
,Extra Questions
;


Diagram Based Questions: Exploring Magnets Free PDF Download
Importance of Diagram Based Questions: Exploring Magnets
Diagram Based Questions: Exploring Magnets Notes
Diagram Based Questions: Exploring Magnets Class 6
Study Diagram Based Questions: Exploring Magnets on the App
|
© EduRev
|
Education Revolution
|


|


within 7 days!