Magnetism Chapter Notes | Physics Class 6 ICSE PDF Download

Introduction
Mwatermark Magnets are special objects that can pull things like iron towards them. This ability is called magnetism. In this chapter, we will learn about magnets, how they work, and why they are so interesting. We will find out what materials magnets can pull, how magnets have two ends called poles, and how they always point in the north-south direction. We will also do fun activities to see the invisible lines around magnets and learn how a magnetic compass helps us find directions. Magnets are used in many things like fridges, TVs, and even to find directions on a ship!
Magnetic and Non-Magnetic Materials
- Long ago, about 4000 years back, the Greeks found rocks that could pull iron objects. They called these rocks magnetite.
- Later, people found that magnetite always stops in the north-south direction. Because of this, magnetite was also called lodestone.
- Lodestone can pull iron naturally.
- But lodestone magnets are weak.
- Today, we have stronger magnets made by humans.
- These human-made magnets are made from iron, cobalt, or nickel.
- These materials can become magnets easily.
- Human-made magnets come in many shapes and sizes depending on their use.
- Magnets are used in fridges, computers, TVs, CDs, generators, and doorbells.
- Things that magnets can pull are called magnetic materials.
- Iron, steel, nickel, and cobalt are magnetic materials.
- Things that magnets cannot pull are called non-magnetic materials.
- Wood, aluminum, copper, rubber, stone, and sand are non-magnetic materials.
Properties of a Magnet
- A magnet exerts a force known as the magnetic force on magnetic materials, which is an attractive property of magnets. This force is strongest at the poles, which are called the north pole and south pole. When a magnet is freely suspended, it aligns itself horizontally, pointing north-south. After aligning, one pole points toward the geographical north pole, known as the north pole of the magnet, while the other points toward the geographical south pole, called the south pole.
- All magnets possess both a north pole and a south pole. When a magnet is broken into two pieces, each piece has both a north pole and a south pole. Unlike poles of magnets attract each other, while like poles repel each other. In other words, a north pole will attract a south pole but repel another north pole, and a south pole will attract a north pole but repel another south pole. This attraction or repulsion between poles is a true characteristic of magnetism.
- The strength of a magnet is greatest at its poles and weakest at its center. When two magnets are placed close to each other, their poles always align in pairs.
Magnetic Field
- The area around a magnet where it can pull things is called its magnetic field.
- You cannot see the magnetic field, but you can feel its power.
- We can see the magnetic field using iron filings or a magnetic compass.
- The strength of a magnet's field gets weaker as you move away from it.
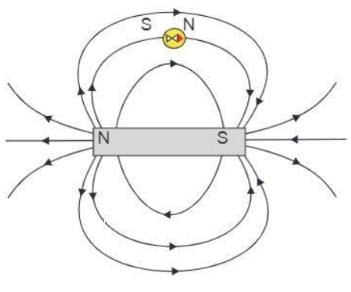
- Magnetic lines of force show the magnetic field around a magnet.
- Outside a magnet, these lines go from the north pole to the south pole.
- Inside a magnet, these lines go from the south pole to the north pole.
- Because of this, the lines form closed curves.
Activity 6.1
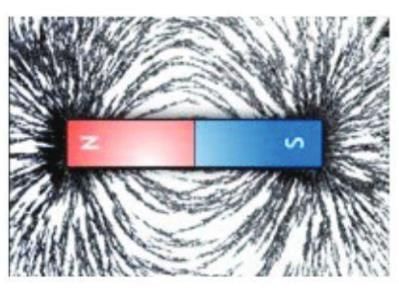
Aim: To see the magnetic field around a bar magnet.
Materials Required: A bar magnet, iron filings, and a sheet of white paper.
Procedure:
- Put the white paper on a table.
- Place the bar magnet in the middle of the paper.
- Sprinkle some iron filings on the paper around the magnet.
- Tap the paper gently.
- Watch how the iron filings arrange around the bar magnet.
Observations:
- Iron filings gather more at the poles of the magnet.
- Very few iron filings stay in the middle of the magnet.
- Iron filings arrange in curved lines around the magnet.
- The iron filings form closed loops around the bar magnet.
- The curved lines show the magnetic field around the bar magnet.
- These curved lines are called magnetic lines of force.
Magnetic Compass
- A magnetic compass is a small tool used to find directions.
- Sailors and navigators use it to know which way is north, south, east, or west.
- It has a small magnetic needle inside a round case.
- The needle moves freely on a pivot (a small point).
- The needle always points in the north-south direction.
- The top of the case is covered with glass.
Activity 6.2
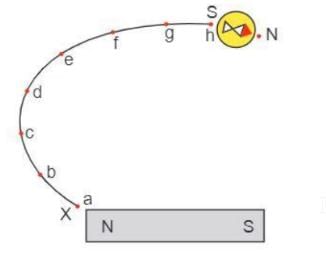
Aim: To draw the magnetic lines of force around a bar magnet using a magnetic compass.
Materials Required: A bar magnet, a magnetic compass, a sheet of white paper, and a pencil.
Procedure:
- Place the bar magnet on the white paper.
- Put the magnetic compass near the north pole of the magnet at a point marked X.
- The needle of the compass will point in the north-south direction.
- Mark the position of the north pole of the needle as point b.
- Mark the position of the south pole of the needle as point a.
- Repeat these steps until the south pole of the bar magnet is reached.
- Join all the points to make a magnetic line of force.
- Draw an arrow on the line pointing from north to south to show the direction.
- Do the same on the other side of the bar magnet.
- Repeat the steps, starting at different points, to get more magnetic lines of force.
Conclusion:
- The curved lines you draw are the magnetic lines of force.
- They start at the north pole and end at the south pole.
Activity 6.3
Aim: To draw the magnetic lines of force made by two bar magnets.
Materials Required: Two bar magnets, a magnetic compass, a sheet of white paper, and a pencil.
Procedure
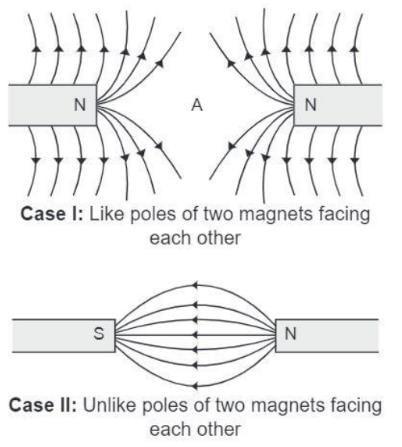
Case I:
- Place two bar magnets on the white paper at some distance.
- Make sure their north poles face each other.
- Draw the magnetic lines of force by repeating the steps of Activity 6.2.
Case II:
- Now, change the position of the bar magnets.
- Make the north pole of one magnet face the south pole of the other magnet.
- Draw the magnetic lines of force by repeating the steps of Activity 6.2.
Observation:
- In Case I, the area between the two magnets has no lines of force.
- This happens because the magnetic field of one magnet cancels the field of the other magnet.
- This area is called the neutral point and is marked as A.
- In Case II, many lines start from the north pole of one magnet and go to the south pole of the other magnet.
Properties of Magnetic Lines of Force
- Magnetic lines of force always make closed curves.
- Outside a magnet, the lines go from the north pole to the south pole.
- Inside a magnet, the lines go from the south pole to the north pole.
- Two magnetic lines of force never cross each other.
- Where magnetic lines are close together, the magnetic field is strong.
- Where magnetic lines are far apart, the magnetic field is weak.
- Magnetic lines of force show the direction of the magnetic field at each point.
Earth's Magnetic Field
- The Earth acts like a big magnet.
- Because of this, a freely hanging magnet always points in the north-south direction.
- A magnetic compass works because of the Earth's magnetic field.
- The Earth's magnetic north pole is near the geographical south pole.
- The Earth's magnetic south pole is near the geographical north pole.
- The line joining the geographical north pole to the geographical south pole is called the geographical axis.
- The line joining the magnetic north pole to the magnetic south pole is called the magnetic axis.
- The geographical axis and magnetic axis of the Earth are not the same.
- There is a difference of about 11½ degrees between the geographical axis and the magnetic axis.
Did You Know?
Sir William Gilbert (1544-1603) was an English physician and philosopher. In 1600, he was the first to suggest that the Earth itself is a huge magnet. He also found the difference between magnetic pull and electric pull. This discovery helped people understand electricity and magnetism better. Because of his work, he is called the "Father of Electricity and Magnetism."
Making of Magnets
- Some things like iron or steel can be turned into magnets. This process is called magnetisation.
- There are different ways to make a magnet. These ways are:
- Single touch method
- Double touch method
- Magnetic induction
- Electrical method
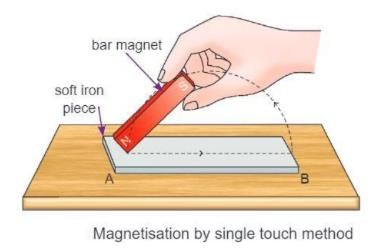
Single Touch Method
- Take a small iron bar and put it on a table.
- Take a bar magnet and pick its north pole.
- Move the north pole of the bar magnet along the iron bar from one end (A) to the other end (B).
- When you reach end B, lift the bar magnet and bring it back to end A.
- Repeat this process many times, always moving in the same direction.
- After some time, the iron bar will become a magnet.
- One end of the iron bar will become the north pole, and the other end will become the south pole.
- You can test this by bringing the iron bar near some iron filings. The filings will stick to the bar if it is magnetised.
- The north pole of the bar magnet makes the opposite end of the iron bar a south pole.
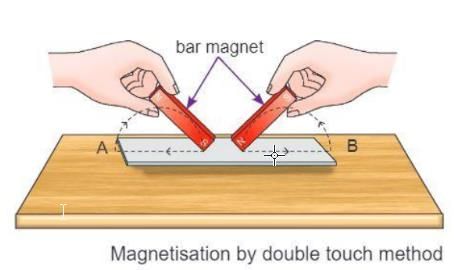
Double Touch Method
- Take a small iron bar and place it on a table.
- Take two bar magnets and pick the opposite poles of each magnet (north pole of one and south pole of the other).
- Touch both magnets at the centre of the iron bar.
- Move the magnets towards the opposite ends of the iron bar (one magnet to end A and the other to end B).
- Lift the magnets and bring them back to the centre of the iron bar.
- Repeat this process many times.
- After some time, the iron bar will become a magnet.
- End A of the iron bar will become the north pole, and end B will become the south pole.
- You can test the magnetic properties of the iron bar using methods we learned earlier, like bringing iron filings near it.
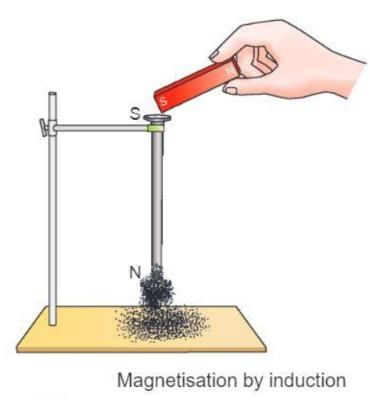
Magnetic Induction
- Take a long iron nail and bring it near some iron filings.
- You will see that the iron filings do not stick to the nail at first.
- Now, hold the iron nail straight up using a stand.
- Bring a bar magnet close to the head of the nail without touching it.
- Now, bring some iron filings near the nail.
- You will see that the iron filings stick to the nail because the nail becomes magnetised.
- The nail becomes a magnet because of the bar magnet nearby. This is called magnetic induction.
- If you remove the bar magnet, the nail will lose its magnetism, and the iron filings will fall off.
- This type of magnetism in the nail is temporary, which means it does not last long.
Electrical Method
- Take a soft iron rod and wrap an insulated copper wire around it to make a coil.
- Connect the ends of the wire to a battery using a switch.
- Turn on the switch to let the electric current flow through the wire.
- Bring some iron filings near the iron rod.
- You will see that the iron rod attracts the iron filings because it has become magnetised.
- The iron rod becomes a magnet because of the electric current. This is called an electromagnet.
- Turn off the switch to stop the current.
- The iron rod will lose its magnetism, and the iron filings will fall off.
- This shows that an electromagnet is a temporary magnet and works only when there is electric current.
Permanent and Temporary Magnets
Permanent Magnets
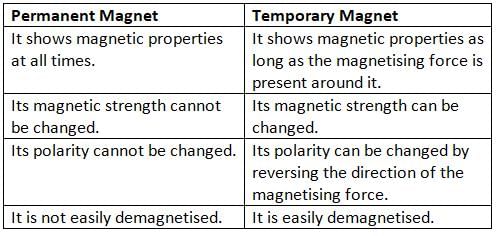
- Magnets that keep their magnetism even after the magnetising force is removed are called permanent magnets.
- These magnets are used in things like radio speakers, telephone earpieces, and refrigerator door linings.
Temporary Magnets
- Magnets that keep their magnetism only for a short time and lose it when the magnetising force is removed are called temporary magnets.
- Magnets made by magnetic induction and electrical methods are temporary.
- Temporary magnets are used in devices like electric doorbells, electric cranes, and generators.
- They are also used in making transformers and contactors in factories.
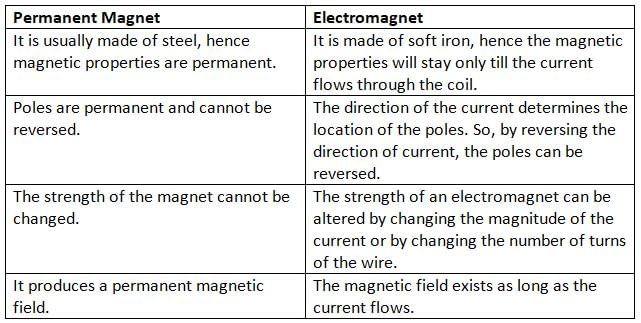
Differences between a Permanent Magnet and Temporary Magnet
Electromagnets
- An electromagnet is a device that makes a magnetic field when electric current flows through it.
- It is made by placing a soft iron bar inside a coil of wire and passing current through the wire.
- When current flows through the wire, the iron bar becomes strongly magnetised.
- You can find the poles of the electromagnet by looking at the direction of the current in the wire.
- The end where the current flows in a clockwise direction is the south pole.
- The end where the current flows in an anticlockwise direction is the north pole.
Properties of an Electromagnet
- The magnetism of an electromagnet is temporary and can be switched on and off, unlike a permanent magnet. So, it is a temporary magnet.
- The strength of an electromagnet can be changed based on certain factors:
- The strength of the current flowing in the coil.
- The number of turns in the coil.
- The type of material of the core inside the coil.
- The strength of an electromagnet can be increased by increasing the current in the coil or by increasing the number of turns in the coil.
Activity 6.4
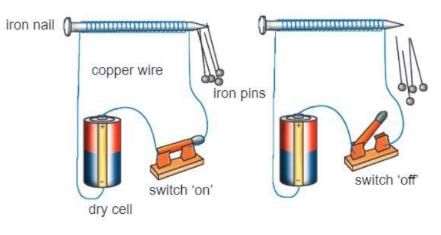
Aim: To make an electromagnet using an iron nail, copper wire, iron pins, and a switch.
Materials required: An iron nail, copper wire, dry cell, iron pins, and a switch.
Procedure:
- Take an iron nail about 6–10 cm long and wind an insulated copper wire on it.
- Connect the ends of the copper wire to the two terminals of a dry cell via a switch.
- Switch on the current through the circuit and bring a few iron pins near the wounded iron nail.
- Switch off the current after some time.
Observation:
- The iron nail acts like a magnet as long as current flows through the circuit.
- The iron pins stick to the nail when the switch is on.
- The pins fall off when the switch is turned off and the electric circuit is disconnected.
Note:
- You can see a stronger magnetic field (more pins sticking to the nail) if you use a battery instead of a cell.
- In the same way, a U-shaped electromagnet can also be prepared.
Uses of Magnets
Uses of Permanent Magnets
- Permanent magnets are widely used for the following purposes:
- They are used in televisions, computers, speakers, and microphones.
- They are used in the doors of refrigerators for closing mechanisms.
- Magnetic strips are used in credit cards and ATM cards to store information.
- Magnetic materials are used in computer hard disks to store information.
- In certain types of toys, permanent magnets are used for their functioning.
Uses of an Electromagnet (Temporary Magnet)
- An electromagnet is used in electric motors, electric bells, loudspeakers, generators, etc.
- It is used in magnetic separation equipment for separating iron ores in industries and for picking up and moving heavy iron objects like scrap iron.
- It is used by doctors to detect and treat a variety of ailments.
- It is used to deflect electron beams in television screens.
- It is used for making strong, permanent magnets.
- The bottom of Maglev trains (the fastest trains in the world) and their tracks both have electromagnets to run the train very fast.
Differences between a Permanent Magnet and an Electromagnet
Demagnetisation by heating, hammering and electricity
- The process of demagnetisation is the opposite of magnetisation. It is the process of destroying the magnetism of a magnet.
- The magnetic properties of a magnet can be destroyed in the following ways:
- By rough handling
- By dropping the magnet on the floor or on a hard surface many times
- By hammering the magnet repeatedly
- By heating the magnet to a very high temperature
- By passing alternating electric current around the magnet
By Heating the Magnet to a Very High Temperature
- If a magnet bar is heated to a very high temperature and then cooled in the east-west direction, it loses its magnetism.
- When the magnet is heated, its molecules gain thermal energy, and their movement increases.
- This breaks the chain of the molecules and results in the demagnetisation of the magnet.
By Hammering the Magnet Repeatedly
- When a magnet is hammered repeatedly, the molecules of the magnet get disturbed.
- This causes the magnet to lose its magnetism altogether.
By Passing Alternating Electric Current Around the Magnet
- When an alternating electric current of high frequency is passed through an insulated copper wire wound over a magnet, the direction of the current changes rapidly with the change in the direction of the current.
- Due to this, the orderly alignment of the molecules of the magnet is broken, leading to the demagnetisation of the magnet.
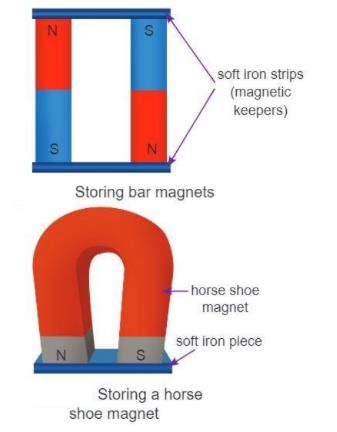
Care and storage of magnets
- A magnet becomes weak and loses its magnetism over time when its poles are left free. This is called self-demagnetisation.
- To prevent magnets from losing their magnetism quickly, we should store the magnets in pairs by placing their opposite poles close to each other and by using soft iron strips across the ends of the bar magnets. These soft iron strips are called magnetic keepers.
- The magnetic keepers help in keeping the magnetic properties of the permanent magnets for a longer time.
- For a horse shoe magnet, only one strip of soft iron is needed to store it for a longer time.
Points To Remember
- A magnet exerts forces of attraction on magnetic substances, and this property is called the attractive property of the magnet.
- When a magnet is freely suspended in a horizontal direction, it always comes to rest in the north-south direction.
- Every magnet has two poles: north and south poles.
- Like poles of two magnets repel each other, and unlike poles attract each other.
- The strength of a magnet is maximum at its poles and minimum at its centre.
- Outside the magnet, the direction of the magnetic lines is from the north pole to the south pole of the magnet, whereas inside the magnet, the magnetic lines of force move from the south pole to the north pole.
- Magnetic lines of force always form closed continuous curves.
- The magnetic lines of force do not intersect each other.
- Earth itself acts like a giant magnet.
- Magnetisation can be done using methods like single touch method, double touch method, magnetic induction, and electrical method.
- The magnets made by the process of induction and electrical methods get demagnetised as soon as the magnetising force is removed; therefore, the magnetism acquired by these processes is temporary in nature.
- The magnetic strength and polarity of a permanent magnet cannot be changed.
- The strength of an electromagnet can be changed as per the need.
- The strength of the electromagnet depends on the following factors:
- The strength of current flowing in the coil.
- The number of turns in the coil.
- The nature of the material of the core.
- To prevent the magnets from losing their magnetism quickly, we should store the magnets in pairs by placing their opposite poles close to each other and by using soft iron strips across the ends of the bar magnets. These soft iron strips are called magnetic keepers.
- The magnetic properties of a magnet can be destroyed by rough handling, dropping the magnet on the floor or on a hard surface many times, hammering the magnet repeatedly, heating the magnet to a very high temperature, and passing alternating current around the magnet.
Glossary
- Natural magnets: Naturally occurring materials like lodestone which have the property to attract iron.
- Artificial magnets: The magnets that are made by humans.
- Magnetic materials: The materials that are easily attracted by a magnet.
- Non-magnetic materials: The materials that are not attracted by a magnet.
- Magnetic force: The force of attraction exerted by a magnet on magnetic substances.
- North pole of magnet: The end of the magnet that points towards the geographical north pole.
- South pole of magnet: The end of the magnet that points towards the geographical south pole.
- Magnetic field: The region around a magnet where its influence can be felt.
- Magnetic lines of force: The curved paths around the magnet that represent the magnetic field around a magnet.
- Magnetic compass: A simple device based on the directive property of a magnet.
- Geographical axis: The line joining the geographical north pole to the geographical south pole of the Earth.
- Magnetic axis: The line joining the magnetic north pole of the Earth to its magnetic south pole.
- Magnetisation: The conversion of an ordinary piece of magnetic material like iron, steel, etc., into a magnet.
- Permanent magnets: Magnets which keep their magnetism for a longer duration even when the magnetising force is removed.
- Temporary magnets: Magnets which keep their magnetism only for a short period of time and lose it as soon as the force magnetising them is removed.
- Electromagnet: A device in which a magnetic field is produced by the flow of electric current.
- Self-demagnetisation: The phenomenon when a magnet becomes weak and loses its magnetism over a period of time when its poles are left free.
- Demagnetisation: The process of removing magnetism from a magnet.
|
8 videos|51 docs|6 tests
|
FAQs on Magnetism Chapter Notes - Physics Class 6 ICSE
| 1. What are magnetic and non-magnetic materials? |  |
| 2. How is Earth's magnetic field generated? | |
| 3. What is the process of making magnets? | |
| 4. What are electromagnets and where are they used? | |
| 5. What methods can be used for demagnetization? | |


Extra Questions
,study material
,ppt
,Objective type Questions
,Important questions
,Magnetism Chapter Notes | Physics Class 6 ICSE
,Previous Year Questions with Solutions
,video lectures
,shortcuts and tricks
,mock tests for examination
,Free
,Magnetism Chapter Notes | Physics Class 6 ICSE
,practice quizzes
,Viva Questions
,Semester Notes
,past year papers
,Sample Paper
,Magnetism Chapter Notes | Physics Class 6 ICSE
,MCQs
,Summary
,Exam
,


Chapter Notes: Magnetism Free PDF Download
Importance of Chapter Notes: Magnetism
Chapter Notes: Magnetism
Chapter Notes: Magnetism Class 6 Questions
Study Chapter Notes: Magnetism on the App
|
© EduRev
|
Education Revolution
|


|


