Yoga as Preventive Measure for Lifestyle Disease - 1 Chapter Notes | Physical Education Class 11 (XI) - CBSE and NCERT Curriculum PDF Download

Asanas for Obesity Prevention
Tadasana
Tadasana, also known as the Palm Tree Pose, is a traditional yoga posture that aims to promote a straight and erect body posture, similar to the tall and upright nature of palm trees.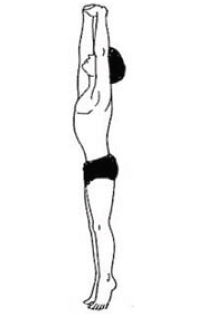
Technique:
- Starting Position: Stand with your feet together or about 10 cm apart if you're a beginner, with your hands resting by the sides of your thighs.
- Weight Distribution: Distribute your weight evenly on both feet to ensure stability.
- Raising Arms: Raise your arms overhead, interlocking your fingers and turning your palms upward.
- Hand Position: Place your hands on top of your head.
- Gazing Point: Fix your gaze on a point on the wall slightly above head level and keep your eyes focused on this point throughout the asana.
- Stretching: Inhale and stretch your arms, shoulders, and chest upward.
- Rising on Toes: Raise your heels, coming up onto your toes.
- Full Body Stretch: Stretch your entire body upward without losing balance or moving your feet.
- Holding the Pose: Hold your breath and the position for a few seconds.
- Returning to Start: Lower your heels while exhaling and bring your hands back to the top of your head. This completes one round of Tadasana.
Breathing Awareness:
- Breathing: Coordinate your breathing with the raising and lowering of your arms. Maintain balance while stretching your entire body.
- Focus: Keep your eyes fixed on a point to help maintain balance.
- Returning to Starting Position: When coming back to the starting position, gently bring your heels down to the floor. Avoid any sudden movements to maintain your balance.
Benefits of the Pose:
- Strengthens: Legs, knees, ankles, arms, and chest.
- Stretches and Opens: Hips, groins, hamstrings, calves, shoulders, chest, and spine.
- Increases: Mental and physical equilibrium.
- Improves: Digestion.
- Reduces: Anxiety, stress, back pain, and sciatica.
Contraindications:
Avoid practicing this asana if you are experiencing:
- Migraine
- Diarrhea
- Low or High Blood Pressure
- Neck and Back Injuries
Katichakrasana
The term "Katichakrasana" is derived from "Kati," meaning waist, and "chakra," meaning circle. This asana involves the rotation of the waist, providing a beneficial stretch and enhancing the flexibility and suppleness of the waist.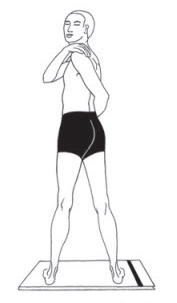
Steps to perform Katichakrasana:
- Stand with your legs 2-3 feet apart.
- Raise both arms to shoulder level, palms facing each other, and keep them parallel.
- While exhaling, twist your body to the left, bringing your right palm to touch your left shoulder, then return to the center while inhaling.
- While exhaling, twist your body to the right, bringing your left palm to touch your right shoulder, then return to the center while inhaling.
- This constitutes one round; repeat it two more times.
- Relax in Samasthiti.
- Inhale and return to the center.
- Exhale and turn to your left, repeating the posture on the left side.
Benefits of Katichakrasana:
- Relieves constipation.
- Strengthens and improves the flexibility of the spine and waist.
- Benefits arm and leg muscles.
- Opens up the neck and shoulders, strengthens abdominal muscles and lower back.
- Especially beneficial for those with sedentary or deskbound jobs.
Precautions:
- Avoid practicing Katichakrasana during pregnancy.
- Do not attempt if you have a hernia, slip disc, or have undergone recent abdominal surgery.
- Consult a doctor before practicing if you have chronic spinal disorders.
Pavanmuktasana
The name "Pawanmuktasana" is derived from the Sanskrit words "pawan," meaning wind, and "mukta," meaning free. Therefore, it is also known as the wind removing asana.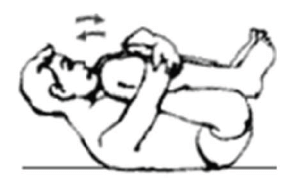
Steps:
- Lie on your back with your legs stretched straight.
- Bend your right knee and hold it with both hands, pressing it towards your abdomen. Exhale and lift your head, trying to touch your knee with your chin.
- Inhale and stretch your legs straight again.
- Bend your left knee and press it against your abdomen.
- Press both legs against your abdomen, placing your chin between your knees. Swing your body back and forth 5 to 10 times, then side to side 5 to 10 times.
Benefits:
- Stretches the neck and back.
- Strengthens lower back muscles and loosens spinal vertebrae.
- Massages pelvic muscles and reproductive organs, beneficial for menstrual disorders.
- Reduces fat in the abdominal area, thighs, and buttocks.
- Improves digestive system, relieves constipation, and increases blood circulation in internal organs.
Precautions:
- Avoid if you have had recent abdominal surgery due to pressure on the abdomen.
- Those suffering from hernia or piles should avoid this asana.
- Pregnant women should not practice this asana.
Matsyasana
Matsyasana, known as the fish pose, derives its name from the Sanskrit word "Matsya," meaning fish. Ancient Yogic texts suggest that practicing Matsyasana can restore spinal strength and overall body balance, leading to improved physical and emotional well-being.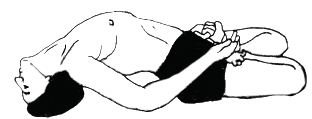
Steps to Perform Matsyasana:
- Begin in Savasana: Lie down in Savasana (Corpse Pose), stretching your arms and legs out, relaxing your body, and taking a few deep breaths.
- Position Your Hands: Place your palms under your hips with your palms facing the ground. Bring your elbows closer together, positioning them near your waist.
- Cross Your Legs: Cross your legs so that your feet overlap in the middle, and your thighs and knees lie flat on the floor.
- Lift Your Chest: Breathe in and lift your chest, allowing your head to lift as well, so that the crown of your head touches the floor. Ensure that the weight of your body is on your elbows, not on your head. Lightly press your shoulder blades as your chest lifts.
- Hold the Position: Hold the position for as long as you are comfortable, breathing normally.
- To Release: Gently raise your head, lowering your chest and head back to the floor, and bring your hands back along the sides of your body.
- Relax: Ensure your head is at rest and your lower spine is close to the floor. Relax in Savasana, taking a few breaths. When ready, you can repeat the asana, holding it for longer durations and deepening the pose with each exhalation.
Halasana
Halasana, or Plough Pose, derives its name from the resemblance of the body to an Indian plough in the final position.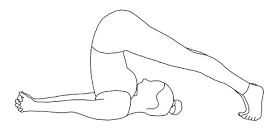
Steps to Perform Halasana:
- Begin by lying on your back with your hands straight by your sides, palms resting on the ground.
- Slowly raise your legs together to a 30-degree angle without bending your knees, using your hands for support.
- After a few seconds, raise your legs to a 60-degree angle and maintain the position for a few seconds.
- Gradually bring your legs to a 90-degree angle.
- Pressing your hands, slowly bring your legs towards your head.
- Continue bending your legs until your toes touch the ground, then stretch your legs backward as far as possible.
- Place your palms on your head with a finger lock, and bring your elbows to the ground.
- To return to the original position, first release the finger lock, stretch your hands straight, and place them on the ground by your sides.
- Lower your waist and raise your legs from the ground, letting your waist rest on the ground while stopping at a 90-degree angle.
- Slowly come back to the original position.
Benefits of Halasana:
- Strengthens the core and back muscles.
- Improves flexibility in the spine and hamstrings.
- Stimulates the thyroid and parathyroid glands.
- Relieves stress and fatigue.
- Aids digestion and improves blood circulation.
Precautions:
- Individuals with high or low blood pressure, neck injuries, back injuries, migraines, spondylitis, or heart ailments should avoid this pose.
- Pregnant women should not attempt Halasana.
Breath Awareness:
- Maintain steady and controlled breathing, avoiding irregular or erratic patterns.
- Inhale deeply while raising the legs to a 90-degree angle, then exhale completely.
- Stay in this position for a few breaths, allowing blood to flow.
- This asana can help correct dyspepsia or constipation due to abdominal muscle disturbance.
- Practicing this asana can be beneficial for certain types of diabetes.
- For maximum benefits, practice Bhujangasana immediately after Halasana.
Halsana should be avoided by:
- Individuals with cervical spondylitis or spine stiffness.
- Those with abdominal injuries or hernias.
Paschimottanasana
Paschimottanasana is derived from the Sanskrit words "paschima," meaning "west" or "back of the body," and "uttana," meaning "intense stretch" or "extended." In this asana, one sits and stretches the back forward intensely.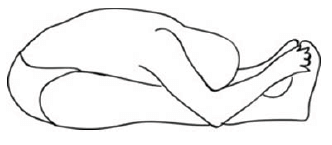
Steps to Practice Paschimottanasana:
- Sit with both legs stretched out in front, hands by the side, and palms resting on the ground. Fingers should be together, pointing forward.
- Loosen your back muscles and bend forward as far as possible.
- Maintain this position, allowing your hands to relax and rest where comfortable, ideally on the thighs.
- Practice daily, gradually bending forward more. Eventually, aim to hold the big toes with your forefingers and place your forehead on your knees.
- After a few seconds, raise your head, release the toes, and return to the original position.
- Breathe slowly and deeply during the final position, or exhale if holding for a short duration. Inhale while returning to the starting position.
Benefits of Paschimottanasana:
- Stretches the back muscles from head to ankles and contracts the muscles of the anterior body.
- Improves respiration and the functions of intra-abdominal glands, especially their secretions.
- Enhances flexibility in the lumbar region, hips, and thighs (back of thighs and calves).
- Massages and tones abdominal and pelvic organs, including the liver, pancreas, kidneys, adrenals, spleen, and intestines.
- Improves blood circulation in the back and tones spinal nerves.
- Enhances vertebral column alignment.
Precautions:
- Avoid Paschimottanasana if you have a painful or enlarged liver or spleen, herniated discs, or acute appendicitis until symptoms subside.
Ardha Matsyendrasana
The name "Ardha Matsyendrasana" is derived from Sanskrit, where "ardha" means half, "matsya" means fish, and "eendra" refers to a king. This asana is called "Half Lord of the Fish" because its final position resembles this pose. It is also known as "Half Spinal Twist Pose."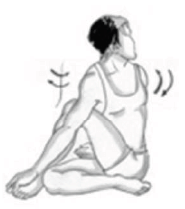
Steps to Practice Ardha Matsyendrasana:
- Sit with both legs extended in front and hands by the side, palms resting on the ground, fingers pointing forward.
- Fold the right leg at the knee and place the right heel at the perineum.
- Fold the left leg, bringing it over the right knee, and place it on the ground beside the right knee, with the left knee pointing up.
- Place the right hand on the left side of the left knee, keeping the left knee close to the right armpit.
- Straighten the right arm and hold the left toe or ankle with the right hand.
- Twist the torso to the left, looking backward, and place the left hand on the right thigh, gazing toward the back.
- To return, release the hand from the thigh, turn the head forward, and bring the back to the normal position, loosening the right hand.
- Return the left leg and then the right leg to the original position.
- Repeat the process from the other side, starting with the left leg.
Breathing:
- Inhale in the forward position.
- Exhale while twisting the trunk. Breathe deeply and slowly without strain in the final position.
Benefits of Ardha Matsyendrasana:
- Alleviates constipation and dyspepsia.
- Enhances liver efficiency and kidney function.
- Beneficial for diabetes management.
- Strengthens shoulder and back muscles.
Precautions:
- Avoid during pregnancy and menstruation due to the strong abdominal twist.
- Individuals who have undergone heart, abdominal, or brain surgeries should not practice this asana.
- Those with peptic ulcers or hernias should exercise caution.
- People with severe spinal issues should avoid this asana, while those with mild slipped discs may benefit from it.
Dhanurasana
The name "Dhanurasana" is derived from the Sanskrit words "Dhanura," meaning "bow." This asana is called Dhanurasana because the final position resembles that of a bow.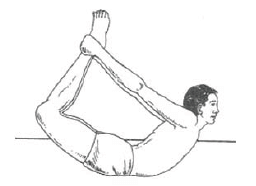
Dhanurasana: The Bow Pose
Starting Position: Lie face down on the floor with your legs together, hands straight by your sides, and chin resting on the ground.
- Step 1: Bend your knees and bring your heels towards your thighs, keeping your knees together.
- Step 2: Reach back with your hands and grab your toes with your thumb and forefinger.
- Step 3: Lift your legs, head, and chest off the ground.
- Step 4: Pull your legs towards your ears, bringing your toes close to your ears. Look straight ahead.
- Step 5: To return, loosen your hands, lower your legs, let your thighs touch the ground, release your toes, and return to the starting position.
Breathing: Inhale deeply at the start. Hold your breath while in the final position. Breathe slowly and deeply. Exhale while returning to the starting position.
Benefits: Improves spine and back muscle flexibility, reduces nervous weakness, alleviates constipation, helps in fat loss, treats dyspepsia, rheumatism, and gastrointestinal disorders, enhances digestion and appetite.
Precautions: Avoid if you have high blood pressure, back pain, hernia, headache, migraine, or have had abdominal surgery. Pregnant women and those on their periods should not practice this asana.
Ustrasana (Camel Pose)
Kneel on the floor with your thighs perpendicular to the ground and your feet flat on the floor. Place your hands on your lower back for support.
Step 1: Gently arch your back, pushing your hips forward and lifting your chest towards the ceiling. Step 2: If comfortable, reach back and grab your heels with your hands, fingers pointing towards your toes. Step 3: Keep your neck in a neutral position or gently tilt your head back to look up at the ceiling. Step 4: Hold the position, breathing deeply and evenly. To release, carefully lower your body back to the starting position.
Benefits: Improves flexibility of the spine and back muscles, strengthens the back, opens up the chest and shoulders, stimulates digestive organs, and can help alleviate stress and anxiety.
Precautions: Avoid if you have serious back issues, knee injuries, or neck problems. Pregnant women should also avoid this pose.
- Meaning: "Ushtra" means camel in Sanskrit, and "Ushtrasana" refers to the camel pose.
- Chakra Activation: Ushtrasana is known to open the Anahata (Heart) chakra.
- Benefits:
- Increases flexibility and strength in the body.
- Improves digestion.
- Stimulates anterior muscles and contracts posterior muscles.
- Has a positive influence on ovaries, thyroid, and other endocrine glands.
- Develops strength and confidence.
- Beneficial for digestive and reproductive organs.
- Loosens vertebrae and stimulates spinal nerves, relieving backache, rounded back, and drooping shoulders.
- Helpful for asthmatic individuals.
- Contraindications:
- Back problems
- Severe arthritis
- Vertigo
- Pregnancy
Steps to Perform Ushtrasana:
- Starting Position: Sit in Vajrasana (Thunderbolt Pose).
- Raise Arms: Stand on your knees and raise your arms beside your body at shoulder level.
- Knee and Feet Position: Keep your knees and feet together or separated as needed.
- Right Side Twist: Exhale and twist to the right, placing your right palm on your right heel.
- Left Side Placement: Bend further back and place your left palm on your left heel.
- Final Position: Push your abdomen and hips forward, keeping your thighs vertical to the floor. Bend your head and spine backward according to your flexibility.
- Relaxation: Relax your whole body, especially your back muscles, in the final position. Ensure your body weight is evenly supported by your legs and arms. Your arms should anchor your shoulders to maintain the arch of your back.
- Return: Exhale and bring your abdomen and thighs back from the vertical position. Inhale and return to the standing position by raising your left hand from your heels. Bring your left arm to shoulder level, followed by your right arm. Exhale, lowering your arms and returning to Vajrasana.
Breathing Pattern:
- Inhalation: Raise your chest and spine, relaxing your body with each exhalation.
- Neck Release: Inhale and release your neck first, slowly bringing your body back to the initial position while exhaling completely.
Benefits of Ushtrasana:
- Increases flexibility and strength.
- Improves digestion and stimulates endocrine glands.
- Relieves backache and rounded shoulders.
- Beneficial for asthmatic individuals.
- Develops strength and confidence.
Contraindications:
- Back problems
- Severe arthritis
- Vertigo
- Pregnancy
Surya Bhedana Pranayama
Meaning: "Surya" means sun, and "bhedhana" means to penetrate or get through. In this pranayama, inhalations are done through the right nostril, and exhalations through the left.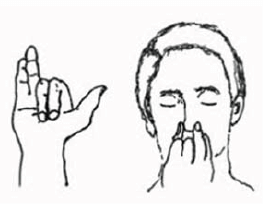
Steps to Perform Surya Bhedana Pranayama:
- Starting Position: Sit in any meditation posture, such as Padasana or Sukhasana, with your eyes closed.
- Hand Position: Close your left nostril using the middle and ring fingers of your right hand.
- Inhalation: Inhale slowly and silently through the right nostril as long as comfortable.
- Breath Retention: Place your hand on your knees and retain the breath by pressing the chin against the chest and contracting the rectum muscles. This step should be gradually increased over time.
- Exhalation: Exhale slowly and silently through the left nostril by closing the right nostril, followed by releasing the rectum muscles and the chin lock.
- Relaxation: Relax and return to the original position. Repeat this process 3 to 5 times.
Benefits of Surya Bhedana Pranayama:
- Purifies the brain and eliminates intestinal worms and diseases caused by excess wind (Vayu).
- Helps manage rhinitis and various types of neuralgia.
- Removes worms from the frontal sinuses.
- Beneficial for individuals with low blood pressure.
Contraindications:
- Avoid if you have shoulder, wrist, finger, or hand injuries or surgeries.
- Individuals with acidity, stomach issues, or mouth problems should avoid this practice due to the heat generated.
Benefits of Ushtrasana:
- Increases flexibility and strength in the body.
- Improves digestion and stimulates internal organs.
- Activates and balances energy in the Anahata (Heart) chakra.
- Loosens the vertebrae and relieves tension in the spinal nerves, helping with back pain and posture issues.
- Helpful for individuals with respiratory issues like asthma.
- Builds confidence and mental strength.
Contraindications:
- Individuals with severe back problems should avoid this asana.
- Those with severe arthritis or joint issues should refrain from practicing.
- People experiencing vertigo or dizziness should not attempt this pose.
- Pregnant women should avoid this asana due to the pressure it places on the abdomen.
Asanas to Prevent Diabetes Mellitus
Bhujangasana
- In this asana, the body takes the form of a hooded snake, which is why it is called “Bhujangasana” in Sanskrit.
Technique:
- Begin by lying on your stomach with your legs together, toes pointing outwards, and your hands by your sides, palms facing up. Place your forehead on the ground.
- Bend your elbows and place your palms on the ground near your shoulders, thumbs under your armpits.
- Lift your chin and place it on the ground, looking ahead.
- Raise your chin and tilt your head back as far as possible. Lift your chest off the ground, arching your back from the navel upwards. Keep your navel on the ground.
- Hold the position for a while, then lower your body back down, starting from the navel, then the chest, shoulders, chin, and finally, place your forehead on the ground.
- Relax your hands and place them beside your thighs.
Breathing:
- Inhale while lifting your torso.
- Breathe normally in the final position.
- Exhale while lowering your torso.
- Ensure your breathing and movements are synchronized and smooth.
Benefits:
- Strengthens and increases the flexibility of the spine and vertebral column.
- Opens up the chest, shoulders, heart, and ribcage.
- Tones and strengthens the spinal extensor muscles.
- Stimulates the endocrine system and digestive organs.
- Beneficial for kyphosis.
Precautions
- Avoid this asana during pregnancy.
- Do not practice if you have spondylitis or spinal injuries.
- Those with weak back muscles should also avoid this asana.
Shalbhasana
- The term “Shalabhasana” is derived from the Sanskrit word “shalabh,” which means grasshopper or locust.
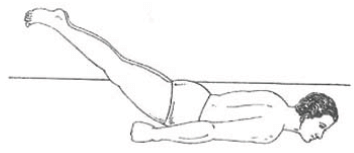
Technique:
- Start in a prone position with your legs together, toes pointing back, and the soles of your feet facing the sky. Your hands should be by your sides, palms facing up, and your forehead resting on the ground.
- Bend your elbows and position your hands under your shoulders, similar to the Bhujangasana pose, with your fingers pointing forward.
- Gradually lift both legs off the ground without bending your knees, and hold this position.
- To release, slowly lower your legs back down and return to the starting position, bringing your hands back to their original place.
Breathing:
- Inhale while raising both legs and holding the position.
- Exhale while lowering the legs.
- Maintain a smooth synchronization of breath and movement throughout the practice.
Benefits:
- Helps to reduce abdominal fat and tones the abdomen.
- Strengthens the back and neck muscles.
- Aids in repairing and replenishing the spinal cord.
- Alleviates neck pain and corrects defects in the neck joints.
- Improves digestion by enhancing intestinal activity through stretching.
- Addresses urinary disorders and strengthens the uterus and reproductive system.
- Regulates menstrual issues and strengthens hip bones while reducing excess thigh muscle.
- Helps alleviate constipation.
Precautions:
- Individuals with acute back pain or herniated discs should avoid this asana.
- Those with severe sciatica should refrain from this practice as it tightens the body from hips to feet.
- People with significant menstrual problems or a prolapsed uterus should avoid this asana.
- Pregnant women should not practice this asana.
- Individuals with blood pressure issues should avoid this asana as it may cause suffocation.
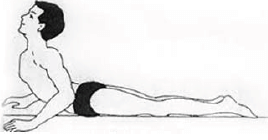
Supta – Vajrasana
- Supta-Vajrasana is a yoga pose that combines the benefits of both the Supta (reclined) position and Vajrasana (thunderbolt) position.
- This pose is particularly beneficial for improving digestion and boosting stamina.
- To perform Supta-Vajrasana, start by sitting in Vajrasana, then gradually recline back, supporting your body with your elbows and eventually lying flat on your back.
- The hands can be positioned in various ways, including placing them by the sides or using the scissor grip under the shoulders.
- When returning to the starting position, it’s important to do so in a controlled manner, first removing the hands and then sitting up.
- Practicing Supta-Vajrasana can help massage the abdominal organs, tone the spinal nerves, improve lung capacity, and is beneficial for those with respiratory issues like asthma and bronchitis.
Benefits of Supta Vajrasana:
- Increases Brain Circulation: Supta Vajrasana enhances blood circulation in the brain, promoting better cognitive function and mental clarity.
- Regulates Adrenal Glands: This asana helps in regulating the functioning of the adrenal glands, which are crucial for managing stress and maintaining hormonal balance.
- Tones Pelvic Muscles: Supta Vajrasana tones and strengthens the pelvic muscles, which is beneficial for both men and women.
- Improves Reproductive Health: The practice of this asana can help improve disorders related to the male and female reproductive organs, enhancing overall reproductive health.
Precautions:
- High Blood Pressure: Individuals with very high blood pressure should avoid practicing Supta Vajrasana.
- Slipped Disc: Those suffering from a slipped disc should refrain from this asana to prevent further injury.
- Vertigo: People who experience vertigo should avoid Supta Vajrasana, as it may exacerbate their condition.
- Pregnancy: Pregnant women should not practice this asana, as it may not be suitable during pregnancy.
- Menstrual Irregularities: Individuals undergoing irregularities in their menstrual cycle should avoid Supta Vajrasana.
- Knee Injuries or Surgery: Those with knee injuries or who have undergone knee surgery should avoid this asana to prevent further injury.
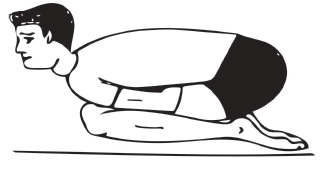
Mandukasana
Benefits of Mandukasana (Frog Pose):
- Improves Digestion: Mandukasana helps in alleviating digestive disorders and constipation by stimulating the abdominal organs.
- Enhances Flexibility: This asana increases the flexibility and mobility of the knee and ankle joints.
- Tones Muscles: It tones the muscles of the shoulder and abdomen, contributing to overall muscle strength.
- Increases Lung Capacity: Regular practice of Mandukasana can enhance lung capacity and respiratory function.
- Beneficial for Pancreas and Heart: This asana is beneficial for individuals with pancreatic and heart issues.
- Reduces Fat: Mandukasana helps in reducing fat from the thighs, belly, and hips.
Precautions for Mandukasana:
- Back Pain: Individuals with severe back pain should avoid this asana.
- Abdominal Surgery: Those who have recently undergone abdominal surgery should refrain from practicing Mandukasana.
- Pregnancy: Pregnant women are advised not to practice this yoga technique.
- Ankle Injury: People with ankle injuries, high blood pressure, insomnia, or a predisposition to migraines should avoid this asana.
Gomukhasana
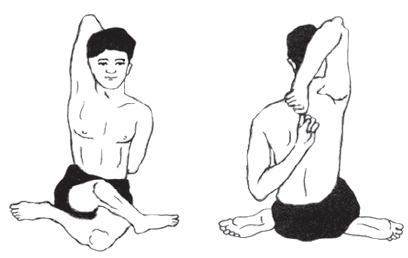 Steps to Perform Gomukhasana (Cow Face Pose):
- Initial Position: Sit on the floor with your legs extended and spine straight. Place your palms on the floor beside you.
- Positioning the Legs: Bend your left leg at the knee and place your left foot below your right hip. Sit on your left foot, ensuring the ankle and toes are tucked in. Bend your right leg at the knee and place your right thigh over your left thigh, bringing your right foot close to your left hip.
- Positioning the Arms: Raise your left arm above your shoulder and bend it, placing your left palm on your back near the shoulder blade. Raise your right arm, bend it at the elbow, and try to reach your left palm from behind. If possible, clasp your hands together.
- Engaging the Posture: Pull your palms closer, lift your chest, and raise your upper body while keeping your neck aligned with your shoulders. Feel the stretch in your thighs, knees, chest, abdomen, shoulders, arms, neck, and elbows.
- Maintaining the Pose: Hold the position for a few breaths, then gradually release and relax by stretching your legs out and bringing your arms down.
- Switching Sides: After a few breaths in the relaxed position, switch sides by bending your right leg and placing your right foot close to your left hip. Cross your left thigh over your right thigh and place your left foot close to your right hip. Repeat the arm positioning steps on this side.
Breathing and Alignment:
- In Gomukhasana, focus on deep inhalations and exhalations while crossing your legs and bringing your arms behind you.
- Maintain a straight spine and avoid forward bending of the neck.
With each exhalation, deepen your stretch into the pose, and with each inhalation, relax and loosen your body.
- Hamstring Stretch: The stretch at the hamstrings during this asana helps improve flexibility in that area.
- Hip Joint Flexibility: Gomukhasana promotes greater flexibility in the hip joint, allowing for increased range of motion.
- Chest Muscle Tone: This pose stretches and tones the muscles of the chest, contributing to better posture and overall upper body strength.
- Blood Circulation: Gomukhasana enhances blood circulation to the legs and arms, ensuring a healthy supply of oxygen and nutrients to these areas.
- Knee Joint Flexion: The flexion of the knee joint in this pose can aid in healing certain types of weakness in the knees, provided there are no ligament tears.
- Abdominal Health: This asana improves the functioning of the abdominal organs and aids in digestion, promoting overall gut health.
- Tummy Fat Reduction: Stretching the abdominal area during Gomukhasana helps burn excess fat in the tummy region and tones the entire torso.
- Arm Strength and Flexibility: The biceps and triceps muscles are strengthened in this pose, and there is increased flexibility in the shoulders and upper arms.
Precautions:
- Individuals with shoulder pain, backache, hip or knee pain, or stiffness in the shoulders should avoid practicing Gomukhasana.
- This asana is not recommended during pregnancy.
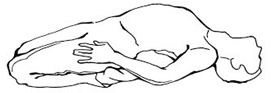
Yogamudra
Yogamudra is not an asana; it is a mudra, but it can be performed as a remedy for diabetes. This mudra symbolizes the human form as part of the Divine, representing great understanding and wisdom of human nature's weaknesses and endless potential.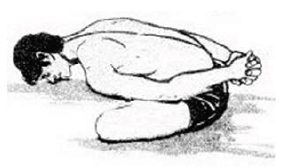
Steps to Perform Yogamudra:
- Sit in Padmasana (Lotus Pose) and close your eyes.
- Hold one wrist behind your back with the other hand.
- While exhaling, bend forward, keeping your spine straight.
- Bring your forehead to the floor.
- Stay in this position for as long as it is comfortable.
- Slowly return to the starting position.
- Inhale slowly and deeply in the starting position.
- Exhale while bending forward. Breathe deeply and slowly in the final position.
Benefits of Yogamudra:
- Stretches the posterior muscles of the trunk and neck.
- Improves muscle toning and venous circulation of the spinal column.
Precautions:
- Should be avoided during pregnancy.
- Individuals with peptic ulcers or hernias should exercise caution.
- Those with severe spinal problems should avoid this asana. It may benefit individuals with mild slipped discs, but it should be avoided in severe cases.
Kapalabhati
Kapalabhati involves forceful and fast diaphragmatic breathing. In a comfortable sitting position, one exhales forcefully by contracting the abdomen and inhales. The exhalations and inhalations are accompanied by abdominal movements that occur in quick succession for a number of times depending on one’s capacity.
Benefits:
- This is a great cleanser for the respiratory passages including the sinuses.
- It improves respiratory function and promotes circulation.
- Improves balance.
- It removes acidity and gas related problems.
- It cures sinusitus, asthma, and hair loss.
Precautions:
- Pregnant women, individuals with slipped discs, and those with asthma should avoid this practice.
- It is not recommended during menstruation.
|
33 videos|47 docs|23 tests
|
FAQs on Yoga as Preventive Measure for Lifestyle Disease - 1 Chapter Notes - Physical Education Class 11 (XI) - CBSE and NCERT Curriculum
| 1. What are some effective yoga asanas for obesity prevention? |  |
| 2. How can yoga help prevent diabetes mellitus? | |
| 3. Which yoga asanas are recommended for preventing bronchial asthma? | |
| 4. Can yoga help manage hypertension, and if so, what asanas should be practiced? | |
| 5. What yoga asanas are beneficial for preventing back pain and arthritis? | |


Objective type Questions
,study material
,Yoga as Preventive Measure for Lifestyle Disease - 1 Chapter Notes | Physical Education Class 11 (XI) - CBSE and NCERT Curriculum
,Extra Questions
,Yoga as Preventive Measure for Lifestyle Disease - 1 Chapter Notes | Physical Education Class 11 (XI) - CBSE and NCERT Curriculum
,Important questions
,video lectures
,Exam
,Previous Year Questions with Solutions
,Yoga as Preventive Measure for Lifestyle Disease - 1 Chapter Notes | Physical Education Class 11 (XI) - CBSE and NCERT Curriculum
,MCQs
,mock tests for examination
,Viva Questions
,Summary
,shortcuts and tricks
,past year papers
,Sample Paper
,Semester Notes
,Free
,practice quizzes
,ppt
;


Chapter Notes: Yoga as Preventive Measure for Lifestyle Disease - 1 Free PDF Download
Importance of Chapter Notes: Yoga as Preventive Measure for Lifestyle Disease - 1
Chapter Notes: Yoga as Preventive Measure for Lifestyle Disease - 1
Chapter Notes: Yoga as Preventive Measure for Lifestyle Disease - 1 Class 11 Questions
Study Chapter Notes: Yoga as Preventive Measure for Lifestyle Disease - 1 on the App
|
© EduRev
|
Education Revolution
|


|


