Electrical Engineering (EE) Exam  >  Electrical Engineering (EE) Tests  >  Test: Error Analysis - Electrical Engineering (EE) MCQ

Test: Error Analysis - Electrical Engineering (EE) MCQ


Test Description

10 Questions MCQ Test - Test: Error Analysis

Test: Error Analysis for Electrical Engineering (EE) 2024 is part of Electrical Engineering (EE) preparation. The Test: Error Analysis questions and answers have been prepared according to the Electrical Engineering (EE) exam syllabus.The Test: Error Analysis MCQs are made for Electrical Engineering (EE) 2024 Exam. Find important definitions, questions, notes, meanings, examples, exercises, MCQs and online tests for Test: Error Analysis below.
Solutions of Test: Error Analysis questions in English are available as part of our course for Electrical Engineering (EE) & Test: Error Analysis solutions in Hindi for Electrical Engineering (EE) course. Download more important topics, notes, lectures and mock test series for Electrical Engineering (EE) Exam by signing up for free. Attempt Test: Error Analysis | 10 questions in 20 minutes | Mock test for Electrical Engineering (EE) preparation | Free important questions MCQ to study for Electrical Engineering (EE) Exam | Download free PDF with solutions
Test: Error Analysis - Question 1

The instruments that determine the electrical quantity to be measured directly in terms of deflection are called:

Detailed Solution for Test: Error Analysis - Question 1

We can classify the instruments into two types:

1. Absolute Instruments:

  • These instruments give the magnitude of the quantity under measurements in terms of physical constants of the instrument
  • There is no necessity of calibrating or comparing with other instruments
  • Tangent Galvanometer and Rayleigh’s current balance are examples of this class

2. Secondary Instruments:

  • These instruments are so constructed that the quantity being measured can only be measured by observing the output indicated by the instrument i.e. deflection of the instrument
  • These instruments are calibrated by comparison with an absolute instrument or any other secondary instrument which has already been calibrated against an absolute instrument
  • A voltmeter, a glass thermometer, and a pressure gauge are typical examples of secondary instruments

Working with absolute instruments for routine work is time-consuming. Therefore, secondary instruments are most commonly used. Absolute instruments are seldom used except in standard institutions and laboratories while secondary instruments find usage almost in every sphere of measurement.

Test: Error Analysis - Question 2

In case of overdamping, the instrument will become

Detailed Solution for Test: Error Analysis - Question 2
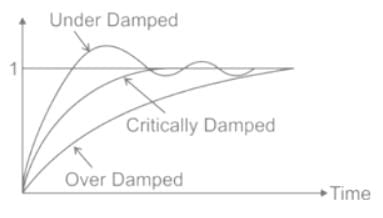
  • In case of over damping, the instrument will become slow and lethargic and it rises very slowly from its zero position to final position
  • An over damped system would never allow the system to reach the desired end state since it is over damped and that is why they are never used.

1 Crore+ students have signed up on EduRev. Have you? Download the App
Test: Error Analysis - Question 3

The change in resistance of an electrical strain gauge with a gauge factor of 2.0 and resistance of 50 Ω when subjected to a strain of 0.001 is:

Detailed Solution for Test: Error Analysis - Question 3

Concept: 

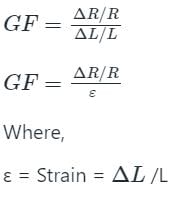
Gauge factor (GF) or strain factor of a strain gauge is the ratio of relative change in electrical resistance (R) to the mechanical strain (ε).

ΔL= Absolute change in length

L = Original length

ΔR = Change in strain gauge resistance due to axial strain and lateral strain

R = Unstrained resistance of strain gauge

Calculation:

Given-

GF = 2, R = 50 Ω, ε = 0.001

Now change in resistance of an electrical strain gauge can be calculated as

ΔR = 2 x 50 x 0.001

ΔR = 0.1 Ω 

Test: Error Analysis - Question 4

A wattmeter reads 25.34 W. The absolute error in measurement is - 0.11 W. What is the true value of power:

Detailed Solution for Test: Error Analysis - Question 4

Given that,

Measured value = 25.34 W

Absolute error = - 0.11 W

Absolute error = Measured value – true value

⇒ -0.11 = 25.34 – true value

⇒ 25.34 + 0.11 = 25.45 W

Test: Error Analysis - Question 5

What is the smallest change in the input signal that can be detected by an instrument called?

Detailed Solution for Test: Error Analysis - Question 5

Accuracy: It is the degree of closeness with which the reading approaches the true value of the quantity to be measured.

Precision: It is the measure of reproducibility i.e., given a fixed value of a quantity, precision is a measure of the degree of agreement within a group of measurements.

  • The precision of an instrument does not guarantee accuracy
  • An instrument with more significant figures has more precision
  • Deflection factor is reciprocal of sensitivity

Resolution: The smallest change in output to the change in input is known as resolution. Resolution is the smallest measurable input change.

Sensitivity: It is defined as the ratio of the changes in the output of an instrument to a change in the value of the quantity being measured. It denotes the smallest change in the measured variable to which the instrument responds.

Deflection factor or inverse sensitivity is the reciprocal of sensitivity.

Test: Error Analysis - Question 6

If a zero-centred voltmeter has a scale from – 5V to +5V, then the span of it is _____.

Detailed Solution for Test: Error Analysis - Question 6

Concept:

Span: It is defined as the difference between the largest and smallest reading of the instrument.

If voltmeter scale is -V1 to V2, then the span is given by (V2 + V1)

Explanation:

The voltmeter scale is -5 V to 5 V

If voltmeter scale is -V1 to V2, then the span is given by (V2 + V1)

Now, span = 5 + 5 = 10 V

Test: Error Analysis - Question 7

Perfect reproducibility means the instrument has:

Detailed Solution for Test: Error Analysis - Question 7

Reproducibility: It is the degree of closeness with which given value may be repeatedly measured. It may be specified in terms of units for a given period of time.

Perfect reproducibility means that the instrument has no drift.

No drift means that with a given input the measured values do not vary with time.

Test: Error Analysis - Question 8

Error due to improper zero adjustment is classified as

Detailed Solution for Test: Error Analysis - Question 8

An error can be classified into three types: Gross error, Systematic error and random error.

1. Gross error: this class of error mainly cover a human mistake in reading instruments and calculating measurement results.

2. Systematic error: The systematic error can be classified into three type’s Instrumental error environmental error and observation error.

Instrumental error:

  • Error due to improper zero adjustment
  • Due to inherent shortcomings of the instruments
  • Due to the misuse of the instruments
  • Due to the loading effect

Environmental error: These errors are due to environmental factors like change in humidity, temperature and variation in pressure.

Observation error: These errors are induced only by the observer and most common error is parallax error. These parallax errors are introduced while reading a meter scale.

3. Random error: These errors are due to small factors which changes very often from instrument to the other instrument. These errors are also due to unknown cases which are also called residual error

Test: Error Analysis - Question 9

The difference between the indicated value and the true value of a quantity is:

Detailed Solution for Test: Error Analysis - Question 9

Absolute error (ε):

The difference between the indicated or measured value and the true or actual value is called absolute error. Also known as a static error.

Absolute error (ε) = Am - At

Where

Am =  measured or indicated value

At = true or actual value

Gross error:

  • Gross errors are the observational errors that happen due to the lack of observation of the observer.
  • These errors vary from observer to observer.
  • The gross errors may also occur due to improper selection of the instrument.

Relative error:

The relative error is the absolute error over the true or actual value.

Relative static error

Probable error is a quantity formerly used as a measure of variability which is equal to 0.6745 times the standard deviation.

Test: Error Analysis - Question 10

A meter reads 125 V and the true value of the voltage is 125.5 V. Find the static error of the instrument.

Detailed Solution for Test: Error Analysis - Question 10

Concept:

Absolute Error: The deviation of the measured value from the true value (or) actual value is called error. It is also known as a static error.

Static error (E) = Am – At

Am = Measured value

At = True value

Relative Static Error: The ratio of absolute error to the true value is called relative static error.

Limiting Error:

The maximum allowable error in the measurement is specified in terms of true value, is known as limiting error. It will give a range of errors. It is always with respect to true value, so it is a variable error.

Guaranteed Accuracy Error:

The allowable error in measurement is specified in terms of full-scale value is known as a guaranteed accuracy error. It is a variable error seen by the instrument since it is with respect to full-scale value.

Application:

Given-

Am = 125 V, At = 125.5 V

∴ Static error (E) = 125 - 125.5

E = 0.5 V

Information about Test: Error Analysis Page
In this test you can find the Exam questions for Test: Error Analysis solved & explained in the simplest way possible. Besides giving Questions and answers for Test: Error Analysis, EduRev gives you an ample number of Online tests for practice

Top Courses for Electrical Engineering (EE)

Download as PDF

Top Courses for Electrical Engineering (EE)