Railways Exam > Railways Questions > While taking a measurement with the help of a...
Start Learning for Free
While taking a measurement with the help of a Micrometer, which two parts of a Micrometer are used to hold the specimen?
- a)Spindle and Anvil
- b)Spindle and Ratchet
- c)Anvil and Ratchet
- d)Anvil and Barrel
Correct answer is option 'A'. Can you explain this answer?
| FREE This question is part of | Download PDF Attempt this Test |
Verified Answer
While taking a measurement with the help of a Micrometer, which two pa...
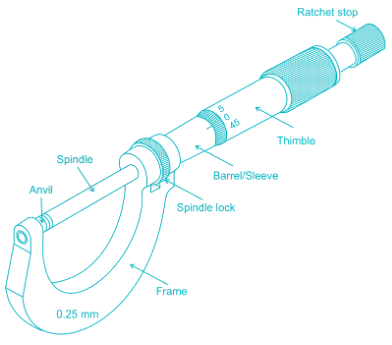
Objects to be measured by Micrometer are placed between the measuring faces; the anvil and the spindle.
The anvil is the stationary measuring face against which parts are held until the spindle contacts the work.
It operates by measuring the space between a hard stop (anvil) and a movable surface (spindle). When a thimble is turned it drives the spindle closer or farther away from the anvil.


Most Upvoted Answer
While taking a measurement with the help of a Micrometer, which two pa...
Explanation:
The correct answer is option 'A', which states that the spindle and anvil are the two parts of a Micrometer that are used to hold the specimen. Let's understand why this is the correct answer.
What is a Micrometer?
A micrometer, also known as a micrometer screw gauge, is a precision measuring instrument used to measure the dimensions of small objects with great accuracy. It is commonly used in mechanical engineering, machining, and manufacturing industries.
The Parts of a Micrometer:
A micrometer consists of several parts that work together to provide accurate measurements. The main parts of a micrometer include:
1. Frame: The frame is the main body of the micrometer, which holds all the other parts together.
2. Spindle: The spindle is a cylindrical rod that moves in a parallel direction to the axis of the micrometer. It is used to hold the specimen being measured.
3. Anvil: The anvil is a flat and hardened surface located opposite to the spindle. It is used to support the specimen and provide a reference point for measurement.
4. Barrel: The barrel is the cylindrical tube that houses the spindle and connects it to the frame. It allows the spindle to move smoothly and precisely.
5. Ratchet: The ratchet is a mechanism located on the thimble of the micrometer. It provides a clicking sound and feel when the spindle is being rotated, ensuring consistent and accurate measurements.
Using the Micrometer:
To take a measurement using a micrometer, the following steps are generally followed:
1. Open the micrometer: Rotate the thimble counterclockwise to open the micrometer and create a gap between the spindle and anvil.
2. Place the specimen: Position the specimen between the spindle and anvil, ensuring that it is securely held.
3. Close the micrometer: Rotate the thimble clockwise to close the micrometer and bring the spindle and anvil closer together, applying gentle pressure on the specimen.
4. Take the reading: Read the measurement from the scale on the barrel and the additional scale on the thimble. The reading can be in millimeters or inches, depending on the micrometer.
5. Record the measurement: Record the measurement for further analysis or documentation.
In conclusion, the spindle and anvil are the two parts of a micrometer that are used to hold the specimen being measured. The spindle and anvil provide stability and support to ensure accurate measurements can be taken.
Attention Railways Students!
To make sure you are not studying endlessly, EduRev has designed Railways study material, with Structured Courses, Videos, & Test Series. Plus get personalized analysis, doubt solving and improvement plans to achieve a great score in Railways.

|
Explore Courses for Railways exam
|

|
Similar Railways Doubts
While taking a measurement with the help of a Micrometer, which two parts of a Micrometer are used to hold the specimen?a)Spindle and Anvilb)Spindle and Ratchetc)Anvil and Ratchetd)Anvil and BarrelCorrect answer is option 'A'. Can you explain this answer?
Question Description
While taking a measurement with the help of a Micrometer, which two parts of a Micrometer are used to hold the specimen?a)Spindle and Anvilb)Spindle and Ratchetc)Anvil and Ratchetd)Anvil and BarrelCorrect answer is option 'A'. Can you explain this answer? for Railways 2024 is part of Railways preparation. The Question and answers have been prepared according to the Railways exam syllabus. Information about While taking a measurement with the help of a Micrometer, which two parts of a Micrometer are used to hold the specimen?a)Spindle and Anvilb)Spindle and Ratchetc)Anvil and Ratchetd)Anvil and BarrelCorrect answer is option 'A'. Can you explain this answer? covers all topics & solutions for Railways 2024 Exam. Find important definitions, questions, meanings, examples, exercises and tests below for While taking a measurement with the help of a Micrometer, which two parts of a Micrometer are used to hold the specimen?a)Spindle and Anvilb)Spindle and Ratchetc)Anvil and Ratchetd)Anvil and BarrelCorrect answer is option 'A'. Can you explain this answer?.
While taking a measurement with the help of a Micrometer, which two parts of a Micrometer are used to hold the specimen?a)Spindle and Anvilb)Spindle and Ratchetc)Anvil and Ratchetd)Anvil and BarrelCorrect answer is option 'A'. Can you explain this answer? for Railways 2024 is part of Railways preparation. The Question and answers have been prepared according to the Railways exam syllabus. Information about While taking a measurement with the help of a Micrometer, which two parts of a Micrometer are used to hold the specimen?a)Spindle and Anvilb)Spindle and Ratchetc)Anvil and Ratchetd)Anvil and BarrelCorrect answer is option 'A'. Can you explain this answer? covers all topics & solutions for Railways 2024 Exam. Find important definitions, questions, meanings, examples, exercises and tests below for While taking a measurement with the help of a Micrometer, which two parts of a Micrometer are used to hold the specimen?a)Spindle and Anvilb)Spindle and Ratchetc)Anvil and Ratchetd)Anvil and BarrelCorrect answer is option 'A'. Can you explain this answer?.
Solutions for While taking a measurement with the help of a Micrometer, which two parts of a Micrometer are used to hold the specimen?a)Spindle and Anvilb)Spindle and Ratchetc)Anvil and Ratchetd)Anvil and BarrelCorrect answer is option 'A'. Can you explain this answer? in English & in Hindi are available as part of our courses for Railways.
Download more important topics, notes, lectures and mock test series for Railways Exam by signing up for free.
Here you can find the meaning of While taking a measurement with the help of a Micrometer, which two parts of a Micrometer are used to hold the specimen?a)Spindle and Anvilb)Spindle and Ratchetc)Anvil and Ratchetd)Anvil and BarrelCorrect answer is option 'A'. Can you explain this answer? defined & explained in the simplest way possible. Besides giving the explanation of
While taking a measurement with the help of a Micrometer, which two parts of a Micrometer are used to hold the specimen?a)Spindle and Anvilb)Spindle and Ratchetc)Anvil and Ratchetd)Anvil and BarrelCorrect answer is option 'A'. Can you explain this answer?, a detailed solution for While taking a measurement with the help of a Micrometer, which two parts of a Micrometer are used to hold the specimen?a)Spindle and Anvilb)Spindle and Ratchetc)Anvil and Ratchetd)Anvil and BarrelCorrect answer is option 'A'. Can you explain this answer? has been provided alongside types of While taking a measurement with the help of a Micrometer, which two parts of a Micrometer are used to hold the specimen?a)Spindle and Anvilb)Spindle and Ratchetc)Anvil and Ratchetd)Anvil and BarrelCorrect answer is option 'A'. Can you explain this answer? theory, EduRev gives you an
ample number of questions to practice While taking a measurement with the help of a Micrometer, which two parts of a Micrometer are used to hold the specimen?a)Spindle and Anvilb)Spindle and Ratchetc)Anvil and Ratchetd)Anvil and BarrelCorrect answer is option 'A'. Can you explain this answer? tests, examples and also practice Railways tests.

|
Explore Courses for Railways exam
|

|
Suggested Free Tests
Signup for Free!
Signup to see your scores go up within 7 days! Learn & Practice with 1000+ FREE Notes, Videos & Tests.


