Decomposing problems: Creating a smart solution Chapter Notes | IGCSE Cambridge Computing for Year 7 - Class 7 PDF Download
All about software
Hardware vs. Software:
- Hardware: The tangible, physical components of a computer that you can touch, like the keyboard, mouse, and monitor.
- Software: The intangible programs and operating systems that run on the hardware. You interact with software but cannot physically touch it.
Types of Software:
- Systems Software: This includes operating systems like Windows, Linux, Mac OSX, Android, and iOS. It’s essential for the basic functioning of your device, acting as a bridge between hardware and applications.
- Applications Software: These are programs designed for specific tasks, such as web browsers, word processors, email clients, and development tools like Scratch and Python.
Binary System:
- Computers operate on a binary system, using only two states: on (1) and off (0). All software and inputs, like a keystroke, must be translated into binary for the CPU to process them.
General-Purpose vs. Specific-Purpose Applications:
- General-Purpose: Software like word processors can be used for a variety of tasks, from writing letters to creating reports.
- Specific-Purpose: Software designed for particular functions, such as flight simulators for pilot training or medical simulators for surgeons.
Simulators:
- Simulators are special types of software that replicate real-world activities, allowing users to practice and develop skills in a controlled environment. This is crucial for safety in fields like aviation and medicine.
Development and Testing:
- Tools like the microbit simulator in the MakeCode application allow developers to test and refine their programs before implementing them on actual hardware.
Software is what breathes life into a computer’s capabilities, enabling it to perform a vast array of functions that we rely on in our daily lives. Whether it’s for general use or specialized training, software plays a critical role in the modern digital world.
Introducing the micro:bit
Inputs and Outputs on the micro:bit:
- Inputs: Buttons (A and B), light sensor, temperature sensor, compass, accelerometer, touch sensor, and microphone.
- Outputs: LED display and buzzer.
Programming the micro:bit:
- You can program the micro:bit using block-based languages like MakeCode or text-based languages like MicroPython.
- MakeCode provides a user-friendly interface with a built-in simulator to test your programs.
Using the Simulator:
- The simulator allows you to test how your program will work on the actual micro:bit without needing the physical device.
- For example, you can simulate pressing the A button and see the programmed response on the simulator’s display.
Flowchart for Programming:
- Before writing code, it’s helpful to plan your program using a flowchart.
- A flowchart helps you visualize the steps your program will take and the decisions it will make, like displaying “Hello” and a happy face when the A button is pressed.
Example Program with Selection:
- In a flowchart, you might have a decision point asking, “Is the A button pressed?”
- If the answer is yes, the program will display “Hello!” and a happy face.
- If the answer is no, the program will do nothing and wait for the button to be pressed.
Creating a Flowchart:
- Use specific shapes to represent different parts of the program:
- Ovals for start and end points.
- Parallelograms for inputs and outputs.
- Diamonds for decision points.
- Rectangles for processes or actions.
Here’s an example of how you might write a simple program in MicroPython for the micro:bit:
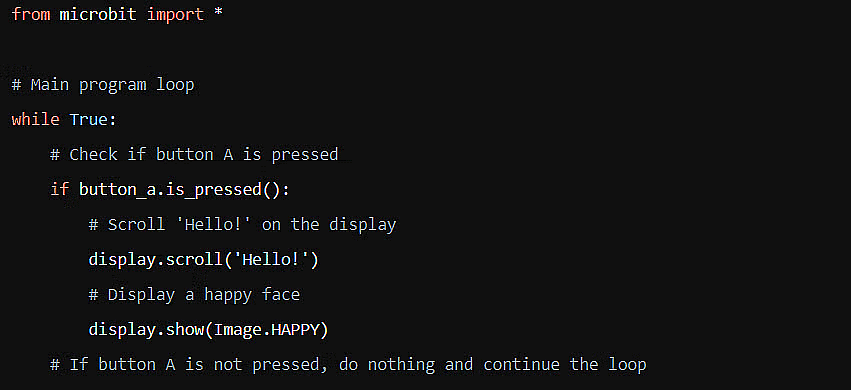
This code checks if button A is pressed and, if so, scrolls the word “Hello!” across the micro:bit’s display followed by showing a happy face. If the button isn’t pressed, it does nothing and continues to check for button presses. This is a simple example of how selection (if statement) is used in programming the micro:bit.
Using Python with the micro:bit
Switching to Python in micro:bit Software:
- In the micro:bit’s online programming environment, you can switch from block-based to text-based coding by selecting Python from the dropdown menu at the top of the page.
MicroPython for micro:bit:
- MicroPython is a streamlined version of Python designed specifically for microcontrollers like the micro:bit.
- It includes libraries and functions tailored to interact with the micro:bit’s hardware.
Syntax in MicroPython:
- Syntax refers to the set of rules that define the combinations of symbols that are considered to be correctly structured programs in a language.
- In MicroPython, you must follow these rules precisely for the code to work.
Example Code:
- The example code provided is for a program that reacts when button A on the micro:bit is pressed.
- It uses a function
on—button—pressed-a()to define what should happen when button A is pressed: it will display the text “Hello!” and then show a happy icon.
Here’s how the example code might look in proper MicroPython syntax:
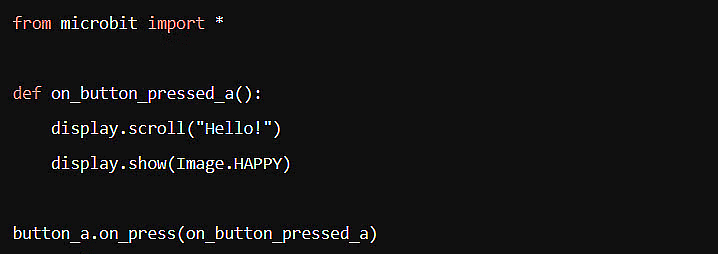
In this corrected code:
from microbit import *imports the necessary modules from the microbit library.def on_button_pressed_a():defines a function that will be called when button A is pressed.display.scroll("Hello!")makes the word “Hello!” scroll across the micro:bit’s LED display.display.show(Image.HAPPY)shows a happy face icon on the display.button_a.on_press(on_button_pressed_a)tells the micro:bit to run theon_button_pressed_afunction when button A is pressed.
The micro:bit Python environment
MicroPython and MakeCode:
- MakeCode allows for both block-based and text-based programming, and it includes a simulator to test your code.
- MicroPython is a version of Python tailored for the micro:bit, and while it works well with MakeCode’s simulator, it’s also used for programming the physical micro:bit device.
Connecting micro:bit to the Online Environment:
- To program the physical micro:bit, you need to use the micro:bit Python online environment.
- Connect the micro:bit to your computer using a USB cable and access the online editor via a web browser.
Flashing the Program to the micro:bit:
- Once you’ve written your code, you “flash” it onto the micro:bit, which means downloading the program to the device.
- The Flash button in the online environment starts this process, and you’ll see a message on your computer screen indicating the progress.
Opening and Saving Programs:
- You can open and save MicroPython files in
.hexor.pyformat. .hexfiles are specific to the micro:bit, while.pyfiles are standard Python files that can be opened in any Python-compatible editor.
Syntax in MicroPython:
- Syntax refers to the rules of a programming language that must be followed for the code to work correctly.
- For example, displaying an image on the micro:bit requires using capital letters for the image name in the code.
- All MicroPython programs for the micro:bit start with importing the micro:bit library using
from microbit import *.
Example MicroPython Code:

- This code will scroll the message “Hello, world!” across the micro:bit’s LED display and then show a heart image.
Correcting errors using a flowchart
Flowchart Explanation:
- The flowchart describes a program that waits for the A button on the micro:bit to be pressed.
- If the A button is pressed, the program will:
- Display the text “Hello”.
- Then display a happy face image.
Identifying Errors in the Code:
- Line 4 Error: The code checks if button B is pressed (
if button_b.) instead of button A. This needs to be corrected toif button_a.is_pressed():. - Line 5 Error: The code incorrectly attempts to display a sad image (
Image.SAD) before scrolling the text. This line should display the text “Hello” and be placed after the check for the A button press. - Line 6 Error: The code should scroll the text “Hello” (
display.scroll("Hello")), but it’s missing the quotation marks around the text, and it’s placed before the image display instead of after the button check.
Corrected MicroPython Code:

Key Points to Remember:
- Always start your MicroPython code by importing the necessary library with
from microbit import *. - Ensure that the syntax is correct, including the use of uppercase letters for images and proper placement of quotation marks around strings.
- Follow the flowchart closely to ensure the program’s logic matches the intended design.
Using sensors in programming
Flowchart Explanation:
- The flowchart describes a program for the micro:bit that uses its touch sensor.
- If the logo (which has a touch sensor) is touched, the program will play a piece of music titled “Baddy”.
Identifying Errors in the Code:
- The code snippet provided is meant to execute when the logo on the micro:bit is touched:
if pin_logo.is_touched(): display.show(Image.SURPRISED) music.play(music.BADDY)- However, there’s an error in the code as it’s missing the necessary imports and the correct syntax for the
ifstatement.
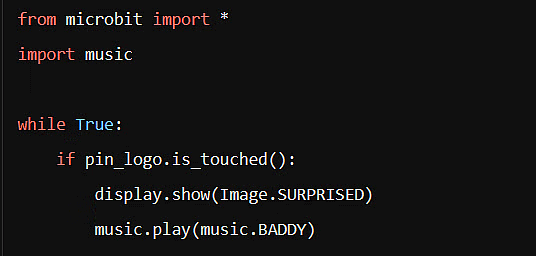
Key Points to Remember:
- The
from microbit import *statement imports the micro:bit module, which includes thedisplayandpin_logoobjects. - The
import musicstatement imports the music module, which includes predefined tunes likemusic.BADDY. - The
while True:loop keeps the program running indefinitely, constantly checking for the touch input. - The
if pin_logo.is_touched():statement checks if the logo is being touched. - The
display.show(Image.SURPRISED)statement shows a surprised image on the micro:bit’s LED display. - The
music.play(music.BADDY)statement plays the “Baddy” tune.
Flowchart Symbols:
- To match the code, the flowchart should include the following symbols:
- Start: An oval symbol indicating the start of the program.
- Decision: A diamond symbol asking if the logo is being touched.
- Process: Rectangles indicating the actions to display an image and play music.
- End: An oval symbol indicating the end of the program (though in this continuous loop, there is technically no end).
Flowcharts for algorithm planning
Flowcharts are indeed a fundamental tool for planning the logic of a program, particularly when it involves decision-making based on input data, such as sensor readings. Let’s break down the concept of using flowcharts with IF statements and comparison operators:
Planning with Flowcharts:
- Before coding, a flowchart helps clarify the program’s structure and the sequence of operations.
- It’s a visual representation of the algorithm that the program will follow.
Using Selection (IF Statements):
- Selection is used in programming to make decisions based on conditions.
- An IF statement checks a condition and decides the next step based on whether the condition is true or false.
Comparison Operators in Flowcharts:
- Comparison operators are symbols that compare values and are used within IF statements in flowcharts and code.
- Common operators include:
<: less than>: greater than<=: less than or equal to>=: greater than or equal to!=: not equal to==: equal to
Example with Light Level Sensor:
- If you’re programming a light sensor, you might have an IF statement like: “IF the light level is below 100 THEN turn the light on.”
- The flowchart would use the
<symbol to represent this comparison.
ELSE in Programming:
- The ELSE part of an IF statement defines what should happen if the condition is not met (the answer is no).
- It’s a way to handle different outcomes based on the sensor data.
Here’s an example of how you might write a MicroPython program for the micro:bit that uses a light sensor to determine whether to turn on an LED:
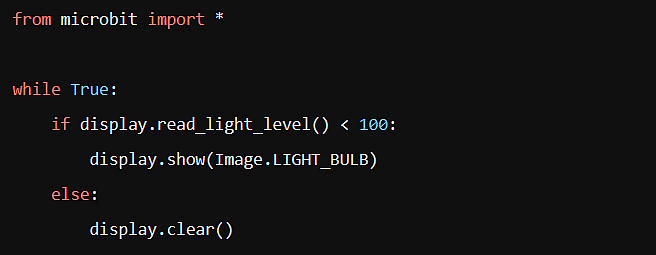
In this program:
- The
display.read_light_level()function checks the current light level. - If the light level is below 100, it displays a light bulb image.
- If the light level is 100 or above, the display is cleared (the ELSE case).
Algorithmic solutions and data types
Understanding data types is crucial in programming, especially when dealing with inputs from sensors and creating conditions in your code. Here’s a breakdown of how data types work in MicroPython for the micro:bit:
Strings:
- Text data is represented as strings in programming.
- Strings are enclosed in single (
') or double (") quotation marks. - For example,
"Hello, World"or'Hello, World'are strings. - In MicroPython, you might use
display.scroll('Hello, World')to scroll text on the micro:bit’s display.
Integers:
- Numeric data from sensors is typically represented as integers, which are whole numbers without decimal points.
- In MicroPython, sensor data is automatically treated as an integer.
- This is important for conditions in IF statements, where you might compare sensor data to a specific value.
IF Statements and Data Types:
- IF statements use conditions to decide the flow of a program.
- The condition often involves comparing a variable to a value using comparison operators like
<,>,<=,>=,!=, and==. - For example,
if temperature < 22:would check if the temperature reading is less than 22 degrees.
Flowcharts and Debugging:
- Flowcharts are a visual tool to plan the logic of your program.
- By following the flowchart, you can predict the program’s output and identify any potential errors.
- This process of finding and fixing errors is known as debugging.
Here’s an example of how you might use sensor data in a MicroPython program for the micro:bit:
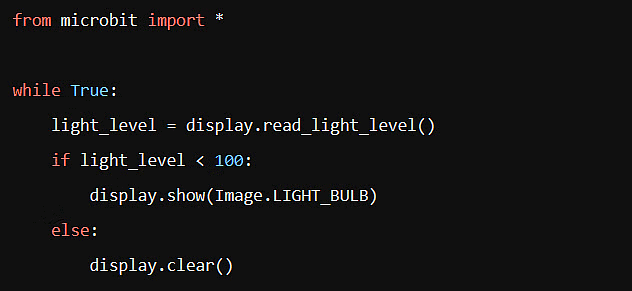
In this code:
light_levelis a variable that stores the current light level, automatically treated as an integer.- The IF statement checks if
light_levelis less than 100. - If true, it displays a light bulb image; otherwise, it clears the display.
Planning a smart solution
In the context of a smart home, creating a flowchart for automated blinds controlled by a light sensor involves defining the conditions under which the blinds should open or close. Here’s how the flowchart translates into an algorithm and what happens next in the program:
Start of the Program:
- The program begins by checking the light level detected by the sensor.
Decision Making (Selection):
- An IF statement checks if the light level is less than 128.
- If
lightLevel < 128is true (Yes), the blinds will close. - If
lightLevel < 128is false (No), the blinds will open.
Continuous Checking:
- The sensor continuously gathers light level data and temporarily stores it in the variable
lightLevel.
Flowchart to Algorithm:
- The flowchart provides a visual representation of the program’s logic.
- The algorithm is the step-by-step instructions that the program will execute.
What Happens Next:
- After the initial decision, the program will loop back to continuously check the light level.
- This loop ensures that the blinds respond dynamically to changes in light throughout the day.
Effective testing
Testing a program using a flowchart is a systematic approach to verify that the program behaves as intended for various inputs. Here’s how the process works:
Creating a Test Plan:
- A test plan lists different inputs and the expected outcomes for each.
- It’s used to predict and then confirm the behavior of the program.
Algorithm Tracing:
- This involves following the flowchart step-by-step with each input to see if the actual outcome matches the expected outcome.
- It’s a methodical way to check the program’s logic.
Example Test Plan for a Burglar Alarm:
- The flowchart represents a burglar alarm system that uses a light sensor.
- The alarm is set to sound if the light level is less than or equal to 10.
- The test plan includes various light levels to check if the alarm behaves correctly.
Test Plan Execution:
- For each test, you input the data into the program and record the actual outcome.
- You then compare the actual outcome to the expected outcome to determine if the test passes or fails.
|
28 videos|17 docs|5 tests
|
FAQs on Decomposing problems: Creating a smart solution Chapter Notes - IGCSE Cambridge Computing for Year 7 - Class 7
| 1. What is the micro:bit and how can it be used in software development? |  |
| 2. How can Python be used with the micro:bit? |  |
| 3. How can errors be corrected in programming using a flowchart? |  |
| 4. What are some examples of sensors that can be used in programming with the micro:bit? |  |
| 5. How can algorithmic solutions and data types be utilized in planning a smart solution? |  |


