HTML Basics Chapter Notes | Computer Application: Class 10 PDF Download
Introduction
Tim Berners Lee is credited with inventing the World Wide Web in 1989, which led to the development of HTML (HyperText Markup Language), the standard language for creating web pages.
Tags in HTML are used to define the structure and content of a webpage. There are different types of tags, including:
- Container Tags: These tags have both a start and an end tag, with content placed between them. For example, and are container tags.
- Empty Tags: These tags do not require an end tag and stand alone. For instance,
creates a line break, and adds a horizontal line. - Comment Tags: These tags are used for notes in the code and are not displayed by the browser.
 Tim Berners LeeThe World Wide Web (W3C) Consortium has given a set of standards while building the HTML language. The W3C uses some special words to define an action. A tag is a special word enclosed in angle-brackets < >.
A tag tells the browser to perform an action as asked by the special word. The special word may be written either in lower case or upper case. The browser will respond to both the cases equally.
The characteristics or the features of a tag are defined by an attribute. An attribute is used inside a tag. An attribute always takes a value to help the browser perform the specific task in a particular direction. There may be more than one attribute used inside a tag. An element is a combination of a start tag, the text (we also use text to insert graphics) and the end tag.
The basic structure of HTML document is shown below: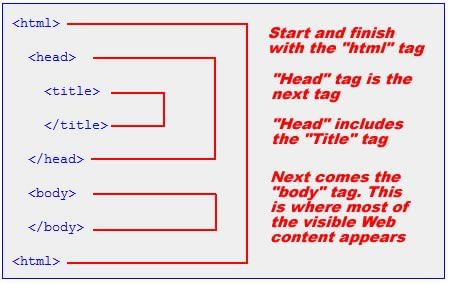 The basic structure of the HTML document is divided into two sections namely, the head and the body. The browser enters the first section after executing the start tag of HTML (telling the browser to begin interpreting the HTML commands) and start tag of HEAD. The first section helps in changing the heading on the title bar of the HTML document (the webpage). The starting of the heading is shown after the start tag of TITLE and the end is shown by /TITLE.
SUB and SUP Tags: Supscript <SUB> and Superscript <SUP> tags allow the web author to place specified text either slightly below (SUB) or above <SUP> the rest of the text in a particular line.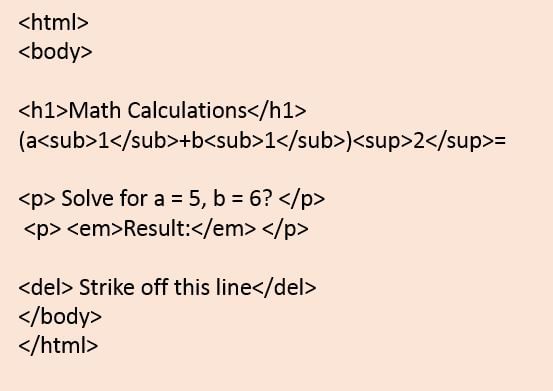 The end tag of HEAD i.e. /HEAD tells the browser that the end of first section has come. The second section begins with the start tag of BODY. The data on the webpage is displayed through the tags used in this section. The end tag of BODY i.e./BODY tell the browser that the end of webpage has come.
A container tag has both the start and the end tag. The text or the graphic is inserted inside the beginning and end tag of the container tag.
For example: <HEAD> and </HEAD>
The empty tag is a stand-alone tag. This implies that such a tag has beginning but no ending tag.
For example: <BR> The tag is used for adding one line break. Such a tag does not need an end so as to tell the browser, that end of line break has come because there is no need. Such a tag is called empty tag. HR is another empty tag. This tag is used to insert a horizontal rule on the web page. Comment tag is also an empty tag. This tag is ignored by the browser. This tag is used to increase the readability of the HTML source code. With this tag, you can insert a description about a command.
The attributes that are used with BODY tag are listed below in the table:
Attributes for the BODY Tag
The BODY tag in HTML has several attributes that define the appearance and behaviour of the webpage's body. Some of these attributes include:
- Background: Specifies a background image for the webpage.
- Text: Sets the colour of the text in the body.
- Link: Defines the colour of hyperlinks in the body.
- Vlink: Sets the colour of visited hyperlinks.
- Alink: Specifies the colour of active hyperlinks.
Heading tags are used to display the main topic of a webpage, ranging from H1 (largest font) to H6 (smallest font). This is also a container tag.
The FONT tag is a container tag that has a number of attributes listed below in the table
A paragraph can be written on the web document using the tag. This is a container tag, though the closing tag is optional. It uses one attribute called align that takes the value left, right or center.
To make the text boldface, italics and underlined,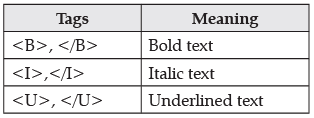
The <hr> element is used for horizontal rules that act as dividers between sections
Backgrounds in HTML
- The
<body>tag in HTML can have a background color or an image. - However, using the bgcolor and background attributes is not recommended in HTML5. It's better to use CSS for these purposes.
1. Background Color
- The bgcolor attribute used to specify the background color is outdated. Instead, you can set the background color using CSS.
- You can specify the color using a hexadecimal value, an RGB value, or a color name. For example:
<body style="background-color: #000000;">sets the background color to black using a hexadecimal value.<body style="background-color: rgb(0,0,0);">sets the background color to black using an RGB value.<body style="background-color: black;">sets the background color to black using a color name.
2. Background Image
- The background attribute, which was used to set a background image, is also deprecated in HTML5.
- You should use CSS to set a background image instead.
- To set a background image using CSS, you can use the background-image property. For example:
<body style="background-image: url('clouds.gif');">sets the background image to "clouds.gif".<body style="background-image: url('http://profdevtrain.austincc.edu/html/graphics/clouds.gif');">sets the background image to a specific URL.
Color Values
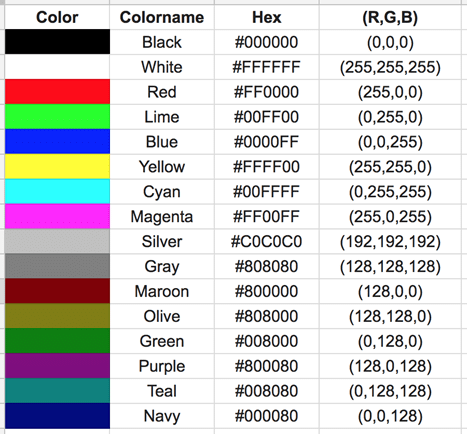
Colors are defined using a hexadecimal notation for the combination of red, green, and blue color values (RGB). The lowest value that can be given to one light source is 0 (hex #00). The highest value is 255 (hex #FF). This table shows the result of combining red, green, and blue: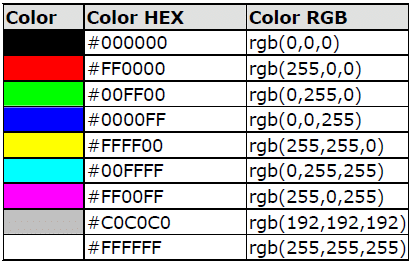 Note: Only 16 color names are supported by the W3C HTML 4.0 standard (aqua, black, blue, fuchsia, gray, green, lime, maroon, navy, olive, purple, red, silver, teal, white, and yellow). For all other colors, we should use the Color HEX value.
Images
You can insert an image using the <IMG> tag. This tag does not have an end tag.
The basic syntax of <IMG> tag is given below: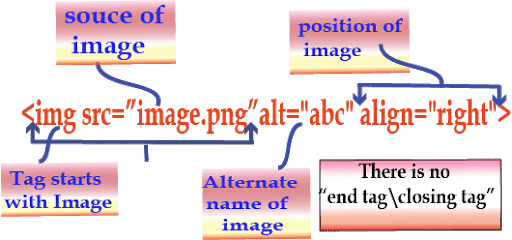
Understanding the Src Attribute in Image Tags
- The SRC attribute is used to specify the location or path of the image you want to display.
- Case 1: Image in Documents Folder If the image 'Rain.jpg' is saved in the 'Documents' folder, the path would be: C:\\My Documents\\My Pictures\\Rain.jpg.
- Case 2: Image in Same Folder If 'Rain.jpg' is in the same folder as the HTML document, the path would simply be: Rain.jpg.
- Case 3: Image on a Web Server If 'Rain.jpg' is not on your computer but is stored in the 'images' folder on Google's web server, the address would be: http://www.google.com/images/Rain.jpg.
The Alt Attribute
- The alt attribute is used to provide alternative text for an image on a webpage.
- For instance, if an image cannot be displayed, the alt text will be shown in its place.
- This attribute is important for accessibility because it helps users who rely on text-only browsers or screen readers understand what the image is about.
- Including the alt attribute for every image is a good practice to make your page more inclusive.
- It ensures that all users, regardless of their browsing capabilities, can access the information presented in images.
Image Dimensions
- The width and height attributes define the size limits for an image.
- These values can be specified as an exact number (in pixels) or as a percentage (relative to the size of the webpage).
- For Example: To insert an image with a height of 150 pixels and a width of 200 pixels, you would use: <img src="https://cn.edurev.in/lower.jpg" width="200" height="150">
Note: Images are composed of pixels, and enlarging an image can lead to a loss of clarity. While specifying width and height is not mandatory, doing so can help your webpage load more quickly.
Longdesc
- When you have a lengthy description for an image, you can use the "longdesc" attribute to link to an HTML file containing the description.
- The "longdesc" attribute is used in conjunction with the "alt" attribute to provide additional information about the image.
- For Example: <img src="https://cn.edurev.in/lower.jpg" width="200" height="150" alt="White Roses" longdesc="abc.html">
Aligning Images
- The "align" attribute in HTML is used to position images on a webpage, either to the left or right.
- When the align attribute is set to left, the image will float to the left margin of the webpage.
- Conversely, if the align attribute is set to right, the image will float to the right margin.
- Example: <p> <img src="https://cn.edurev.in/lower.jpg" alt="White Roses" width="32" height="21" style="float:left;"> This text will be positioned on the right side of the image. </p>
- In the provided code, the paragraph tag <p> is used to create a paragraph that includes the image on the webpage.
- The "alt" attribute is important because it describes the image when it cannot be displayed by the browser.
- The "height" and "width" attributes specify the size of the image on the webpage.
- The "style" attribute is used to define the position of the image on the webpage.
- In this case, since the image is aligned to the left, the text flows to the right side of the image.
Know the Terms
HTML: HyperText Mark-up Language
Hypertext: The text that contains links to other text
Container tag: An HTML element requiring start as well as end tag
|
15 videos|131 docs|18 tests
|
FAQs on HTML Basics Chapter Notes - Computer Application: Class 10
| 1. What are the basic components of an HTML document? |  |
| 2. How do you create a hyperlink in HTML? |  |
| 3. What is the purpose of the alt attribute in HTML? |  |
| 4. How do you add CSS styles to an HTML document? |  |
| 5. What is the purpose of the meta tag in HTML? |  |


